
Electrolysis Rust Removal: Restore Old Tools with Ease
George VondriskaEver get to an auction or flea market and stare lovingly, but in despair, at a hand plane that you'd love to own, but are going to pass on because it's too rusty? There's a solution to this problem. Electrolysis. It's crazy cool and easy to do.
Here's the overview: Submerge the tool in a solution of baking soda and water, connect a battery charger, and let it sit overnight. By the next day, the rust will have sloughed off.
The beauty of using electrolysis for rust removal is that you're not abrading the tool and removing metal. It's better for the tool, especially if you're concerned about its value if you don't hit it with sandpaper or a wire wheel. This, and the ease of doing it, makes electrolysis the perfect answer for restoring old tools. Electrolysis provides a very easy way to get rust out of a tool's nooks and crannies.
I picked up the plane in this story cheap. You'll see it go through the rust removal process here and, in future stories, get to follow along as it's restored and tuned up.
Follow These Electrolysis Rust Removal Steps
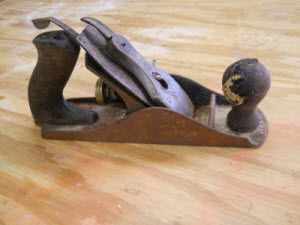
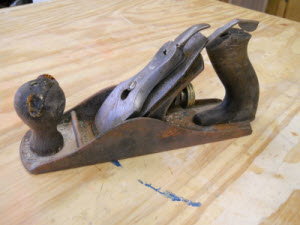
Here's a Bailey #4 hand plane I picked up for $25. The last patent date on the body is April 1910. It's sound, but has a lot of surface rust on it, and is unusable in its current condition. I'll remove all the parts from the body and use electrolysis to remove the rust.
What You Need:
- An electrolysis vat that is non-conductive. A plastic five-gallon bucket works well for most tools.
- An anode (I'm using a coffee can)
- Auto battery charger
- Baking soda or washing powder
- Measuring spoon
- Scotch Brite pad and soft bristle brush
- Wire leads
- Rubber gloves
1. Preperation
Wash the tool you'll be treating. Make sure there isn't any oil or wax on it that will prevent the electrolysis process from working. Give it a good bath with soap and water.
2. Make an anode
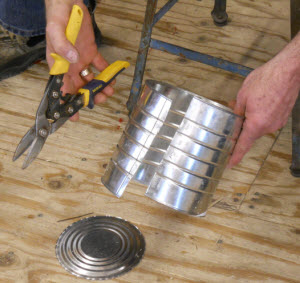
You need some kind of sacrificial steel for this. It's best if the anode surrounds the tool so the electrolysis can happen from all sides. The anode will get eaten up by the electrolysis process, and will need to be replaced after being used a few times.
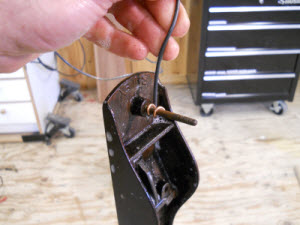
3. Connect one of the wire leads to the anode

Make sure you have a good, solid connection and that the lead is long enough to connect to the battery charger outside of the bucket.
4. Connect a lead to the tool
You've got to have a good connection or the process won't work well. This can be challenging with a rusty tool. You may have to clean a small section of the tool with sandpaper to make certain you have contact.
5. Make up the electrolyte solution
You need enough water to completely submerge the tool. Add one tablespoon of baking soda or washing powder (either one will work) per gallon of water. Mix the solution to dissolve the powder.
6. Suspend the tool in the vat and check the set up
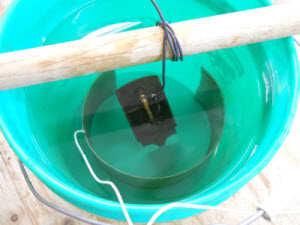
Try to arrange the anode so it surrounds the tool, but don't let the tool and anode touch each other.
7. Start Removing Rust
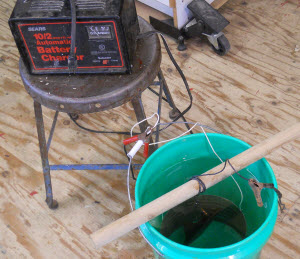
Connect the clips from the battery charger to the leads on the tool and anode. Make sure you get this right. With the charger unplugged connect the positive to the anode and the negative to the tool. If you do this backward, your tool will become the sacrificial anode. Set the charger on a 2-amp charge and plug it in. Don't let the connections from the charger touch the electrolyte solution.
Within minutes of plugging in the charger you should see bubbles rising from the tool. Allow the tool to "cook" for 15-20 hours.
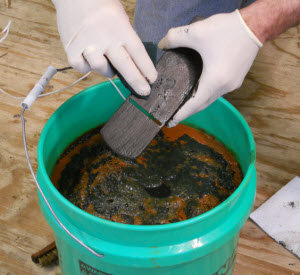
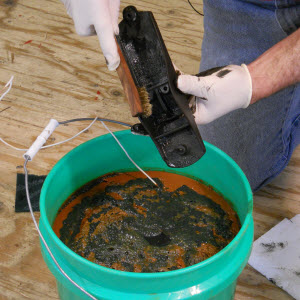
8. Remove from solution
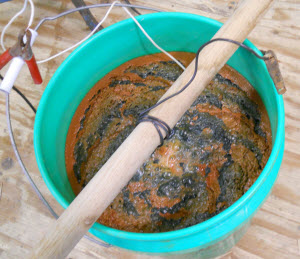
After some time the top of the vat will be covered with sludge. This is a good thing. The sludge is the rust coming off the tool. Unplug and disconnect the charger and remove the tool from the solution. It won't look like much now. It'll need some cleaning.
9. Remove sludge
Wearing rubber gloves, use a fine Scotch Brite pad to remove the sludge from the tool. It doesn't take much elbow grease, just some wiping.
Use a soft bristle brush to get into the spots you can't reach with the pad. Wipe the tool clean using a paper towel.
10. Wax it
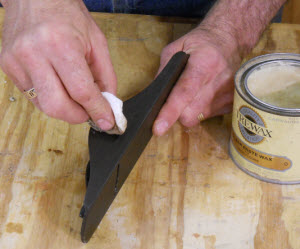
After the tool is clean and dry, coat it with paste wax so it doesn't start to rust again.
11. The Result?
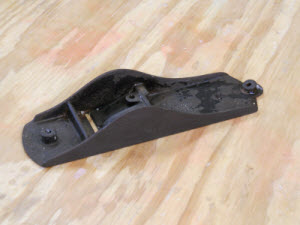
A tool that's clean of rust. If only I could make a vat large enough for my 1959 Farmall tractor to fit into...
The vat of electrolyte solution is pretty benign stuff but will burn your lawn if you dump it all in one spot. It's best to dilute the liquid before disposing of it.
Now that the rust is gone from the plane body it's time to do some shopping!
Photos By Author
Share tips, start a discussion or ask other students a question. If you have a question for an expert, please click here.
Already a member?
9 Responses to “Electrolysis Rust Removal: Restore Old Tools with Ease”
This plane is really a mess, just covered with surface rust. The answer to this is electrolysis. It's a pretty easy way to remove surface rust from tools. For the complete recipe on this whole thing here's what you need to do, go to the WWGOA, Woodworkers Guild of America website, and search for the story, Removing Rust with Electrolysis. The recipe is in there, the precise how-to on everything that I'm about to do here, completely walk you through the process, so you can try this in your shop.
I'm going to get this plane cooking, and then we'll let it sit for a while and have a look at the results. I got everything hooked up, Sheba helped me, and it's already cooking away. It's literally only been minutes that body of the plane has been down in there, and things are bubbling away. I'm going to leave this sit for probably 12 or 15 hours and then we'll come back and show you the results. Now, again, the complete recipe for this on the WWGOA website.
And one of the things that's really great about this process is that I'm not abrading the plane at all, we're just using the electrolysis to remove the rust. So as a result I'm not going to leave any scratch marks, I'm not really going to remove any metal. You'll see that when the body of the plane comes out of here. but let me show you from here just how I know it is that something's happening. Well there I've got the set up cooking, and the battery charger has only been plugged in for moments here, and you can see the reaction happening.
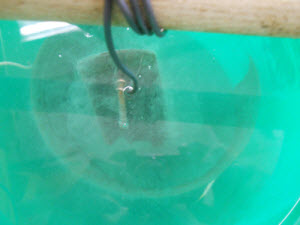
There's bubbles coming off of that plane body down there in the solution. In just minutes that water's going to be so foggy, you're not gonna be able to see anymore. So capturing it now, and then in a little bit, we'll see, well overnight, have a look at just how far along that plane body has come. Well, it's been about 18 hours, and this baby's been in here cooking. Looking down into this bucket, icky!
The top of this water, the electrolyte solution, is covered with all sorts of schmutz. And that's a good thing, because that is all of the oxide that has rolled off of that tool. So I'm really anxious to get this pulled out of here. Really important, got to disconnect the battery charger first, unplug it from the wall, take the leads off of here, and then we can take this out of here and look at just what the plane itself looks like. Everything's disconnected.
We'll lift this out of here and that's what we've got. Now I don't want to touch it yet, I'm going to put some rubber gloves on. But really it doesn't look too bad. So pretty good process. Pretty good way to clean rust off of tools.
Very little work on my part to make this happen and boy does that plane body look great. So just to refresh your memory, this is our after shot, after about 18 hours in the electrolysis vat, and our before shot, before any work was done, a lot of surface rust. So electrolysis is a pretty easy process, something you can also do in your shop.

What if my battery charger doesn't have a 2 amp mode. It does a tapering charge starting at 10 amps.
How do you get rid of the chemical solutions left in the Pal?
I've tried electrolysis and although it works as shown, it's simpler and safer to mix up some citric acid solution and soak the tool in it. It works just as well, but there's no fire hazard and no electricity involved. It's safe to handle, no more dangerous than lemon or orange juice. You can get citric acid powder inexpensively at any place that sells candy or wine making supplies, on Amazon, and even at many grocery stores. Instructions are available online and there are videos on YouTube.
Hi, I was worried about the hydrogen generation from the electrolysis process... Is it dangerous to do this indoors, and did you have a way to vent the hydrogen in your example? Thanks
Does the positive ("hot") wire connect to the tool or the anode? Naturally the negative wire attaches to the other point of contact. Thank you!
In the recipe, it states you used a coffee can. Is there any particular metal type it needs to be? You don't specify. Is an anode like that used in a water heater or attached to an outboard motor okay to use? Metal coffee cans are hard to find. Thanks
Technical question - can you make it work on the inside of a gas tank?
Don't have a tin can so can I use aluminium baking tray or foil? I have empty paint tin cans which are painted on the outside. Can I use one of these?
The body comes out black in colour. Will this happen to all tools?