 In part one of this series, we provided an overview of the project as well as scaled drawings. Here we will begin construction of the project, starting with the legs where we will mill mortises that will join the face frame as well as side and rear rails. We will also taper the legs at the table saw using a tapering jig.
Start With the Legs – Mortises First.
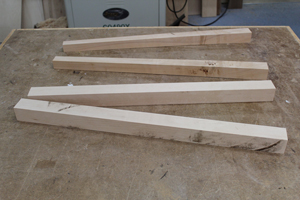
Mill Blanks. The legs call for 2″ x 2″ x 32″ blanks. If you have material of this thickness, great. If not, you can laminate thinner material together to create the blank.
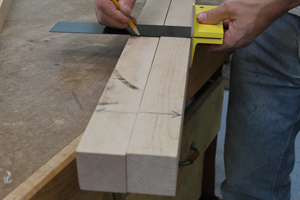
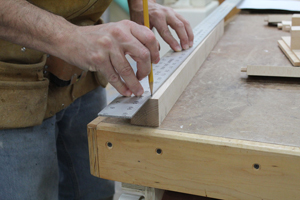
Clearly Mark the Legs.
Write on the top of each leg to indicate “left front”, “left rear”, “right front”, and “right rear”. I also like to put an arrow on the top of the leg that points to the front. Then mark the sides that will receive tapers (this will be both sides of each leg that do not have mortises). Then mark where mortises will be milled to receive the side panels on the rear of the front legs, and the front of the rear legs.
All of this marking might seem excessive, but it is difficult to keep it all straight without this built-in cheat sheet. Refer to the diagram for specific positioning for all the mortises.
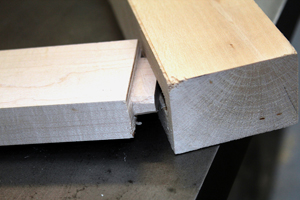
Mill Mortises in Legs.
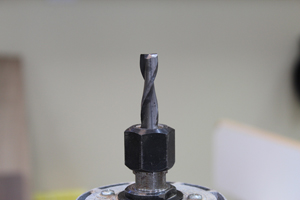
Since I don’t have a dedicated mortiser I use a table-mounted router to mill these. This approach works great for most mortising projects. I like to use a solid carbide spiral upcut bit. The spiraled flutes on these bits serves to remove debris as they cut, and also help to pull the work piece downward toward the router table surface.
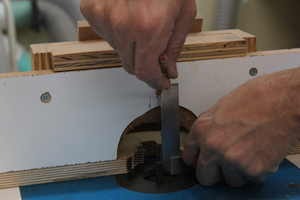
Set Up Your Router Table.
The edge of the bit is positioned 3/16″ from the fence. Then mark the left and right edges of the router bit on your fence (or place tape on the fence if you don’t want to mark your fence) so that they can be clearly seen above the work piece as it is placed against the fence. As always, do all the set up with the bit unplugged.
Mill the Mortises Slowly Plunge onto the Bit.
Mill the mortise in multiple passes to avoid stressing the router’s motor and prematurely dulling the bit. Start with a depth of perhaps 1/8 – 1/4″ for hardwoods depending on the power of your router and the size of your bit, and raise the bit with each successive pass. Position the work piece above the router bit so that the outside edge of your mortise location aligns with the outside edge of the router bit. Hold the work piece firmly against the fence and slowly plunge the work piece down onto the bit. Slowly slide the piece from right to left until the witness marks for your mortise and router bit align at the end of the cut.

Remove the Work Piece.
Back the work piece off slightly and raise it up while holding it solidly against the fence. Increase the bit height by 1/4″ (or whatever you deem appropriate for your router and material) and repeat until you have achieved a mortise depth of 5/8″ for this project. For larger projects go with deeper mortises. Repeat this procedure for all mortises on all four legs. Check your work regularly to ensure that you are milling mortises in the correct places on each leg.
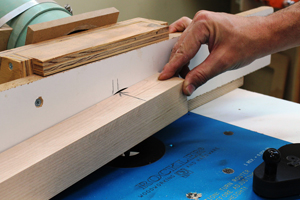
Tapered Legs.
Cut Tapers on Legs. My preferred method for cutting tapers is to use a tapering jig on the table saw, but these can be done effectively on a band saw or jointer as well. Draw lines on one leg for your taper, and clearly mark which sides of the legs you want to taper. Taper the two outside edges of each leg, with the narrower portion of the leg positioned on top. Place witness marks on the non-mortised side of each leg as a visual reminder of which side to cut.
Set Up Taper Jig.
Place the tapering jig against the fence. Set the leg into the tapering jig and adjust the jig so that your taper line is parallel with the fence, then lock in the jig’s angle. Slide the table saw fence so that the blade will cut to the taper line, and return the blade guard into position.

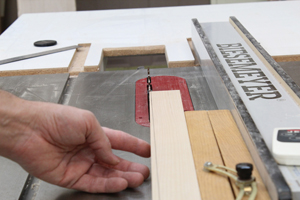
Cut Tapers.
Run all four legs through on both tapered sides, and then sand any saw marks from each leg. Keep the tapered cutoffs from this step as they will assist in delivering even clamping pressure during assembly.
Photos By Author

Questions; What is the distance from the edge of the legs to the mortises, especially the small top one? Are the lengths given in the cut list excluding the tenons?