This clever and gorgeous iPad stand is a great last-minute gift project; you can complete it over the course of 2 to 3 days. The stand has both a high and a low setting, and to amaze the audience, the leg seems magically held in place! The secret? Small rare earth magnets.

Almost everyone has a tablet or smartphone these days, so you must have many friends and family members who would love to receive a gift like this (especially since you made it). I've been refining this design ever since I made my first version a few years back, and I think this is the best one yet. It can be made using any wood species, but it really lends itself to being made from an exotic or highly figured wood, which will make your gift special and unique. I used lacewood… it's stunning!
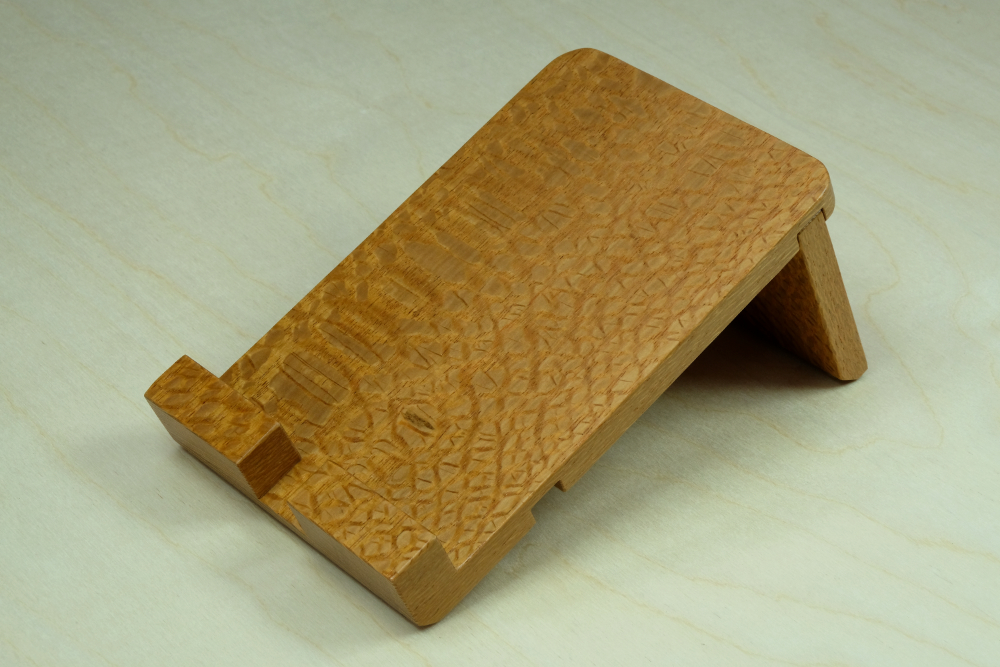
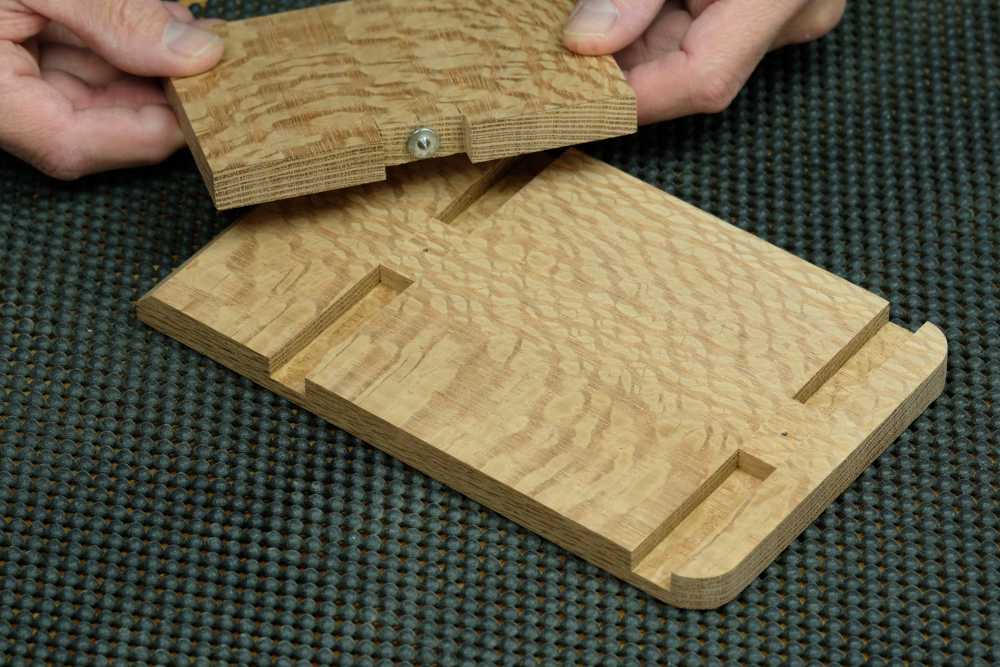
The stand is in its "low" position when the leg is placed in the upper dado on the back of the platform.
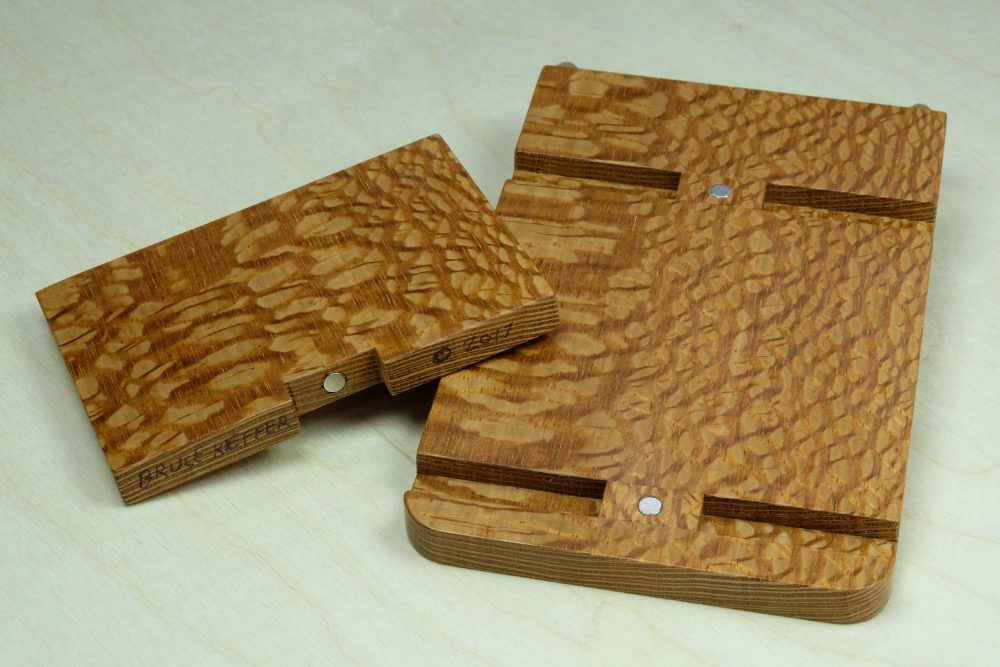
It's just two parts! The leg fits in either dado, the notch in the leg engages with the block glued in the dado, and magnets hold the pieces together.
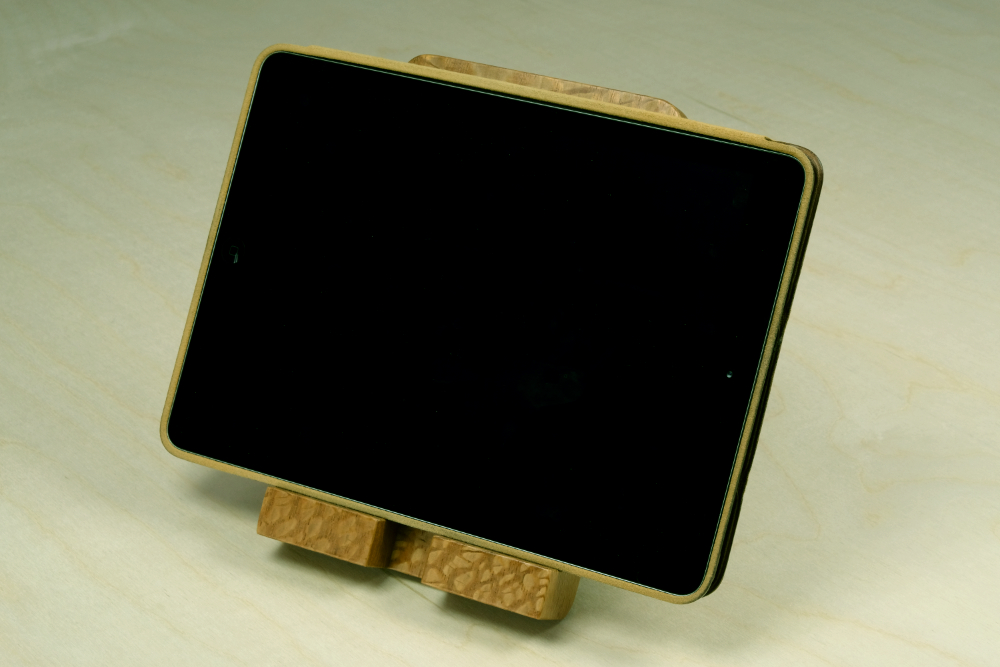
It can support an iPad…
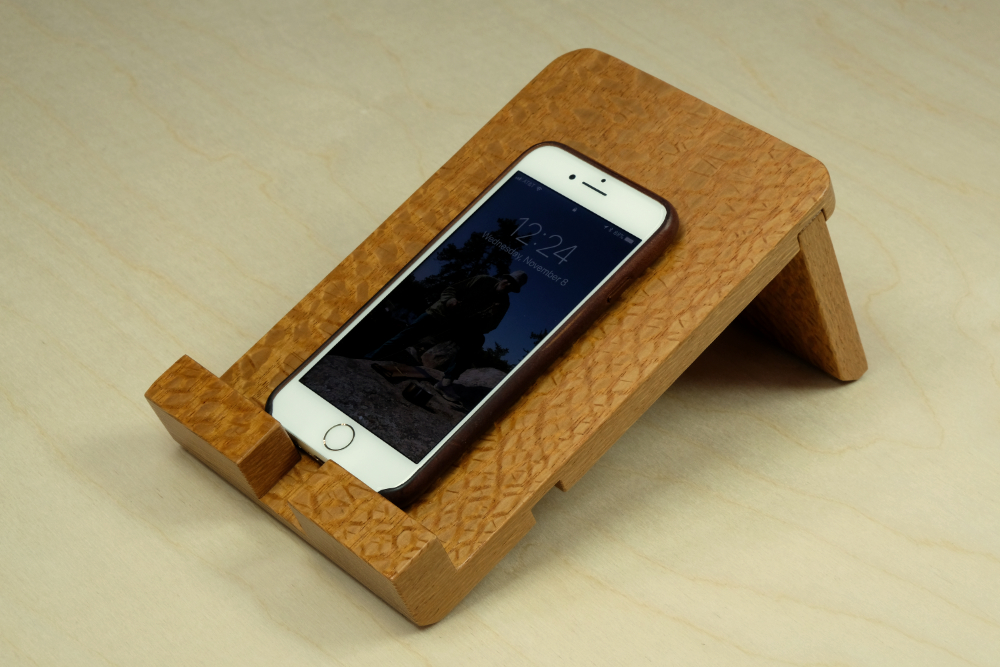
Or an iPhone.
Design Details
This high and low position stand works for a tablet or smartphone oriented either landscape or portrait. The space between the ledge pieces (D) is there to allow for a charging cable to be used while an iPad or iPhone is oriented portrait. Rubber door bumpers are placed on the bevels ends and they grab well in both setup positions.
Construction Notes
Be precise when you fabricate the parts. A leg that is well fitted to the platform dado is critical. Using a drum sander to size the leg for a perfect fit in the dado is a great approach. Regardless of the technique you use, be sure you do a good job on the fit.
The grain direction of the blocks and ledge pieces is oriented the same as the platform and leg. This is done for appearance and proper construction. It's never good to glue solid wood pieces cross grain to each other. Seasonal wood movement will eventually break them apart.
Make absolutely certain you have the magnets oriented correctly before you glue them in place. If you get this wrong the parts will repel each other rather than attract. That will not be good! I use a marker to label the same end (magnetic pole) on all three magnets. Then I glue the leg magnet in with the mark exposed, and I glue the block magnets in with the marks buried. Set this up and think about it, and you will understand what needs to be done.
Tools List:
- Table Saw with Miter Gauge
- Band Saw with Fence
- Drill Press
- Thickness Planer
- Dowel Hole Drilling Jig
- 1/4" Dowel Center
- Drum Sander - Optional, but very helpful to accurately sand the thickness of the leg to fit the dadoes cut in the platform.
Cutting List:
| Part | Name | Quantity | T x W x L | Material |
| A | Platform* | 1 | 1/2" x 5" x 8" | Lacewood |
| B | Leg* | 1 | 1/2" x 5" x 3-7/16" | Lacewood |
| D | Blocks | 2 | 5/16" x 1" x 1/2" | Lacewood |
| C | Ledge Pieces | 2 | 3/4" x 2" x 3/4" | Lacewood |
Start with a piece 1/2" thick x 5-1/4" wide x 11-5/8" long. Review the step-by-step instructions for details.
Materials List
| Item | Quantity | Item # | Source |
| 1/4" dia. x 1/8" thick | - | - | - |
| Rare-Earth magnets | 3 | NSN0579 | magcraft.com |
| Door bumpers, clear, 5/16" dia | 4 | - | Hardware Store/Home Center |
| Epoxy glue | 1 | - | Hardware Store/Home Center |
| Clear semi-gloss spray finish | 1 can | - | Hardware Store/Home Center |
Layout Illustration
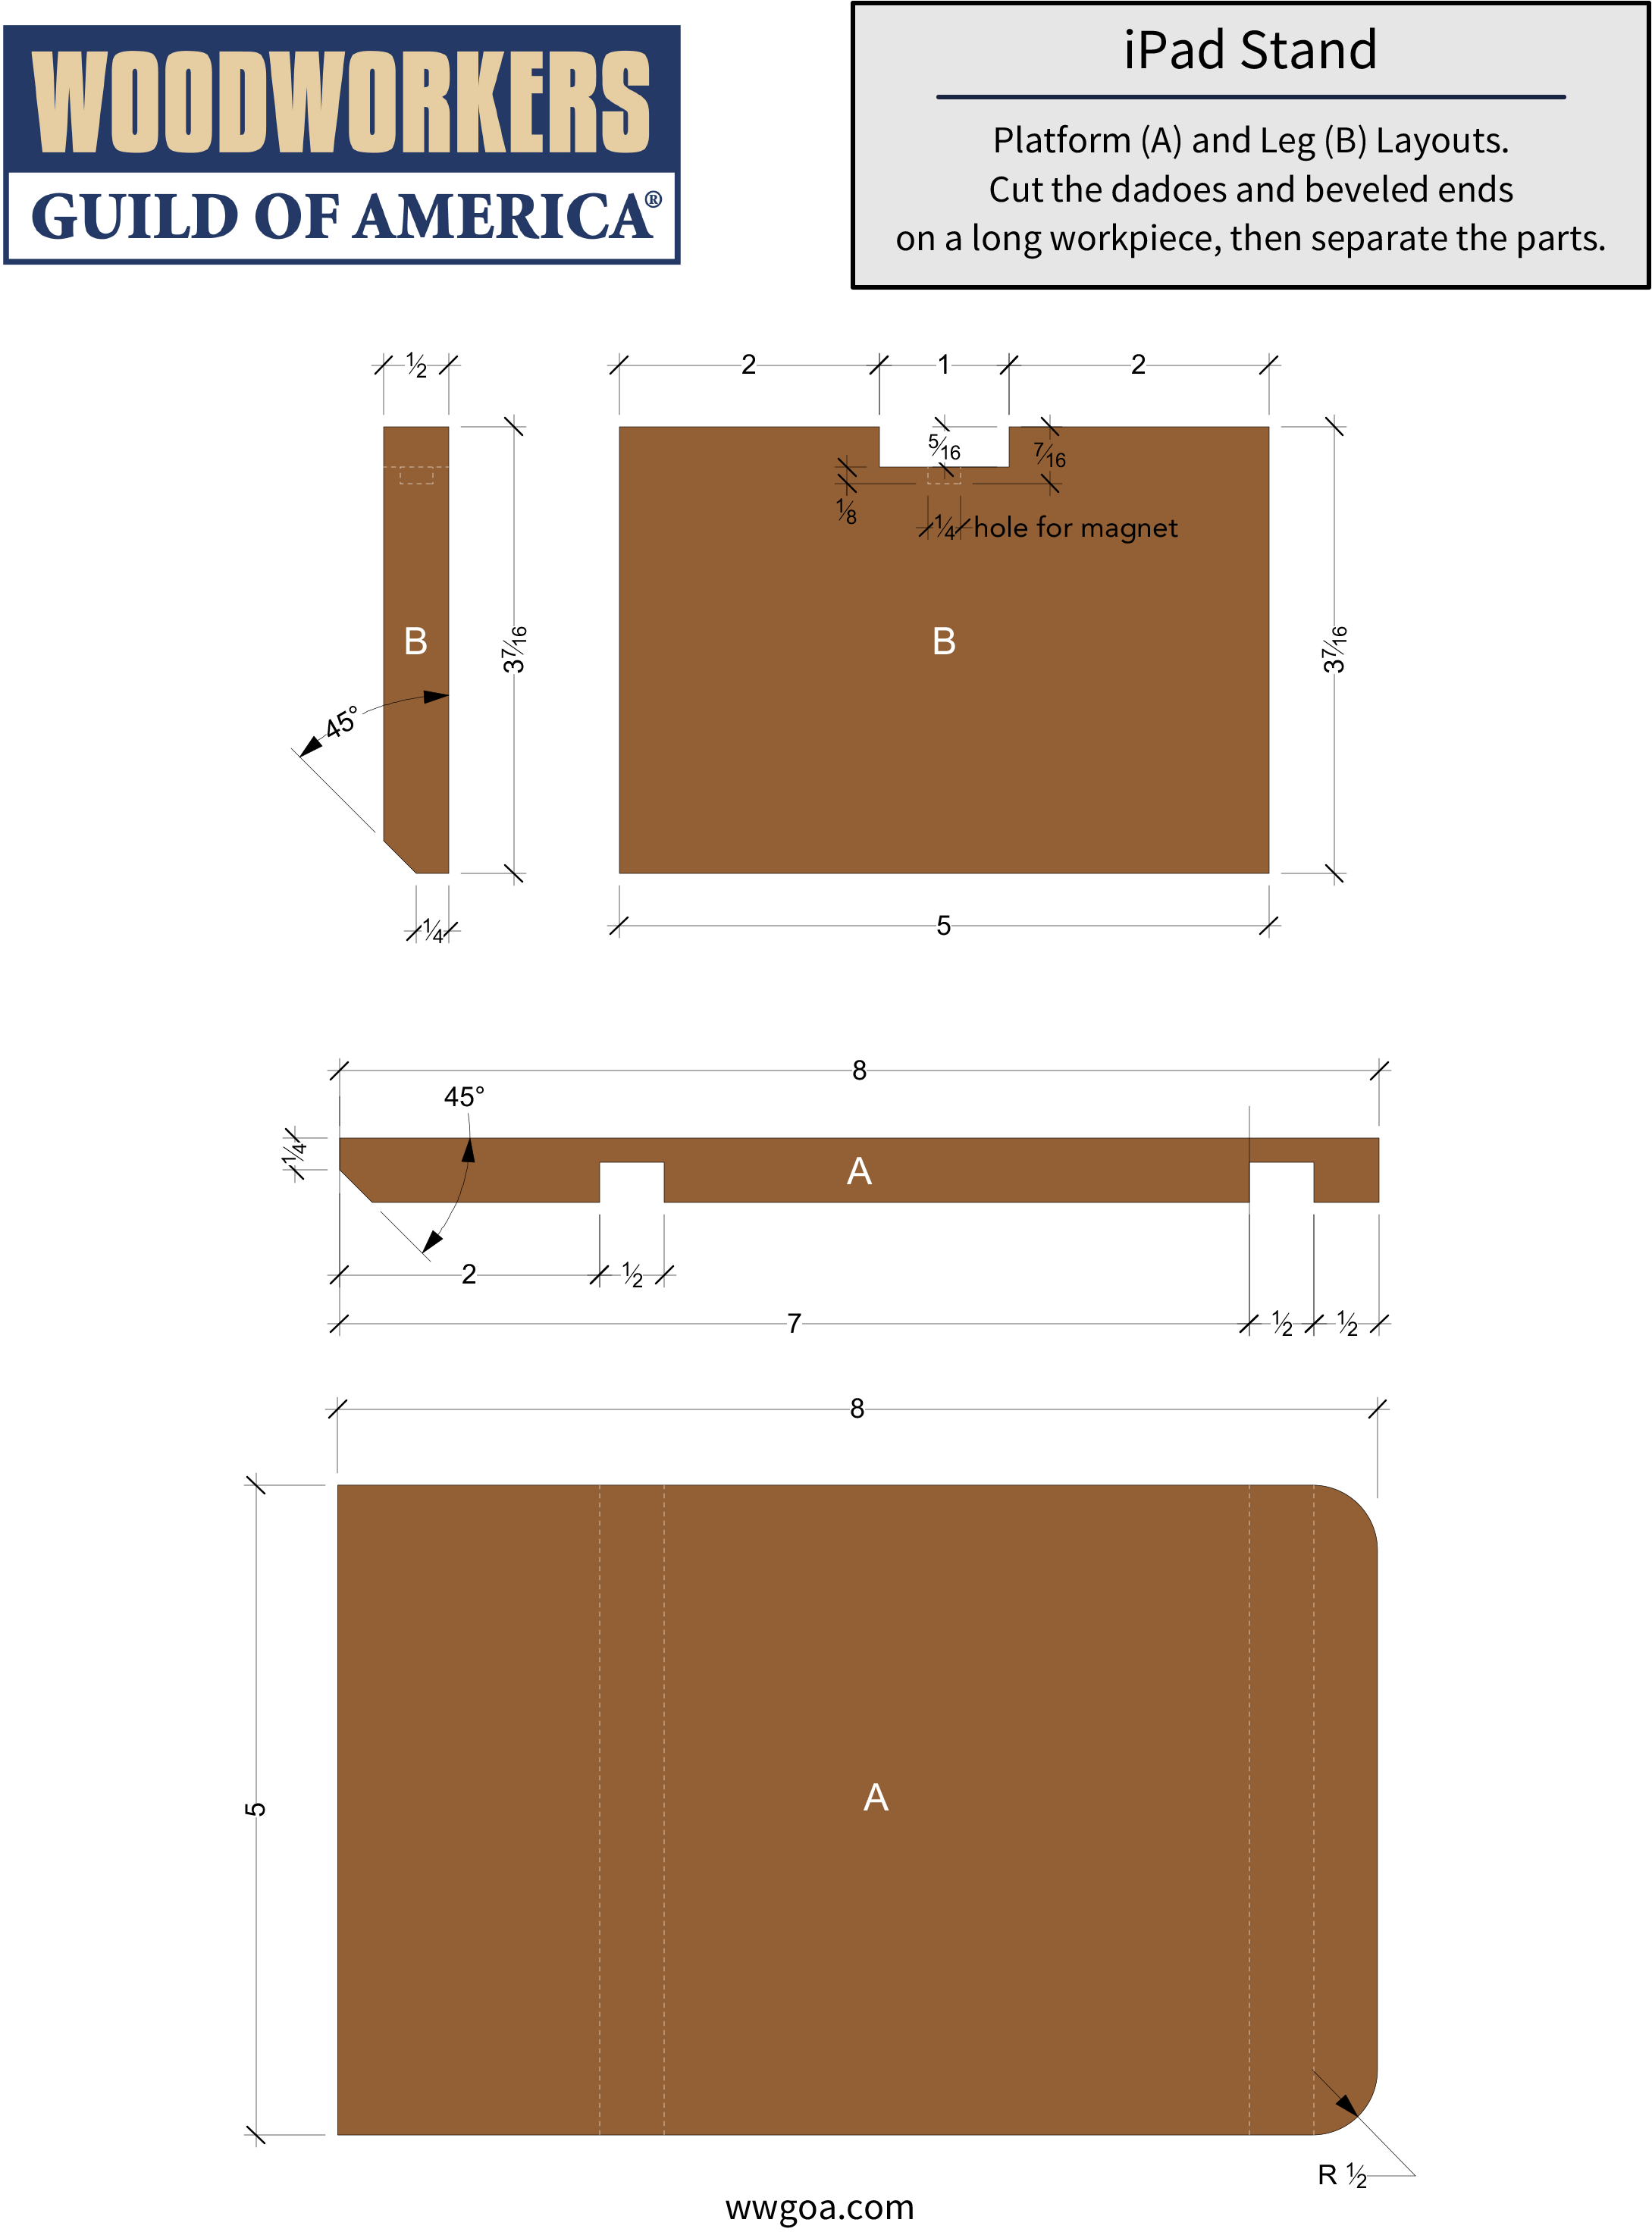
Follow this drawing to fabricate the platform (A) and leg (B). See the PDF plan for this project here.
Make a Test Dado Cut
Mount a 1/2" wide dado blade in your table saw, set the height to 5/16" and cut a test groove in scrap wood.
Cut a 1/2" thick x 5-1/4" wide x 11-5/8" long piece of lacewood (or your choice of wood) to make the platform (A) and leg (B). Make the thickness of the platform and leg workpiece fit into the sample dado groove. The best fit is one where the workpiece slides in and out without being forced, and there is minimal play in the fit.
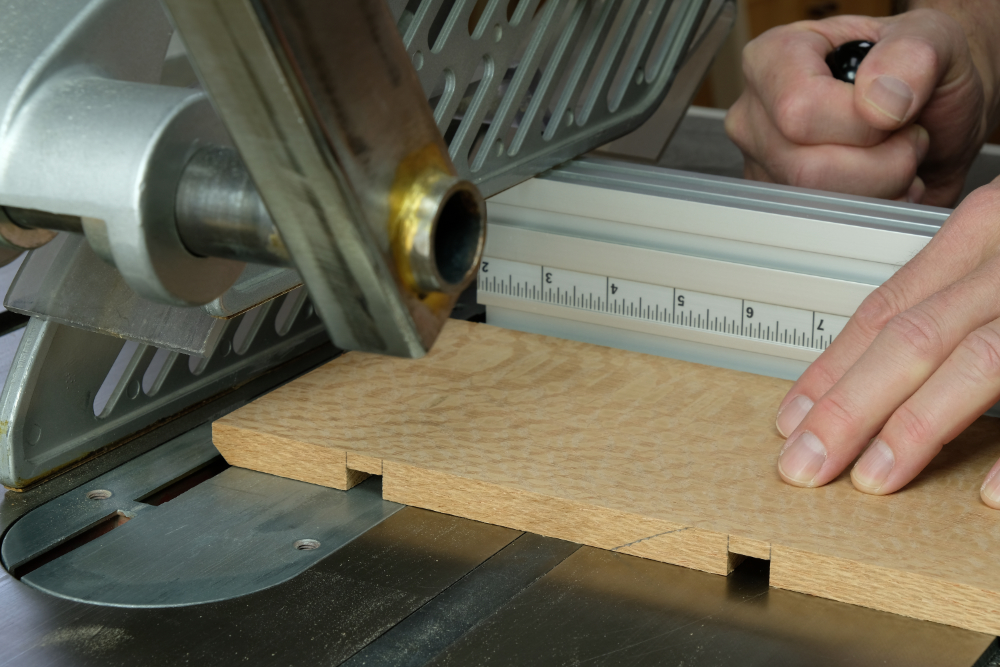
Cut the Dadoes
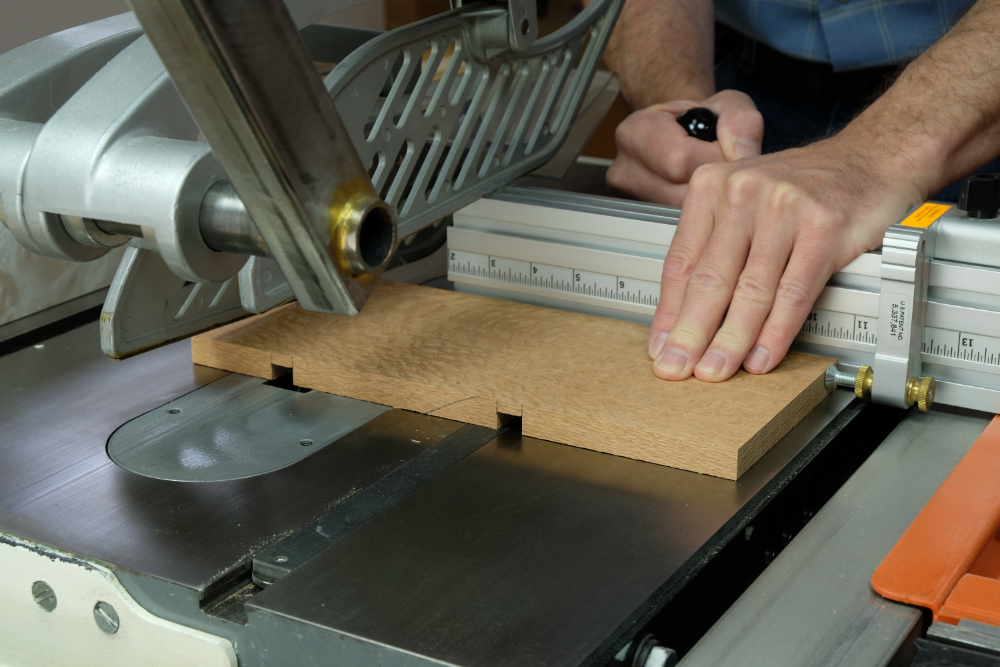
Use a miter gauge with a stop to align and feed the workpiece while cutting the dadoes. Follow the dimensions given in the "Layout Illustration" above.
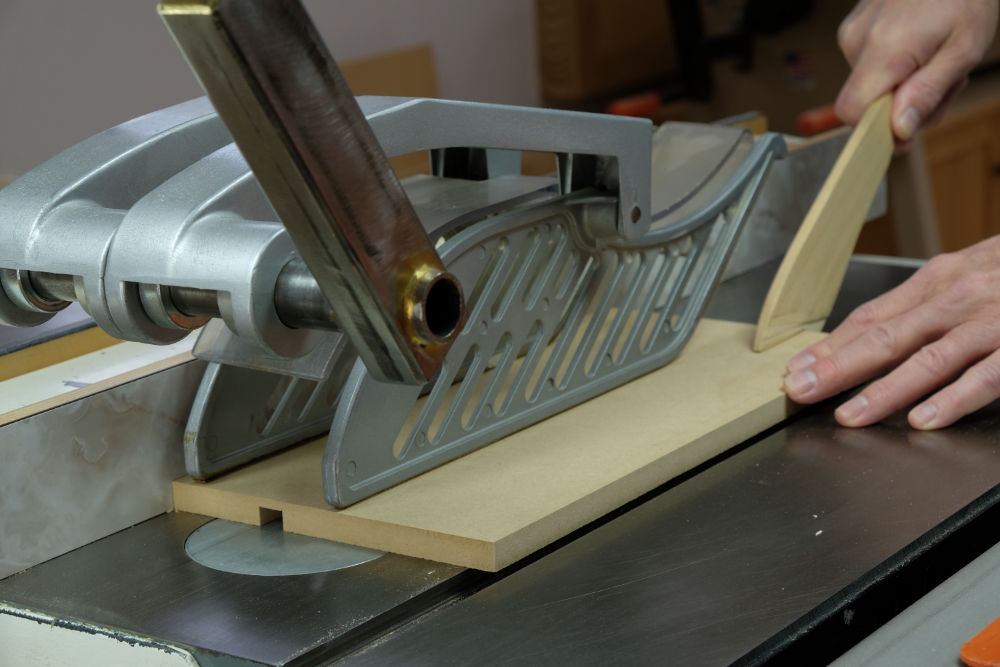
Cut the Beveled Ends
Using your miter gauge and stop again, cut the beveled ends using a fine-cut cross-cut saw blade. The saw blade is set to 45-degrees.
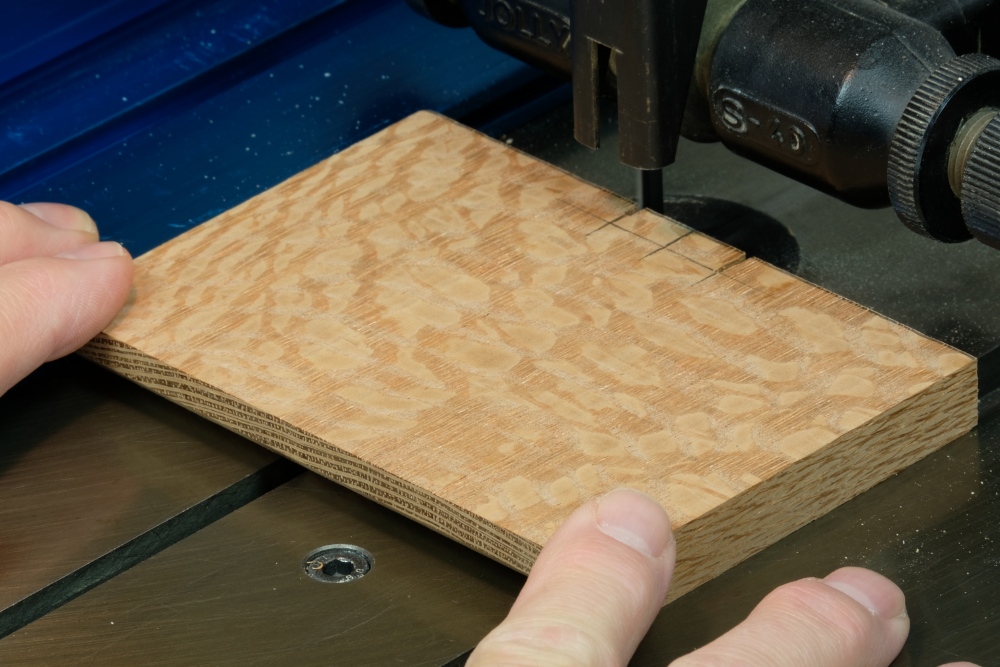
Separate the Platform and Leg Pieces
Use a band saw and cut down the center between end lines drawn for the two pieces. The platform piece A is to the left, and the leg piece B is to the right. Sand the sawn ends smooth.
Draw the Rounded Corners
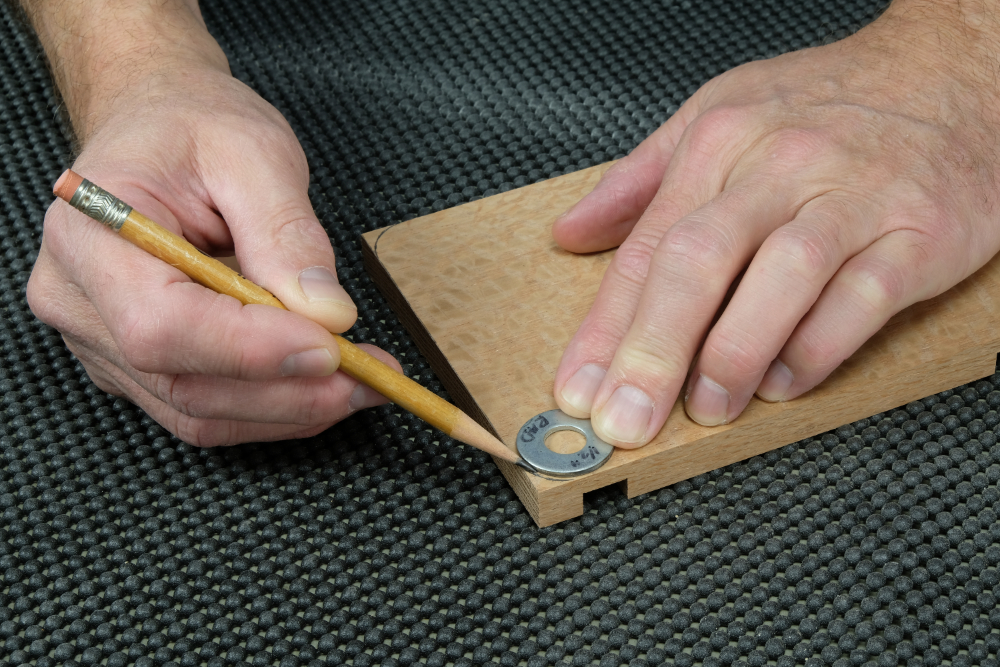
The top corners of the platform are rounded to a 1/2" radius. It just so happens that a 3/8" dia. flat washer has exactly a 1" outside diameter, and thus a perfect guide to draw the corners! Cut the corners and sand the sawn edges smooth.
Drill the Leg Magnet Hole
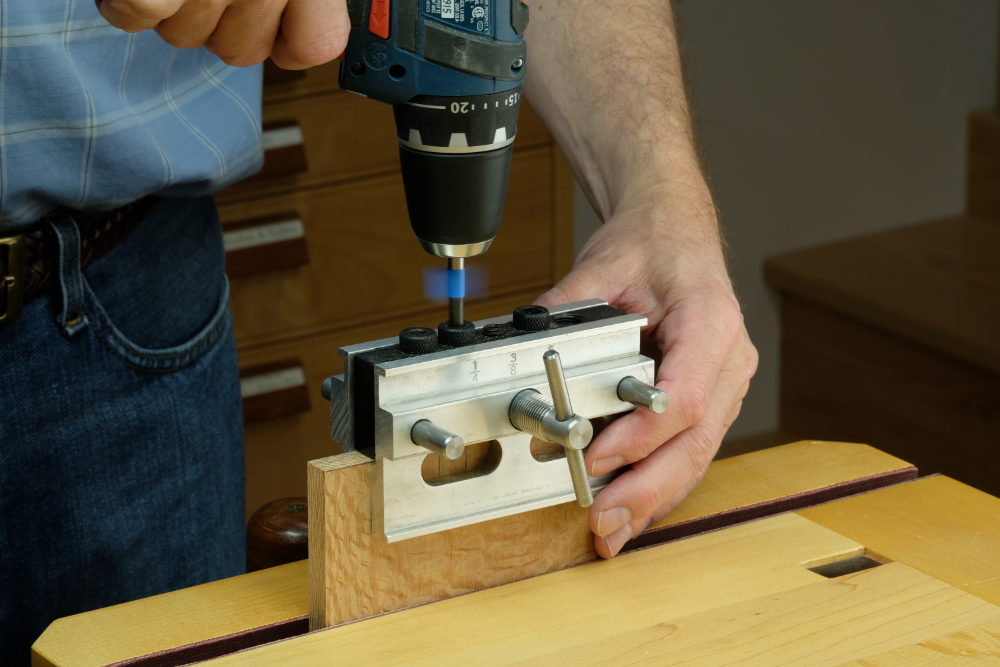
Drill test holes in scrap wood using all of your 1/4" diameter drill bits (sounds weird, but there’s a reason for this), and then check the fit of the magnets in the test holes. Do not force the magnets in the holes. Use the bit that allows the magnet to go in and out of the drilled hole the easiest because you will need to do that in order to check the depth of the drilled holes later. You're probably wondering why would a 1/4" drill bit not drill 1/4"? Well, I have four 1/4" drill bits and none of them drill the same diameter!
Drill the magnet hole in the leg using a self-centering dowel hole drilling jig and a 1/4" dia. drill bit. Set the bit depth to 7/16" which will make the magnet hole 1/8" deep once the notch is cut. Err on the hole being too shallow now since you can always make it deeper later. Too deep now will mean you have to somehow fill the excess depth later.
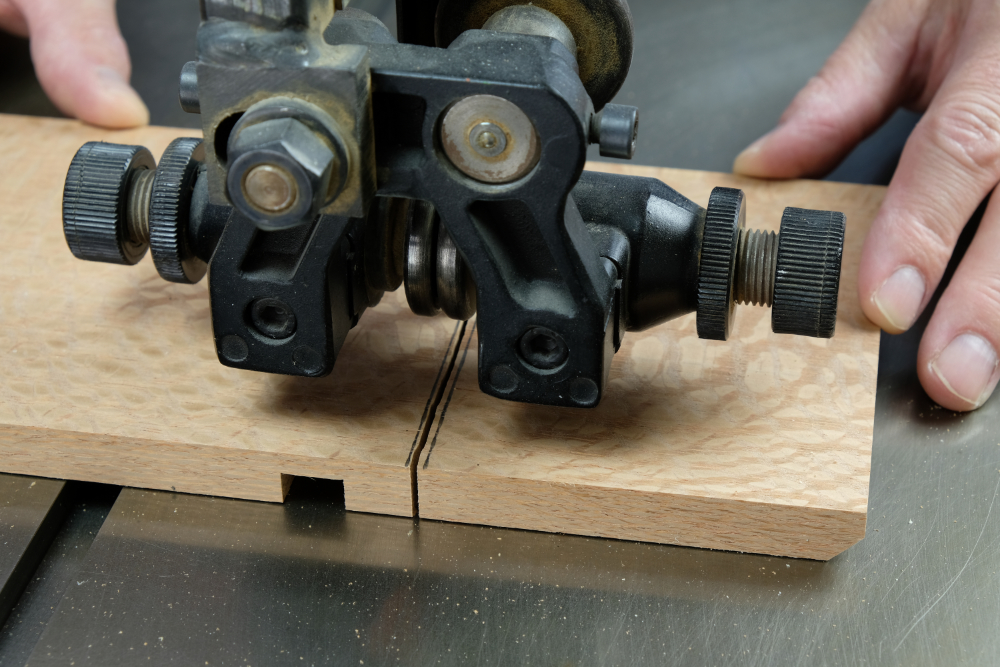
Cut the Notch
Mount a fence to your band saw and set it for 2" from the blade. Cut the 5/16" long notch end cut on one side, flip the leg over, then cut the other end. This centers the notch. Make a series of relief cuts between the notch ends, and then remove the waste and smooth the notch bottom with a hand file.
Attach the Blocks (C)
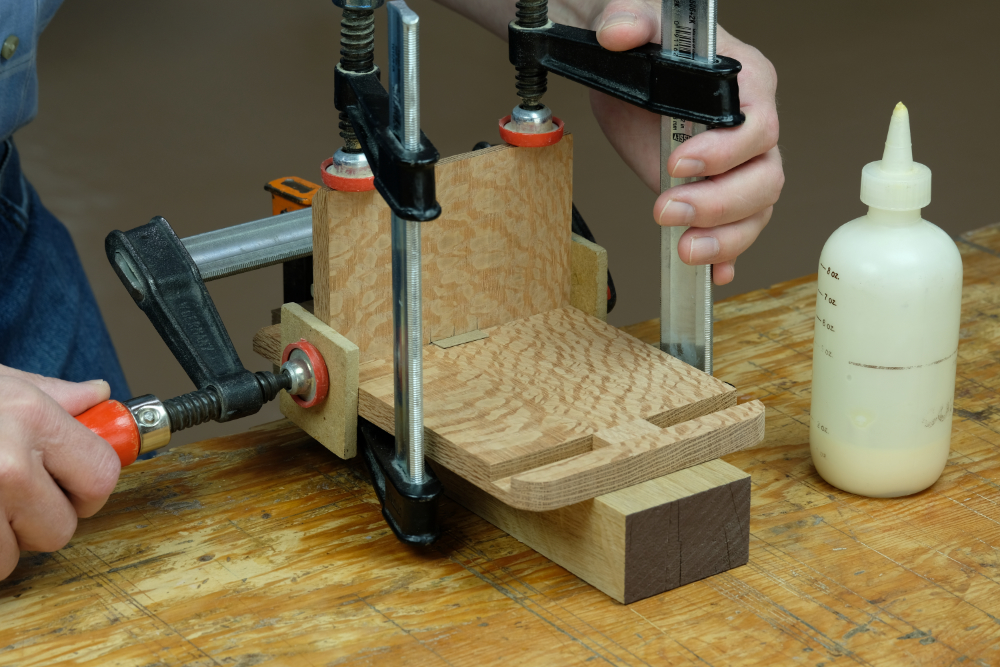
Cut the blocks to fit in the dadoes, then glue and clamp them in place. Use the leg to position the blocks side-to-side on the platform, and use a piece of cardboard in the leg notch to apply pressure to the block.
Mark the Magnet Holes
Fine tune the depth of the magnet hole in the leg, then place a 1/4" dia. dowel center in the hole. Orient the leg so the bevel is downward and pointing to the platform bevel. Slip the leg into the dado and over the block and press down to mark the center of the magnet hole on the block. Mark both block holes.
Drill the Magnet Holes

Again, use the 1/4" drill bit that fits the magnets. Using a drill press, drill the holes 1/8" deep.
Attach the Ledge Pieces (D)
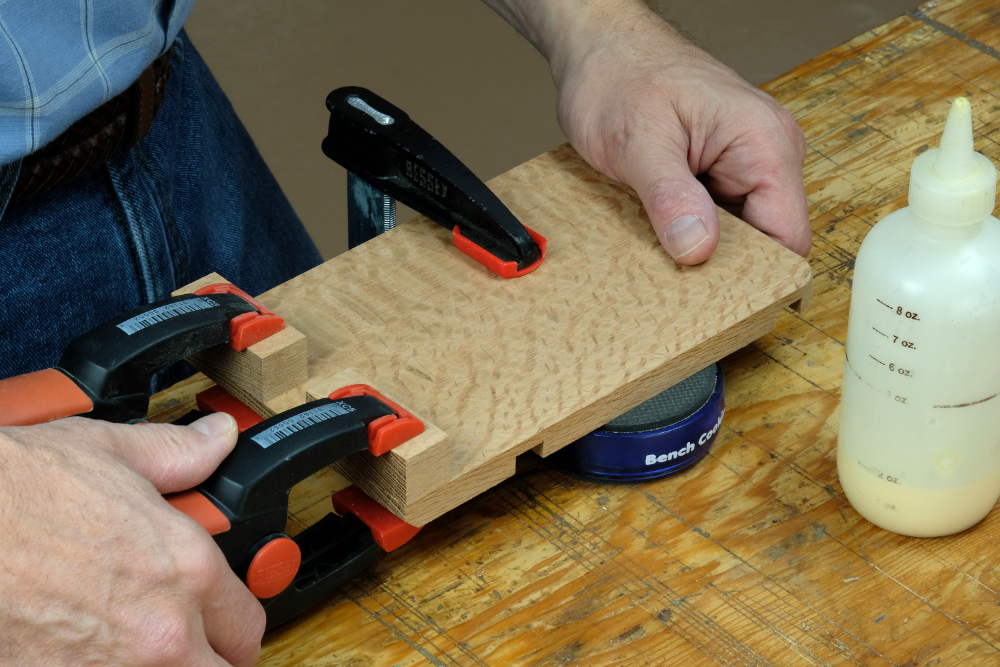
Finish sand the ledge pieces (D) and the face of the platform, then glue and clamp the ledge pieces to the face of the platform. Apply the glue sparingly so as not to create an oozed-out mess on the inside corners of the joints. Spring clamps work great for the clamping.
Apply Finish
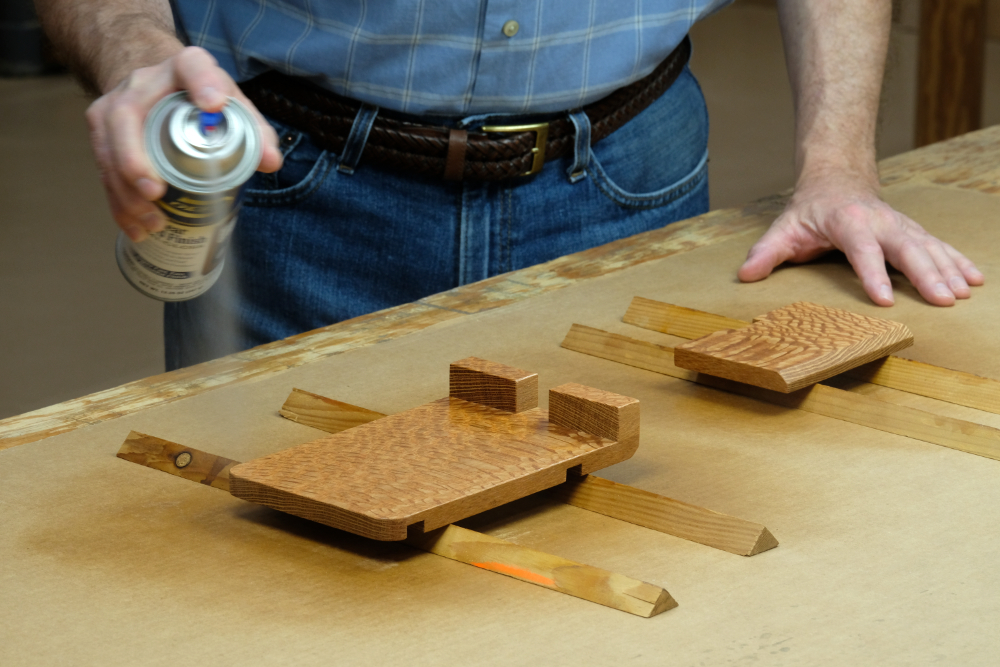
Spray clear finish on to the wood pieces. I used Deft Clear Wood Finish Semi-Gloss Laquer. I love this stuff for a project like this. It dries super-fast, builds fast, and is easy to sand between coats. An alternative would be any fast-drying spray polyurethane. And know this, lacewood is like a sponge when it comes to finishing; it sucks up a lot of finish. I had to apply 5 coats before I was done!
Insert the Magnets
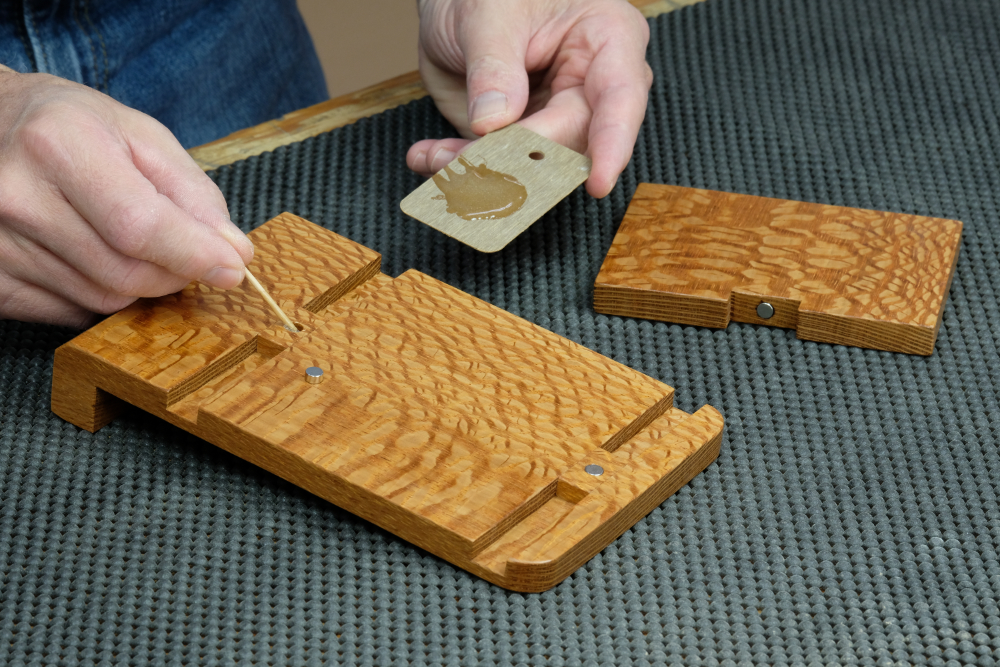
Mix up some two-part epoxy glue. Use a toothpick to spread some in the magnet holes, and then insert the magnets. Do the leg magnet first, and then the platform magnets. BE SURE YOU HAVE THE MAGNETS ORIENTED CORRECTLY. They need to attract, not repel! Use mineral spirits to clean up any oozed-out epoxy before it dries.
Apply the Rubber Door Bumpers
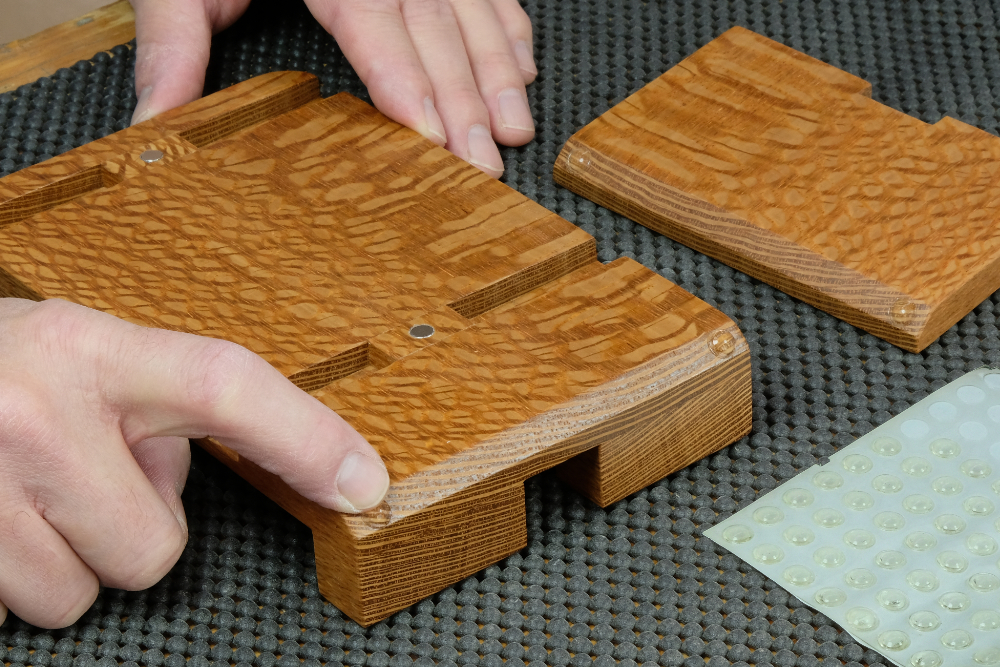
The final step is to add rubber door bumpers to the beveled ends of the leg and platform. These bumpers keep the stand from sliding when it's set up in either the high or the low position.


I would agree with the comments about gluing "blocks". Doesnt make sense. Something isn't right with the plan. The PDF file is missing part "C and D". I hope he fixes it because I'd really like to make this.
I second Judy's comment about: Step C talks about gluing blocks. What blocks? They are not in the diagram or mentioned anywhere else. Why do you use a bandsaw to separate the leg and base? Are you concerned about tearout?
cool
I need to use my scrap this is one I can use
I learned a lot and gained more knowledge.I was seeking this certain information for a long time..<a href="https://ox599.com/" rel="nofollow ugc">강원랜드카지노</a>
The instruction says to start with a 5-1/4” piece for the platform and leg but both of those pieces are only 5” wide in the cut list and the diagram. Is there a reason for this difference?
Is there any concern for the magnets causing problems for the electronic devices?
Thanks...love the magnets ! ! !
BE careful. I am allergic to lacewood. You could be , too. I made a pen for someone once as I was learning it affected me. They couldn't tolerate even using the pen, either.
I would use a small steel nail or screw instead of a magnet in the leg.