 Over the years I’ve made pet cremation urns and boxes for friends who’ve lost pets. In 2010 I had a request from a dear cousin for his own cremation cask. He knew he was dying after a long battle with cancer. It took a couple tries to get a good, sound design that I felt comfortable with. Along with a sound design, size is a major consideration. As it turns out, there is a formula for volume you can use.
Volume Calculation.
Let’s start with the volume calculation. It turns out the cremation process removes all the water – about 60% of body mass. Then, the heat reduction of the other elements results in about 1 cubic inch of material per pound of body weight. So, a person weighing 180 pounds requires about 180 cubic inches inside their cremation casket or urn. One final word – don’t go overboard, but it’s probably better to error on the high side – well, just in case…
Here’s a formula you can use – it’s just a bit of simple algebra:
L x W x H = V – that is – Length x Width x Height = Volume. An applied example for, say, 180 cubic inches might be 5 x 4 x 9 = 180. Knowing this, you can increase or decrease the length, width and/or height to adjust the volume of your casket. Our example in this article is 5 x 5 x 9-1/2 for a total of 237.5 cubic inches.
Material Selection.
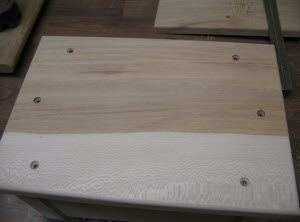
For this article I’ve chosen quarter-sawn sycamore from my shop. You can choose any quality wood – the higher density of hardwoods makes the most sense. Don’t forget this project will result in a piece of furniture that might be around for many years. Keep in mind the project takes only about 4 or 5 board feet of lumber – no reason to skimp on materials.
- 2 ends – 3/4″ x 5″ x 5″
- 2 sides, front and back – 3/4″ x 9-1/2″ x 5″
- A bottom – size calculated below.
- 2 pieces for a double stacked top – size calculated below.
- 4 corner pillars – 1-1/8″ x 1-1/8″ x 5″ – these could be optional if you choose some other sort of corner joinery.
- 8 splines to bolster the butt joints where the sides and ends meet the pillars.
- 4 each 5/16″ x 3/4″ long dowels for use as alignment pins.
- 16 each 1-1/4″ wood screws.
Cut List and Materials:
A few notes about the top and bottom – I make the bottom about 3/4″ wider than the outside dimensions of the casket frame. So, for the long dimension of the casket frame you have:
1-1/8″ + 1-1/8″ + 9-1/2″ = 11-3/4″. Adding 3/4″ for each end gives you a bottom length of 13-1/4″…and for the width of the bottom:
1-1/8″ + 1-1/8″ + 5″ = 7-1/4″. Adding 3/4″ for each end gives you a bottom width of 8-3/4″.
The top overlaps the casket frame by 1/2 as much as the bottom, extending 3/8″ beyond the outside of the frame on each side. The second top piece is the size as the outer dimensions of the cask.
Of course, you can decide for yourself how these dimensions relate – please keep in mind that the dimensions of the two top pieces play a particular role in assembly – please read on before you start cutting.
Material Preparation.
Once the bottom, top and frame pieces are cut to size, sand 180-grit. Look carefully for any latent sanding marks – they’ll show up through the finish. (You will have one more sanding step after routing is done.)
I keep the pillar stock in one piece for milling on the router. I use a biscuit slot cutter bit for the spline slots and a 1/2″ roundover bit for the outside edge of the pillars.
Note – you have to set the slot cutter high enough to ensure you don’t overlap opposing slots – thereby making it a rabbit instead of a slot.
 I also round over the top edges of the bottom and both top cover pieces using the same radius as the pillars. You could use a more ornate router bit, but the somber nature of the project makes the simple roundover bit my first choice. Here’s a detail of the spline slots during dry-fitting:
Next, cut the pillar pieces to length. Finish sand all parts. I sand to 320 grit.
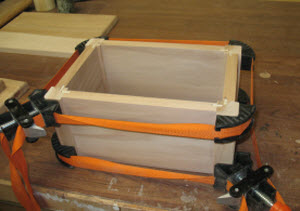
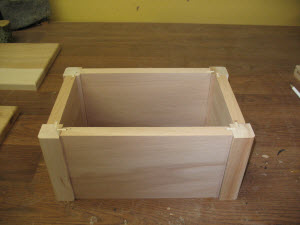 Now, dry assemble the casket frame to ensure everything fits nicely. Use the splines to hold things in alignment. Make any adjustments now – it’s your last chance! This is the best time to ready your clamping system as well. Remember, in just a moment you’ll be gluing and assembling 8 joints at one time – better have things in order!
Assembling the Frame.
Apply glue to the slot on each side of the pillars and insert the splines. Watch for squeeze-out – you don’t want a lump of dried glue to keep the sides from fitting flush to the pillars. When all is ready, apply glue to the protruding spline edges and the end-grain surfaces of the frame pieces. Assemble and clamp. Let cure.
Truing the Top and Bottom Edges of the Frame.
Once you remove the clamps, check the top and bottom edges of the casket frame for uneven spots. If you have high spots, it’s important to flatten them so the top and bottom frame edges fit tight and flush against the top and bottom. One method for flattening high spots is to attach some PSA sandpaper to a dead-flat surface and rub the edges over the abrasive until any high spots are eliminated.
Fit the Bottom to the Frame.
I lay out the bottom dowel pins first. Position the casket frame on the bottom piece and make some positioning marks on the bottom board inside of the frame with a pencil. These marks will be important in just a moment. Now, drill four 5/16″ holes in the bottom edge of the casket frame – one on each side. I always off-set one hole so the top and bottom only fit together one way. Insert dowel centering pins in the holes and position the casket frame over the casket bottom using the pencil marks for alignment. Press down hard enough to make 4 davits in the bottom piece. Drill corresponding 5/16″ holes in the bottom piece. Use a drill stop to ensure you don’t drill all the way through – that could get ugly. Test to ensure they align correctly with the holes in the bottom piece. Once satisfied, glue the dowels into the holes on the edge of the casket frame.
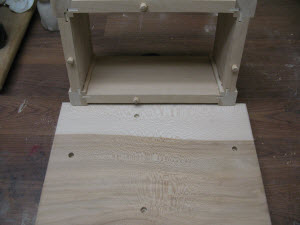
Attach the First Top Piece.
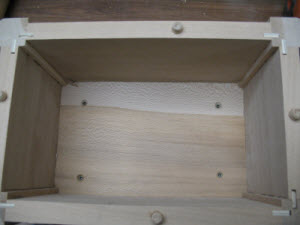
Next, place the larger top-piece top-up on the workbench. This might seem counter-intuitive, but you’ll get it in a moment. Use a pencil to outline the inside edge of the frame onto the top piece. Set the frame aside and, using the appropriate drill/countersink bit, use the lines you just marked to drill 6 holes in the top – see photo. Next, turn the top piece up-side-down again and align the frame in its final position over the inverted top. I use a couple bench cookies to support the top above the bench. Make some pencil marks for reference. Apply a small bead of glue to the top edge of the casket frame. Re-position the frame on the top. Once the frame is in position, lightly clamp the 2 pieces together. Invert them so you can screw the top to the frame using six 1-1/4″ screws. Let the glue cure, then remove the clamps.
Attach the Second Top Piece.
Drill and countersink 4 holes in the under-side of the top – inside the casket frame, one in each corner – see the photo! Apply glue to the underside of the upper top piece and position it on the lower top piece. Turn the assembly over and screw the two pieces together from the inside using four 1-1/4″ wood screws.
Here's what it looks like on the inside.
 Now, from the outside – the screws for the first top layer are covered by the second top layer. No visible hardware!

Attach the Bottom.
Now we’re ready to attach the bottom. I make light pencil marks on the underside of the bottom at points where the center of the frame will rest. Drill and countersink holes in the bottom to accommodate 8 screws – see the pattern on the photo. DO NOT USE ANY GLUE AT THIS POINT! As a test, attach the bottom to the frame.
Finishing.
Remove the bottom from the frame. Apply 2 or 3 coats of polyurethane, lacquer or other finish of your choice to the inside of the frame and top. Once cured, finish the exterior surfaces. Let the whole project cure completely and reassemble. When ready to introduce the contents, simply remove the bottom and place the contents inside. Run a thin bead of silicone sealer along the exposed edge of the frame, position the bottom using the dowel pins for alignment, then, screw the two pieces together.
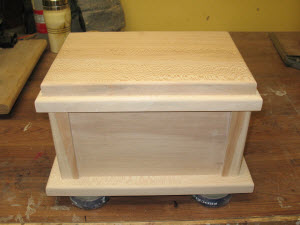
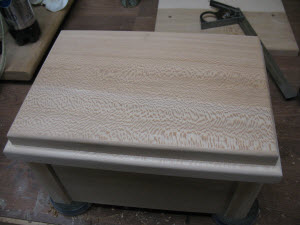
 Here’s the sycamore casket in final form.
Footnotes.
I recently had a request from one family for 6 identical caskets. Identical except for the names engraved on them. The names were laser engraved. Think of the possibilities – an emblem from military service, something related to a favorite sport or activity or a favorite saying.
I also attach felt dots as feet to the bottom.


Do all the cremations cemeteries have the same size urn storage space?
Very nicely done, following steps to create one as well
Did make for me and my wife not sure on size standard.
Looking at the urn. I think a standard size would be much easier and less time consuming in bulk. Thoughts?
Not to be morbid, but I've been wanting to make this for myself. My ex-wife wants me buried (as if she has a say in it) but I prefer the quick burn over the slow rot.
i will hopefully make this for my self before i expire.
Thank you. I am fairly handy and like doing intricate wood work. Urns were brought to my attention over the weekend. This looks like an easy project as a start.
Any chance you have a plan for a double cremation urn ? Looking for a family member who has lost her husband and is not wishing to be apart from him after her own passing Thanks
The first sentence confused me. Is the 60% water loss included in the weight? If so, does the 180 pound example mean the mass was 300 pounds to begin with?
do you use one solid piece for the tops and bottom, or can they be glued to achieve the proper width, 9 to 10 inch wide pieces are hard to find in my area and my intent is to build several of these. would it be improper to have a two piece top or bottom on this particular project.