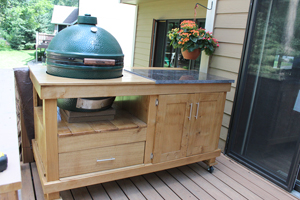
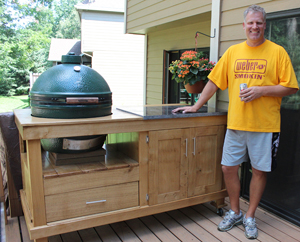
I occasionally like to take on unusual woodworking projects, so when my friend asked if I would help him build a rolling cart for his new “Big Green Egg” grill, I didn’t hesitate to dive in. My only concern was that putting wood so close to a source of fire gave me the “willies”, but he assured me that this particular grill contains heat so well that it would not be a risk.
We started by wrestling with some design ideas. He wanted a level of “fanciness” that was appropriate for this high-end grill/smoker, so he opted to go with quarter sawn white oak. We found a stash of wood that had brilliant ray fleck patterns throughout the boards, and we used this high-quality material for all of the external visible parts, while we opted for cheaper pressure treated materials for less visible interior components.The Big Green Egg Cart Build Process:
 To form the legs we joined pieces of 6/4 oak at a 90 degree angle. This gave us a good ability to run screws into the upper and lower stretcher from behind the legs, leaving the screws unexposed.
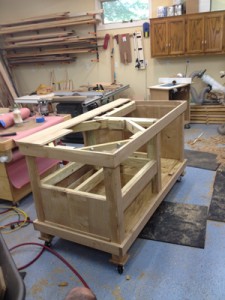 We started from the bottom and “built up”, first adding the lower rail, then framing the drawer housing and cabinet section using pressure treated 2x4s. It was important to configure an adequate structure to support a 200 pound grill, patio stones to set the grill on, and a 100 pound slab of granite. We stress tested the carcase to our satisfaction before putting anything of value on top. This thing is built to last!
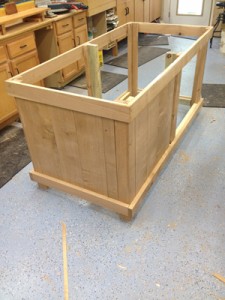 We wrapped the sides with tongue and groove oak boards that we milled using random width boards for a nice effect. Even though quarter sawn wood is relatively stable we left plenty of room for wood movement given that this project will live outside all year.
 We did not have a formal plan or even precise dimensions in mind as we began the project, so as a result we had to make many “adjustments” along the way, including this oversight where we did not account for the hinge movement of the grill, and went we set the grill in place the lid was unable to open fully. So we used an oscillating multi-tool to perform a clean plunge cut and remove enough material to provide adequate clearance for the lid hinges.
A couple of construction tips if you want to take on a similar project:
Material choice:
Choose a material that is known to resist rot, such as cedar, teak, cyprus, or white oak. This is a big project, so you won’t want to build a new one every 5 years.
Adhesive:
You will want to use adhesive products that can withstand exposure to water. We used a combination of Tightbond 3 and construction adhesive, both of which are proven winners in this area.
Fasteners:
Get good quality corrosion resistant fasteners, as ordinary interior grade fasteners will stain your project over time and may eventually even fail.
Finish:
Use a good exterior grade finish to protect your project. We applied three coats of spar varnish which gave the white oak an amazing glow.

Hardware:
Use high quality corrosion resistant hardware (stainless steel or brass are good options). These are not cheap, but they will look good for a long time.
Wheels:
This project weighs nearly 600 pounds when fully loaded with the granite slab and the grill itself, so it is great to have large wheels attached which make it easy to move the unit around.
If you want to look like a world class BBQ chef, a cart like this might be in your future!
Photos By Matt Christianson and Paul Mayer


None of the images work and i dont see a link for the plans?
What wood making machine would be good to purchase to make this?
Are there plans available to build this cart?
several of the photo links are broken. any chance of getting them fixed? thanks.
Hello, is the tree preserved from the heat of the grill? What separates them?
Excellent project
Fasteners - corrosion resistant isn’t always enough with oak, the tonic acid in the oak can overcome plated type corrosion protection, best go stainless in every case in my opinion.
Do you have plans for xl bge table?
Do you have plans for building a table for xl bge i can use or buy?
Can I use a Weber kettle instead and is it safe using with a wood application as well?