Repair Veneer on an Antique

A recent restoration job required that I replace the badly damaged oak veneer on the top of an antique table. The piece was an old salesman sample of a sewing table. Back in the day,salesmen would bring these scale models on sales calls. This sample was from the White Sewing Company but the quartersawn white oak top was beyond repair.

woodworking projects for the home banner

I like to stick with original materials and techniques when restoring veneer antique table tops. I knew the old veneer was attached with hide glue so the new veneer would be put down the same way. The beauty of hide glue is it’s reversible and when it comes to veneering, there’s no need to use clamps. If you’ve ever applied plastic laminate to a substrate using contact cement you are already familiar with the basic technique. In this story I’ll walk you through how to veneer the old fashioned way.

Repair Veneer
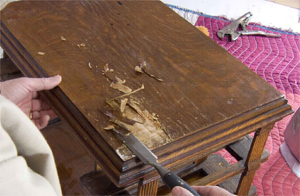
Remove the old veneer. This is usually a simple job on antiques because the glue is almost always hide glue. Hide glue was the glue of choice back then and one of its salient features is reversibility. A little hot water will re-liquify the glue for easy removal. If the veneer is buckled and split like this one was, you may be able to pry it off with just a chisel.

Repair Veneer
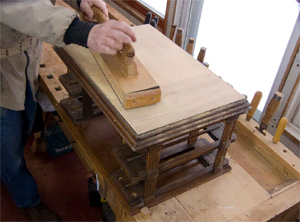
Sand the substrate flat. Before you put down new veneer, make sure the substrate is sound with no voids or loose areas. Make any necessary repairs and sand flat with a large sanding block.
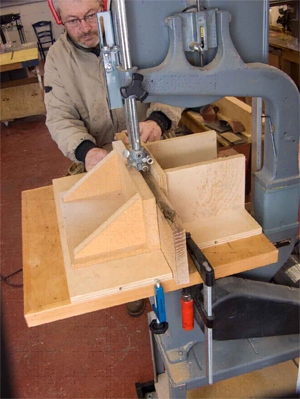
Repair VeneerCut your own veneer. It’s not hard, especially on a small piece such as this. Here I’m resawing a quartersawn white oak board into 3/32″ thick slices. I like to use two fences for resawing veneer. One sets the thickness of the cut and the other holds the board gently against the opposing fence. I like the freedom cutting my own veneer gives me, especially when it comes to thickness. Store bought veneer is almost paper thin.

Repair VeneerEdge glue the veneer. This is done the same way as you would 3/4″ thick boards. It’s easy to edge glue veneer this thick. Make sure the seams are flush and use gentle clamping pressure. A slightly narrower support board and a few handplane weights keep the veneer from buckling under clamp pressure. Wax paper protects the planes and prevents the veneer from sticking to the support board.

Repair Veneer
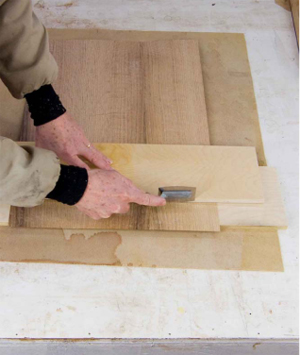
Flatten any irregularities. Use a hard sanding block to level the seams. It’s important that the sheet be perfectly flat to avoid glue pockets under the veneer.

Repair VeneerTrim the veneer slightly over size. A veneer saw and a straight edge work great for this. The teeth on a veneer saw are set to one side only so the saw can run tight against a straight edge.

Repair Veneer
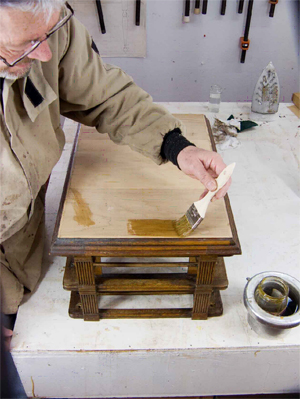
Get gluing. Apply a generous coat of hot hide glue to the substrate. For more on how to mix and use hot hide glue, see my story on chair repair. Chair Repair

Repair Veneer
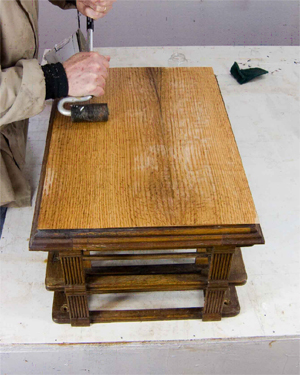
Press the veneer on with a J-roller. This is one of the big advantages of hot hide glue;you don’t need clamps. You can veneer a huge surface without pulling out a single clamp. Keep a spritzer bottle with water handy and periodically spritz the veneer. Keeping it moist prevents the veneer from curling up as it absorbs moisture from the hide glue.

Repair Veneer
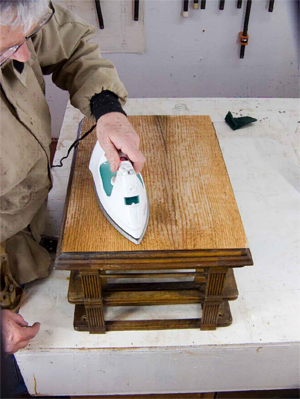
Iron out problems. Use a hot iron to melt the glue if it sets too fast. Heat the area then roll again with the J-roller. If you get a bubble trapped under the veneer, slit the bubble with a razor and apply heat. Then roll.

Repair VeneerTrim edges. A rabbet plane finishes the job. Trim the veneer edges flush with the substrate, sand, finish and you’re done!

Repair Veneer
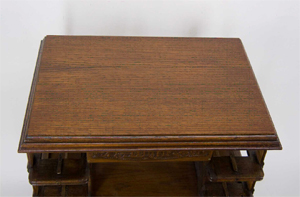
A complete repair ready for another 100+ years.

Photos By Author

woodworking project for the home banner

You might also be interested in:
Furniture Leg Repair – How to Fix a Broken Leg
How to Repair Wood Cracks
Repairing an Old Chair
Applying Veneer with a Vacuum Bag
Applying Veneer
Gluing Veneer: No Paper Back

Make a comment
  • (will not be published)

82 Responses to “Repair Veneer on an Antique”

  1. shloime

    love it! i have an old singer sewing machine with a walnut cabinet, which has a somewhat “distressed” top. (it was a bad idea to put potted plants on a wooden antique.) this article may give me the confidence to remove the old veneer, rather than try to patch the missing spots and cover it over. thanks a bunch!

    Reply
  2. Brenda Schafer

    Any way to remove raised bubbled up veneer? Its a kitchen table and I’m not sure what caused these, maybe a hot item even though I’ve always tried to use hot pads. Thank you for any help.

    Reply
  3. Carolyn Liverzani

    I need to replace the veneer edges of furniture damaged during moving. Information regarding this would be helpful.

    Reply
  4. Damson Nyozani

    Yes I enjoyed the tip but where to get good quality tools and it’s names like that veneer trimmer *whats it’s name* please provide the detailed name of the carpentery tools if you can

    Reply
    • Customer Service

      Hello Damson. That tool is called a Veneer Saw, and here is an example that is similar to the one that Dave used in the article: https://amzn.to/3KLaa1S
      In addition to online sources such as Amazon, you can find good quality woodworking tools at woodworking specialty stores such as Rockler and Woodcraft. They often have them set up for you to try in the stores.
      Paul
      Woodworkers Guild of America

      Reply
  5. Hannah J Parrish

    thank you! I just bought the most beautiful vanity for next to nothing because of the terrible state of the top veneer. You just saved me countless hours of worry and work 🙂

    Reply
  6. Bill Wheeler

    It turned out wonderful! What was process/type of stain and finish used to get the great color match? Thanks

    Reply
  7. Joel D Butler

    An excellent piece of educational instruction. Presented simply and in an easy to follow manner. Thanks.

    Reply
  8. Michael Mullins

    David i enjoyed your post. I have a question, I have removed a veneer off of an old sewing machine and now want to put a new one on it. But there are some uneven surface areas and I don’t know how to fill them in. Would the hot glue you used be thick enough to fill these areas in or do you have another idea? Thank You Mike Mullins

    Reply
    • Customer Service

      Hi Michael. The hot glue can handle very small irregularities, but I wouldn’t count on it. The best prep is to sand the surface you are veneering too smooth. If there are areas too deep to sand, then fill them first with wood putty or Durham’s Water Putty.
      A smooth substrate will always give you the best appearance.
      Good Luck!
      Paul-Woodworkers Guild of America

      Reply
  9. Freyda Black

    This is an excellent article but, I have an antique sewing machine with some of the veneer broken off. I have the pieces and wonder what technique I could use to piece them in. I have experience repairing veneers on pianos but have always pieced with new veneer and stained to match but using contact cement. This old treadle has loose veneer as well. Could it actually be pieced and repaired with hide glue?

    Reply
    • Customer Service

      Hi Freyda. Thanks for checking in with us. Honestly, this is an area where we are more dabblers than experts. We primarily focus on building new projects. Your idea sounds reasonable to me, but I’d check with a restoration expert for better guidance on this one.
      Thanks
      Paul-Woodworkers Guild of America

      Reply
    • Customer Service

      Hi Steve. Thanks for reaching out. While we occasional publish a piece on aspects of furniture restoration, it’s really outside of our core coverage area which is primarily building new projects.
      Thanks
      Paul-Woodworkers Guild of America

      Reply
    • Customer Service

      Hi James. I am sorry you are having trouble viewing the images. Please try hard refreshing the page or using a different browser. If you are still having trouble viewing the images, please contact our customer service team at 1-855-253-0822.
      Thanks
      Jean-Woodworkers Guild of America Video Membership

      Reply
  10. Rudy83638

    Thank you I have tried with the paper thin stuff this looks like a better method

    Reply
  11. Dennis Dumminger

    I have to read more about how to use hide glue I have a dresser that belonged to my wifes great aunt
    that I need to take it apart and try to fix the venner that has buckled. thank you for the information so far this may be the begining of a good restoration

    Reply
  12. DANIEL

    This is fine for a flat surface, but my challenge is repairing the exterior veneer on an old cedar chest. What to do on curved surfaces?

    Reply
    • Customer Service

      Hi Daniel. Honestly, repairing antiques is a bit out of our coverage area, as we are primarily focused on building new projects. With something as complex as that I would likely take it to a furniture repair professional.
      Thanks
      Paul-Woodworkers Guild of America

      Reply
  13. Kevin R Thomas

    What if you only want to patch a small spot but not strip the whole piece off?

    Reply
    • Customer Service

      Hi Kevin. You can do your best to match the finish, but it is likely that you will notice the difference in appearance.
      Thanks
      Paul-Woodworkers Guild of America

      Reply
  14. Eric

    I have a 1934 Montgomery Wards stand up radio and would love to “re-veneer” this. Unfortunately it’s not a flat surface but curved / rounded. Any suggestions on how to tackle this?

    Reply
    • Customer Service

      Hi Eric. Thanks for your question. Unfortunately that type of work is a bit out of our coverage, as we are primarily focused on building new projects from solid wood and sheet good. I suspect that there is a lot of info available on line for refinishing old radios.
      Thanks
      Paul-Woodworkers Guild of America

      Reply
    • Customer Service

      Hi Gregory. It is a slow setting adhesive used in traditional woodworking. It’s nice because of its long open time as well as the ability to steam a joint loose if you ever need to for repair. It also bonds well in the presence of older adhesives, vs. modern PVA glue that requires wood pore penetration to form a good bond. You can find it here: https://amzn.to/2lyHWBD
      Thanks
      Paul-Woodworkers Guild of America

      Reply
  15. Barry Goian

    I’ve repaired and it will need it again a very old mantle Clock with 99.9 % pure Silver Rods for the chime. The repair was excellent and will run and sound beautiful, the only drawback, is it’s look. The 100’s Of years of dry Farm land have taken the toll (pun intended) on the laminate. I’m nervous about even trying a repair to these curved surfaces. Can it be repaired with this process? Or should I take my repair to another? My skills with my woodworking tools are not bad, but I don’t have the setup shown either.., help?

    Reply
    • Customer Service

      Hi Barry. A repair on a curved surface like that is a bit out of our coverage area, and I’d suggest taking it to someone who specializes in this area.
      Thanks
      Paul-Woodworkers Guild of America

      Reply
  16. Marco Hoffman

    Please contact my cell so we can talk on the phone I have a few questions thank you.

    Reply
  17. Laura Michelle Reynolds

    We’re working on what we thought was just a strip and finish, turns out to be a severe repair job, where another contractor used an undercoat of primer, to cover up damage he/she had done. This article is extremely helpful.

    Reply
  18. joe burttcshell

    Images of pictures did not show up, and interested in learning more about repairing Wood veneer on antique furniture. Thanks.

    Reply
  19. Cheryl Doss

    I have an antique bookcase with glass front and a thin veneer design on that whichis shaped in an archway with more thin veneer that makes it look like lites but it’s one piece on each door. It’s has been losing pieces over the years. When I can, I have been glueing them back on. If I can’t find the pieces that come off Ive stained the veneer behind it to blend color. So it’s really two layers of veneer actually. I would like to replace the top layer of veneer. I imagine the only way is to remove all of the old and replace each section which will take me forever. I don’t mind doing it as I love it. What is the best way to saw curved thin strips of veneer?

    Reply
    • Customer Service

      Hi Cheryl. Unfortunately we don’t do a lot of veneering, so don’t have a great answer for you. I feel like producing a template in hardboard and then running a utility knife along the edge of the hardboard to cut the veneer could work, but this is just a stab in the dark. Sounds like you really love the piece, so it would probably worth some more research on your end to see if there’s a better solution.
      Thanks
      George-WWGOA

      Reply
  20. Craig Vanaken

    This is exactly what I was looking for!!! Question(s) however. I actually am fixing a White sewing machine cabinet top for my wife. When you put the veneer down was it saw side down? I assume you sanded it as flat as possible first but does a few residual saw marks matter if it is saw side down? I resaw with a 1″ steel blade, no carbide. Also, rabbit plane is good going with the grain, how about getting the ends flush? Lastly, any tips on matching finish? I cant wait to get started now!!!

    Reply
    • Customer Service

      Hi Craig. Yes, the veneer was installed with the saw side down facing the substrate. Minor imperfections in the surface should not cause problems with adhesion. Clean-up with light sanding or a cabinet scraper is fine if needed. A rabbet plane can work well on end grain with the usual end grain caveats; light cuts, sharp tool, etc.
      Thanks
      Paul-WWGOA

      Reply
  21. Gwen Stevens

    I have a old couch table that needs new vener the top is flat but 1 1/2 in from the edge. Of the table ther is a cut in the center making a pattern some what like a router would make but the cut in the vener is no larger than the width of a knife blade giving the appearance the vener has been laid in two different pieces. The ends of the cut have a pattern and are not straight how do I repair it?

    Reply
    • Customer Service

      Hi Gwen. This sounds fairly complex. While we do have an article or two on WWGOA covering simple repairs, we’re more about starting-from-scratch woodworking than about refinishing and repairing. Sorry, but we’re not your best resource for this question.
      Thanks
      Paul-WWGOA

      Reply
  22. Linda S McConnell

    I nee some help. I am new to DIY projects and I bought a 1920’s end table. It’s gorgeous but needs a redo. I am scared to death to touch it in fear of messing it up. If I send you a picture do you think you could tell me the best way to redo it?

    Reply
  23. Peggy Walker

    I’m an OLD gal but a relative newbie to woodworking…I’ve already noticed several videos that I need LAST week! Thanks for all the great instructions and encouragement!

    Reply
  24. Jeanne Serbeck

    Good info. I have a table that has probably 12 different pieces of veneer on it, making a really subtle design, which I love. We moved from a hot humid locale to Alaska, where I have to run the heater…hot, dry air. I am guessing that’s why several of the pieces popped, buckled, whatever the term would be. Other than releasing from the substrate, the veneer pieces are in good condition. i would like to see how this might be fixed. Any ideas?

    Reply
  25. Debbie Clark

    I’ve inherently my great grandmothers 44×43 1/2 dining table. (With 2 12″ leaves)
    I’d like to restore for every day use, w/o having to use protection like placemats, etc. Would the veneer withstand or should I use a another teqnique? I want to preserve the original integrity but have practical use.

    Reply
    • Customer Service

      The thick veneer as shown in this article would be quite durable for every day use. This is many times thicker than store-bought veneer and I would not hesitate to use a table normally after applying this type of veneer.

      Reply
  26. Denby Smith

    Thanks so much! I have couple treadles I would like to do at least the tops of them.

    Reply
    • WWGOA Team

      This is not a simple repair, so it’s difficult to say. The price would depend on the skill and experience level of the craftsman, as well as local pricing standards in your area. I’d suggest looking for a reputable professional in your area and getting a no-obligation quote.

      Reply
        • Customer Service

          Hi Frank. It is a slow setting adhesive used in traditional woodworking. It’s nice because of its long open time as well as the ability to steam a joint loose if you ever need to for repair. You can find it here: https://amzn.to/2lyHWBD
          Thanks
          Paul-Woodworkers Guild of America

          Reply
    • WWGOA Team

      Edge gluing is where you glue to boards together, or in this case, two pieces of veneer, where the glue joint is formed along their thin edges (as opposed to joining along their wider faces, which is generally referred to as laminating. This is commonly done when gluing boards together to form a table top or cabinet door panel. It is less common with veneer, but the technique that Dave demonstrates in this article is a great approach.

      Reply
    • Hamish Kearney

      It is where you put glue on the edge of the board and glue the board into a panel

      Reply
  27. hippiedigger

    I just fixed a broken 1940’s dining chair with this technique. Thank you so much for saving me from drilling them out!

    Reply
  28. larryjoe

    good info. have round table i need to do. this will help greatly. thanks

    Reply
  29. Mitch Miller

    Thanks for the info. I am restoring and oak veneered door and this will be just the tip I need.

    Reply