Patience and Accuracy Pay Off.
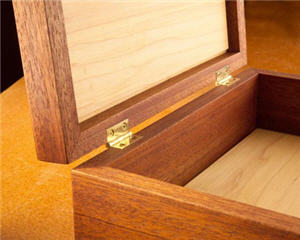
There is nothing quite as beautiful as a small wooden jewelry box and its promise of treasures hidden inside. Poorly installed hinges that bind or catch can ruin the anticipation of opening the lid. Installing hinges to hold the lid in place can be tricky, if not downright maddening. The hinges have to be perfectly spaced and correctly oriented on the lid for it to function correctly. Furthermore, brass screws are soft and prone to breaking. Here are some simple steps to make sure that you avoid all of the pitfalls of this challenging operation.
Practice these techniques on scrap first and in no time, you’ll be ready to perfectly place hinges on your precious jewelry box.
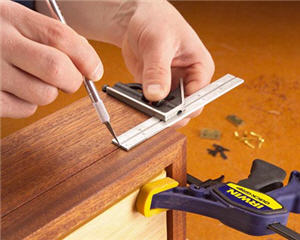 Mark the location for the hinge with a pen knife, not a pencil. Set the desired distance on an adjustable square and use this setting for both sides to insure they’re the same. Clamp the top and bottom together and mark them at the same time, so the marks are perfectly aligned.
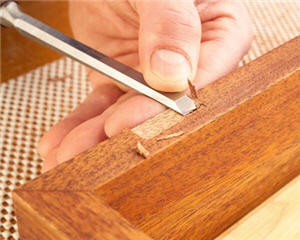
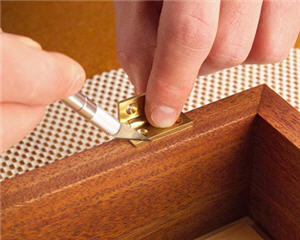 Scribe the hinge in place with a pen knife, aligning the hinge knuckle on the back of the box. Index the side of the hinge with the mark you made on the box in the previous step. Make multiple passes to gradually deepen the scribed mark.
 With the router unplugged, set the depth of the router bit for mortising the hinges. Install a straight bit in a palm router. Use the actual hinge to determine the perfect depth for the mortise. Make a test cut to check depth.
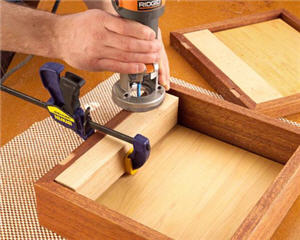 Mill the hinge mortises with a palm router, cutting up to the line you made with the pen knife. Clamp a support board inside the box to support the router. The router guarantees mortises with perfect depth and flat bottoms. This level platform for the hinge to sit on prevents binding and uneven alignment of the hinges. This technique takes a little practice, but free handing this cut is easier than you think, thanks to the shallow cut required for small hinges.
 Using a chisel, square the corners of the hinge mortises and pare back to the line in any spots where the router bit cut short of the line. Use the flat surface created by the router to help guide the chisel.
 Drill pilot holes for the hinge screws. I use a self-centering bit, available at woodworking specialty stores, for a foolproof hole. Driving screws into un-centered holes can pull the hinge out of alignment.
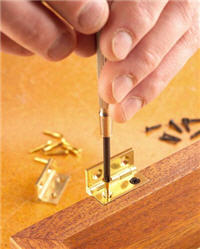 Brass screws are very soft. To prevent the brass screws from breaking, first drive the same size steel screws in each hole to cut threads. Then remove the steel screws and replace them with brass screws. For this step, I pick up a screwdriver instead of my drill in order to get better control and break fewer screws.
Photos By Mike Krivit


I'm making a small jewelry box with the top extending beyond the case. What do you think of making the mortises on the case twice as deep allowing the upper hinge to fit without allowing a gap? I would then use small thumb tacks through the holes in the bottom hinge to locate the holes for the top hinge.
Very helpful
The article stops before locating the hinge to the box top. In order to have the top match perfectly to the bottom, how do you locate the actual pilot holes in the lid? I see in the second picture, marking the spot for the hinge but if the holes are off.....?
You didn't discuss how to position the screw holes in the lid so you get a perfect alignment with the body of the box. I find this the most difficult part of assembling hinges.
I read the item on how to cut perfect hinge mortises. Thanks for the help
A router for a 1/16" thick hinge? Controlling even a small router has a large chance of failure.Best use a chisel.
Although not the hinges you are describing, I am asking about a support lid stay, a kind of hinge I suppose! I have asked how to fit them on Google, rephrasing every way possible, and I cannot get an answer to the simple question, How do I attach them. Sorry if I am out of line not asking about the hinges you are describing. I would be very grateful for some help. Thank you.<strong></strong>
I've noticed after installing hinges on a small box using your method, there is still a gap all around the lid and it does not sit "closed". Looks like perhaps mortise is a tad too shallow? I set the router bit the way you suggested...any comments? Thanks!
I need to make 20 hinge mortises on small boxes. The hinge is 1 1/2" by 7/8".Are there any jigs that i can make or buy?
I am working on a design using basswood and would like to add a hinge but don't want the gap nor is the thickness (1/4 inch) conducive of making a mortises box - getting frustrated trying to solve my dilemma. Any suggestions .. thank you.