If you want to get an animated discussion going within a group of woodworkers, just mention sharpening. Everyone has his or her own answer for getting the best edge in the least amount of time.
The price range for sharpening equipment is huge. At the low end of the cost scale is hand sharpening. All you need are a couple water stones and you’re good to go. Hand sharpening is a wonderful skill to have but, like any skill, it takes time and practice to develop. That leaves many woodworkers frustrated and looking for a product that will give them consistent results without the learning curve. The array of sharpening jigs and machines found in woodworking catalogs testifies to that demand. Cost for these sharpening aids can range from a few dollars for a simple jig to hundreds of dollars for a powered machine.
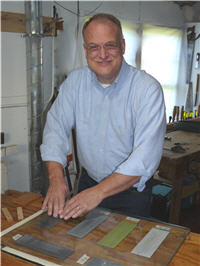
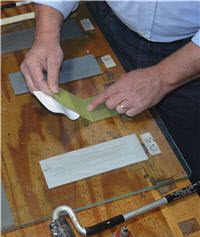
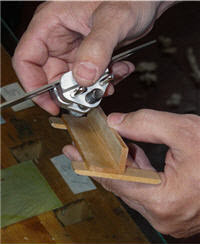
I came up with a system that I think delivers the best of both worlds, (Photo 1); it’s quick, easy like a machine, but also inexpensive, like hand sharpening. Total cost is less than $50. I can touch up a tool edge in seconds or do a thorough edge treatment in a few minutes. But the best thing about the system is the result – an unbelievably sharp edge on my bench chisels and plane blades.
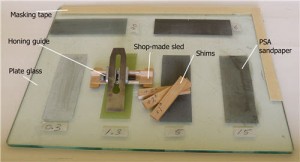
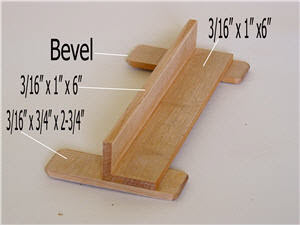
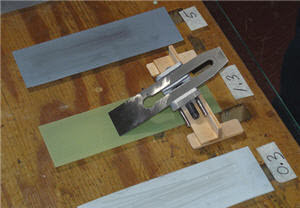
The sled sets this system apart. Normally, the honing guide rides on top of the sandpaper. That takes up valuable real estate on the abrasive and limits the sharpening stroke. Plus, a steel wheel running back and forth on the abrasive must shorten the life of the abrasive. So, I built a simple sled from scrap maple to hold the honing guide and bridge the sandpaper, (Photo 2). The sled is designed to hold the honing guide and bridge the paper, allowing me to use the entire sheet at once. A slight bevel on the front of each runner helps it slide along the glass.
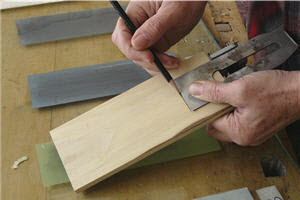
A set of shims allows me to fine tune the bevel angle and create micro-bevels (Photo 3). The sled is designed to hold the honing guide and bridge the paper, allowing me to use the entire sheet at once. A slight bevel on the front of each runner helps it slide along the glass. This sled was sized for 3″ wide paper.
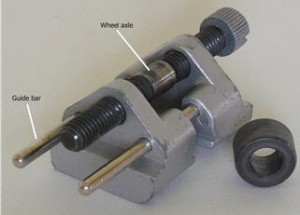
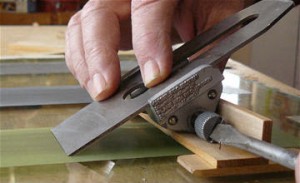
I modified the honing guide to fit the sled by removing the now unnecessary wheel. (Photo 4). Use a punch to knock the guide bars out, then unscrew the two halves of the holder and slip the wheel off the axle. Screw the halves back together and tap the guide bars back in place.
Self-stick abrasive paper (Photo 5) is mounted on plate glass to provide a flat abrasive surface for sharpening my tools. The self-stick, or PSA paper is readily available from automotive or woodworking outlets, and comes in a variety of sizes. I like the 3″ x 1″ size. Four grits of approximately 800, 1200, 1500, and 2000 grit can bring a tool from out of the box dull, to razor sharp, in minutes. If you need to lap the backs of your cutting tools or remove nicks, you may want to buy some coarse grit paper (220 to 600-grit). You can use a second piece of plate glass for the coarse grits.
Some abrasive companies use microns (m) instead of grit sizes. Unlike grit numbers, microns go down as the grit gets finer. I use 15m , 5m , 1.3m and 0.3m. Sandpaper is inexpensive, so you can experiment to find the combination of grits you like best.
The plate glass insures a dead-flat surface so I never spend time flattening dished out stones. The glass should be 1/4″ or thicker and at least 12″ x 18″ to comfortably hold four strips of 3″ x 11″ sandpaper. Have the edges of the glass sanded smooth for safety.
Apply the sandpaper on the glass, leaving enough room between sheets for the skids on the sled to move freely (Photo 6). Start by peeling a portion of the backer off of one end and position it on the glass. Then pull the backer off as you press the paper in place. Take your time to insure there are no air bubbles trapped under the sandpaper.
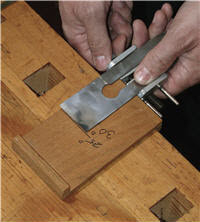
The next step is to properly set your plane blade or chisel in the holder (Photo 7). Adjust the blade projection with the honing guide on the sled until the bevel lies flat on the abrasive. Lock the blade in the guide.
Once you’ve manually set it and made a jig (Photo 8), it’s easy to use the jig for future sharpenings (Photo 9).
The honing guide is then placed in the sled (Photo 10), and set on the desired grit (Photo 11).
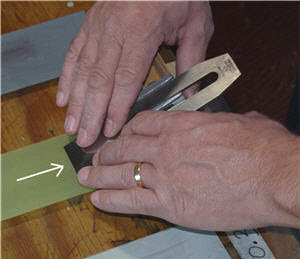
Now you’re ready to sharpen. Use a little mineral spirits or honing oil to lubricate the paper. To sharpen, hold the sled and blade as shown (Photo 12) with your fingers over the top of the blade and your thumbs hooked behind the sled.
Pull the sled towards you for the sharpening stroke. Keep downward pressure on the blade throughout the pull stroke. Then, tip the blade up so the edge is not in contact with the paper, slide the sled forward, drop the blade, apply pressure and pull towards you again.
Sharpen on the pull stroke only. Otherwise you risk tearing the paper.
Co-Authored And Photographed By Dave Munkittrick


Incredible! I recently got a beginners chisel set and I was stressing about how much whetstones were going to cost to sharpen them, but this looks like it could be very effective as an alternative.
Do not have table saw; how do I thickness the shims and parts of the sled? I assume shims go under between bottom of honing guide and the top surface of sled's bottom "cradle" 3/16" x 1 x 6" board, thus tipping chisel angle upwards to create microbevel? What is board in figs 8 & 9? Are all flat chisels sharpened to same basic angle + a common micro angle--or which chisel gets 1°, 2°, and 3°?
I am a brand new member to the Guild. I am glad to have found this article which took me a little more time than I thought it should but perhaps that's just because I'm not familiar with the system. As as happened with some other articles, I cannot get the photos or short videos to show or play. I keep getting an error message that I should try later and I have tried to do that and it just doesn't seem to work. Thank you for your help, John
It is my first tour at that part of the site. I will be able to say something about the site later on
It looks so nice. I'll try to do it. Thanks for sharing!
This looks good!
Where do I buy one of the sharpener jigs. If it is from you then please send information to John Rea jonjrea@aol.com
Sounds neat. Appears simple, but very effective and repeatable. I'm definetly going to try this method. Thanks for the tip.
I have tried this system but have trouble removing the paper when it gets worn. How do you remove the worn paper? Thanks.
Sounds like a very good idea. I will try this out. Kenn