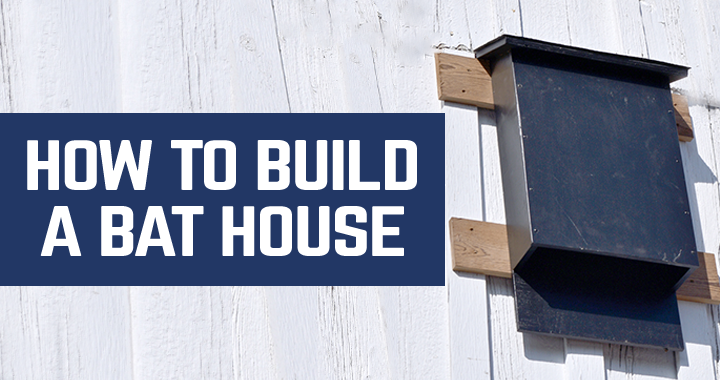
Why a Bat House?
I have bats in my belfry. Well, actually, they’re in my barn where I store my lumber and I’d like to get them out. Although my initial research was aimed at getting rid of the bats, I ended up building them a house. Here’s why: I discovered that many of my long-held beliefs about bats were completely wrong.
I was surprised to learn that bats are not blind and can see as well as any animal. They do have radar designed to hunt flying insects at night, but their eyes work just fine. Also, bats are not common carriers of diseases. They do not spread rabies or disease any more than other mammals. Finally, only three of the more than 1300 species of bats feed on blood. Most eat fruit, insects or nectar. Turns out, bats aren’t as bad as I thought!
On the plus side, I learned that bats offer a great many positive benefits to a homeowner with a little property. For starters, most North American bat species eat insects—lots of insects. Some will consume up to their body weight in bugs every night! Think of them as living bug zappers without the annoying noise. They also produce guano (a fancy word for bat droppings). Guano is a potent fertilizer and is actually mined for profit in bat caves in the south.
After all this research, I resolved to build my bats a house instead of remove them. Building a bat house helps you choose where the bats live, so they won’t come into places you don’t want them. I chose to build the basic four-chambered unit featured on the Bat Conservation International website. They have a wealth of information about bats and bat houses. Be sure to check them out.
The Plans
The bat house plan we’re using offers a perfect opportunity to work with youth or large groups. All the parts can be pre-made into a basic kit that’s fun to assemble. It’s a great way to do something positive for the environment (bats are great) and introduce kids to woodworking.
I modified the plans I found on the BCI website slightly, substituting plywood for cedar and eliminating the ventilation slots as they are not needed in the far north where I live. The bat house we present here is designed for the northern tier of the US. Warmer climes may need to add slots for ventilation. Consult the Bat Conservation International website to see what modifications you may need for your part of the country.

Working with Kids
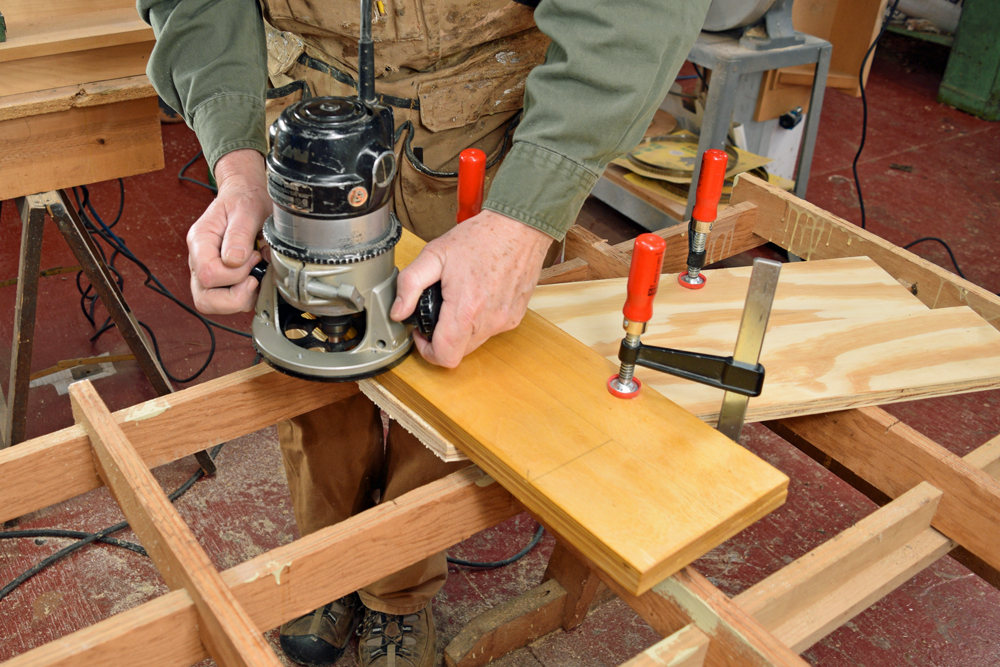
I enlisted the help of my oldest granddaughter, Jadyn, to help me build a couple bat houses. To keep the project approachable and safe for young woodworkers, I developed a system for cutting up plywood sheets into accurately machined project parts without the hazard of a table saw. Even the angled edges are made using a router bit. All you need to build this bat house is a jigsaw, a router, and a couple router bits (See Sources). Jigsaws are relatively safe tools for young adults to handle under skilled adult supervision. You may want an adult doing the routing.
For younger kids, it’s best to have them pick up the project at the assembly stage. Assembly requires nothing more hazardous than a drill. People love the opportunity to build a tangible object that they then can later observe in service. Kids will get a kick out of seeing something live in their project.
Machine the Parts
For tools, all you need is a jigsaw, a router, and a screw gun. That’s it. I will show you how to use these tools to cut and machine the bat house parts without having to muscle huge pieces of plywood around on a table saw.
For a detailed look at how this technique works, check out this video:
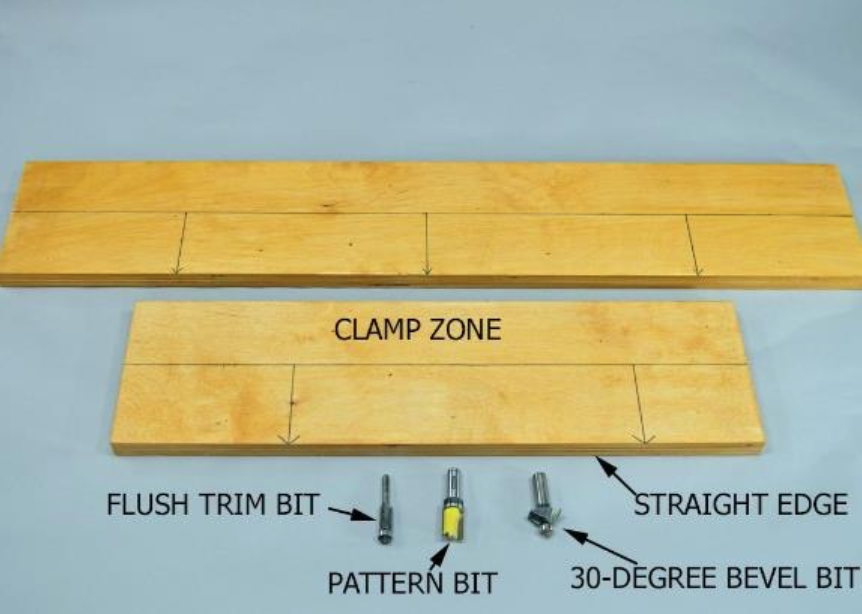
Besides the straight edge, you’ll also need two router bits to make the bat house. A pattern bit is my first choice for this technique. It allows you to align, clamp, and run the router without having to flip everything over. You could use a flush trim bit to make the cuts. These bits have the bearing at the bottom rather than the top. That requires you to set your straight edge, then turn everything over so the bearing can run on the straight edge. Be sure your pattern bit and/or flush trim bit has a 1” cutter length.
You’ll also need a 30-degree bevel cutter. Again, make sure the cutter is large enough to bevel 3⁄4” stock.
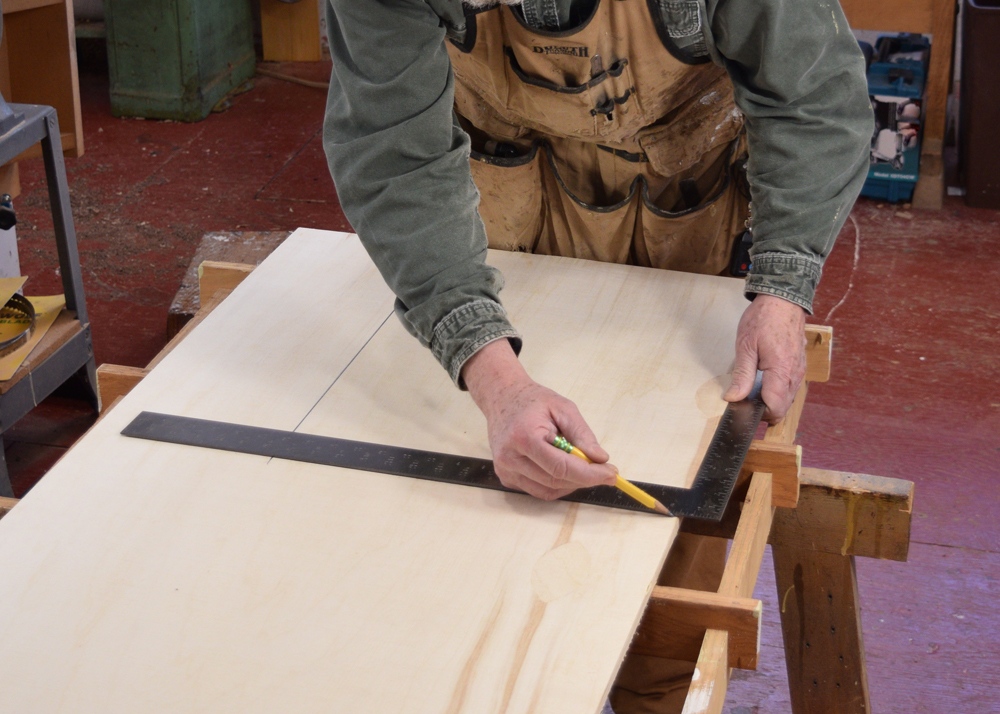
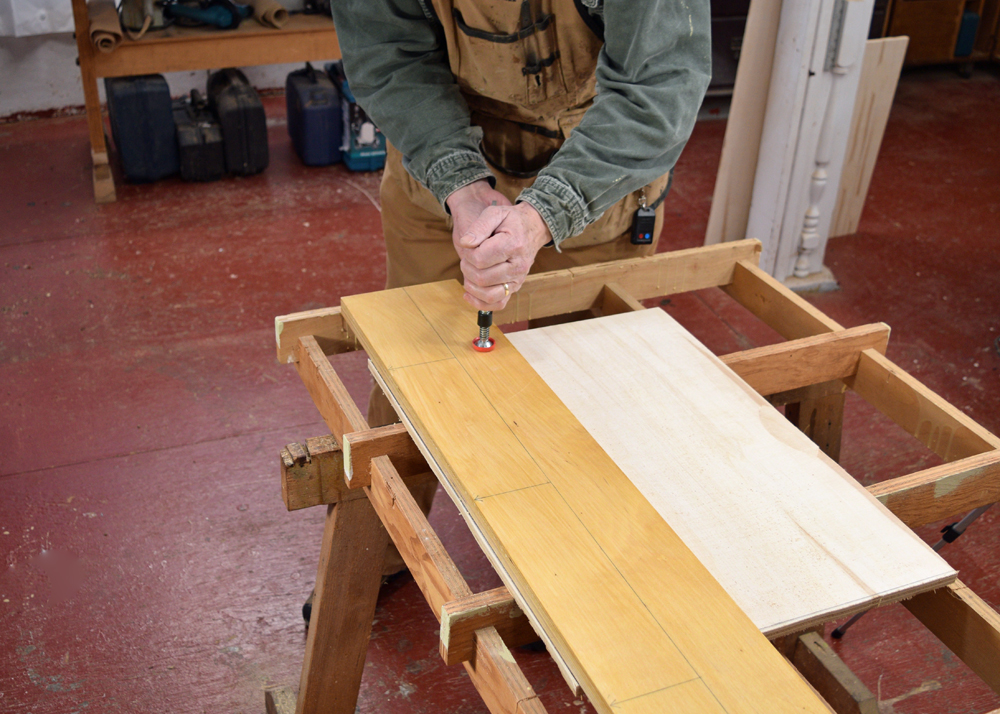
First, lay out your part. If possible, use your factory edge as a starting point. The edge must be in very good shape to do this. If it needs to be trimmed, simply lay out your part oversized and trim all four edges.
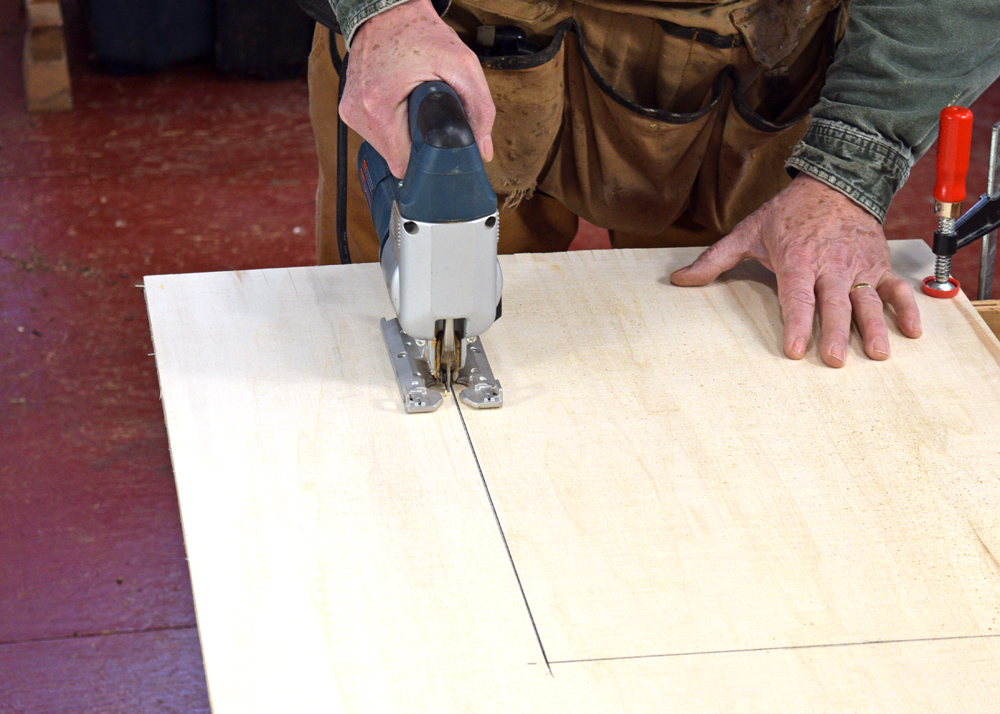
Use a jigsaw to rough cut the part, leaving about 1⁄8” outside the line.
Align the straight edge with your mark and clamp in place. Clamp the whole assembly to your bench or sawhorses to prevent shifting while you rout.
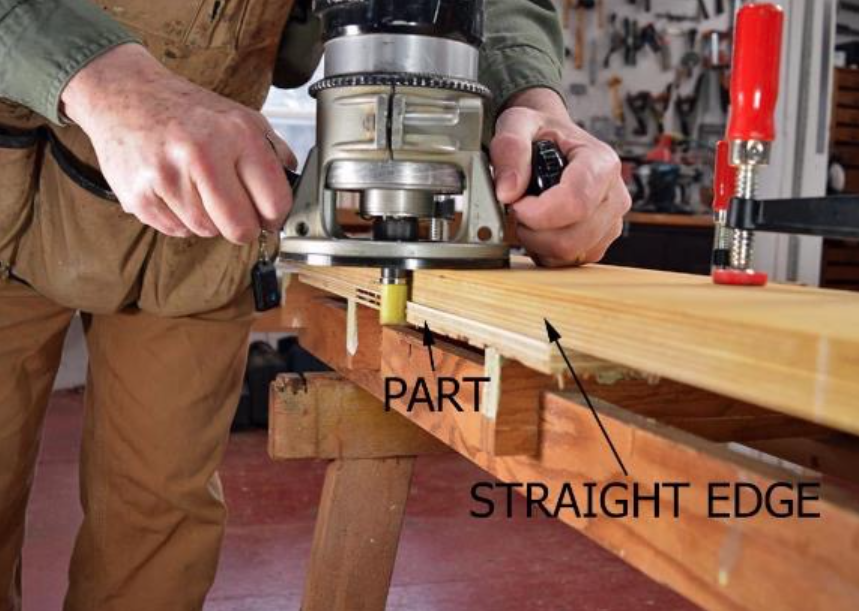
Chuck the pattern bit into your router and trim the edges flush to your straight edge.
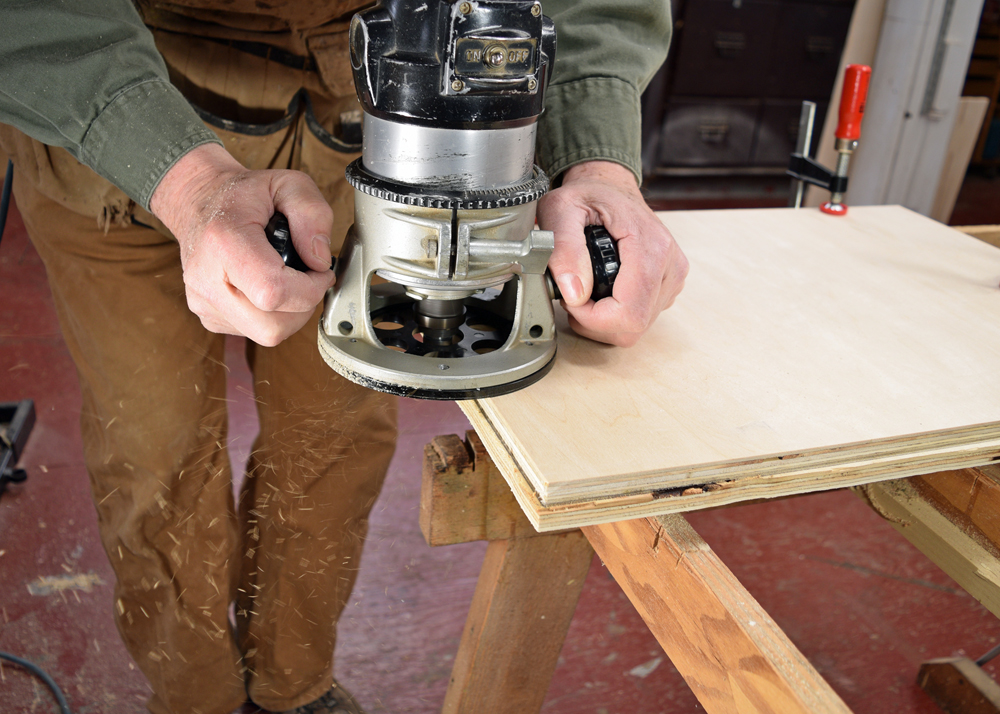
Use the completed partition as a pattern for the other partitions. This technique insures exact duplicate parts. Temporarily secure the partition template to the rough-cut partition with screws or brad nails. Hold the assembly onto your bench or horses with clamps so it won’t shift as you rout.
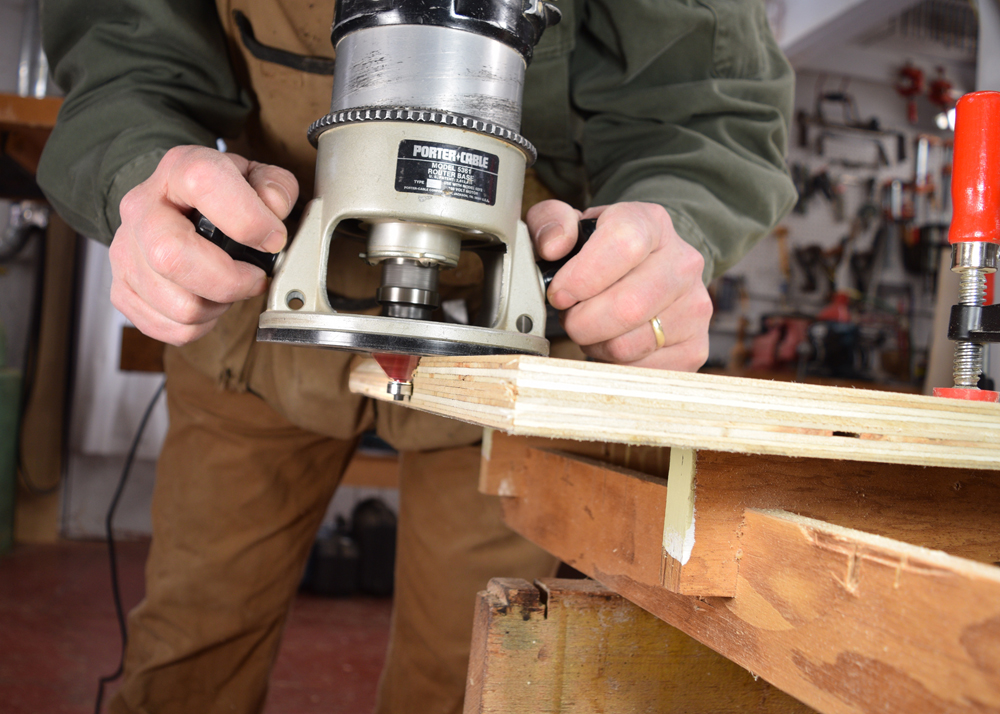
After all four edges are routed flush to the template, flip the assembly over and rout the bevel on the top edge of the partition (C) while the two partitions are still together, giving the bearing of the bit something to ride on. This creates an angled edge that matches the roof angle. Set the depth of cut so you’re leaving a sharp on the layer of plywood you’re cutting.
Use a straight edge clamped even with the edge of the plywood to rout the bevel on the first partition you created, the top edge of the back (A), the front (B) and the two roof supports (G) as well as the back edge of the roof (D). For the roof supports, I like to route the bevel on both long edges of a 1 x 4, then rip the 1 x 4 in two with the jigsaw. An uneven edge on the bottom of the roof supports won’t matter to the bats.
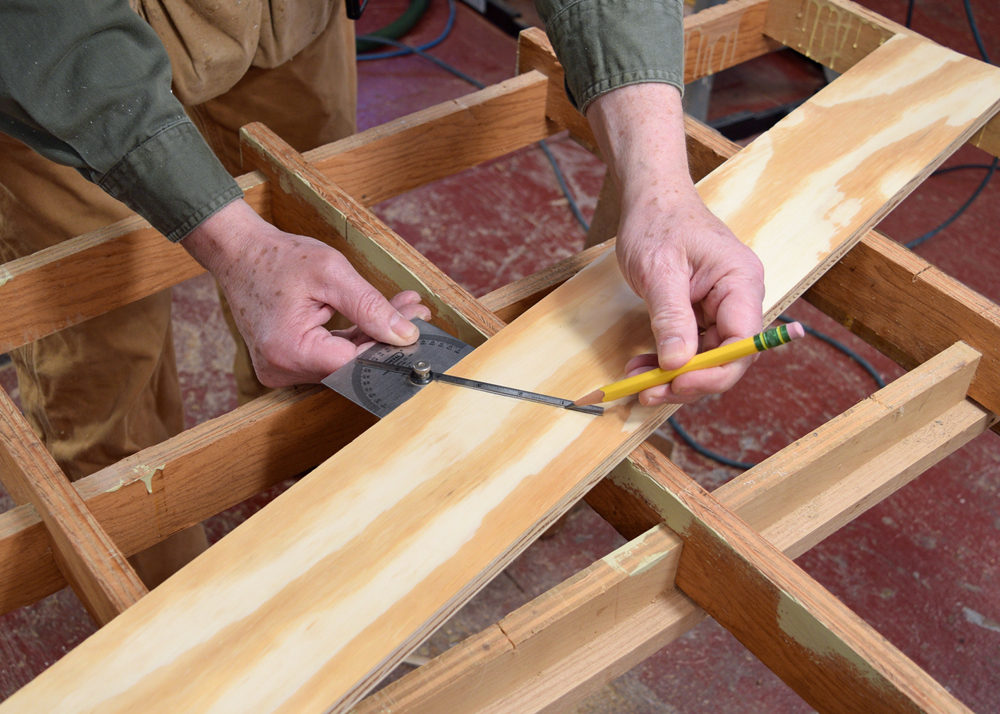
Lay out the two sides on a piece of exterior grade, 3⁄4” plywood. Use a protractor to mark the angles at the top of each side.
Rout the angled ends (E) using the same technique you used on the sides; rough cut, and then trim using the straight edge and router.
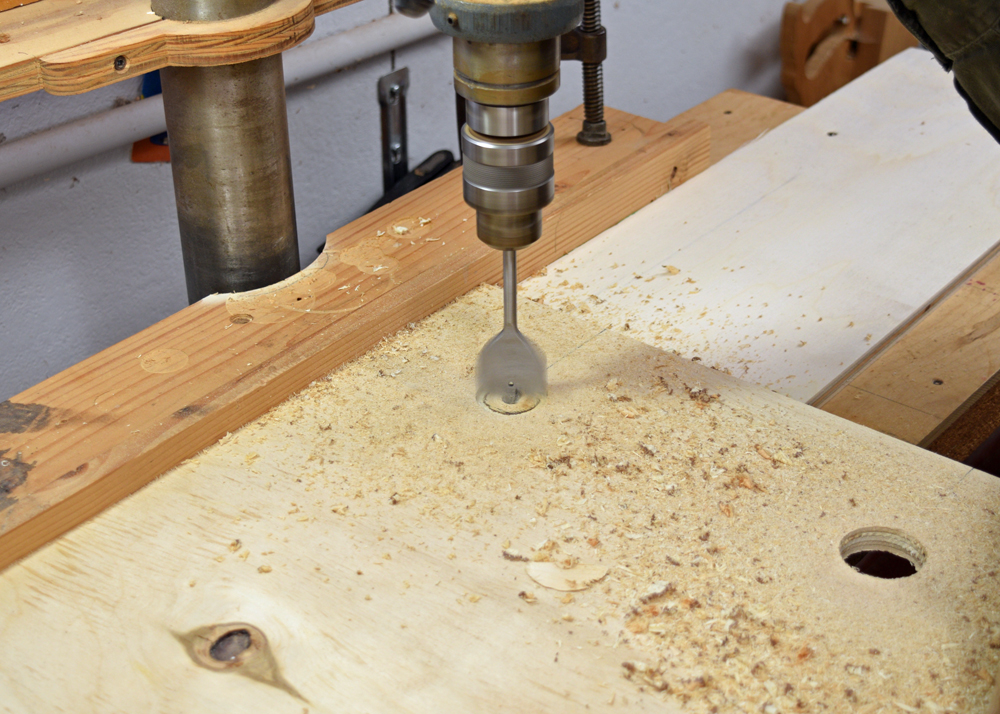
Drill the two access holes at the top of each partition. This can be done on a drill press or with a hand-held drill. Hole diameter is 1-1⁄2”. The holes are located 3-1⁄2” down from the top, and 3” in from the edge.
The access holes allow the bats to move from one chamber to another and regulate their temperature. During the day, the chamber closest to the outside where the sun is hitting will be the hottest. On a cloudy day, that might just be the perfect place for the bats. On a hot midsummer day with full sun, the bats will want to retreat to a deeper chamber where the temperature is a little lower.
Assemble the House
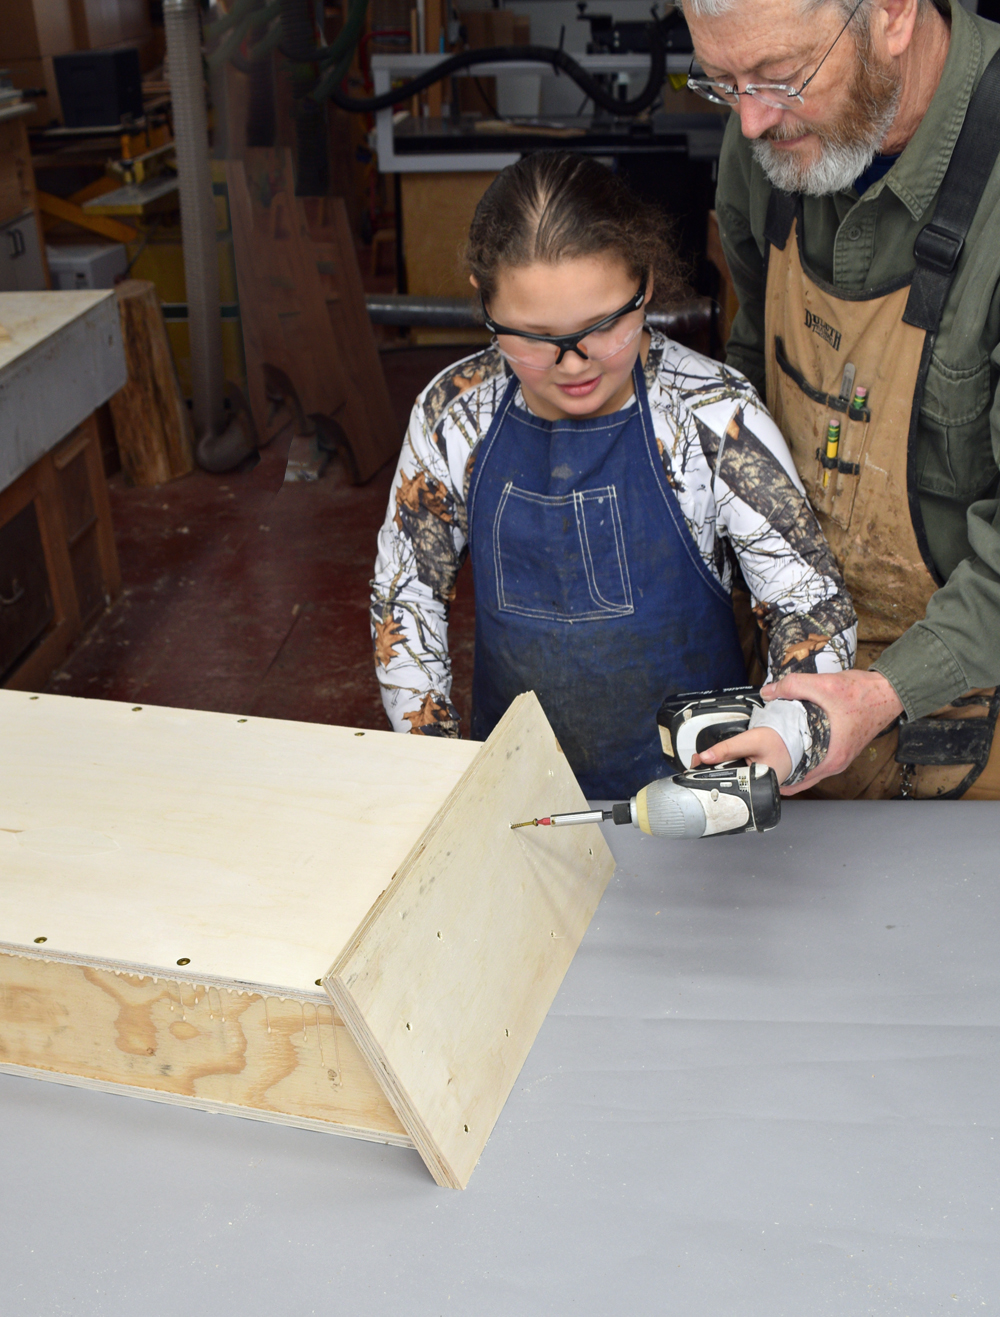
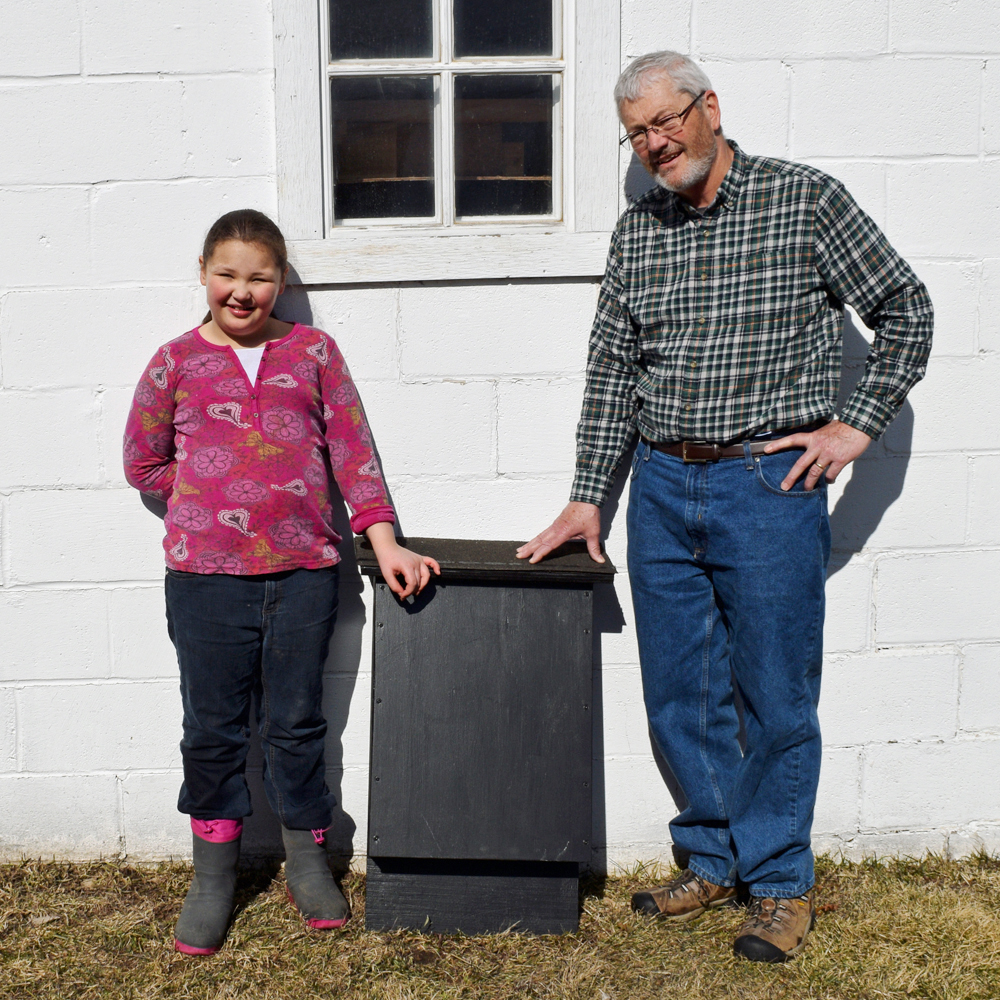
 Now your bat house kit is complete and almost ready for assembly. For this part of the job, I enlisted the help of my oldest granddaughter, Jadyn. She’s 10 years old and proved herself a very capable woodworker (with a little help from her grandpa).
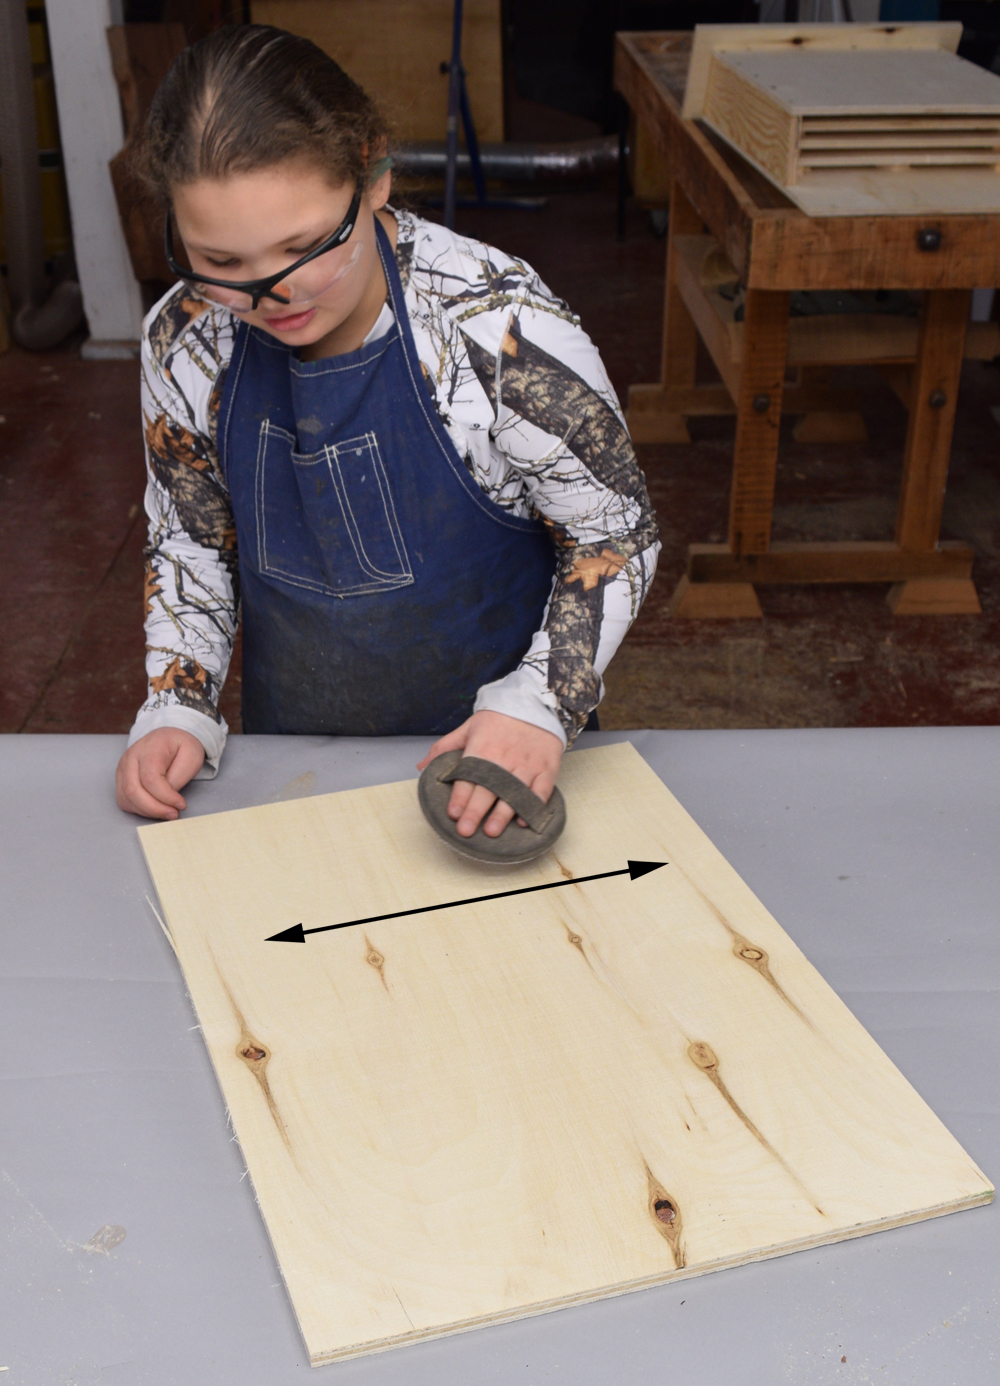
Rough up all the interior surfaces of the bat house with coarse sandpaper. Jadyn used a 24-grit disc on a hand pad. Make the cuts across the grain. The grooves make it easier for the bats to climb around the house.
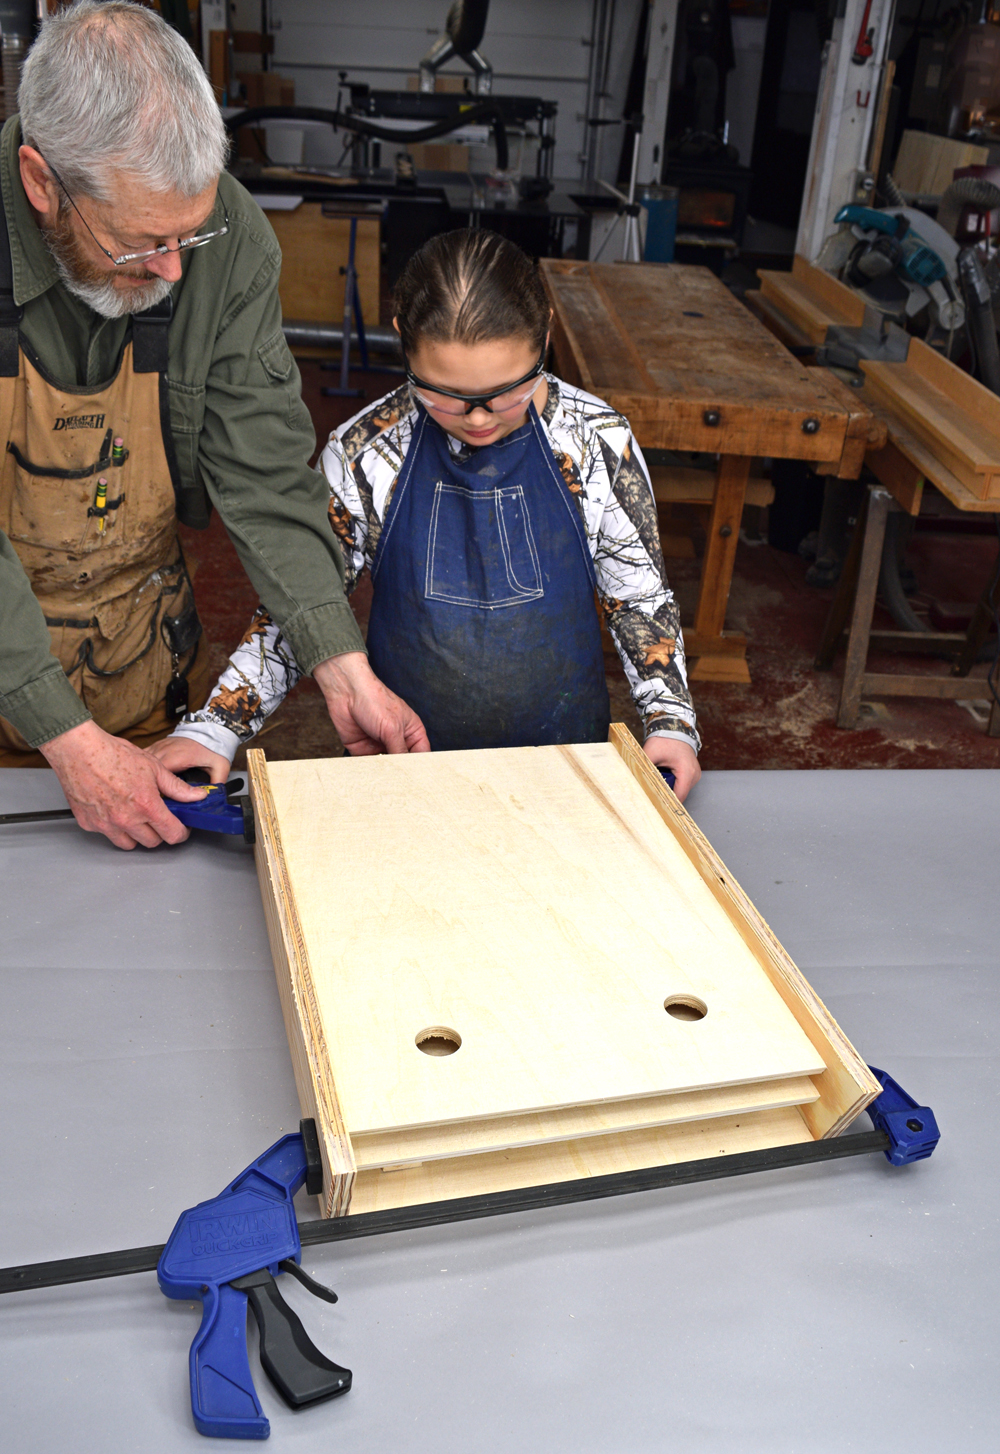
Next, stack the partitions and spacers (F) and dry clamp the two sides to the stack with their back edges up. This ensures the two sides are spaced perfectly before you attach them to the back.
Attach the back to the sides. Be sure the angled ends of the sides and the beveled edge of the partition line up perfectly. We used self-drilling deck screws, and they worked like a charm. No splitting, no pre-drilling.
Once the back is attached, flip the bat house over on its back. Remove the clamps, partitions, and spacers.
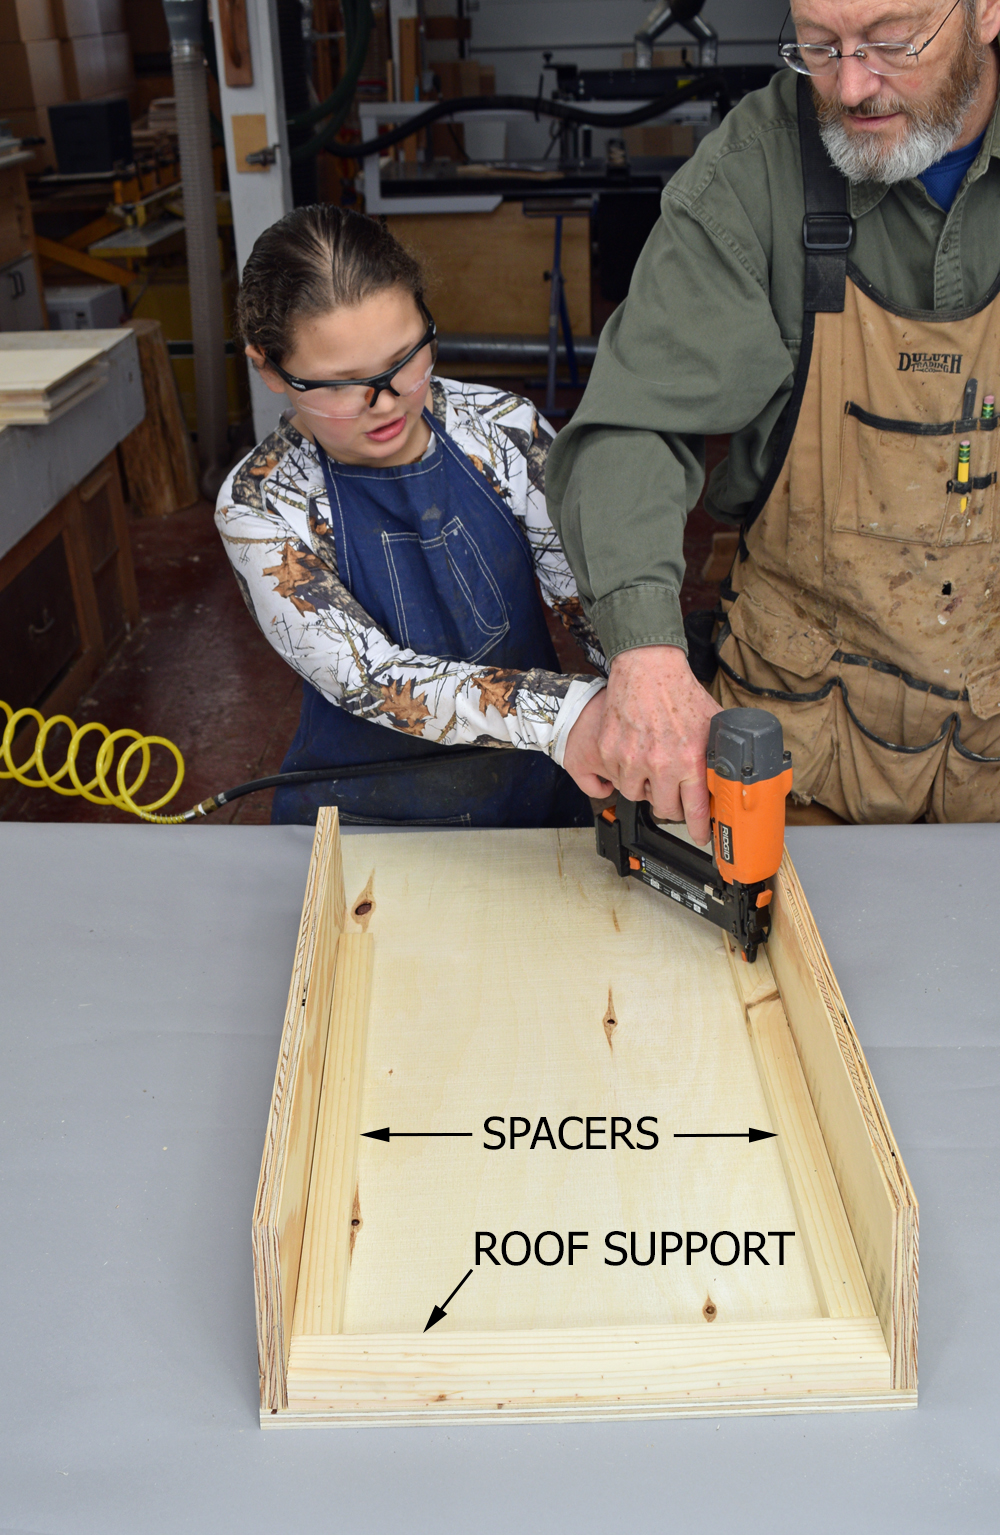
Attach the roof support and spacers with galvanized brad nails. Make sure the beveled edge of the roof supports line up perfectly with the angled tops of each side. You could use 1” screws if you don’t own a brad nailer.

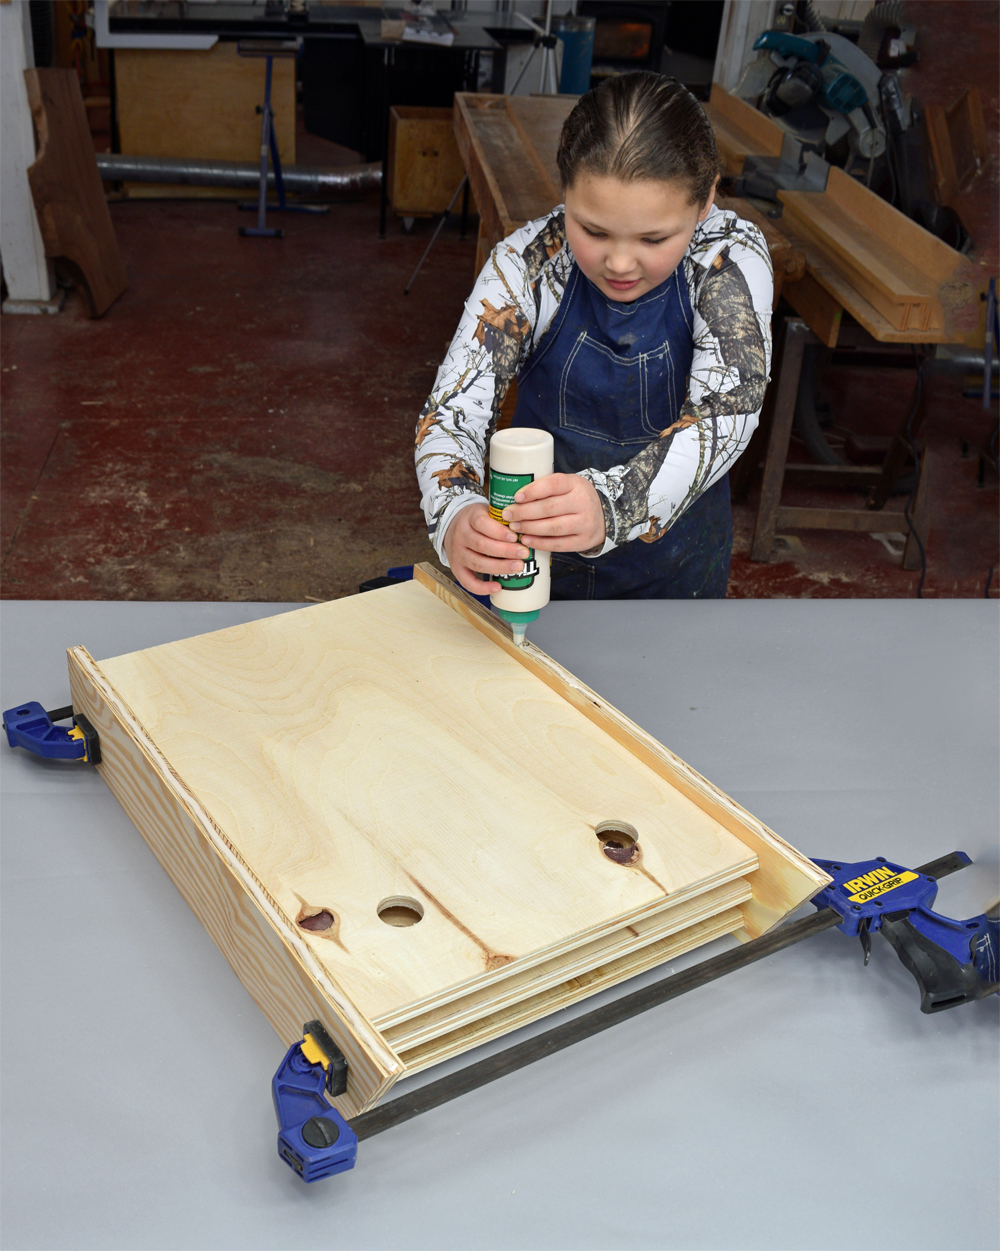
Apply a bead of glue on the face of the spacers and the roof support.
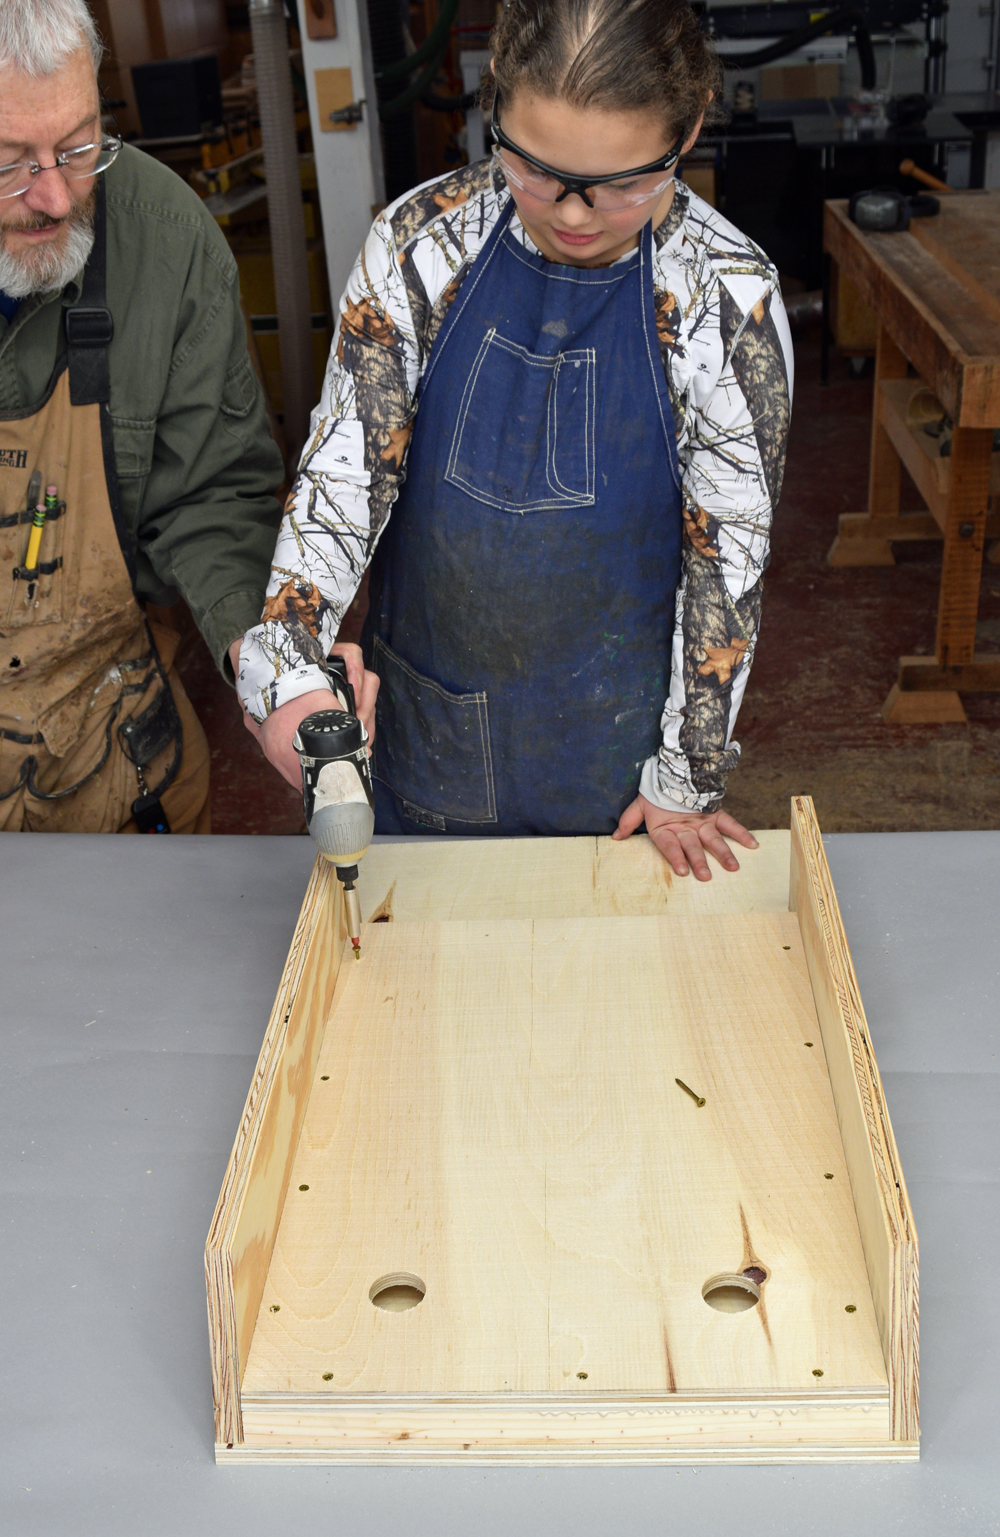
Screw the partition down onto the spacers and the roof support. Continue to build the interior of the house, alternating spacers and partitions. Be sure to keep the beveled top edge of each partition flush with the angled sides. The roof supports are only placed in the front and back chambers.

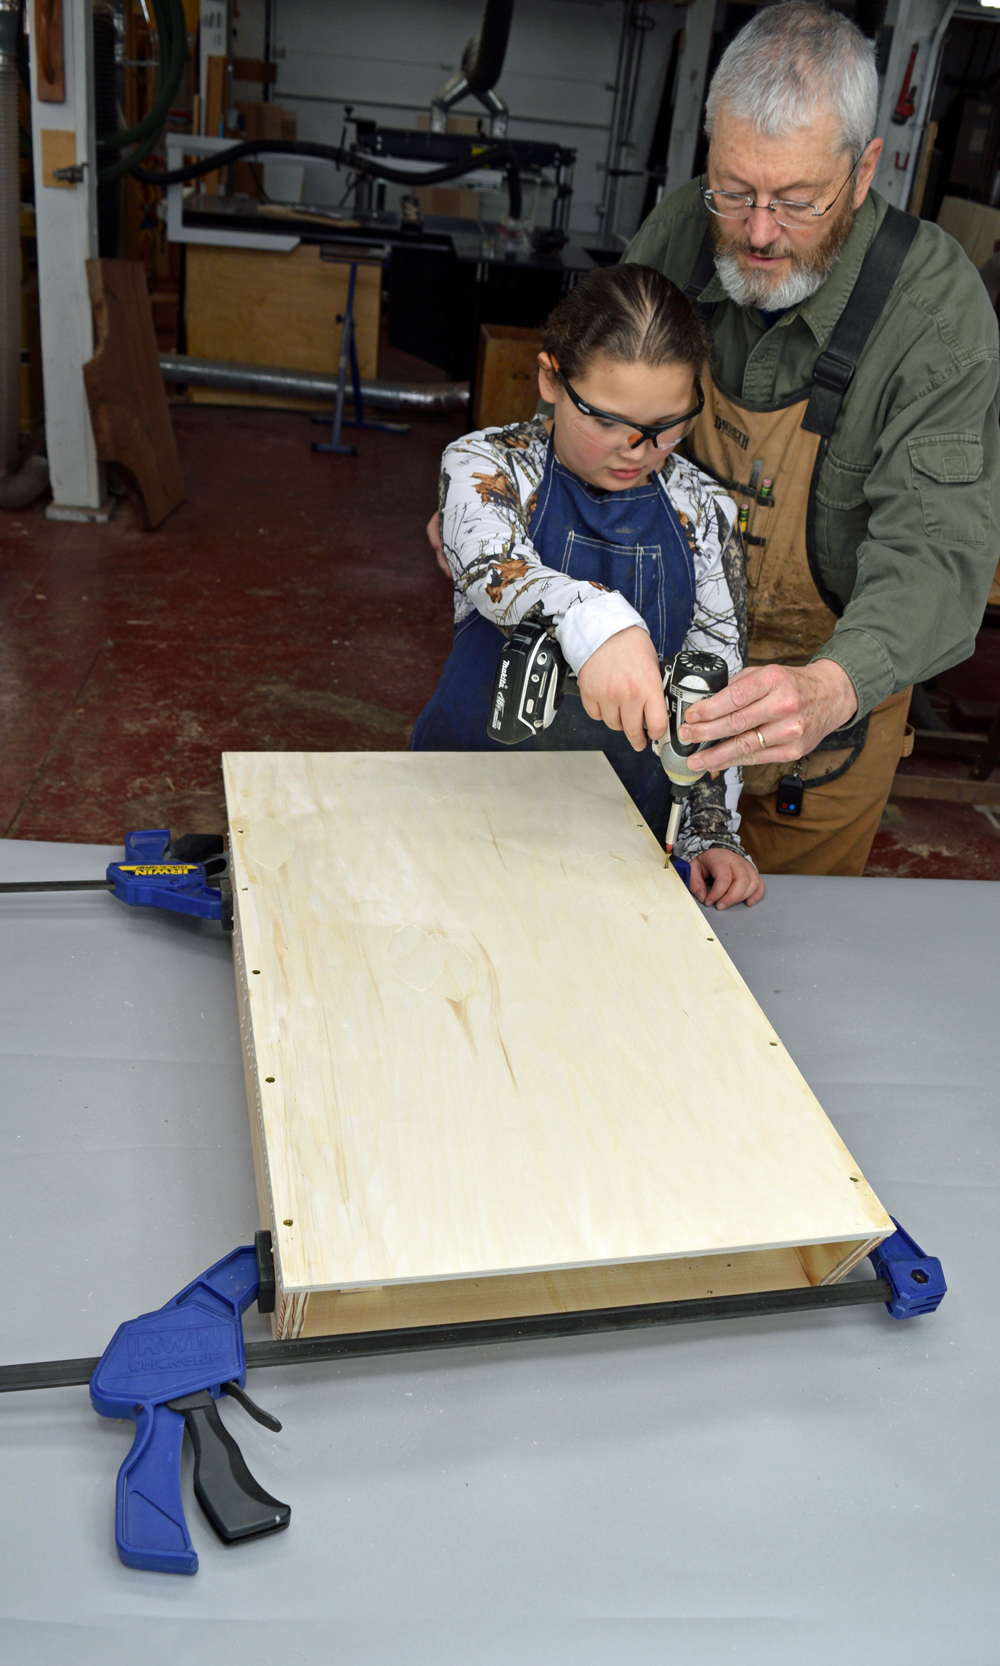
Attach the front to the sides with glue and screws to finish the box.
Finally, attach the roof to your house with glue and screws.
With the house assembled, all that’s left is a bit of touch-up sanding to relieve the sharp edges before painting.
Finish the House
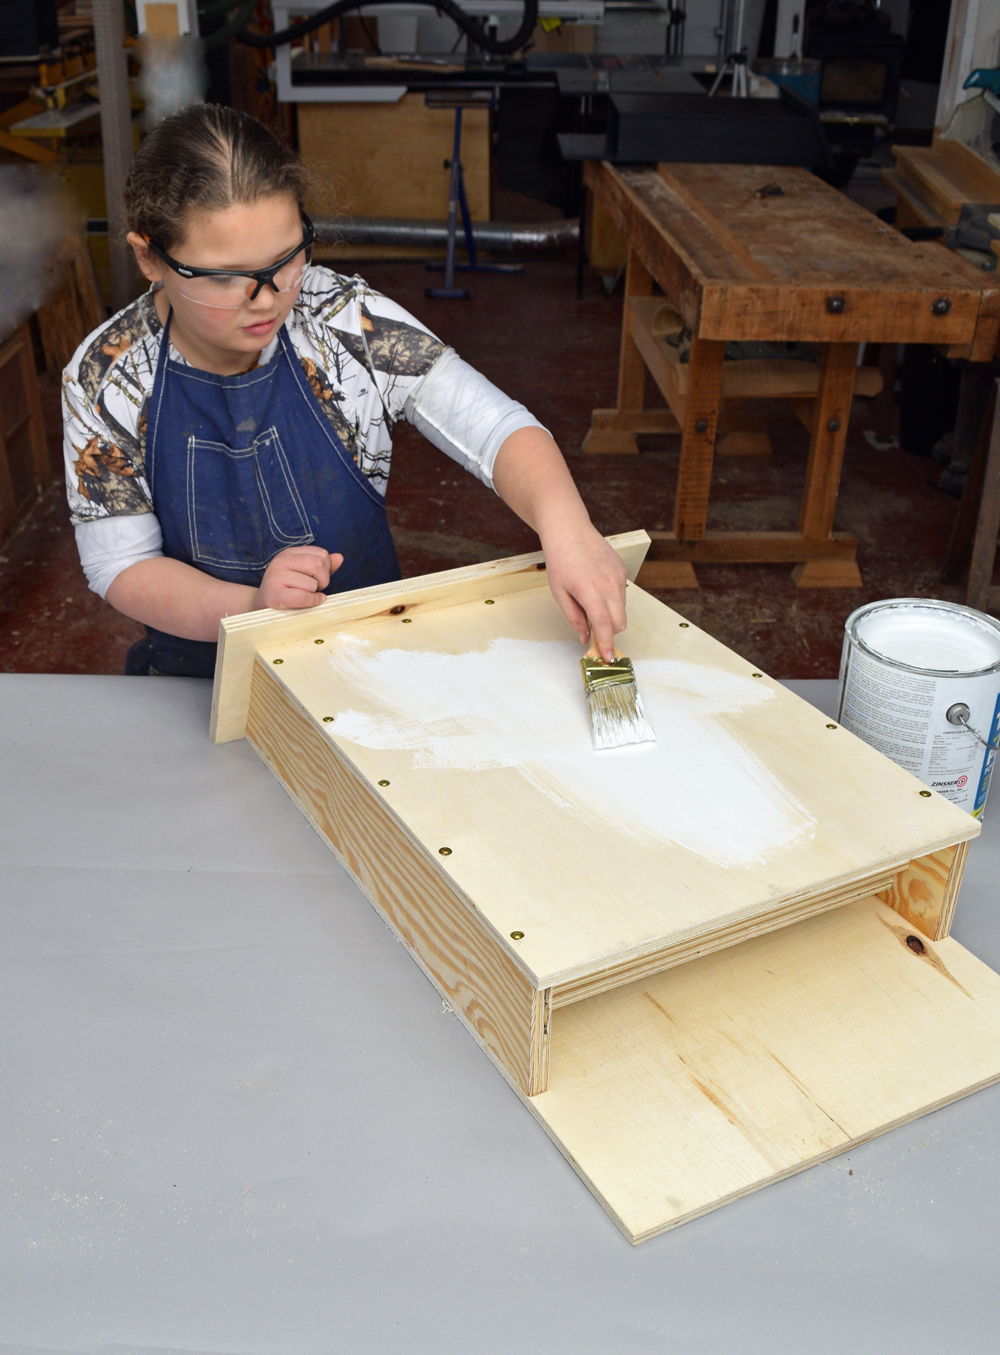
Apply a high-quality outdoor primer to the house. Be sure to seal all the plywood edges, as they are vulnerable to delaminating despite their exterior grade. I also sealed the bottom edges of the partitions inside the house.
Follow up the prime coat with a dark color. For use in the north where I live, a black or very dark brown are required for maximum heat gain during the day. I always thought bats liked it cool, you know, like in a cave, but apparently just the opposite is true. Bats like it hot! Especially when they have little ones in the nursery.
Check the charts on the Bat Conservancy International website for the best color to use in your area.
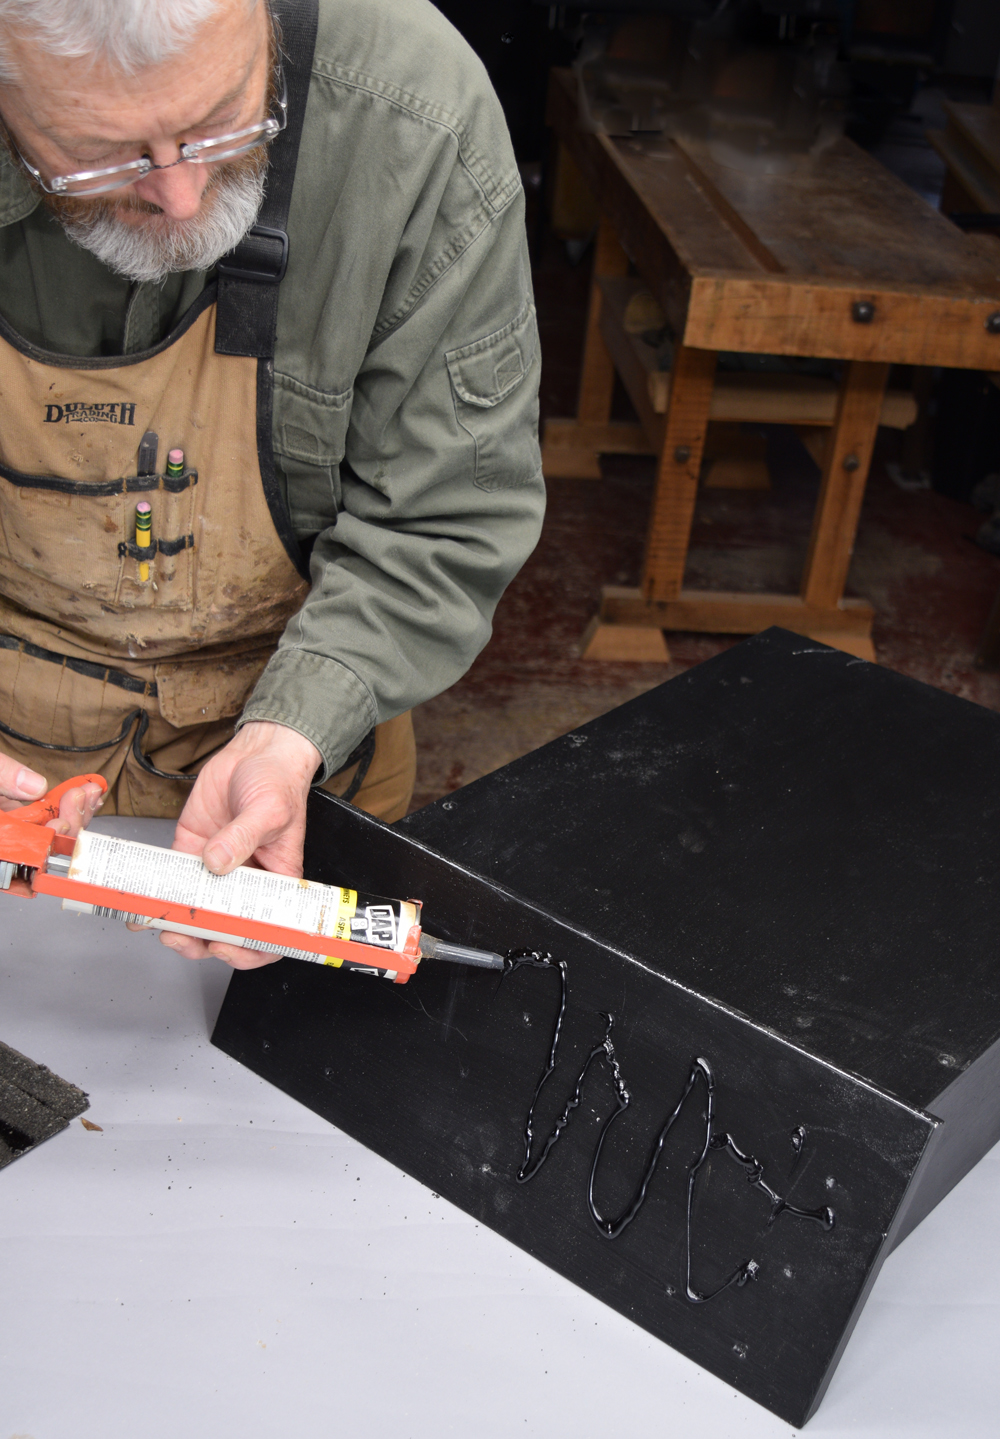
Use roofing cement as an adhesive to hold shingles on the roof. You could install the bat house with nothing but paint on the roof, but it will last longer with shingles.
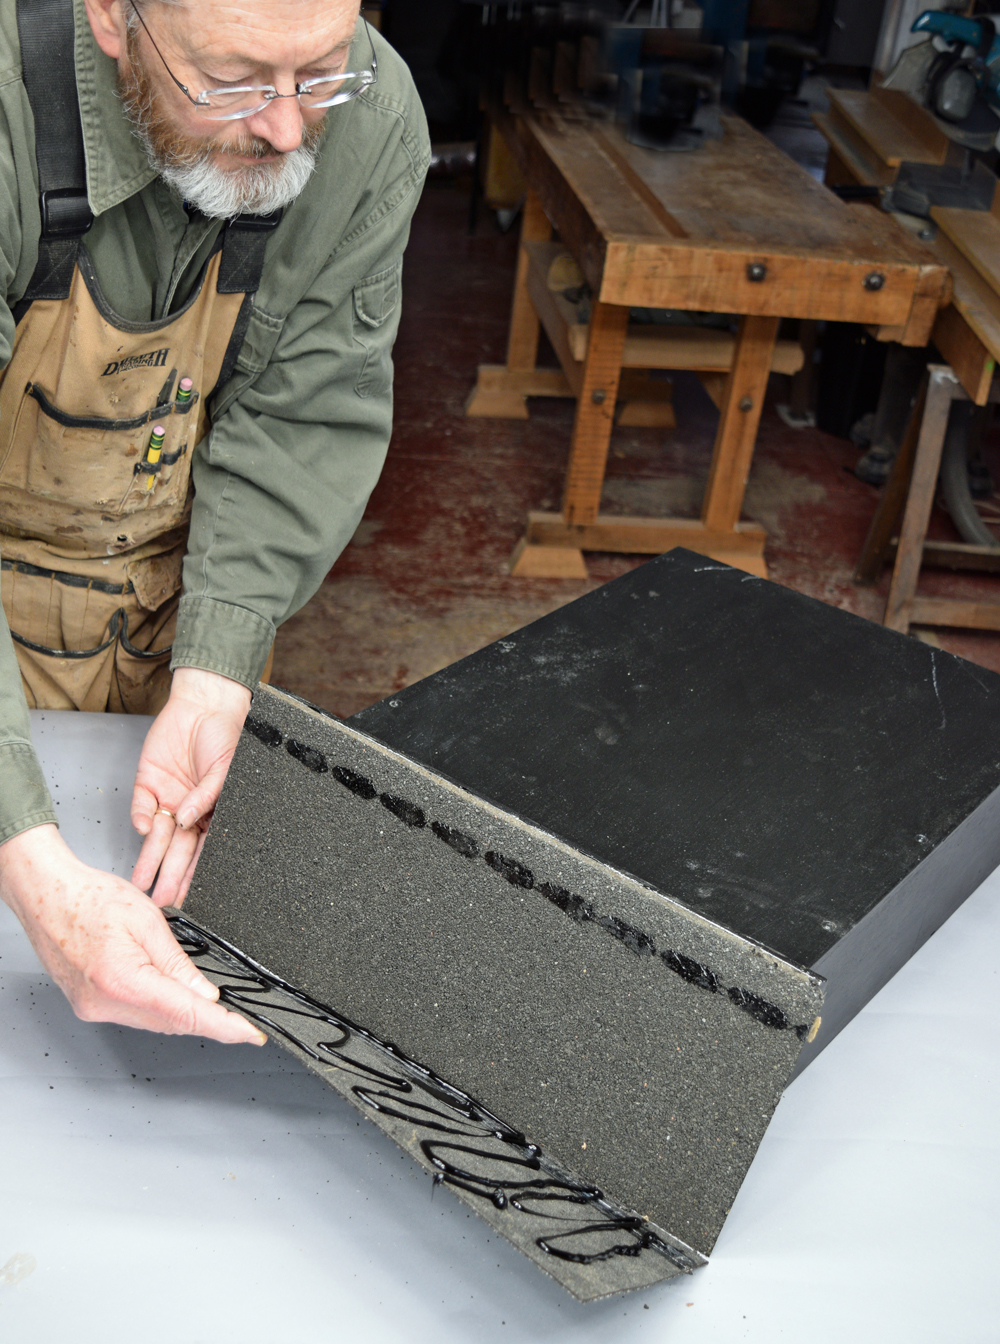
Add the shingles to the roof. I used two layers of starter strip I had left over from roofing our house. Now we’re ready to hang the bat house on the barn.

I thought it best to have Jadyn’s uncle Ben do the ladder work.
It’s important to choose a good site for your bat house. It should be 15 feet off the ground and away from any trees to avoid predators. A southern exposure for heat is also very important. BCI has lots of great information on properly installing bat houses.
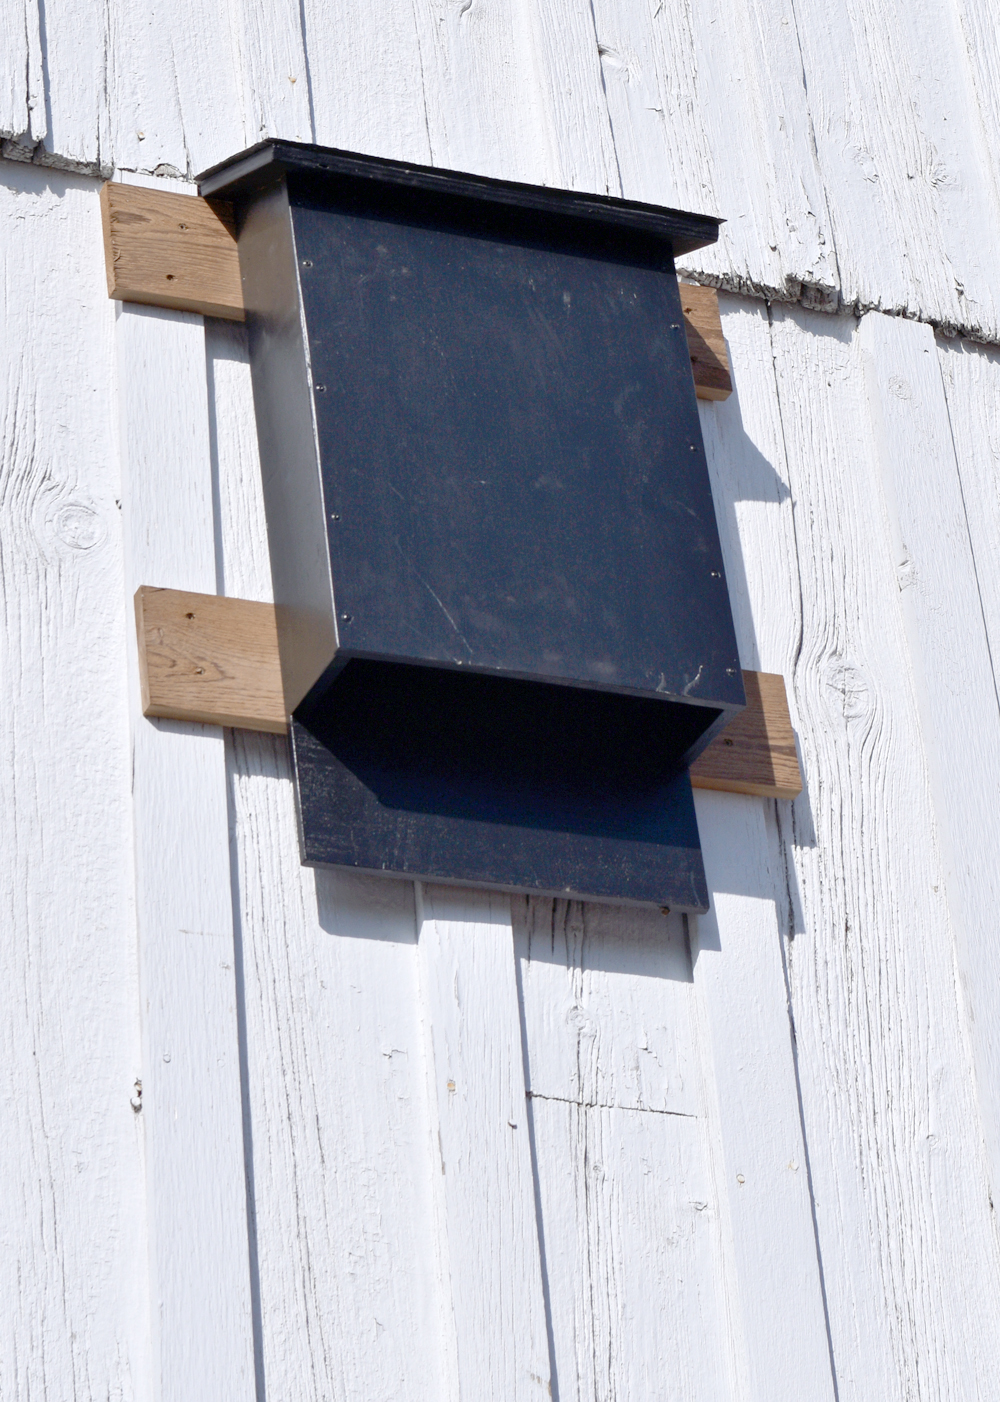
The bat house is all set and waiting for its new tenants.
I hope you have as much fun building your bat house as Jadyn and I did building ours!
Sources
Bat Conservation International: www.batcon.orgRouter bits
3⁄4" Pattern bit #817-393
30-degree chamfer bit #115-574
Woodworkers Supply: www.woodworker.com
(800) 645-9292

I love that your getting kids interested in bats but you have one flaw with your build the inside of the bat house shouldn't be smooth. The bats need something to grip and please do not use mesh or screen( the bats can get stuck to it) The best way to do it is use a router with 1\8 bit and put some grooves in it.
Ty for your help.I’m going to set the bat house up in south Texas on a larger ranch by a large fishing pond.
I had bats in a louver on the gable of my house and while they were not in my house they were a problem there. So, I screened the louver where they could not get back in the louver and I put my bat house over the louver for a couple of years and then during a winter hibernation period I moved them to a tree nearby. I started with eighteen bats now I have nearly one hundred. Mosquitoes become less and less of a problem. I am going to add another bat barn this summer and I will use your plan.
Great project and directions. It may be my computer, but the images of shingles being installed aren't there; it's just the glue application image repeated. I like the details in this project that a lot of other plans leave out.
Can you post one just using hand tools? allI have is a handsaw and sandpaper
Sounds like an interesting project I’d love to try.
The link for downloading the plan doesn't work. Where can I get it? Thanks!
[…] more enjoyable (think seriously diminished mosquito populations). As it turns out, they also make a fun building project to practice your woodworking skills – which to be clear, mine were minimal when I started. As […]
Love the bat house my son built one in school. Bet it works great. He sold it but no body has ever put it up so I have bats in my house maybe i should go live in the bat house since nobody else is using it. :)
Hello all, over the years I've come across several friends and family who've built nat houses, and I've done a bit of research on them just out of general interest. A couple of things I've found are ... Bats tend to not like man made/processed materials such as metal/wire, plywood, paints and glues. They are however attracted to cedar, hence the reasoning behind using cedar boards rather than plywood. If you've ever gone into a very old barn in an area that has bats, you're likely to find them hanging from the roof inside, that is because many old barns had cedar roofs and some were even entirely built using cedar beams and boards. Those old barns were never stained and bats love to hide out in them. If you are worried about the bats not having anything easy to grasp onto, you would be doing them a favor first of all to NOT sand the inside, rather leave it rough cut. If you still feel the need to add something for them to grasp, you could incorporate some small diameter ROUGH cedar dowels on the inside in various places. Not knocking anyone or their plans, I think this is all a very good thing, just tossing out a bit of what I've learned over the years. Thanks for your time and by all means have fun with your projects and awesome to share this with the young ones, it is great education about a creature that's so often misunderstood!