This is the first in a three-part story, each showing a different way of applying veneer to a substrate. When veneering wood, it is important to remember a couple of things. First, and foremost, veneer always needs to be counterbalanced, meaning, ALWAYS apply veneer to both sides of the substrate. When glue is applied between two surfaces, it shrinks, or contracts when it dries. This contraction pulls the surface in tension and cups it. To balance this out, the exact procedure should be done to both sides, balancing out the tension created by the glue drying. Taken from experience, I cannot emphasize this enough!
Second, it is important to get an even bond between the veneer and substrate. Take your time applying adhesive, making sure each surface is evenly covered. While each coat doesn't need to be thick, it should be nice and even. Lastly, while we all have busy shops, it is a good idea to control dust when veneering. Wayward dust has a way of finding its way into the glue. Not only does this affect the quality of the bond, but if the dust is large enough a bump can telegraph through to the surface, making sanding and finishing a nightmare. This is particularly true with table-tops, when viewed under raking light. Again, trust me on this one!

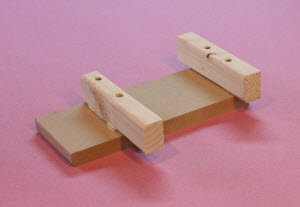 The quickest way to veneer a surface with wood, plastic laminate or phenolic or paper backed veneer is to use contact cement. This is a great solution if you rarely intend to veneer, as it requires little set-up, few tools and is relatively low-tech. It doesn't require clamping, but rather, pressure in the form of a J-Roller or shop-made burnishing tool. It is also ideal for large, full-sheet sized veneering jobs, where even clamping pressure across a large surface is difficult to achieve. The downsides are it is expensive, is a bit messy if you aren't careful, and requires learning the nuances of a new adhesive. It is also rather unforgiving if you misplace the veneer, as the contact cement bonds the two surfaces immediately and can rip the veneer if you try to adjust it once the surfaces come in contact with each other. Oh, and one last thing: it has a strong odor. You need to work in a well-ventilated area and away from any ignition sources.Make a burnishing tool out of waste plywood or MDF. You will use this to apply pressure to the surface of the veneer to work out air bubbles and force the bond of the veneer. It is simple a 10" board about 4" wide, with two "handles" glued and screwed. Round over the bottom leading edge so it doesn't tear the veneer.
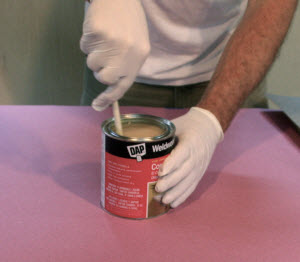 Stir the contact cement. Put on latex gloves to protect your hands. Cover your bench with cardboard or rosin paper to protect it from contact cement residue, which is sticky and difficult to remove.
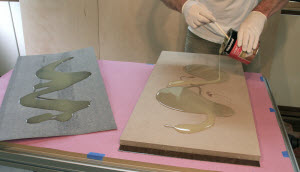
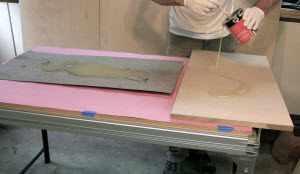 Lay the two surfaces to be bonded on a table next to each other. Pour the contact cement onto the two surfaces, taking care to not drip on the table. Set the contact cement somewhere safe so you don't knock it over, (again, from experience!).
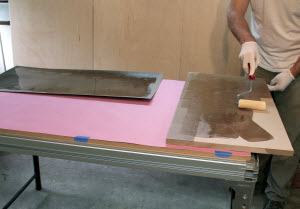 Roll a layer of contact cement onto each surface using a small trim roller. Wait for it to become tacky, about 20 minutes. The goal is to have each surface tacky and glossy but not wet. Each substrate and veneer differs in porosity, so every material needs to be treated differently. For this project, I am bonding phenolic-backed maple to MDF. The phenolic is not very porous, but the MDF can be very porous. I anticipate applying one more coat to the MDF than the phenolic veneer.
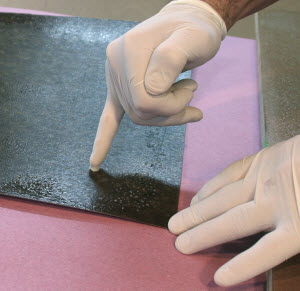 Check for glossy and tacky. I tap the glossy surface after 20 minutes and see if it grabs my finger just a little bit. If it does, I am ready to bond the surfaces.
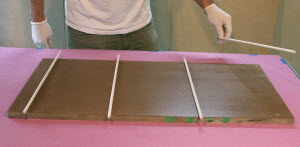 Set 3 or 4 clean dowels down on the MDF. These dowels suspend the veneer above the MDF so you can position it perfectly.
 Place the veneer on the dowels and orient it so it sits directly over the substrate. As I mentioned before, the initial grab of contact cement is REALLY strong. You want to get this right.
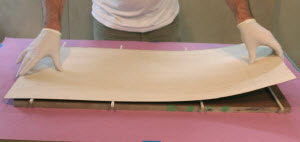
 Once the veneer is in place, gently pull or roll the dowels out one at a time, taking care to not leave any air bubbles.
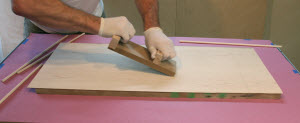 As you pull out the dowels, rub the veneer with your custom burnisher. The instructions on the can may recommend a J-Roller, however I find this tool to be an expensive and less effective for the job. If you see a bubble, use the burnisher to force the bubble out the side or end. I vigorously burnish the surface in every direction to ensure a good bond.
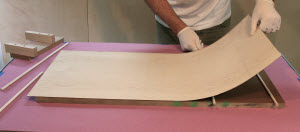
 Remember, you are only halfway done! Flip the piece over onto a clean piece of cardboard or rosin paper, and repeat. The second piece of veneer counterbalances the adhesive on the other side and helps keep the panel flat.
In the end, using contact cement is only one option for veneering. It is a quick method requiring little or no preparation, and minimum investment in tools. It is ideal for infrequent and larger projects. In the next weeks, look for part two of this story, where I use cauls, clamps and woodworking glue to apply veneer to a substrate.
Photos By Author
View Additional Parts in this Series:
A Guide to Veneering Wood: Part 1
A Guide to Veneering Wood: Part 2
A Guide to Veneering Wood: Part 3

All good info. Tons of info on technique, but very little about counter-acting wood movement. The mantra is everywhere: veneer both sides. Does this apply to all situations? What if epoxy+bag used for bonding? What if I make MDF sandwich, PF ply 1 side, MDF middle, veneer show face all bonded with epoxy (so MDF is epoxied on 2 sides and semi saturated)? What makes stable is enough substrate to counter movement of veneer. Where can I find more info on THAT, as this is the needed knowledge. TIA
You demonstration shows one piece of veneer being used. I can only find veneer in 4-7 inches wide planks. How would you use those types of pieces on the size of board in your demonstration? Do you have a video or documentation on that situation?
Good information Thank You
Thanks for this informative article. I have always feared the mis - alignment OR have been veneering cabinet carcasses still hung on the wall and for sure knew alignment would be a challenge. Do you cut the veneer slightly bigger than the substrate piece so you have some wiggle room when pulling out the dowels? Do you have any suggestions for vertical surfaces?
My name is Rana Attiq. I am made different types of furniture cabinet doors office furniture etc. I needed job urgently plzz
A very educative and professional article
Good tips
Does the counter-balancing principle apply to natural wood veneers only? I'm about to apply a Formica- type surface to a 2' x 6' X11" mdf counter top. I hadn't considered laminating both sides.
OK, understand the logic of veneering both sides, but what if one side is not easily accessible such as a 42" round antique table with lions head feet? It has expansion arms underneath when collapsed plus other encumbrances.
You should mention that the veneer should be larger than the substrate and then trimmed with a router and flush trim bit. Also, do you expect that the MDF will cup like a solid lumber substrate?