This is the second part of a three-part story, each showing a different way of applying veneer to a substrate (Click here to read part one). This story focuses on using clamps, cauls and wood glue to do the work. The same essentials are true using this technique for veneering. Veneer always needs to be counterbalanced, meaning, ALWAYS apply veneer to both sides of the substrate. Second, it is important to get even glue application between the veneer and substrate. Lastly, keep dust down when veneering wood, as the dust particles have a sneaky way of getting into the large wet glue surfaces and causing havoc later while finishing.
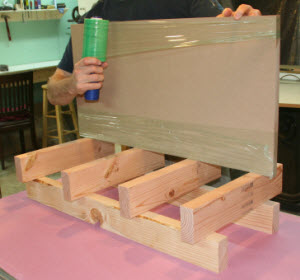
This is probably the most common way of adhering veneer in a non-production workshop. Glue, unlike contact cement, needs sustained and even clamp pressure to be most effective. It can be challenging to distribute the pressure of clamps to the center of a board and substrate, but definitely not impossible. Here, I am veneering a 24" x 48" substrate of MDF with a sheet of laminate backed maple. I use a combination of cauls and a sandwich of MDF (called a platen) to evenly distribute the pressure of the clamps. I edge jointed and squared risers and cauls from framing stock (2 x 4s) into 24" cauls and 48" risers; risers suspend the cauls off the workbench to simplify clamping. As always, it is a good idea to do a dry run before any complex glue-up, especially if one is using rare or expensive veneers.

 Stack a clamping structure, first placing risers the length of your piece down on the workbench. Then, place cauls on top, perpendicular to the risers. I try to have a caul every 8-12 inches. While I'm sure there is a scientific way to figure out exactly how many cauls one needs, I just go from experience. When in doubt, add a caul. I also use an equal number of cauls on the top and bottom so the clamping pressure is balanced.
If you clamp a bow into your glue-up, it will come out bowed! You will adjust these during your dry run, so placement isn't critical.
 Next, I apply plastic wrap to a platen that is the same size as the substrate. This MDF acts as a flat surface on which to press the veneer, and the plastic prevents glue squeeze-out from adhering the veneer to it. I wish I could tell you this step isn't important, but -- let's just say "don't skip this step!" If you plan to do many panels the same size, this sheet (which can be used multiple times) can be finished with polyurethane or some other finish that glue doesn't stick to very well. Don't roll too thick of a layer of plastic, as the texture could telegraph through if ridges of plastic wrap are built up.
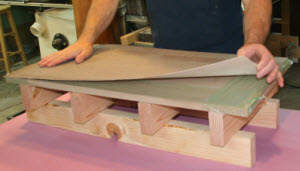 I lay the veneer face down on top of the platen, cauls and risers. Because I don't have a huge shop, I just apply glue while the veneer is in place.
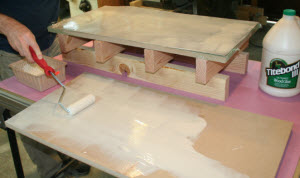 Next, I roll a layer of glue onto the MDF substrate as well as the veneer. I use a trim roller with a firm foam pad, which seems to hold onto just the right amount of glue as I apply it. The perfect thickness is wet and even, and almost translucent. I prefer Titebond III glue as it has a longer open time than traditional wood glue; around 15-20 minutes.
Because I work by myself, I like the extra time to adjust the veneer if I need to. In the past, I have used full-sized rollers for big glue-ups, but a trim roller is fine for this size project.
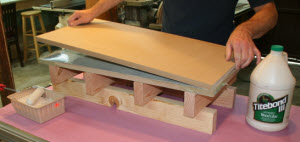 Now I flip the glued substrate over onto the veneer and carefully align the edges. I adjust the cauls parallel to the ends and evenly spaced along the length of the platen. As soon as I finish this, I wrap the roller and pan in a plastic bag to preserve the glue between glue-ups, but always clean out the glue at the end of a day.
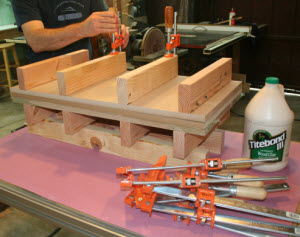 I add a second platen on top of the substrate to further distribute the clamping pressure. Then, I lay the top cauls directly on top of the bottom cauls, and gently attach a clamp onto each set of cauls, but don't tighten the clamps just yet. It is important to have the clamps distributing pressure evenly. I always begin on the inside and work outwards, or work from one end to the other. By working this way, no air can get trapped in between areas that have already been tightened.
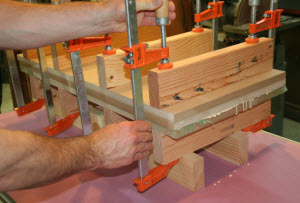 Finally I tighten all of the clamps hand tight. I like to see mild glue squeeze out off the ends and along the sides to guarantee I am getting a good bond. If the boards slide a bit, lightly loosen the clamps and adjust the platen, veneer and substrate. I leave this clamped for about an hour. Then, I loosen the clamps and open the glue-up. Next, I scrape the glue and re-wrap the platen and follow the same steps to veneer the second side.
I have applied countless sheets of veneer using this method. It requires a fair amount more time to shop for and prepare risers and cauls than contact cement, but I save the cauls and use them multiple times. Of course, it also requires a lot of clamps, which are also expensive, but you can never have too many clamps (but I'd be happy to talk about that later!) Like any type of veneering, these projects take up a lot of real estate in the shop while drying. By taking the time to keep the pieces flat and prevent unwanted glue adhesion this is a great, low-tech way to apply veneer.
Photos By Author
View Additional Parts in this Series:
A Guide to Veneering Wood: Part 1
A Guide to Veneering Wood: Part 2
A Guide to Veneering Wood: Part 3

With 3/4" plywood would you need to veneer both sides? Also other size plywood?
I think that you spent too much time discussing the use of contact cement in veneering. Contact cement should only be used with paper backed veneer. Several years ago I used it to quickly band a table top that I was making. The sides remained on it for a year and then started to come off and couldn’t be repaired. Now I am remaking the entire table top. Veneer offers such beautiful woods and grain pattern that the novice should be encouraged to use contact cement with laminates
Great work. Thanks
I also use MDF as platen but I also use 1/2" thick sheets polypropylene and I have various sizes that I use the advantage is that glue does not adhere to the polypropylene, polyethylene sheets can also be used. I have also used white laminate shelving from box stores like Lowes and Home Depot with equal success.
Are the cauls actually cauls with an arc, or they just square surfaced? Thank you.
Thank you