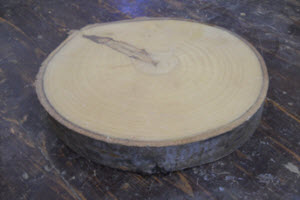
 I recently received a request from a co-worker to supply 30 log slices - about 8" in diameter and 1-1/2" thick. Her plan was to use them as a base for candles on the dining tables at her wedding reception. I have to say, the concept went past me until we attended her wedding. The room was dimly lit, but the candle light on the bark edge had a wonderful effect. I've also known people to make stool seats and small tables from discs like these.
So, I tried a couple different techniques to cut these disks - a chain saw worked quickly, but keeping the two sides parallel as well as smoothing the top surface eliminated that method. George and I considered cutting the disks on George's saw mill, but the set-up time and material waste seemed excessive.
Off to the band saw. We quickly discovered holding the end of a log and feeding it into the blade just wouldn't work. The log wanted to roll, twist and bind. I left George's shop a little concerned. Before I left, however, George suggested we'd need a jig of some kind.
I sat in the shop with a pad and pencil for an hour or so before it hit me. My shop has more sleds than the winter Olympics. I made a sled for tapering delicate table legs on a drum sander, a sled for cutting segments for bowl rings, one for inserting contrasting splines in miter joints and I built a sled for cutting finger joints when building bee hives, to name a few.
Why not a sled for cutting disks from a log? How would it look? I remembered another shop jig I use for drilling centered holes in round stock - it's simply a V-cut down the length of a short 2 X 4. It holds a round piece of stock firmly on the drill press - no twisting or rolling, and a perfectly centered hole every time.
My final sled was the 4th - iteration though the first 3 were very similar to the final project. The final material choice was 3/4" thick Baltic birch plywood and a piece of miter slot material purchased from Rockler.
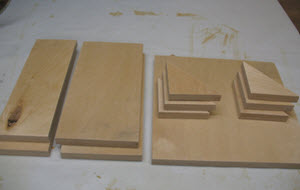 Here's the cut list:
A. 1 - 12 x 12 for the base
B. 2 - 4 x 12 for the vertical end slats
C. 2 - 4 x 6 for the log cradle slats
D. 6 - right triangle pieces with 4" legs
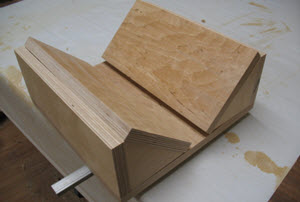
You'll also need a length of miter slot bar about 16" long - just for the stability. Adjust the miter slot bar to the width of your band saw's miter slot before you start assembly.
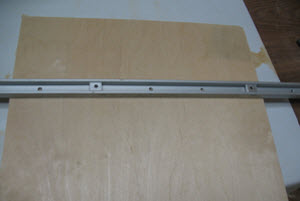 Measure the distance from the blade to the near edge of the miter slot on your band saw table. The bar location on the sled base should allow about 1/4" clearance between the edge of the base and the blade. Attach the bar to the base as shown.
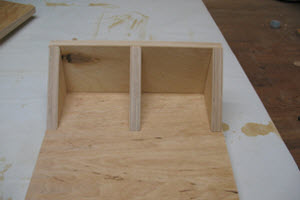 Now, assemble the sled parts. Attach the vertical end and triangle braces as shown. I used wood glue and attached the parts with 1-1/2" wood screws - countersink all holes to eliminate drag as the sled glides along the miter slot.
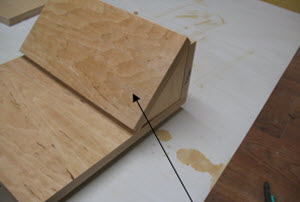 Next, attach the log cradle slat.
 Repeat these steps for the other end of the sled.
 Your project is now ready for a test run. Position the sled on your band saw and place a log into the sled cradle. Adjust the blade guide height and you're ready for the first cut.
To ensure your cookies don't split and shed the bark layer, treat with Pentacryl brand wood preservative. I simply brushed the liquid on the cookies - both sides - and for good measure I brushed it on the bark edge as well. You can opt to finish the cookie faces with polyurethane, shellac or other product of your choice.
A couple of notes -
Choose a straight section of log if you can. If not, to keep the faces parallel, simply nest the log between 2 slats that run at about 90 degrees and screwed to one end of your log. That way, as you push the log through the sled it doesn't twist and tilt, keeping the cookie faces parallel. (See illustration.) Note - you'll be cutting away at the slats as the log feeds into the saw - so use scraps for this operation.
Green wood is notorious for clogging sandpaper. If you want a fairly clean, smooth surface on your cookies, blade selection is important. I used a fairly fine tooth blade 1/4 X 6 tpi. I tried a 3/16 X 14 tpi, but it was a bit unsteady.
I brushed the Pentacryl on the cookies right away - within a few minutes of cutting. The wood will soak up quite a bit since you're applying to end grain. I applied the Pentacryl with a brush rather than try and soak the cookies in a pan. Once all the cookies were coated, I put them in a pail - no cover - for a couple days to dry. Just allow a little air space between cookie faces.
Sources:
Rockler
(800) 279-4441
Incra Miter Slider Bar, 18"
#21982
Pentacryl, quart
#21788


I want to find a finish that will preserve the bark on maple slabs . [rough bark]
was the wood dry or green? tried this on green wood and it was difficult to cut
Check your cut list. I think you want for C., 2 - 6"X12' for the log cradle slats not 4 X 6
hT Track ( from Rockler ) works upside down for the slider. Should the cradle be adjustable?
Is there a preferred wood that will keep its bark on after cutting? I'm in Missouri and have lots of white & red oak, cedar, elm, and hickory. Charley
The "Little Ripper" from Stock Room Supply (https://stockroomsupply.com/) is a cool, albeit more expensive bandsaw accessory, that has an accessory for cutting cookies like these. The cookie cutting accessory can be angled to create cookies with a bevel.
I made 12 of these for my Daughters wedding plus 90 smaller wedding favors ( 4" with a snowflake stenciled on them, wedding was on the 2nd of January)
this is great learning information for cutting 'cookies' from logs for pyrography artists too! thank you!
Don't follow the discussion about screwing two slats to the log to keep faces parallel. Can you clarify
I made something similar for my daughter's wedding four years ago. My slices were about 9-10" diameter and I sliced them about 2" thick on my Grizzly 17" band saw. My first attempt hand holding the log resulted in a twisted and ruined blade. Then I worked out a system simpler than the jig you described that worked great. Rather than candles (a bit dangerous), I used a battery powered (3AAA) string of LED lights with the battery box recessed in the underside and with short legs made from dowel sections. I didn't treat the wood and they got many compliments. I made about 15 or so. I have photos of the process I used and the finished product if you are interested. I can provide more detail as well.