 My wife loves the look of built-in furniture and cabinets, so when I finished a family room in our basement I wanted to incorporate some built-in cabinetry. The challenge that I faced in designing this was that the room was relatively small, and we had many items that we wanted to incorporate, so space was at a premium. We opted to go with “zero footprint” built-in display cabinets, tucked between the wall studs, which met our design objectives and allowed us to use the room space for other purposes.The concept is simple; wall studs are generally spaced 16? on center, leaving a space between them of roughly 14-1/2?, with the depth depending on the size of lumber used to frame your walls. Typically you will want to do this on interior walls so that you don’t interfere with insulation in the wall cavity, although one of my units was placed into an exterior wall because the insulation was behind the stud wall rather than in the cavity.
I built three separate units. One was constrained by the depth of a 2×6 stud wall, 5-1/2", while the other two were placed in a wall that has unfinished basement space behind it, so I went deeper to 9?. Just pick an ideal location for these, cut the hole, measure your working size, and build from there.
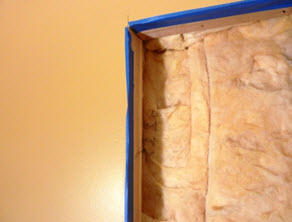
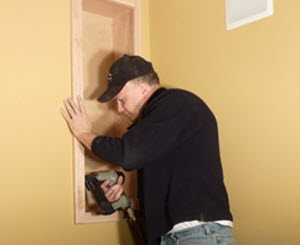
First cut a big hole in your wall.
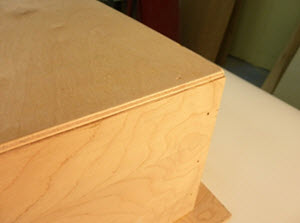
Use a reliable stud finder to locate the studs that will be used as the guide for your opening. Use a drywall saw, utility blade or other cutting tool to remove the drywall and create the opening. It’s important to do this as your first step for a couple reasons. First, you will get the exact measurement of the opening. Second, it will force you to complete the project, because the big hole will be a constant reminder of your unfinished work. I like to smooth the rough edge with a drywall rasp and then cover it with masking tape to contain the dust. Carefully measure the opening, and design the height, depth and width of the cabinet to be 1/4? less than the opening. This will give you wiggle room to get the unit level when you install it.
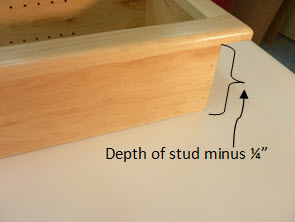
Depth.
Normally on interior walls in a home you will be limited to a depth of 3-1/2?, the width of a 2×4 stud. I would recommend subtracting 1/4? from the depth of your wall to allow for variations in stud width. You will be tacking 1/4? plywood to the back of this cabinet, so be sure to accommodate that in your wall depth sizing calculation. As an example, for a 2×4 wall, your cabinet depth should be 3-1/4?, consisting of 3? width plywood, and 1/4? thickness plywood for the back.
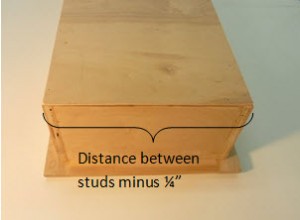
Width.
For a typical stud cavity that is 14-1/2? wide, you will design your cabinet so that it is 14-1/4? wide. Measure the opening carefully at top and bottom to find out your smallest measurement, and subtract 1/4? from that for your cabinet width.
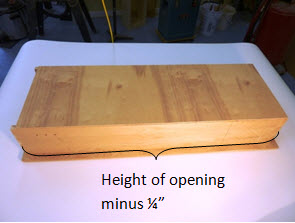
Height.
Normally, you can design the height to whatever specification you would like unless you find an obstruction when you open the wall. I would suggest setting the bottom of the unit at a height above typical furniture height in case you want to rearrange the furniture in your room and place a chair, table or sofa in front of that unit. Subtract 1/4? from the height of the hole you have opened in your wall to set the height of the carcase.
Construction is super simple
Carcase construction.
I used maple veneer plywood for the carcase. Once this cabinet is attached to the wall studs, it will receive very little stress, so I simply assembled with glue and brads. Biscuits would be fine for this as well, although perhaps unnecessary.
Attach 1/4? plywood back.
Simply glue and tack 1/4? plywood in place using brads or staples. Be sure that it does not extend past outside edges of sides or top.
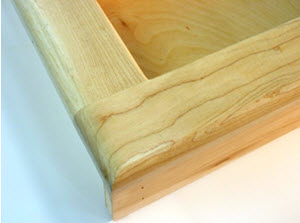
Face frame design.
One of the keys to keeping this project simple is the face frame design. My face frame was 2-1/2? wide, and I milled my own stock using a simple roundover bit in my router. You could also use window casing or other commercially available trim for this application. Overlap the carcase slightly toward the inside of the cabinet, perhaps a 1/4? or so, so that face frame alignment is easier and more forgiving.
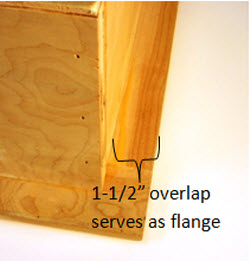
Face frame as a flange.
On the outside of the cabinet (you are viewing the outside from the back in the photo), you will want a generous overlap of the face frame. Mine overlapped by about 1-1/2?. This is obviously not typical cabinet construction, but the face frame serves as a flange in this design, covering the imperfections in the hole you will cut in your drywall, and allowing for some leveling of the cabinet.Attach the face frame before installation. Normally with built-ins, I place the carcase in place and attach trim afterward to tie it all together, but in this case it is easier to apply the trim in the shop. Biscuit joinery is typically my choice for both assembling the face frame and attaching it to the carcase. Find lots of tips on biscuit joinery here.
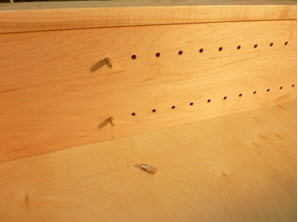
Adjustable shelves.
This is really a matter of personal preference. Sometimes I build permanently fixed shelving, but more commonly I drill holes for shelf pins. I have used peg board as a guide for these holes in the past, but these days I use a jig designed for this purpose.
Shelf Construction.
I used maple plywood with solid maple edging. I cut the edging to a full 1? thickness to give the shelves a more substantial appearance. For longer shelves I would typically go to 1-1/4? with the edging which would also help minimize shelf sagging, but for these small shelves the risk of sagging is nearly zero, and 1? seemed to in better proportion with this small cabinet. Edging can be attached using biscuits as an alignment aid, but generally I just glue the edging and clamp it in place, which allows me to get near-perfect alignment on these which minimizes tedious flush sanding down the line. Avoid using brads, because they are unnecessary and the puttied nail holes with disrupt your serenity.

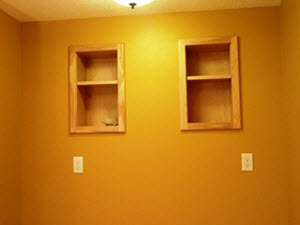
Installation Time - Level it.
Because of how these are built, installation is about as easy as it gets. Set the unit in place, check it for level, remove and use shims to level if necessary.
Bam!
After you find level, force the unit all the way to one side of the opening on either the top or bottom, and place the first nail in that corner. Shoot into an inconspicuous place. You should go at least 1? back from the face frame to clear the sheetrock and get to a solid portion of the wall stud. Shoot a 2? brad into each corner area of the cabinet, fill holes with putty, install your shelves to a desired height, and you are done.
Come on; give it a try.
This is an easy weekend project that will earn you the family “hero plate” at your Sunday evening dinner. Feel free to post any questions you encounter on the Forum on the WWGOA website.

Next to the Between The Studs Display Shelves article is a banner that states SHOP DEAL SAVE 45% ON FUNDAMENTALS OF CABINET MAKING CLASS [See Video Preview Now]. Unfortunately, when I click on the See Video bar, I receive the 404 error. Is there another way to view this video preview?
I plan on doing this for a built in spice rack for the wife. Thanks for the help.
Great project and hung painting over to hide valuables with vertical hinge
building a smaller home, downsizing. This could come in quite handy
None of the images show. I get an error message when I click on the area. For instance: X Give it a try 11 - message the requested image can not be loaded please try again. Is there also a video for this topic?
I'm doing something very similar to this for a bathroom remodel. The plan is for the medicine cabinets to be between the studs with a recessed power outlet in each cabinet side for out of sight charging. The plan is to mount soft close drawer slides to the frame for the mirrors so they slide out of the way for a clean look.
Paul, thanks for such a detailed yet simple instructions. Going to give this a shot over the weekend as a birthday present to my wife; only it'll be a jewelry vanity. Any advice on hanging a door? Will a simple piano hinge work? Any insight would be greatly appreciated. Either way, thanks again!