Tips for Cutting Tenons with a Tenoning Jig
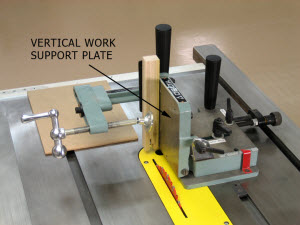
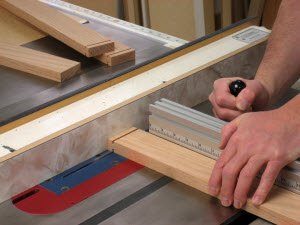
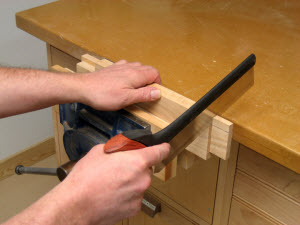
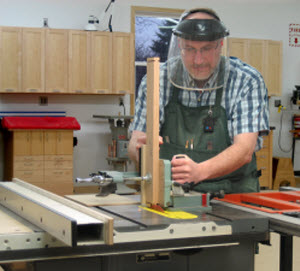 Table Saw Tenoning Jig - Tracks in the miter gauge slot of a table saw. Work pieces are clamped upright against the vertical work support plate so saw cuts can be made in the end grain. The distance between the work support plate and the saw blade's side is adjustable. I added an auxiliary wooden backup board to the face of the jig's backstop. It reduces tear-out as the blade exits the work piece.
 There are many ways to cuts tenons. The right way is the way that works for you. I've cut a ton of them over the years, and each time I do, I strive to make them faster and more accurate. I'll show you how I cut my tenons these days so you can benefit from the time I've spent refining my techniques.

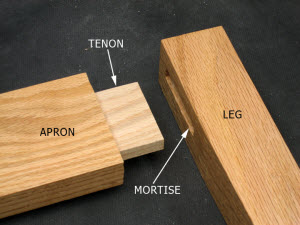
First off, just in case you don't know, a tenon is the male component of a mortise and tenon joint (Figure 1, Photos 1 & 2). Tenons are cut on work piece ends, and then glued and pushed into mortises (slots, or square holes) cut on the edges of the mating pieces. The beauty of this joint is that it creates a lot of 90-degree face grain to face grain glue surface. The joints can be cut so the faces of the mated pieces are flush, or so they are offset to create a decorative reveal.
The generally acceptable method of cutting tenons and the method I used for most of my life, is to cut them on a table saw with a dado blade and miter gauge. You cut one tenon face, flip the work piece over, and then cut the other tenon face. The thickness of the resulting tenon is relative to the thickness of the work piece. This works perfectly fine if your project has only one tenoned rail, but if you have more than one, the system breaks down. Cutting the tenons all the same thickness, using the same table saw setup, requires that all your rails be EXACTLY the same thickness. Achieving that, with even the best-tuned planer, is difficult. I gave up on the cut, flip, cut method a few years ago, and instead decided to cut my tenons, mortises, and panel grooves all relative to one face so the work piece thickness is irrelevant. Doing so requires a tenoning jig, a well-tuned table saw, a quality crosscut blade, and a flat ground rip blade. The alignment and fit of the tenons cut this way is infinitely more predictable.
 The majority of frame and panel doors I make have square edges with 3/4" thick x 2-1/8" wide stiles and rails, and 1/4" thick flat panels. I like that clean look! The overall size of an average door is 12" wide x 24" tall. For those doors I've standardized my tenons to be 1/2" long, thus the panel grooves are 1/2" deep (plus a smidgen to allow the joints to close tight, "come home"). Also, I try to center the tenons on the rail ends. Here's how I set up and cut rail end tenons for my frame and panel doors:
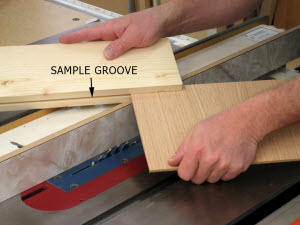
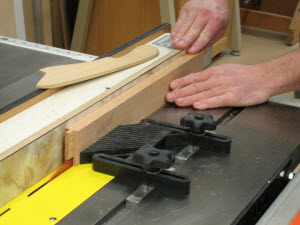
Cut a Sample Panel Groove in Scrap Wood.I know that starting by cutting a sample groove seems odd, and you're probably thinking why not just cut the final panel grooves and go from there? Well, here's the deal: Cutting the tenons causes tear out on the rail edges. I find it easier to start with my rails wide, cut the tenons, then trim the rails to their finished widths cutting some off each edge. That removes the tear out. Then I cut the panel grooves to match the tenons. The sample panel groove gives you a way to fit the tenons prior to cutting the final panel grooves.Check the consistency of your panel stock thickness. It should be very close to all the same. Use one of the thickest pieces as a gauge for cutting the sample panel groove. Cut the groove using your table saw and any 1/8" kerf blade. You can cut, flip, cut; or cut, shift the fence, cut. How you cut the groove, and how deep it is does not matter. All that's important is the panel stock fits well in the sample groove.
Cut the Tenons Cut the tenon shoulders using a quality crosscut blade, a zero-clearance throat plate, and a miter gauge. Test your setup on scrap wood. You'll want the tenon lengths exactly 1/2", and the shoulder cut depths about 1/16" shy of their full depth. The cuts made with the tenoning jig later will finish the shoulder cuts. Cut a few extras for testing your tenoning jig setups later.
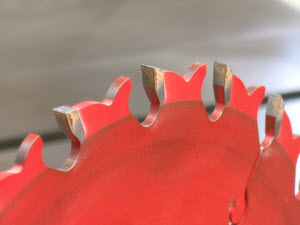
You're close to being ready to cut the tenon faces using your tenoning jig. You'll need a flat ground rip blade to make those cuts.
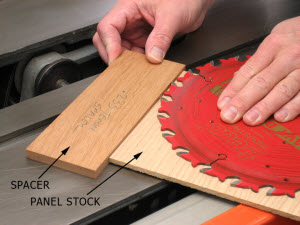
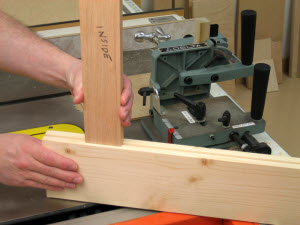
Remember, this technique involves cutting both tenon faces relative to the front face of the rail. To do this you will need to shift the rail in the tenoning jig. A spacer does the trick!
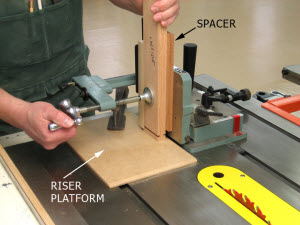
Next you'll need to set up your tenoning jig in preparation of cutting the tenon faces. Adjust your tenoning jig as per the manufacturer's directions. Make and clamp a 1/4" thick riser platform to your saw table behind the blade and slightly to the right of your tenoning jig. This platform is used to set the height of the rail ends above the saw's table, so that when you make the tenon face cuts, the rail ends do not bind on the saw table or throat plate. I beveled the leading edge of my riser platform so when I pull my tenoning jig back, the rail end doesn't catch on that edge.
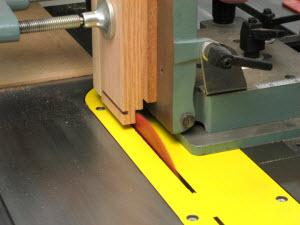
The tenon face setback from the rail face is determined by the distance the tenoning jig's vertical work support plate is relative to the saw blade's side. Adjust the distance so your tenon will be centered close to the end of the rail. Set your blade height short initially. Wear a face shield when cutting your tenons. Small cutoff pieces can go flying! Make successive passes slowly raising the blade until the tenon face is cut and the shoulder corner is square and finished.
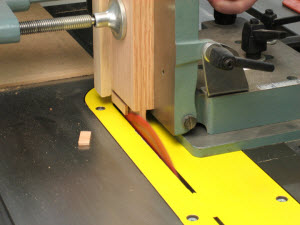
Don't change any of the tenoning jig or saw blade settings. Reset the rail in the tenoning jig with the front face against the jig's table, but this time without the spacer. This shifts the rail left so the rear face of the tenon can be cut.
Test the fit of the tenon in the sample panel groove. If your tenon is too tight, reduce the thickness of the spacer. If it's too loose, add a layer or two of making tape to the spacer, or if need be, make a thicker spacer.
The last step is to cut the panel grooves in the stiles and rails. Make them fit the tenons, and align perfectly with the tenons. Set the fence so the first cut aligns with the front face of the tenon. Make this cut on all of your pieces, then shift the fence right, again orient the work pieces faces against the fence, then make the final cuts.
One last note; if you're making "blind" tenons, I find it best to hand cut the shoulders and edges. It seems every time I try and do that work with my table saw I create more problems, rather than save time.
Photos By Author
Product and Ordering Information:
Tenoning Jig
(877) 335-8219
Crosscut Blade
Infinity Tools Super General
(877) 872-2487
Flat Ground Rip Blade
Freud Tools Heavy-Duty Rip Blades
(800) 334-4107


I am considering the purchase of a Delta 34-184 Tenoning Jig but have read many negative reviews by owners. Has WWGOA evaluated this model and published a review? Thanks, Bill
Thank you so much!! Great post help me with the issues I was having.
Hi Nice share. In my opinion the most stable cccam are those from Fishbone cccam I would like to see more posts like this Thanks
What is the best way to cut tenons on board 1"x16"x36"? I have bench table saw. No jigs.
Some great tips, Thanks. I just wish they would make these for left tilt saws. It's just awkward when I use mine in the right miter slot to cut bevels on pieces ... like on a flag case.
I Love my Delta Tennon Jig, one of my better investments.