Photos and illustrations by author
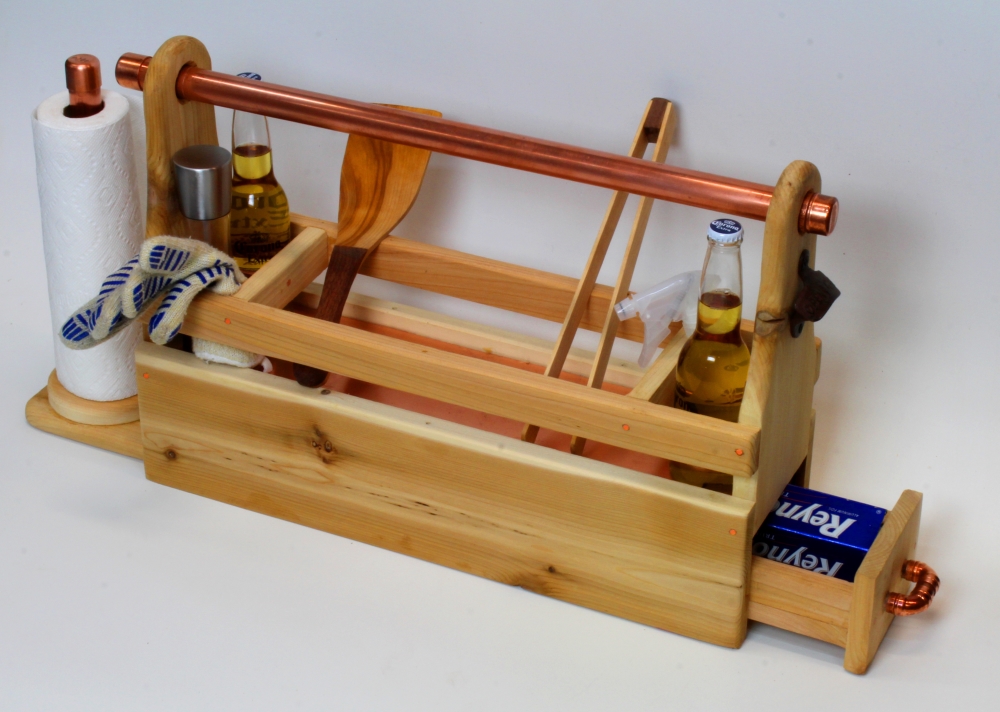
There’s not much that I enjoy more than standing on my deck with a cool beverage, basking in the aromas of meat that’s slow-cooking on my grill. The only part that I don’t like is when I can’t find my spatula, tongs or one of the other important items that I need when I am producing a BBQ masterpiece. That dilemma led to the development of this woodworking project, which is a toolbox of sorts, purpose-built for outdoor cooking supplies. I gathered requirements from many “grill masters” in developing this project, so I believe it should address the needs of most BBQ chefs; pros and weekend warriors alike. You should also note that I designed the proportions of this grill caddy to meet the dimensions of my grill utensils, so you should measure your own and make any adjustments necessary so that it works well for you.

Click here to download a free PDF of this plan
Click here to download a PDF template of the end panels
Design aspects
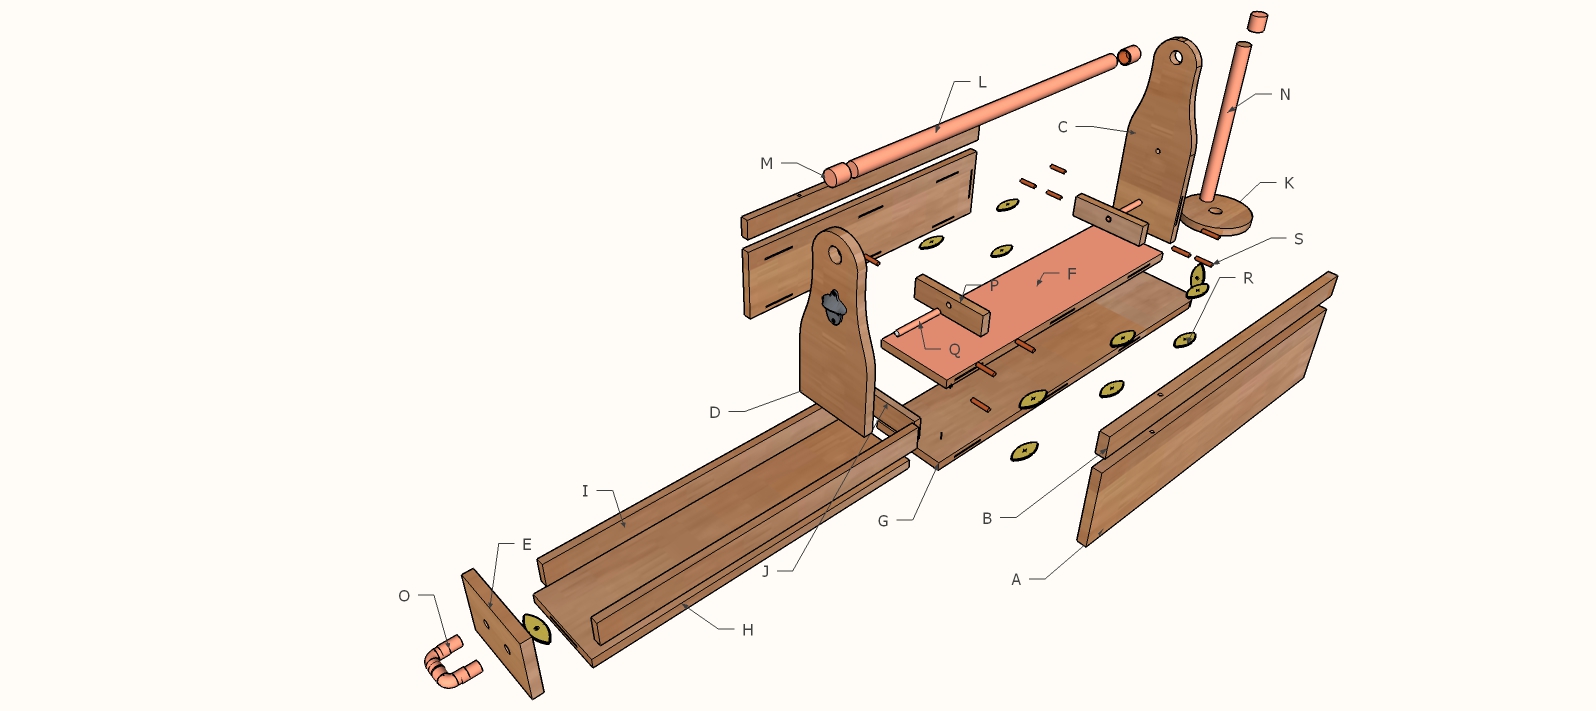
The grill caddy is designed to accommodate everything you need for outdoor cooking. There’s room in the top storage area for beverages, spices and a small spray bottle, as well as utensils such as spatula, grill scraper, tongs, etc. There’s a drawer that is sized to house a roll of foil, and it is concealed from the elements to provide storage for matches, pellets, or other items that need to remain dry. I’ve chosen western red cedar for the project because it holds up well for outdoor use and is lightweight for carrying purposes. To crank up the aesthetics of this simple project I have incorporated a few copper elements, including copper pipe for a handle, copper rod stock used as joinery pins and section dividers, and I’ve even lined the bottom with copper flashing for ease of cleaning. Copper is expensive, so you can use a wooden dowels for a handle and joinery pins if you want to save a few bucks, and you might choose to use aluminum as an alternative copper flashing if you prefer (it is normally found right next to the copper flashing in home centers).
The tools that you will need include the following:
- Table saw
- Sander
- Drill
- Clamps
- Bandsaw, jigsaw or scroll saw
- Router
- Brad nailer or hammer
Getting Started
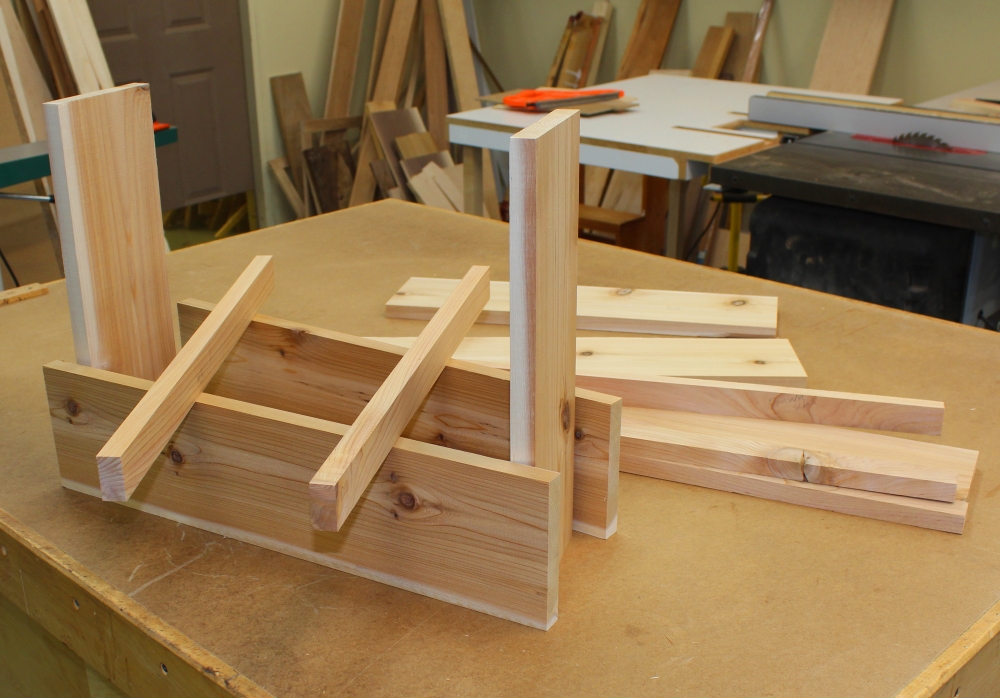
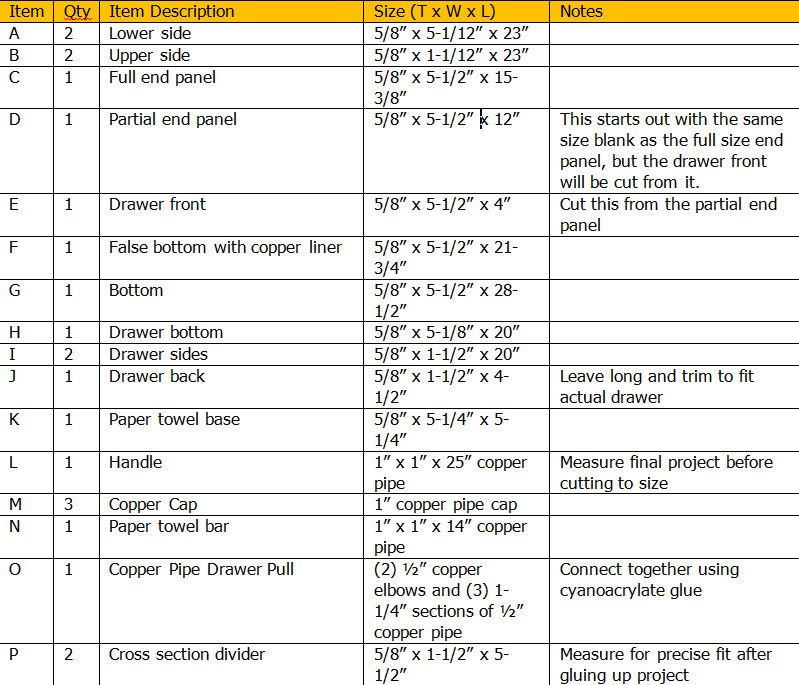
Cut pieces to size. Reference the cutlist and cut all pieces to their appropriate dimensions.
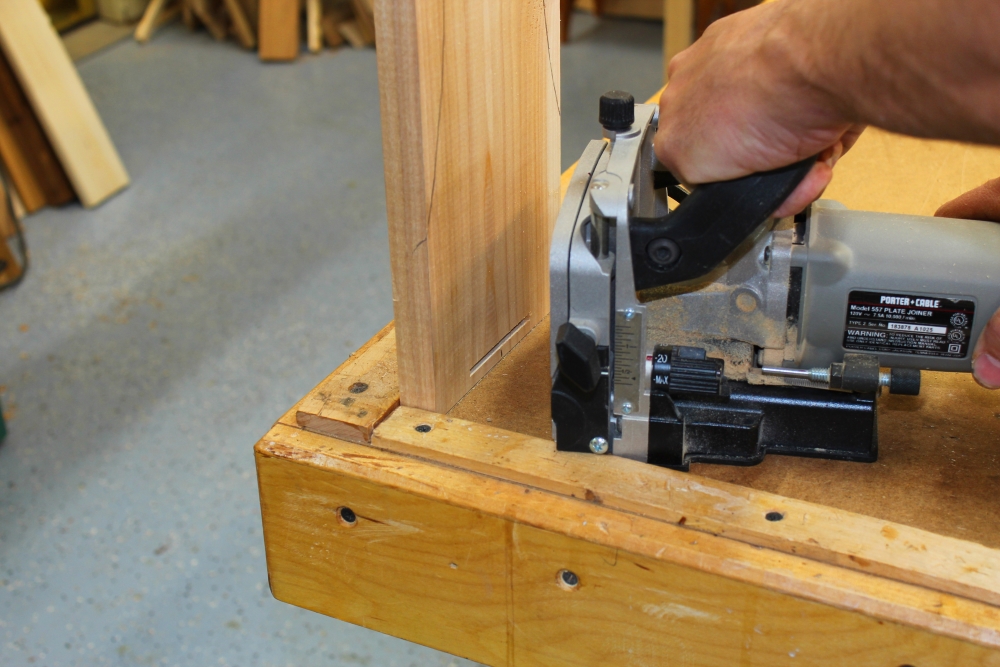
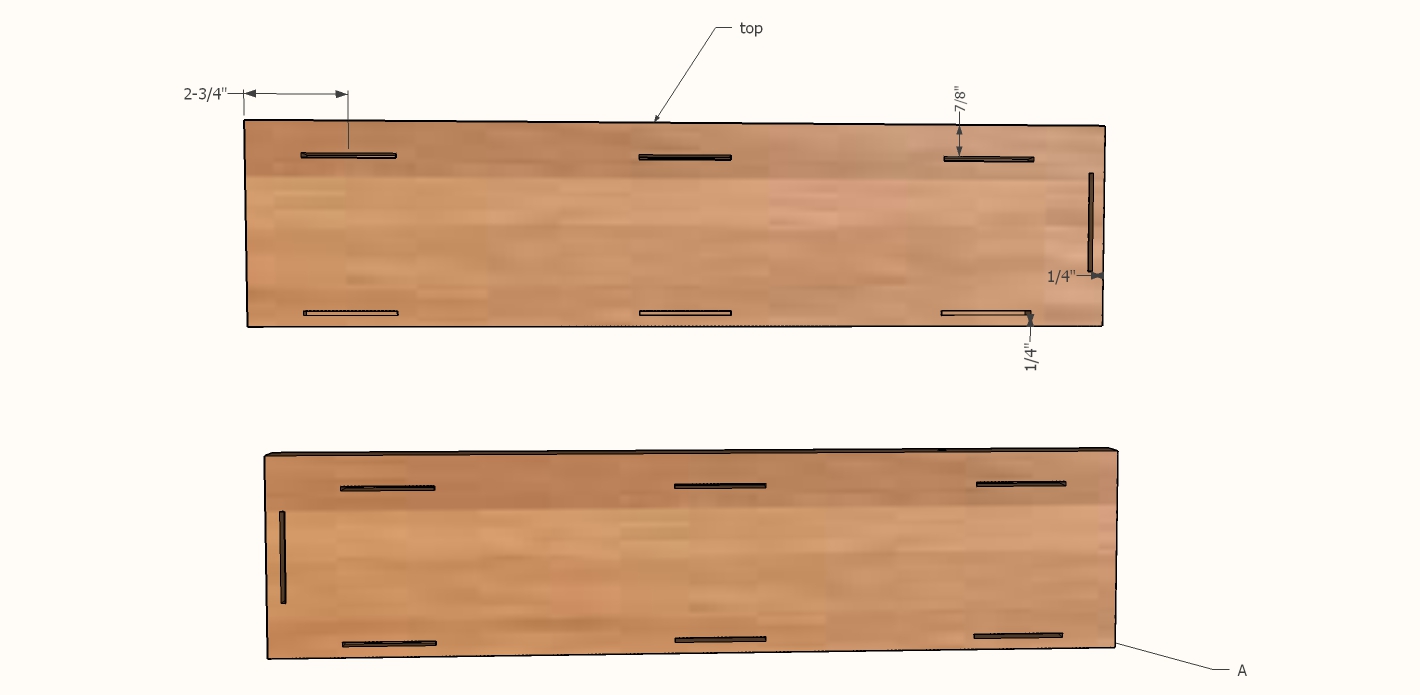
Biscuit joinery. Cut biscuit slots in all locations marked in the diagram. If you don’t own a biscuit joiner, or are just looking for a faster method, you could simply use glue and 18 gauge brad nails.

Use pattern to drill and cut end panels. Print the PDF template provided for the end panels, and use spray adhesive to temporarily attach to your stock, or trace onto the pieces.
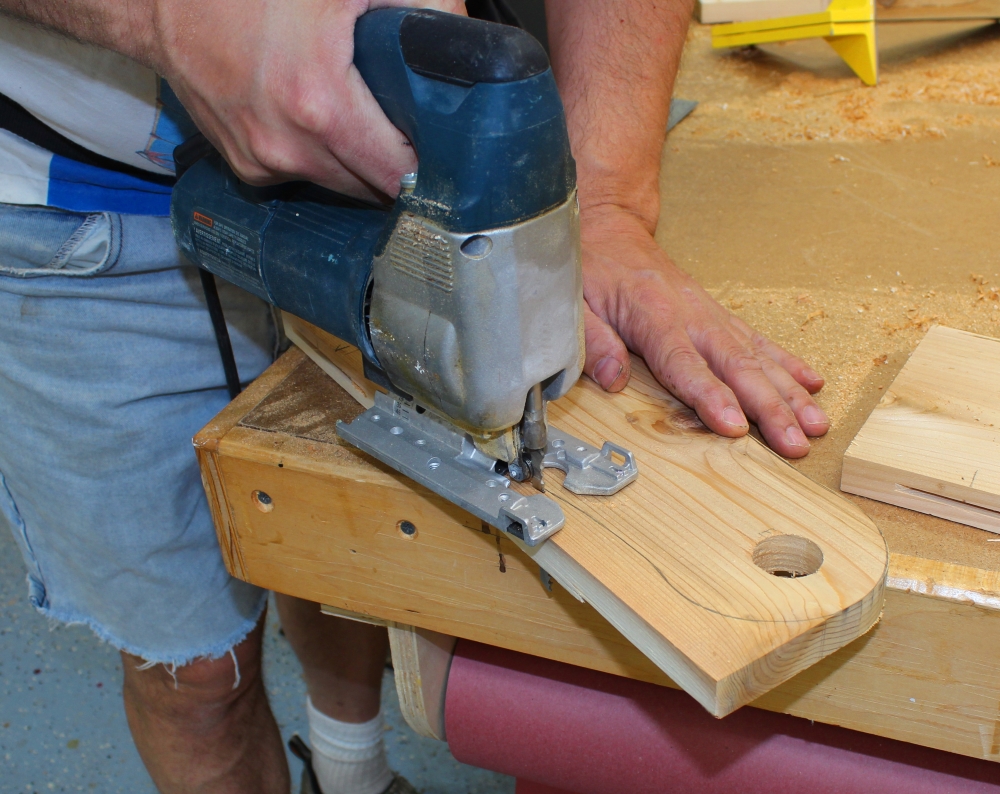
Cut to shape. Drill 1-1/8” holes first using a paddle or forstner bit. Then use a bandsaw or handheld jigsaw to cut the curved pattern. Confirm the hole diameter against your handle.
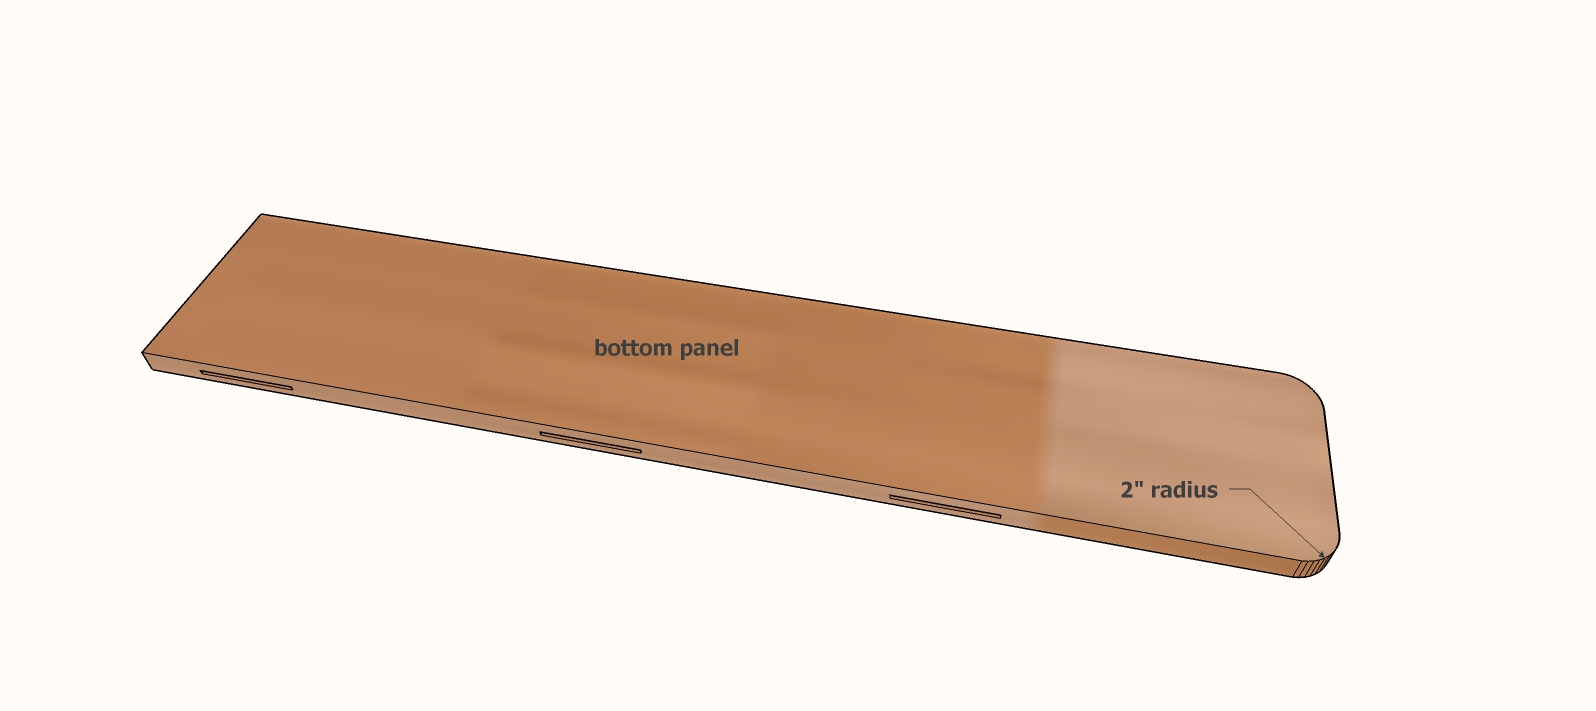
Round corners on bottom panel. Cut a 2” radius curve on the corners of the bottom that will be near the paper towel holder. Check the biscuit location to ensure that you don’t cut on the wrong end.

Attach copper flashing to false bottom. Spread an even layer of contact cement across both surfaces, let dry for 15 minutes, and press the flashing into place allowing the copper to overhang slightly on all edges.

Remove any gaps: Using a J-roller or rounded edge of a board, firmly press the copper into place, going over it repeatedly for a couple minutes until the copper flashing is fully seated against the board.
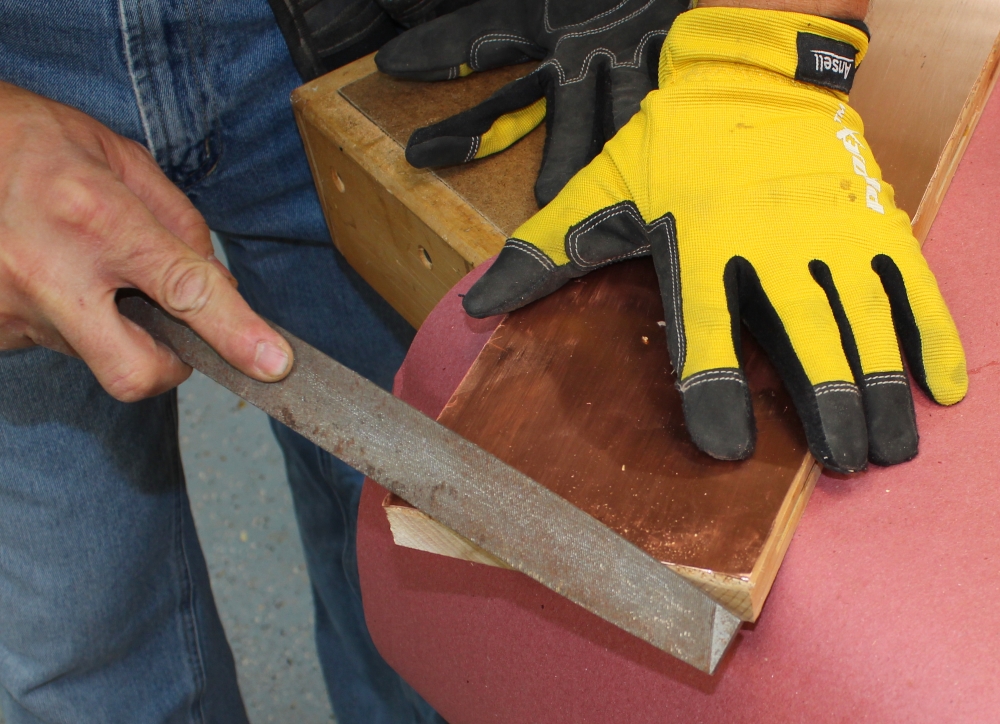
Trim and flush copper. Cut the copper flush with the wood’s edge by making 3-4 passes with a sharp utility blade. Using a file, remove any sharp edges from the copper flashing by stroking downward toward the wood. Filing in the other direction could pry the copper away from the wood.
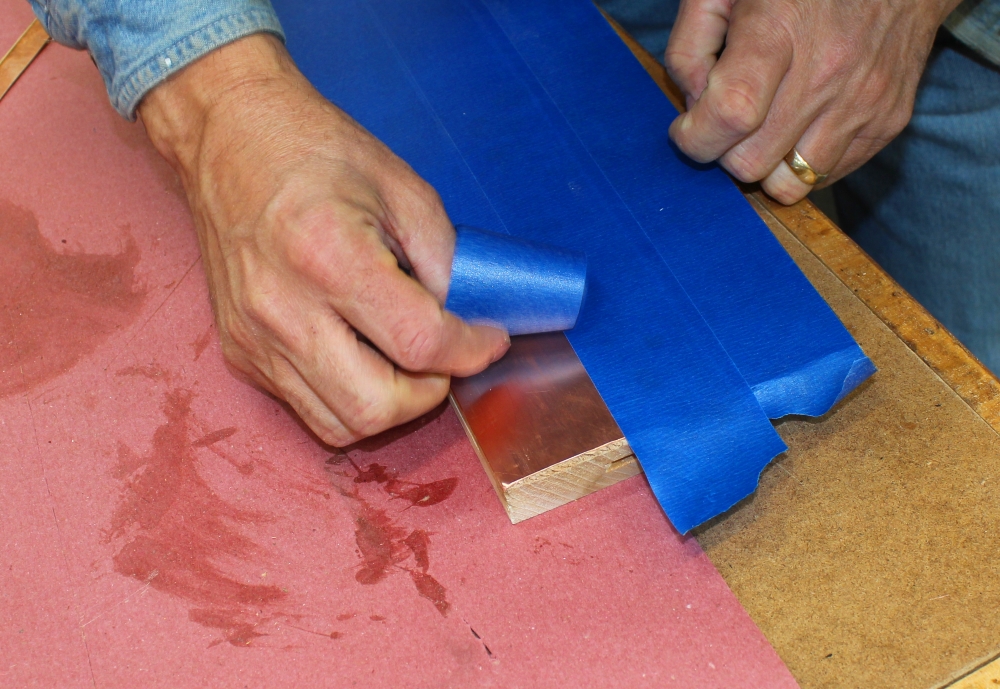
Protect copper for glue-up and finishing. To avoid the hassle of removing stubborn glue and finish later, put a protective layer of painter’s masking tape on the copper prior to assembly.
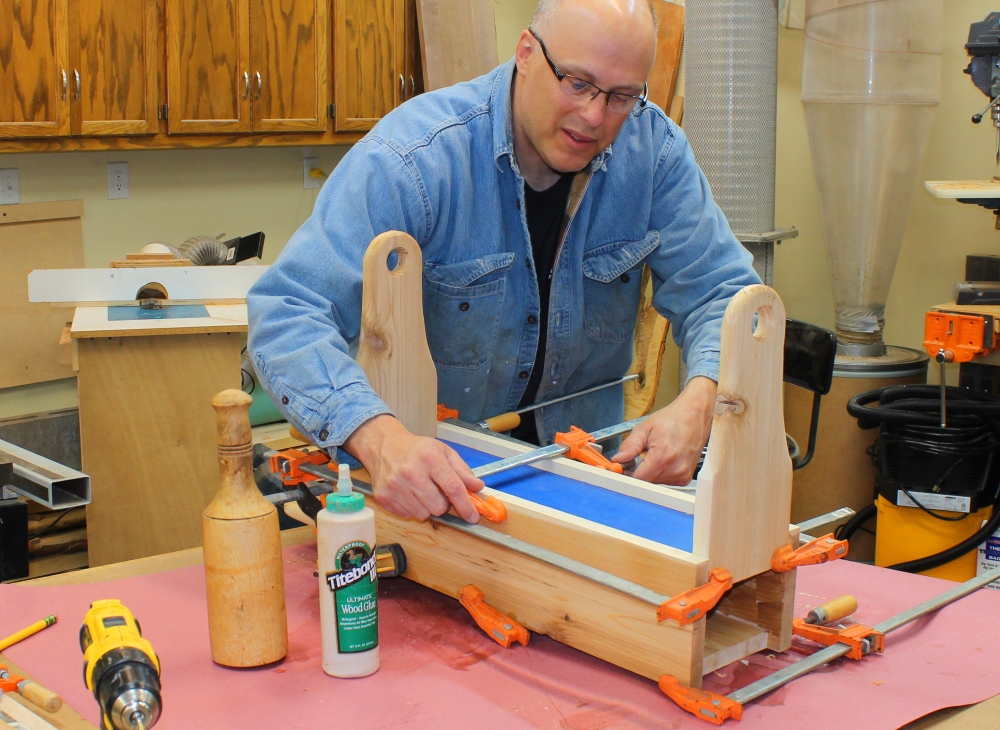
Assemble. Apply glue and biscuits, assembling all components of main carcase except for upper rails. Those can be installed after glue cures.
Drill for pins. Hold upper rails into position. Drill 3/32” holes in locations marked on diagram, going all the way through the side rails and ½” into the mating piece. After drilling the first hole into the upper rail, insert a copper rod to hold it in position while drilling the next hole. This will ensure perfect alignment. Then remove rod before applying glue.
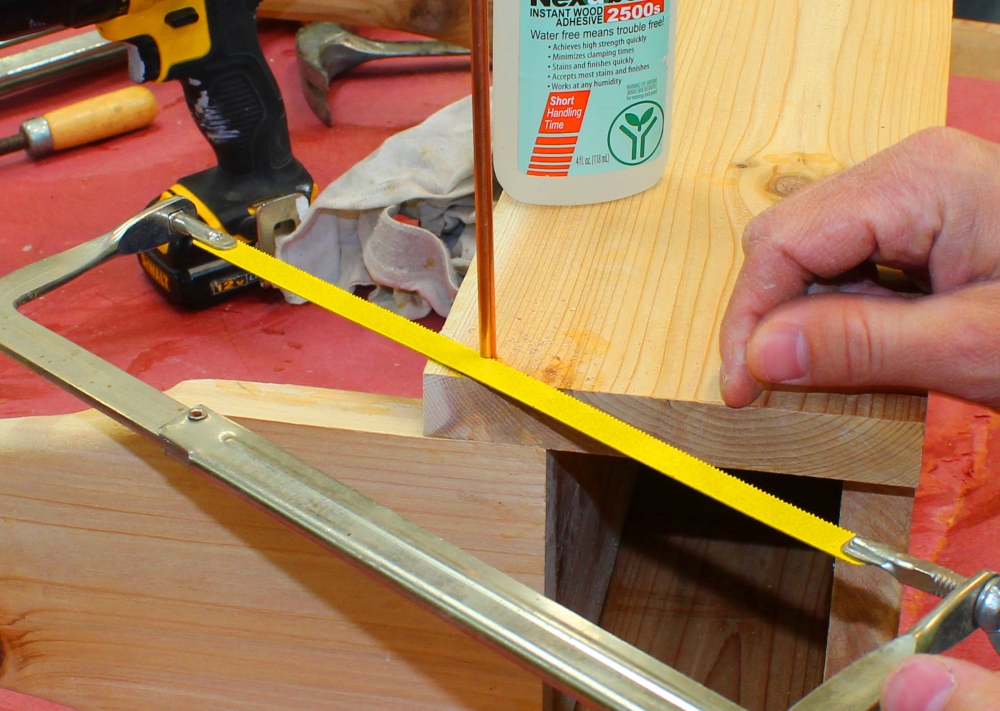
Glue and pin. Using an adhesive that bonds copper and wood, such as Nexabond or epoxy, coat the mating surfaces as well as the holes. Leaving the pins long, tap them into the holes. Cut the pins proud of the surface and sand them flush later. After installing all pins, use clamps to secure the assembly until the glue cures.
Install upper rails and drill hole for thermometer storage. Prior to installing the upper rails, hold one upper rail in position, and rest it on the lower rail. Ensure proper alignment at each end, then drill a 1/4” hole through the upper rail, and into the lower rail as shown. Then use a spacer to raise the upper rail 1” above the lower rail. Using the same approach as previously to install the pins, attach the upper rails to each end panel.

Build drawer. Attach drawer front to drawer bottom using a biscuit. Then attach drawer sides and back using a brad nailer or by tapping in brads (if you use this method, predrill to avoid splitting).
Make drawer pull. Using three sections of copper pipe ½” dia x 1-1/4” long and two 90-degree elbows, form a drawer pull.
Install drawer pull. Mark the locations on the drawer front and use a ½” forstner bit to drill recesses ½” deep. Using Nexabond or epoxy, press the drawer pull into position.
Install section cross dividers. Measure and cut 5/8” x 1-1/2” cedar to length. Drill a 3/8” hole through the center of the piece. Set the cedar piece into position and temporarily pin with 3/12” copper rod stock. Use a section of 3/8” copper rod to mark the location on the end panel where the rod will be inserted. Drill a 3/8” hole ½” deep into the location on the end panel. Disassemble, apply glue and reassemble. After glue cures cut copper rods flush and sand with a coarse to medium grit such as 80.
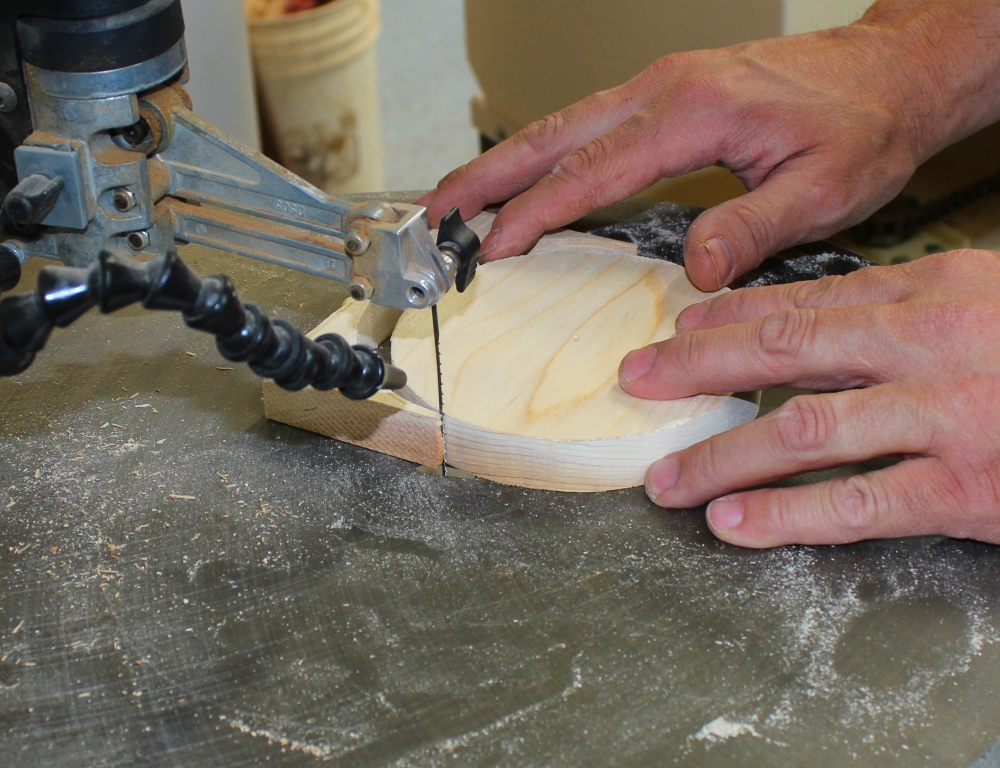
Install paper towel base. Using a scroll saw or bandsaw, cut a 5” circle. Then drill a 1-1/8” hole through the center of it, and roundover the top edges using a router or sander. Glue and clamp into position.
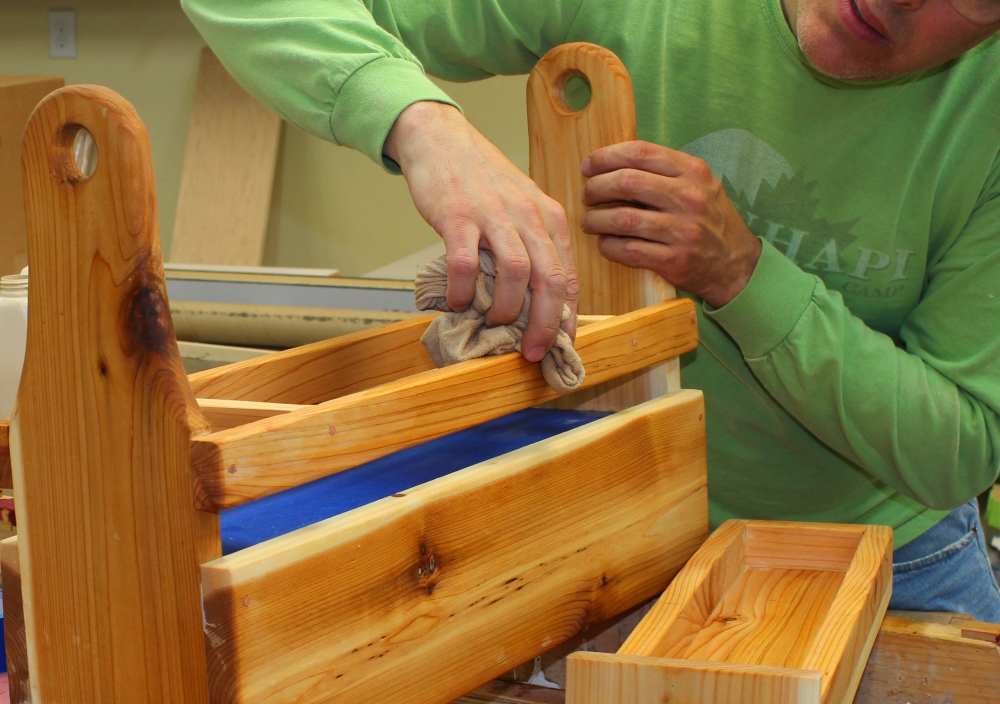
Finish. Use a penetrating finish such as deck sealer to preserve the wood.
Install handle, paper towel holder and bottle opener. Slip 1” copper pipe through holes in the end panels, and cap each end. No need to use adhesive or solder to fix the caps to the pipe; a friction fit should suffice. If yours are loose, then use cyanoacrylate glue, epoxy, or solder to permanently mount the caps. Install and cap the paper towel bar with no adhesive, and use screws to fasten the bottle opener into position.
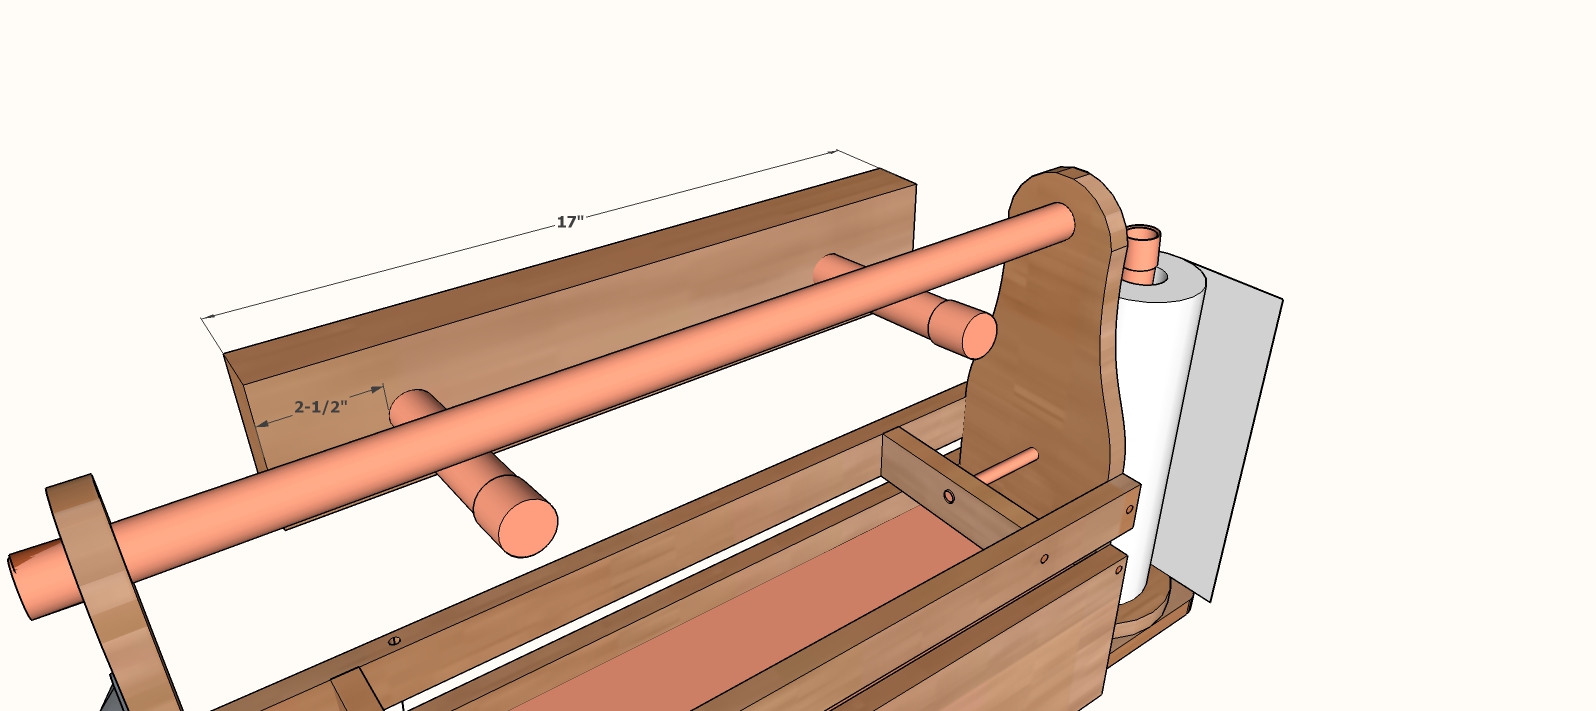
Optional hanging bracket. If you want to preserve table space near your grill, you can build the optional handing bracket and install it on a deck railing or side of your house. Simply cut a cedar 2x4 to the specified length, and use a 1-1/8” forstener or spade bit to drill holes 1-1/4” deep at the identified locations. Holes should be drilled at a 5-degree angle so that the pipes will tip slightly upward. Stain the 2x4 to match your deck, and install 9” sections of 1” copper pipe into the holes. Add a cap to the end of each pipe. Do not permanently attach the copper pipe, as this will allow you to remove the pipes when not in use. Store them in your grill caddy!
I hope you have fun building and using this project. Let us know in the comments section if you have ideas for customizing and improving the grill caddy.
Click here to download a free PDF of this plan
Click here to download a PDF template of the end panels
Sources
3/32” Copper rod stock is available at Amazon.com; $4/ft.
3/8” Copper rod stock is available at Amazon.com; $10/ft
Copper bottle opener is available at Amazon.com; $14.
1” copper pipe, end caps, and 6”copper flashing are available at most home centers

Hi, would I be able to get a link to the 3D model of this? As i would like to see if a can make this a 3D printed project. It would be amazing if you could.
Does the face of the draw protrude from the end panel or does it slide underneath it flush: Also, why are there only 1 biscuit cuts on the end panels--does the other sides of the end panel get nailed?
Where on the diagram are the indications of where the pin holes are to be drawn?
Hi, are you able to have this converted in LxWxH? Would appreciate it!
Great project, I recently purchased a Timber-King 1600 Portable band Sawmill and have been cutting red cedar boards for a playroom remodel. This would be a good place to use up some of my smaller scrap and the red cedar heartwood boards are a beautiful option.