Wood doesn’t just grow on trees, you know! There are lots of ins and outs to understand when it comes to the lumber industry that will make you a better consumer and help you put together better projects.
Two Types of Wood: Softwood & Hardwood
Softwood versus hardwood depends entirely on the tree’s leaves and has nothing to do with how hard the wood is. The classic example is balsa wood, which has been used for generations for model airplanes and is a hardwood. Why? It’s a deciduous tree. Evergreens are softwoods. There are other differences in their pore and grain structure, but in the end, they are known as evergreen trees. The key here is that if you see “hard wood,” that is a wood that’s hard. If you see “hardwood,” it’s deciduous. Likewise, a “soft wood” is a wood that’s not very hard. If you see “softwood,” it’s an evergreen tree.
Heartwood and Sapwood
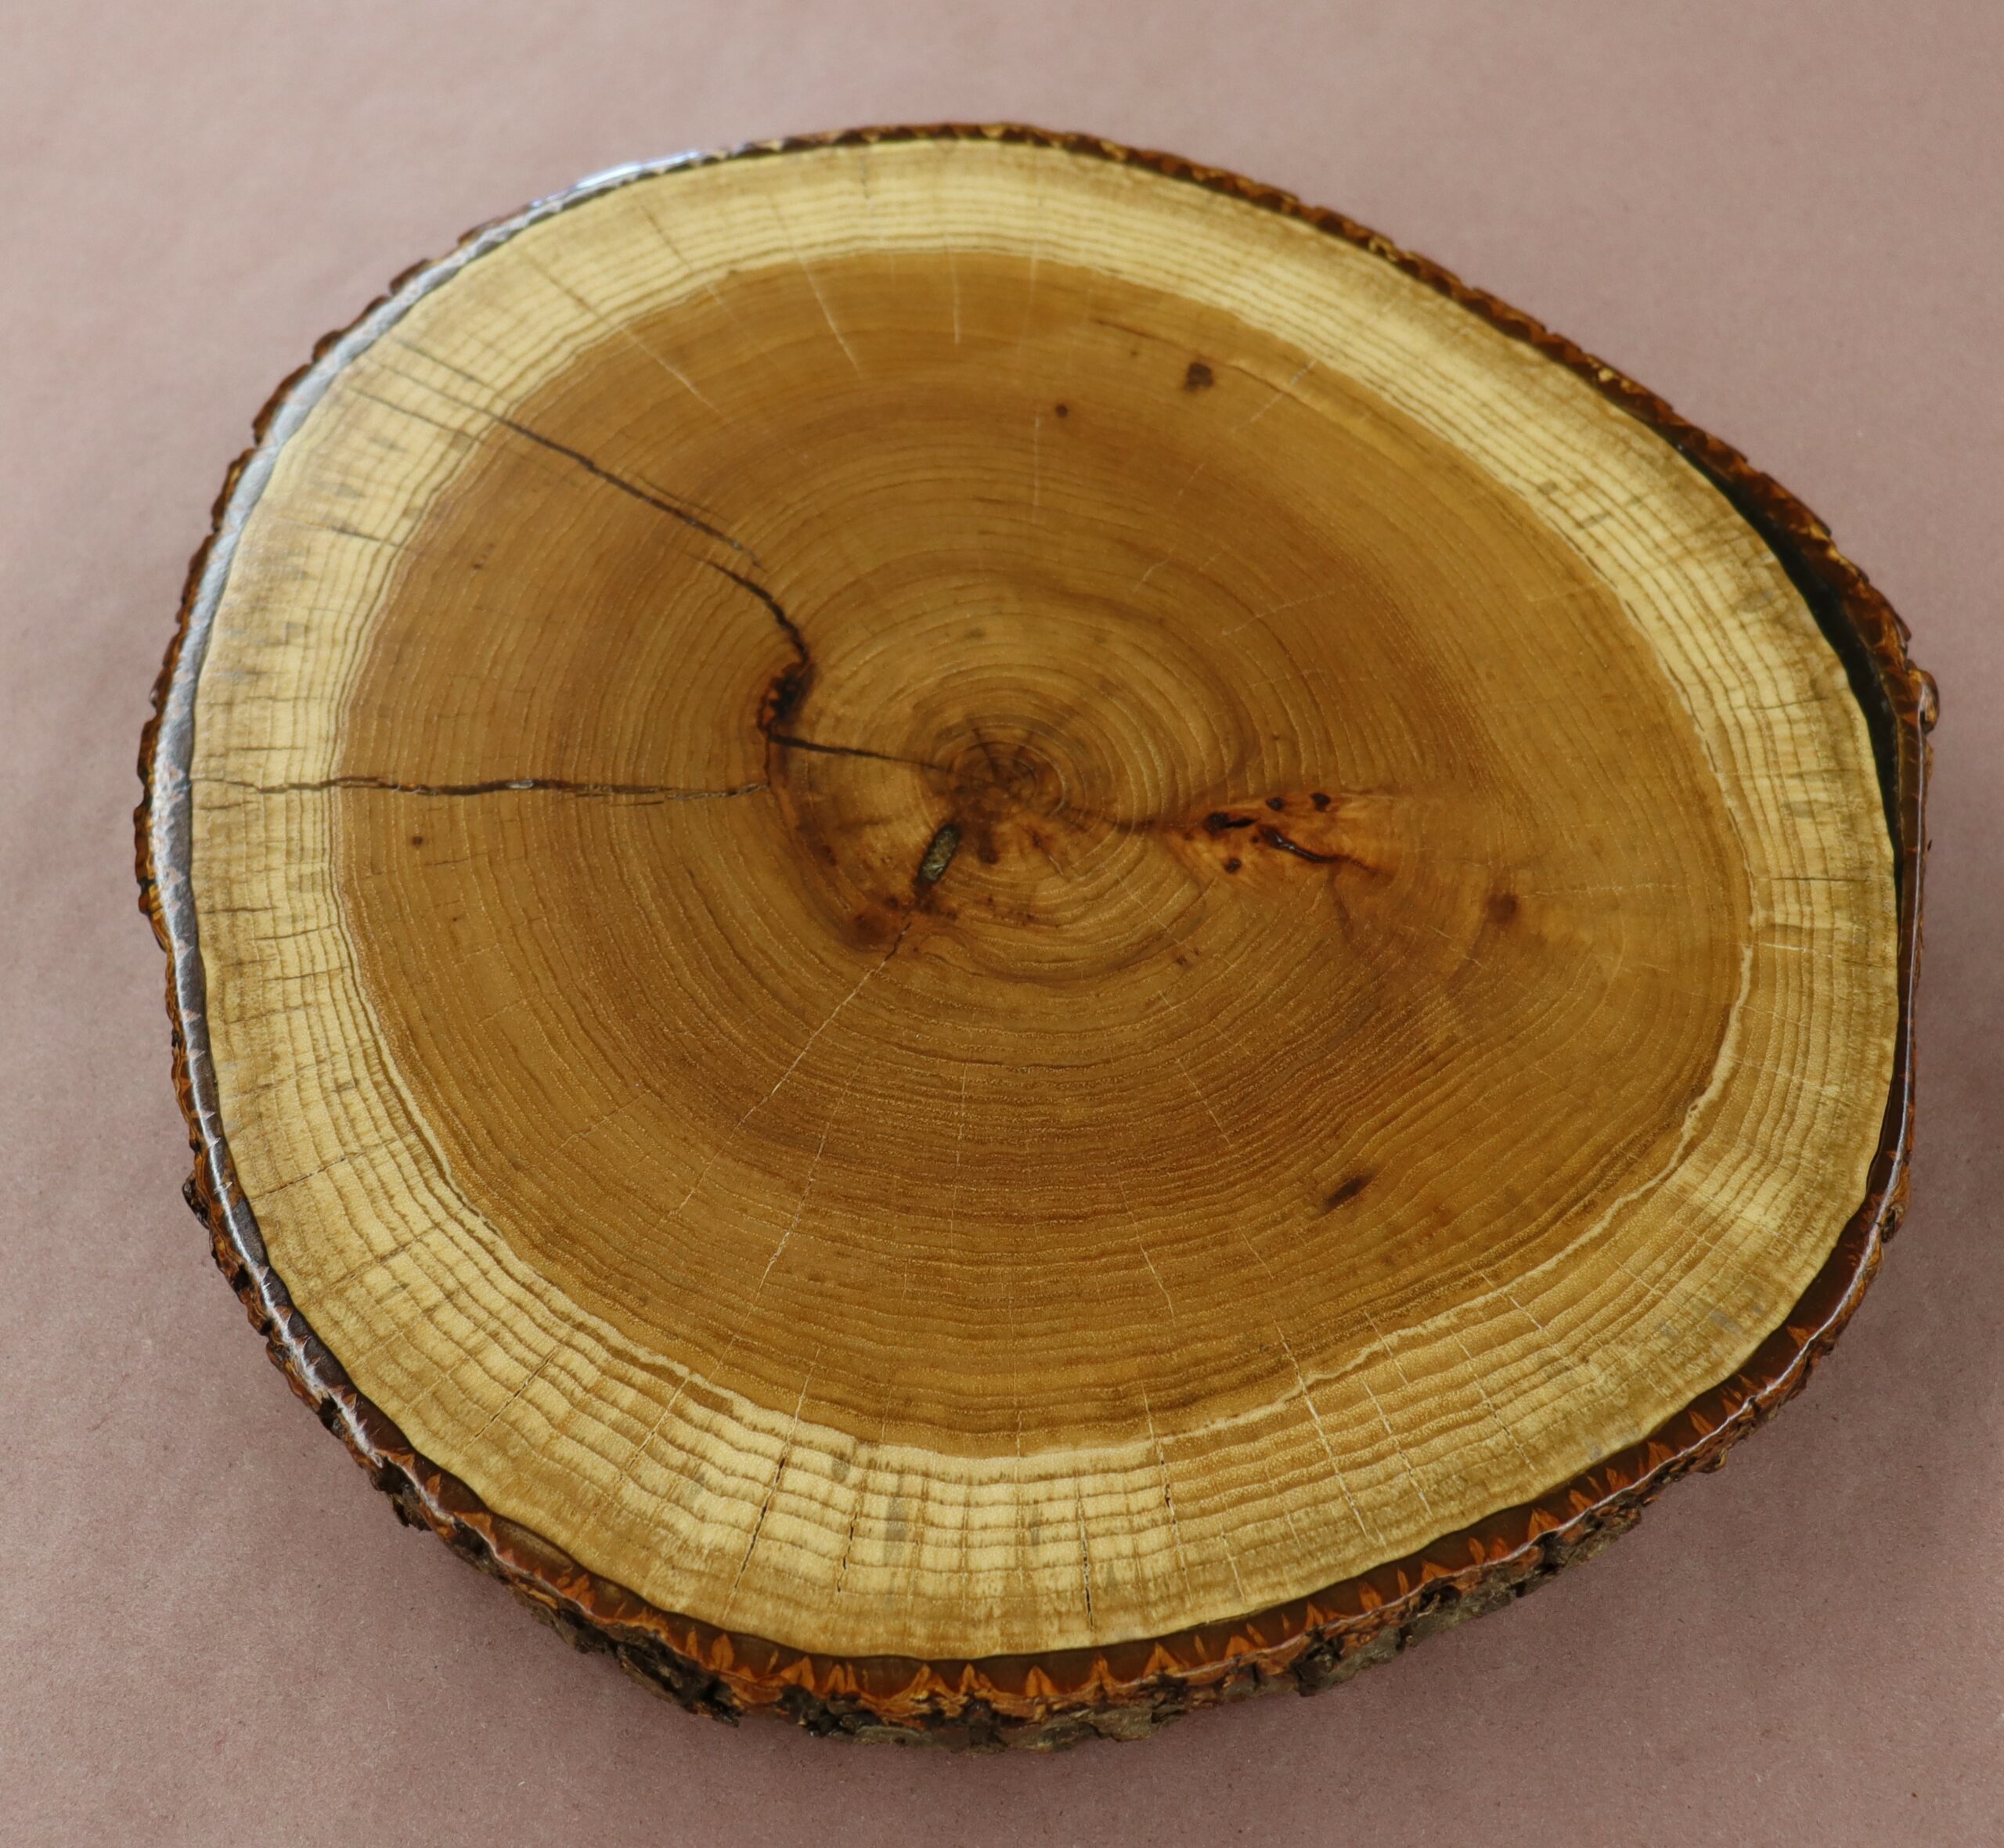
You’ll often see the words heartwood and sapwood used when describing wood and its colors. Heartwood is typically darker, as shown in this hickory crosscut.
Trees have two kinds of growth cells. One helps the tree grow taller, the other helps it grow thicker and larger in diameter.
The tree uses sapwood for food storage, strength, and storing sap for nutrition. As the tree gets older, the cambium in the center of the tree dies and becomes heartwood. In addition, a buildup of deposits called extractives is responsible for the colors we often associate with a species. Without these mineral deposits, the wood colors we love—red cherry, brown walnut—would be sadly dull. Since soil chemistry is different everywhere, a walnut tree grown in one environment may look somewhat different from one grown somewhere else.
Some woods, walnut and cherry for example, have a stark contrast between their dark heartwood and light sapwood. Some woodworkers see sapwood as a color defect and eliminate it from their projects. Others see it as an organic part of the material and include it in their projects. As a woodworker, you can make your own aesthetic choice on this.

Shelf Loads: How to Work Around and With the Modulus of Elasticity
The three most common projects that the home/hobbyist woodworker is likely to make are frames, boxes, and shelving. For the latter, nothing is sadder than seeing a beautiful bookcase with sagging shelves.
There are ways to prevent sagging shelves. First, start with the strength of the shelving material. The quality and type of wood make a big difference. A hard wood full of knots is not as strong as a soft wood with no knots. So, excluding issues such as knots, the best to worst choices for shelving are:
1. Real wood
2. Plywood
3. Medium-density fiberboard (MDF)
In addition to the material selected, other factors that can affect the viability of shelves include the design.1. Design factors that can affect a shelf’s viability include:
a. The thickness of the shelf. (Doubling the thickness provides 8x the carrying weight.)
b. The length of the shelf. (Shortening a board by half provides 8x the carrying weight.)
c. The width of the shelf. (A shelf of double the width provides 2x the carrying weight.)
In other words, a short thick shelf of MDF can support more than a long thin shelf of oak.2. Here are two other design dynamics that come into play when making shelves:
a. Are the ends fixed or floating? (Fixed shelves are 5x stiffer than floating shelves.) In other words, forget “brick & boards” for shelving.
b. Is the load equally bearing across the length of the shelf, or is the weight centered in the middle? The same weight placed in the middle will cause more sagging than the weight distributed across the length of the shelf.
So, to keep things simple, for something like bookshelves, use real wood at least ¾” thick with no knots, 8–10˝ wide, and about 30˝ in length. If the shelf is for knickknacks, these recommendations are unnecessary. But for heavy items, one might ask, “Which real wood should I use?”
In the companion article “Commonly Used Woods,” you’ll see a number for the modulus of elasticity (MOE) listed for each wood type. Use this as you decide on material for a project. For example, cedar’s MOE is 880,000, so it is not as good for shelving as birch, with an MOE of 2,010,000.
Wood Expands and Shrinks
Solid wood expands and contracts seasonally. Even if you’ve sealed every surface of that tabletop, it’s still going to be affected by environmental changes, and this needs to be taken into account as you plan your project. Man-made materials don’t move seasonally, and this is one of their significant advantages. If you don’t accommodate seasonal movement, the project will develop cracks. We’ve heard about so many projects on which breadboard ends weren’t done correctly, or panels were glued rigidly in place—these projects are doomed from the start. You need to understand and allow for wood movement.
What Is Wood Movement?
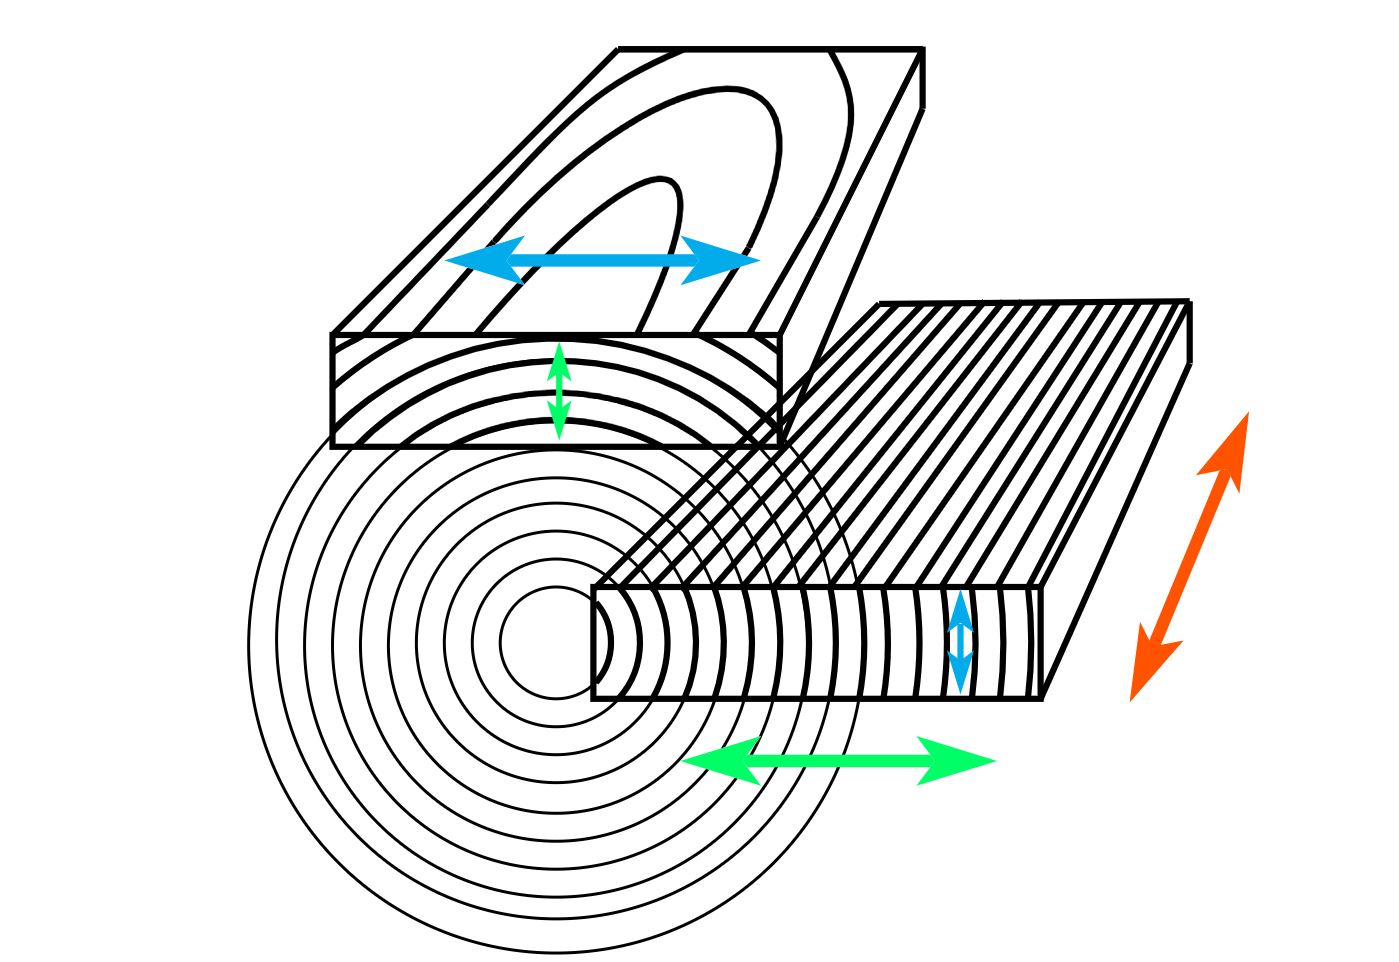
Wood responds to the ambient humidity in its environment by absorbing or desorbing the moisture content within its cells. As moisture leaves, the cell size decreases. As moisture increases, the cell size increases. However, the direction the wood was cut from the tree influences the amount of change. This is demonstrated below, displaying a tree trunk end.
- The red arrow displays the longitudinal movement. The amount of dimension change here is too insignificant to be of concern.
- The green arrow represents radial movement across the width of quarter sawn wood.
- The blue arrow represents tangential movement across the width of plain sawn wood.
- Note that the plain sawn board has radial movement across the board’s thickness and the quarter sawn board has tangential movement across the board’s thickness.
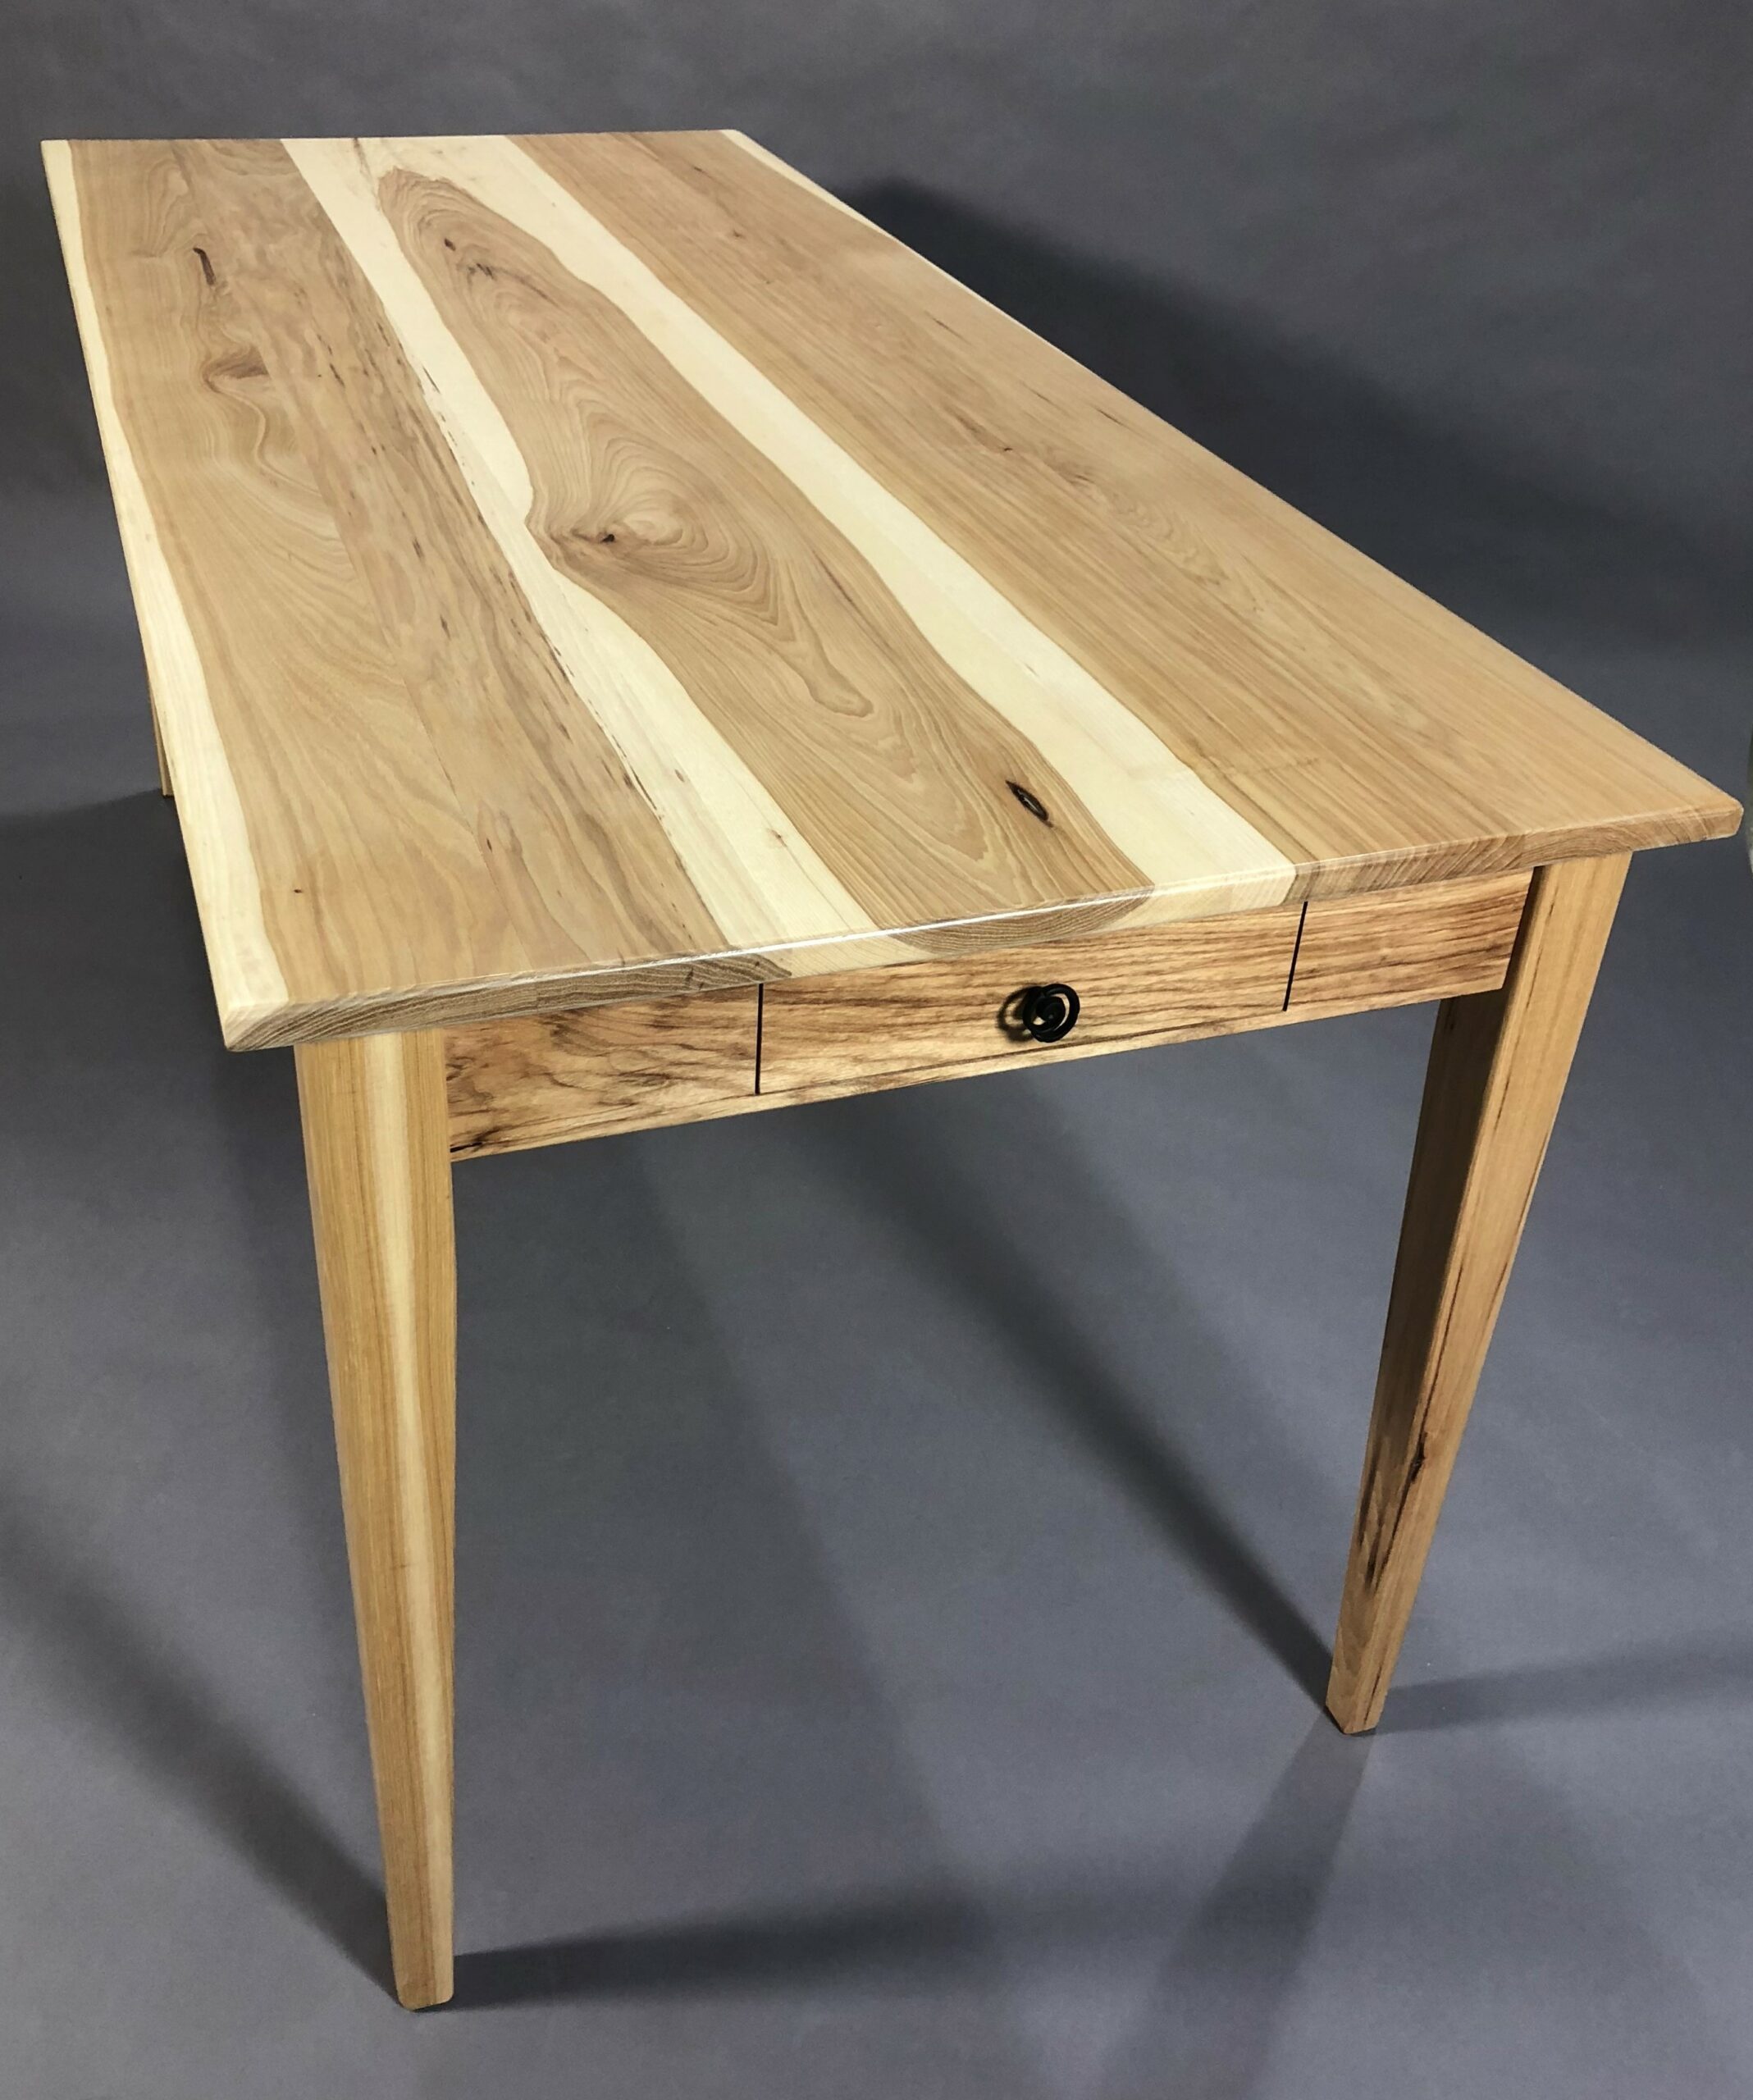
There are greater dimensional changes in tangentially cut wood than in radially cut wood. So, one of the benefits of quarter sawn wood is that it’s less prone (but not immune to) expansion and contraction.Wood expansion is collective. If a board is 1” wide and expands 0.01”, that same board at 10” will expand 0.1”. The 32” wide hickory table in the picture will move a lot seasonally. Similarly, if you’ve created an inset drawer whose height tolerances are extremely tight, seasonal changes could cause the drawer to jam.
How to Calculate Wood Movement
You can get an approximation of how much a board will expand or contract by using the Dimensional Change Coefficient numbers provided in “Commonly Used Woods.” This requires a simple calculation. The objective is to find the change in dimension based on the difference in the moisture percentage in the wood. Most houses that are heated and air-conditioned see a moisture change of 3% to 4% over the course of a year. Let’s use 4%. Multiply that (4%) times the radial or tangential number in the table and then multiply that by the original width of the board. The formula looks like this:
∆D = DI[CT(MF-MI)] Where ∆D = Change in dimensionDI = Dimension (original)
CT = Dimensional Change Coefficient
MF = Moisture content at the end
MI = Moisture content at the beginning
Let’s say you have some Honduran mahogany that is flat sawn. The tangential DCC is 0.00238. The board is 7.5” wide, and you’re estimating there will be a 4% moisture change. So now the equation looks like this: ∆D = 7.5” [0.00238 (4)] ∆D = 7.5” [0.00952] ∆D = 0.071” (Or a little over 1/16” of an inch)This tells you that the 7-1/2” wide board will change 1/16” from the driest to most humid times of year. That may not seem like much, but what if it were a 37” wide tabletop? That would be 0.352” or just under 3/8,” and if improperly constructed, there would be a lot of forces in that construction that have to be released in some fashion. Read: cracking... But let’s say you do not know the actual percentages for the before and after moisture content. It’s best to simply put some guesses in there and build your project with an idea of what could happen. Don’t assume that the dimension you have in your shop will always be the same for that project. The bottom line is that you MUST accommodate wood movement.
Don’t Forget About Warping
Warping is caused by the moisture content of the wood trying to match its new environment. The problem is that different layers of wood have different amounts of water and internal stresses caused by how it was grown (think of a tree growing on the side of a hill trying to point at the sun). If the internal structure of the wood is straight and the wood is quarter sawn, there will be very little distortion from drying. But few trees are straight with no stresses and/or no branches.
After the tree has been cut into lumber and the wood is drying out, the internal stresses bow, warp, cut, and twist the wood. Most of this can be eliminated by proper drying techniques. However, if the wood was dried in the Midwest during winter and you bought the wood on the east coast in summer, it will take some time to equalize. In addition, if the wood is not uniformly dried and you start milling the wood for a project, wait a few days or weeks before the next step; you may find that even though you left it flat, it is no longer flat.
The best practice is to:1. Allow the material several weeks to acclimate before milling the wood.
2. If you know you will be taking time to mill and assemble a project, it’s best to mill it close to what you want, then wait until you’re about to use it before the final milling.
However, even with your best-laid plans, you may find some of your wood has warped. What’s the best option? That depends, but you do have a few.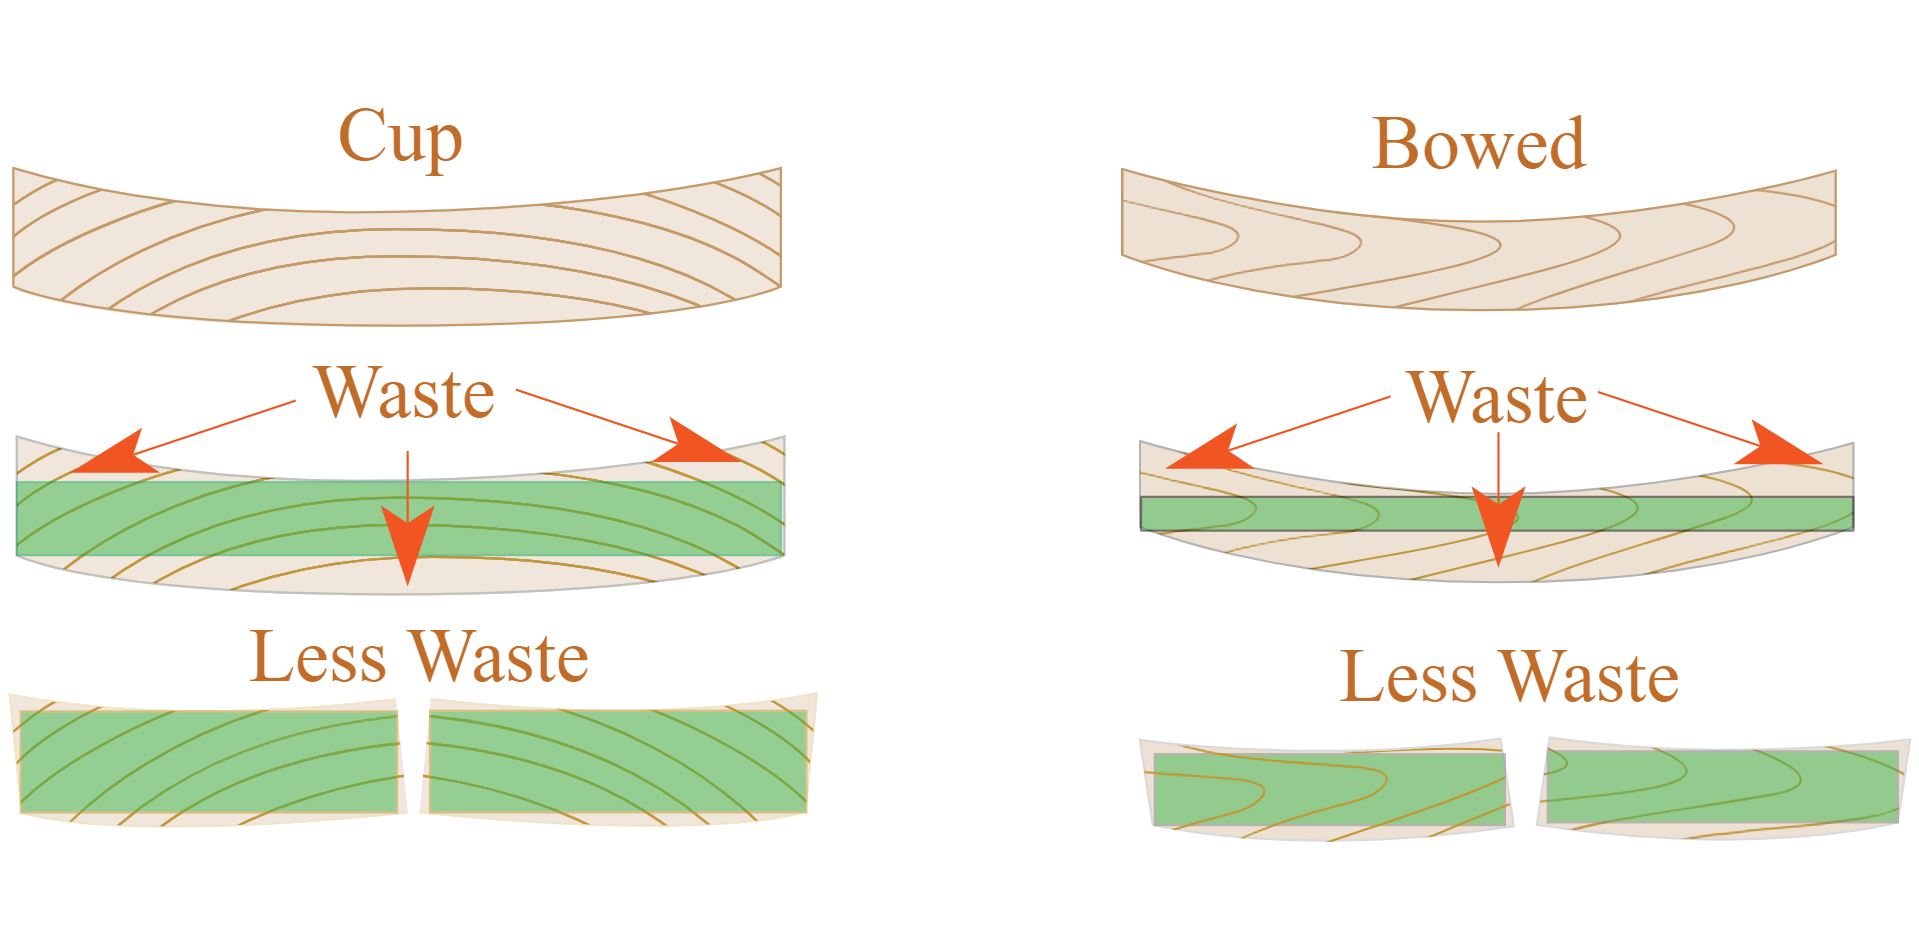
First, look at the images above: cupped wood is on the left, and bowed wood is on the right. A cup happens across the width of a board. A bow happens down the length. It helps to establish which is more important for your project: the length, width, or thickness. In the images above, the original boards are light brown, and the salvaged wood is green. If you try to keep the original width in the cupped wood, you will lose much of the wood's thickness (on the left) or width (on the right). If you rip a cupped board down the middle and flatten each half, you will lose less of the thickness, and you can always glue together the flattened two pieces.
Similarly, the bowed board has good length and width. But, if you try to maintain the length and rip everything else that is not straight, you’ll end up with a skinny board. However, if you crosscut the bowed example in half and then remove everything that isn’t straight, you’ll lose a bit of the board’s original length, but you’ll lose much less material after straightening.

To provide a more concrete example. Here is a short board with a considerable twist. The original board was 10-3/4˝ long, 3-3/8˝ wide, and 0.667˝ thick. You can see how the front-left and back-right edges are raised in the air.
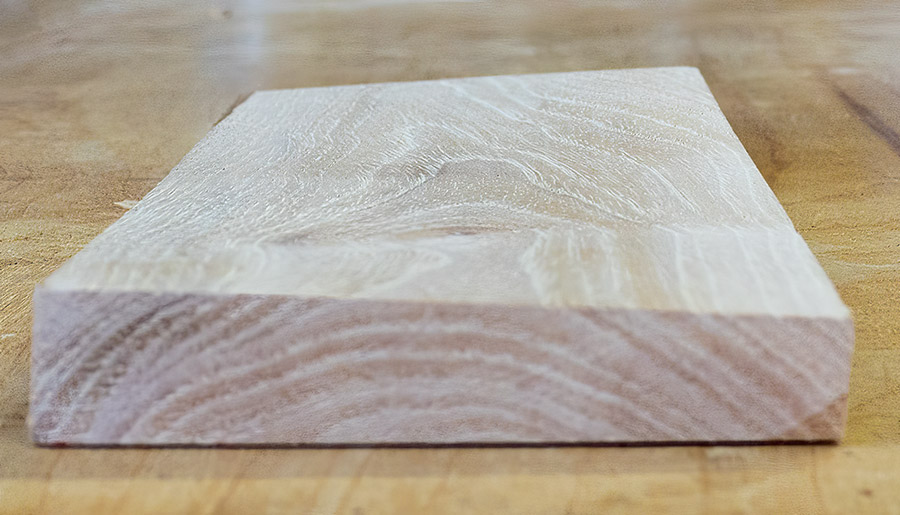
After flattening one face you can see the wood loss as the sides show considerable changes in thickness.
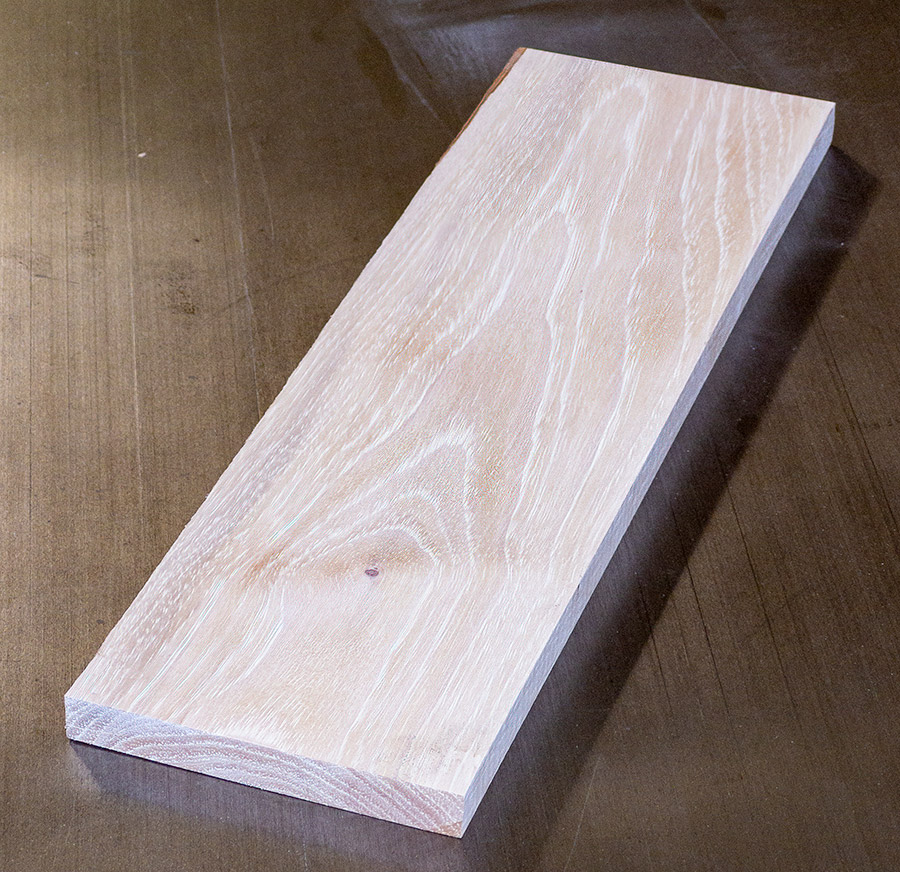
After flattening the top to make it parallel to the bottom (flat) face, the final thickness was 0.480˝, indicating a loss of 0.187˝, or about 3/16˝.
This example was using a short board; if the board was ten feet long, with the same amount of twist, it’s unlikely that any wood would have remained if one tried to flatten the entire board. The solution, in this case, would be to cut the board into shorter pieces, flatten them so that you would have less wood loss. Part of the lesson to learn here is that by buying your material rough sawn, typically a full 1” thick or more, you have the most opportunity to get the thickness you need for your project out of the boards.
Does Sealing Help?
You can slow down the change in moisture by coating the outside with paint or a finish. This will not stop the moisture transfer in or out, but it will slow down the process. However, there is some debate: Do you have to cover both sides of a piece of furniture, or only one? This came up because researchers looked at the insides and undersides of furniture made centuries ago. These had not shown any evidence of profound cracking or warping due to moisture changes despite only being covered on one side. The argument is that items that failed were discarded, removing them from the study. On this issue, the jury is still out.
Nonetheless, there is no question that applying a finish or paint will help slow down the moisture transfer, so it’s best to seal all faces and edges of your projects. A rule of thumb for coating wood is three coats of finish (except shellac, which should use six layers). This is in addition to the wash coat/sealer. Oil finishes provide the least protection against water vapor transfer.
Storing Your Materials
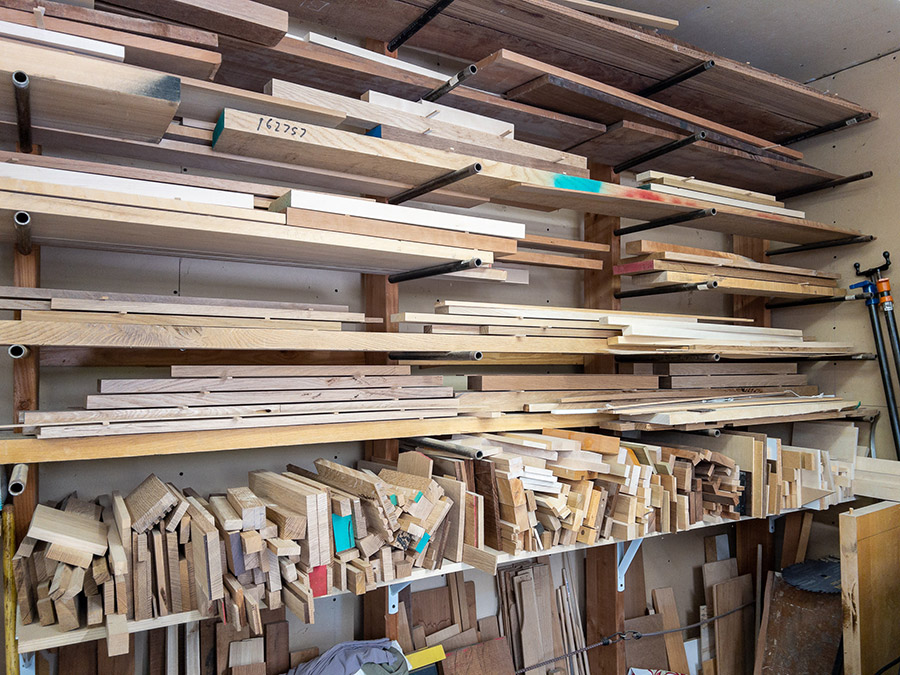
There’s one last point to cover on this subject: wood storage. For wood to acclimate to new locations and changes in seasons, it needs to breathe. When storing wood, placing stickers in between boards is essential so that no two boards are in full contact with each other. Similarly, laying a board on cement is even worse, and laying plywood flat on cement is very likely to result in a very warped piece of plywood.
Stickers can be any sliver of wood, 1/8˝ – 1/4" thick, 1/4"– 1˝ wide, and 4˝ – 8˝ long, depending on the width of the boards. Make them all the same thickness to make it easier to “grab and use.” Masonite (which will not stain your wood) works very well. Cut it into thin strips (at the appropriate length for your wood size, and place handfuls of these into tin cans around the shop. This makes it very easy to have a ready supply at hand to both store wood and wood that is milled and waiting for assembly. In the above image, all the larger, horizontal boards are stickered.
Sources: Websites- National Hardwood Lumber Association
- Wood as an Engineering Material
Books- The Handy Shop Reference by Tom Begnal
- Woodworkers’ Essential Facts, Formulas, & Short Cuts by Ken Horner
- More Woodworkers’ Essential Facts, Formulas, & Short Cuts by Ken Horner

Good basics summary
Yikes "laying a board on cement is even worse..." Cement is the powdery material when mixed with sand, stone, and water produce concrete. This is like calling paper mache flour.
Great article. It was well-researched and well-written The explaination and examples were clearly written and easy to understand. Well done. Thanks.
I cannot find a way to print this article. I would like to keep this for reference. How can I do this ?
This article is great!! Well written and described. I’m keeping this one.
Good Info. It’s nice to read conformation on my shop methods.
very nteresting and important your information, about the wood. RICHARD FUENTES M. CHILE
Geez, did you write all that? Mind-boggling! Thanks for all the background, Gary.
I had heard a lot of this from various sources over the years, but I had never heard this clear an explanation of hardwood vs. softwood. It clicked into place for me when I read this article. Great explanation of heartwood vs. sapwood, too. Thanks!
One more question on my countertop, regarding moisture absorption. I plan on applying equal coats of finish to both sides of the top. Does that not limit, to a great extent, wood movement due to moisture? Hello Blake, Applying finish evenly to both sides is an important step, and it does slow the moisture absorption rate. The extent to which it will slow it will depend on the type of finish, the number of coats, etc. There's not a simple formula for this, but regardless of how many coats are applied you will always want to accommodate wood movement into your design. Paul