 A Tricky Joint Simplified. Exposed joinery is the perfect blend of form and function. A well-executed joint is not only beautiful to look at but also serves to bond furniture elements with strength and endurance.This article will focus on making a through tenon joint.The through tenon is especially useful for joining boards that are at right angles as in a bookcase or, as in this example, the legs of a slab wood coffee table. Historically, furniture joinery was kept hidden, serving the function, but ignoring the form. Undoubtedly, the pressures of production (yes, it has always been there) coupled with the limitations of hand tools, helped keep joints like the mortise and tenon hidden from view.

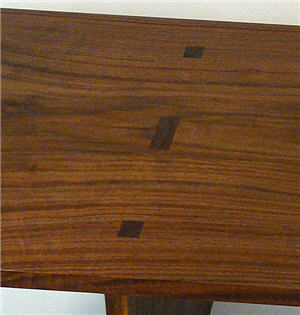 Twentieth century furniture designers began to explore the concept of exposed joinery. The through tenon used in Art and Crafts furniture is a good example. Today, joinery is routinely exposed and even used as a design element.The through tenon is a difficult joint to make well and there's no easy way to fix a poor fit. You've got one shot; better make it count.
I've developed a system for through tenons that's quick and almost guarantees a clean, tight fitting joint. This is a machine-based technique, although there is a little chisel and handsaw work involved. Typically, tenons are cut with shoulders to create a step that adds strength to the joint. My technique flips things on their head. The tenons are cut to the same thickness as the stock, so no shoulders. Instead, the shoulders are created around the mortises in the form of a shallow dado. Once cut, the dado acts as a guide for cutting the mortises. If your dado fits well, than chances are the tenon will fit well. Cutting the rest of the joint is almost automatic.
To execute this joint, you'll need a band saw, a router table, a plunge router with a straight cutting bit, a straight edge guide, a flush trim bit (1/2"), a drill, a sharp chisel and a hand saw. For this story, I used Festool's straight edge system and plunge router. You can also get the job done with a simple straight edge and spacer stick (see sidebar).
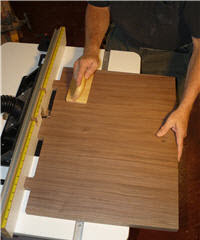
First, cut and prepare the stock to be joined. Finish-sand the parts that get the tenons. If you sand after the joint is cut, you run the risk of a perfect fit becoming sloppy.
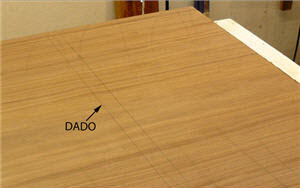
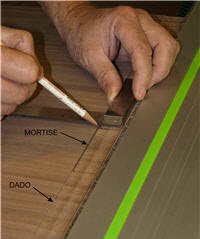
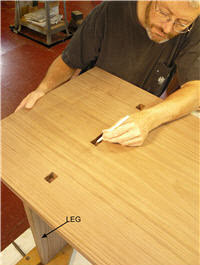
Lay out the 1/16" deep dados for the legs on the underside of the top (Photo 1). In this case, it's the underside of a coffee table. The dados help position the pieces for tenon layout and increase joint strength.
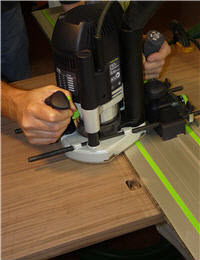
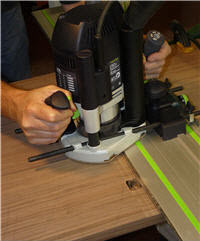
Use a straight edge to guide the router along the marked dado (Photo 2). The first pass cuts a 1/2" wide dado. Adjust the router guide so the next pass cuts the dado to the exact width. The Festool system shown here simplifies the job with micro-adjustments on the router guide. See the Sidebar 'Straight Edge and Spacer Sticks' at the end of this article for a low-tech way to get the job done.
Leave the straight edge in place and lay out the mortises (Photo 3). No need to be super-precise as the tenons are cut to fit the mortises. Do not move the straight edge until the mortises have been cut.
Cut the mortises using the same router and straight edge set-up as for the dados (Photo 4). The only difference is the plunge router is set for a deeper cut - cut most of the way through. Following this procedure insures the mortises are cut exactly the same width as the dados. Stop and start blocks aren't necessary. Eyeball the beginning and the end of each cut but stay within the layout lines. Later you'll scribe the tenons from the mortises until they're a perfect fit.
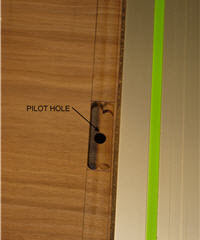
Drill a pilot hole through the middle of the mortise (Photo 5). The hole must be large enough to slip a flush-trim bit through.
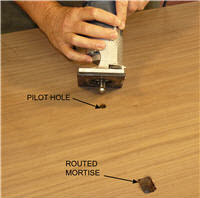
Then, turn over the top and use a flush trim bit and a router to finish the mortise (Photo 6). A trim router is the perfect size for a job like this.
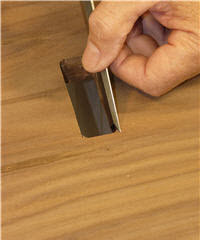
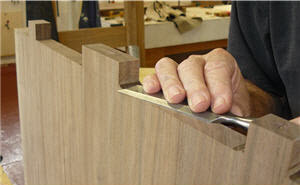
Use a chisel to square the corners and finish the mortise (Photo 7). Rest the back of the chisel on the mortise wall to guide the cut.
Fit the legs into the dados and trace the mortises onto the ends of the legs (Photo 8). Lay out the tenons so they are slightly longer than the depth of the mortises as measured from the bottom of the dado. The leg is held in place by the dado on the underside.
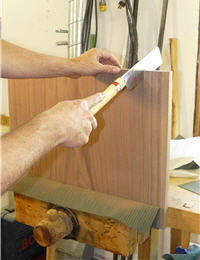
Hand cutting the tenon sides is where you need a practiced hand. Make the cuts a bit generous so they can be pared to a perfect fit later. I like to use a pull saw for cuts like this (Photo 9). These cuts can be made on the band saw, but this requires time-consuming fence set-ups.
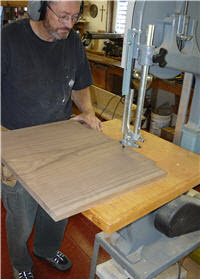
Use the band saw to cut out the waste between the tenons (Photo 10). Don't try and cut to the line. Leave about 1/16" waste to be trimmed on the router table.
Next, move to the router table and use a straight cutter to finish the bottom cut between the tenons (Photo 11). Start the cuts between tenons by pushing the piece into the bit until the top of the tenons hit the fence. The fence insures the tenons are the correct length and that the bottom cut between the tenons is straight and even. Then slide the board along the fence. Stop the cut short of the next tenon and pull the board away from the cutter. You are removing very little material so entering and exiting the cut is not a problem.
Clean up the remaining wood between the tenons with a chisel (Photo 12). Pair the sides of each tenon to the layout lines. The tenon will fit the mortise perfectly. Sand the protruding tenon flush or leave it a bit proud. It's your call.
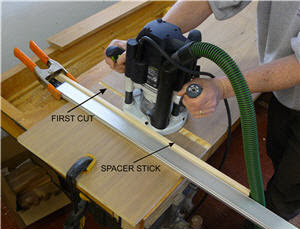
Side Bar - Straight Edge and Spacer Stick You don't need a commercial router guide to make this joint. A low-tech alternative is to use a straight edge with a spacer stick, which some people call a slip stick. Make the first cut with the straight edge alone. Clamp a slip stick to the straight edge to cut the dado to the desired finished width on the second pass. Use the same procedure when cutting the mortises. You'll need to make some test cuts to get the slip stick the correct size for the dado you're making.
Photos By Author

I am making a large slab dining table with slab legs. What is the best way to connect the legs to the top without permanently attaching? I want to be able to Dismantle for moving, I also want to have through tenons for the stretcher which will span the legs and keep the legs from splaying with the weight of the top. Is there an article or video on creating through tenons with removable locking shims?
Hi there,I check your blogs named "Through Tenons Made Easy" daily.Your humoristic style is witty, keep doing what you're doing! And you can look our website about proxy list.
I understand making tenons etc but how do you make exposed/protruding tenons, glued up but without having glue all over your slightly protruding tenon to mess up the finishing? Thank VERY much.