 My family lives in Northern Michigan, where we get tons of snow. While we love to cross country ski in the woods, we also like to go for walks out on the snow-covered road. I wanted to pull my two-and-a-half year old daughter in something a bit more stylish than an orange or red plastic sled designed for going down hills. In my mind, I wanted something that had beautiful curved runners and a classic design. Of course, I made it out of wood.
 It is possible to make curves many ways, but sled runners are unique. They have a long straight section, and only the front section needs to have the curve. I thought there might be an alternative to regular bent laminations. After discussing the project with my "wood crew", I decided to make the runners using a bent lamination with stopped kerfs and filler strips; a simpler process that uses fewer materials. I learned some things along the way, and wanted to share the process with you.
 I wanted the stopped kerfs to be 14" long, so I measured that out on my work piece and clamped a stop block on the table saw fence. I made the runners out of 1-1/2" wide maple, a strong and dense wood that laminates well. At this point, I needed to figure out how many cuts to make.
(Note that the guards have been removed from all of these photos for clarity. But please use all appropriate safety cauls, pawls and guards with your own table saw.)
 I used calipers to measure the exact width of the blade (the widest part is the end of the teeth). This helped me determine how many laminations to use; I decided on six evenly spaced cuts into my runner blank. This isn"t an exact science, but rather an estimate. As long as the thicknesses of the kerfs and the laminations are close, the sled's runner will look great.
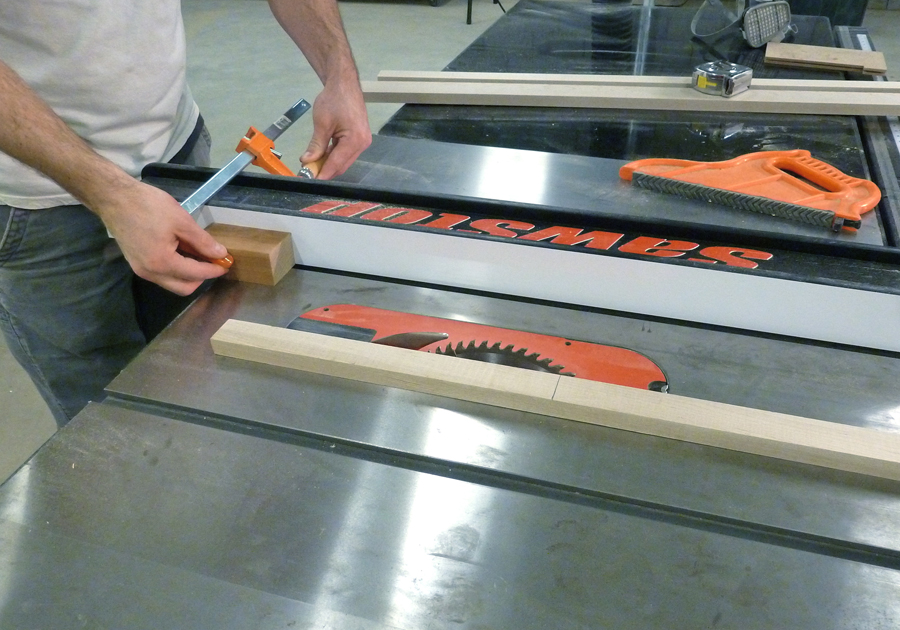
 I made my first cut on the outside of the piece of maple. If I cut the inside first, I would lose the solid edge that I needed to run against the fence. I pushed the sled runner until I hit the stop block and then turned off the tablesaw. Once the blade had stopped spinning, I removed the work piece and reset the fence. I continued cutting all six of the stopped kerfs. On the final cut for each runner, there was only about 3/8" material, which I needed to split in half with a kerf. I made sure to hold the rigid, rear part of the runner firmly against the fence as I pushed it forward.
 Next, I ripped thin pieces of maple for the filler strips.
(I recommend consulting Paul Mayer's article for three techniques.) I made these slightly thinner than the kerf to leave room for the glue. The tablesaw left an angle at the end of the stopped cut, so I needed to match that angle on the filler strips. The angle, which was greater than 45 degrees, was best lopped off with a couple quick strokes of a Japanese saw.
 I used a jigsaw to cut the bent-lamination form out of a 2 x 6. The form was really simple, with the section of a 20" circle, tangent to the bottom of the 2 x 6 nested inside a 21.5" circle. I also cut out places for my clamps.
 I always like to do a rehearsal when gluing up complex parts, and this project was no exception. I learned where I needed to set my glue, how quickly I needed to move and how the parts would slide against each other. Don't skip this step!
 I laid out a sheet of rosin paper to protect my bench, arranged my clamps, poured my glue, put on my latex gloves and it was GO TIME! First, I brushed glue liberally into all six kerfs. Working quickly, I used my fingers to spread out the separate parts. I prefer Titebond III because it has an extended open time, which was essential here.
 Next, I brushed glue on my thin strips, inserting each one into the cut as I finished applying the glue. I used a disposable chip-brush as this can get pretty messy.
 Once all of the ripped laminations were inserted, I pushed them all down and back so they sat into the angle at the terminus of the kerf. This is difficult to do once clamping pressure is applied, so it is best to do now.
 I clamped the straight section of the sled runner to the form with two clamps. Then, I concentrated on the lamination. I popped the clamp into the angled clamping areas of the form and held it vertically with my left hand while using my right thumb to depress the lock and push the female part of the form against the sled runner. Once I'd pushed as far as possible, I used the handle to screw the clamp tight. I let the lamination sit overnight, and started the second runner in the morning.
 The next day the glue had dried, and I planed the laminations with an old plane. This step could also be executed on a stationary jointer or hand held power planer. After I got one side flat, I flipped it over and finished the other. Of course, this step could be done in a planer.
 After laying the runners out and marking them, I trimmed the ends with a Japanese saw. Once the runners were the same length, I marked my mortises for the uprights.
 After chopping the mortises and tenons, and fabricating other parts of the sled, I assembled the base in steps. I set the sled up on cauls to distribute the clamping pressure evenly and confirmed the uprights were square to the runners. Once the uprights were in place, I then measured corner to corner on the tops of the posts to make sure the sled base wasn't twisting lengthwise.
 I bored and countersunk all of the oak slats before finishing with an exterior grade Spar Varnish. Of course, I wore a respirator and latex gloves for safety. I applied three coats of Varnish, sanding with 180-grit sandpaper between coats.
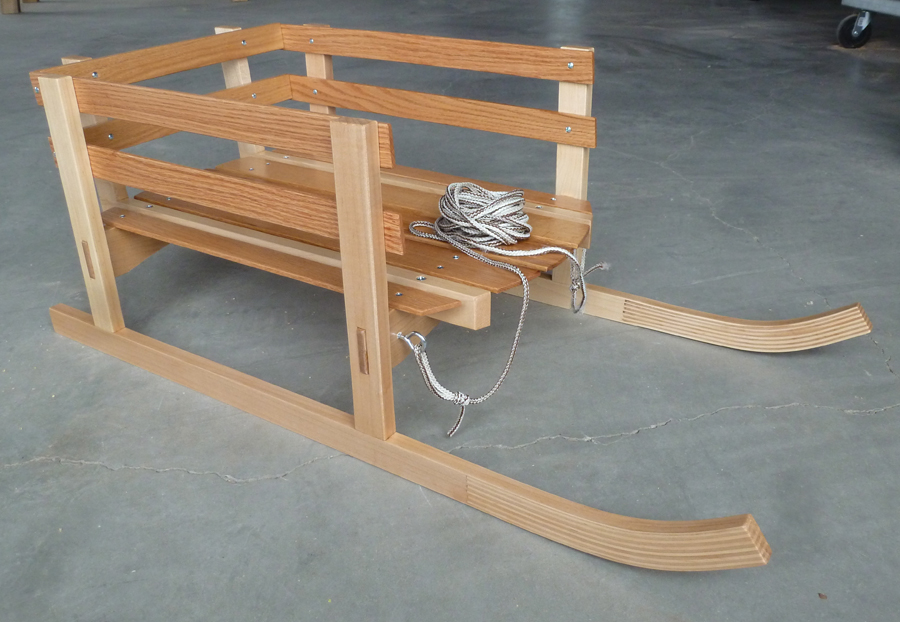 After the last coat of varnish had dried overnight, I reassembled the sled. I used oval head stainless steel screws to attach all of the slats, but brass would work outdoors too. I love the way that the reddish Red Oak plays off the creamy Hard Maple. While this sled will last for decades of normal use, I take extra care to wipe it down afterwards, and then set it on its end...I want my great grandchildren to ride in this stylish sled!
Photos By Author


Very informative set of photos and instructions. I am sure you are aware that you can buy saw blades with a flat top to avoid an angled cut at end of the cuts.
What type of glue do you use for the lamination? Thanks
This sled is great very nice choice of wood would like to have the measurements thanks.
With a properly setup saw (riving knife and blade parallel to the fence), the blade raised to its maximum height, wouldn't you have created a cut angle at the stop that would mean little to no trimming of the inserts?
I found it very interesting & informative, good pictures to follow. I live in South Africa where we never have snow but it was good for tips & methods of process
The sled and the runners are beautiful. The model is a cutie with a contagious smile. It did take me a while to figure out the main wood used. In the last two photo captions I learned it is red oak. Wish it had been stated earlier in the piece. Nice woodworking, good idea.
Really cool sled! I had planned to make the sled runners for my project a different way but, this appears to be simple, effective and strong!
Nice! I may have to try that for the grandson next Christmas. Thanks.