I remember, distinctly, the first time I used my mortiser. It was SO cool to be able to punch a square hole into a piece of wood, I had to run into the house and drag my wife back out to the shop to see it. OK, making a square hole wasn't so hard, but I learned that it took careful set up to make the hole accurately and correctly. Here are some shop-proven set-up tips to help you get the most out of your mortise machine.
Know the Players
Mortise machines aren't complicated, but there's a little jargon involved. The hole is made by two components working together, the auger and the hollow chisel.
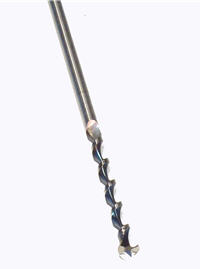 The auger spins inside the hollow chisel, excavating most of the waste out of the cut.

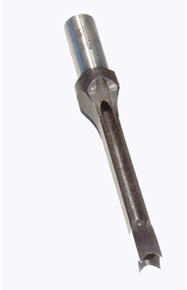 The hollow chisel shears its way down the walls of hole, leaving behind square inside corners.
 Setting Up the Auger and Chisel
It's critical to get the auger to lead the cut by just the right amount or the hollow chisel won't work effectively. If you've got a dime to spare, it's easy to get this just right.Insert the hollow chisel and auger into the mortiser, together. Lock the hollow chisel into the mortiser head and the auger into the chuck. Don't sweat the relationship between the auger and hollow chisel yet.
Setting Up the Auger and Chisel
It's critical to get the auger to lead the cut by just the right amount or the hollow chisel won't work effectively. If you've got a dime to spare, it's easy to get this just right.Insert the hollow chisel and auger into the mortiser, together. Lock the hollow chisel into the mortiser head and the auger into the chuck. Don't sweat the relationship between the auger and hollow chisel yet.
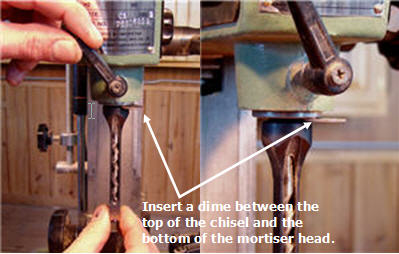 Loosen the hollow chisel and insert a dime between the top of the chisel and the bottom of the mortiser head. Lock the chisel in this position.
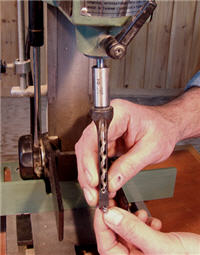
 Loosen the auger and position it so the flat part of the auger tip is even with the long point of the hollow chisel.
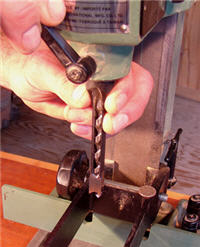 Loosen the hollow chisel, remove the dime, and slide the chisel up as far as it will go. The auger now leads the chisel through the cut by the thickness of a dime. Perfect.
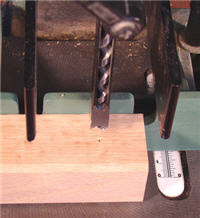
 Set the Depth
Make your mortises 1/16" deeper than the tenon length.Set the depth of the chisel by marking out the mortise depth on the end grain of the material being mortised. Lower the chisel until the long points of the chisel meet the lay out line. Lock the stops on your machine.
Set the Depth
Make your mortises 1/16" deeper than the tenon length.Set the depth of the chisel by marking out the mortise depth on the end grain of the material being mortised. Lower the chisel until the long points of the chisel meet the lay out line. Lock the stops on your machine.
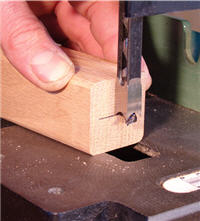
 Locate the Fence
Use the fence to guarantee that the distance from the edge to mortise is the same on every joint.Locate the fence by working off the point of the auger, which is the center of the mortise. Center the mortise on the leg by holding one face against the fence and slightly dimpling the top surface with the auger point.
Locate the Fence
Use the fence to guarantee that the distance from the edge to mortise is the same on every joint.Locate the fence by working off the point of the auger, which is the center of the mortise. Center the mortise on the leg by holding one face against the fence and slightly dimpling the top surface with the auger point.
 Rotate the leg so the opposite face is against the fence and make another dimple. If the two dimples are in line with each other, you're done. If not, adjust the fence until they are.For a mortise that isn't centered on a leg, simply lay out the center of the mortise on the leg and adjust the fence so the auger dimples the lay out line.
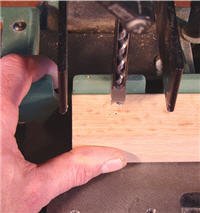
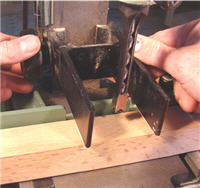
 Orient the Hollow Chisel
The hollow chisel must be parallel to the fence and to the face of your work, in order to cut a smooth-walled mortise.Position the leg against the fence and slide it against the side of the hollow chisel. Check for a gap where the chisel doesn't completely meet the end of the leg.
Orient the Hollow Chisel
The hollow chisel must be parallel to the fence and to the face of your work, in order to cut a smooth-walled mortise.Position the leg against the fence and slide it against the side of the hollow chisel. Check for a gap where the chisel doesn't completely meet the end of the leg.
 Loosen the chisel and turn it until the side of the chisel evenly meets the end of the leg. A test cut will confirm if you've done this correctly.
 Set the Hold-Down
There's a lot of friction on the hollow chisel and, as you raise it out of the wood, the wood wants to lift with the chisel. The hold-down prevents the wood from lifting, which will also prevent the wood from racking and twisting on the chisel.Position the hold-down on your mortiser so it's as close as can be to the top of the material, without dragging on it as you slide the part underneath.
Set the Hold-Down
There's a lot of friction on the hollow chisel and, as you raise it out of the wood, the wood wants to lift with the chisel. The hold-down prevents the wood from lifting, which will also prevent the wood from racking and twisting on the chisel.Position the hold-down on your mortiser so it's as close as can be to the top of the material, without dragging on it as you slide the part underneath.
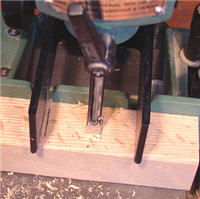 Cut a Mortise
It's best to cut the mortise in the correct sequence. The goal is to have wood on four sides of the chisel or two sides of the chisel-- never on three sides. With wood on three sides. the chisel can deflect, and possibly bend.Hole #1 goes at one end of the mortise.
Cut a Mortise
It's best to cut the mortise in the correct sequence. The goal is to have wood on four sides of the chisel or two sides of the chisel-- never on three sides. With wood on three sides. the chisel can deflect, and possibly bend.Hole #1 goes at one end of the mortise.
 Hole #2 goes at the opposite end of the mortise, defining the overall length.
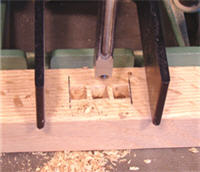 The next hole, #3, must be less than one chisel width away from an existing hole.
 Finally, remove the last 'bridges' left across the mortise.
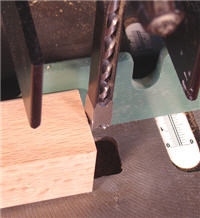
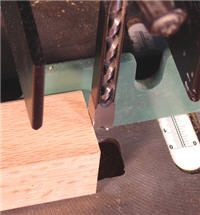
 Check Your Work
With a mortise complete, make certain all the settings are correct. You can push a ruler into the mortise to make sure the depth is right.Check the walls of the mortise to make sure they're not 'saw toothed.' A saw toothed wall is caused by the chisel not being parallel to the fence.
Check Your Work
With a mortise complete, make certain all the settings are correct. You can push a ruler into the mortise to make sure the depth is right.Check the walls of the mortise to make sure they're not 'saw toothed.' A saw toothed wall is caused by the chisel not being parallel to the fence.
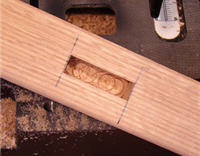 If the walls of the mortise aren't smooth, unlock the chisel and rotate it until its position is correct and you end up with a smooth-walled mortise.With these simple set up tricks, your machine will make perfect mortises.
Photos By Author

I just got an old Grizzly G8620 floor model and I'm so glad I found this information.
I just was given a never used craftsman and just put it together. These tips have already paid off. Great info.
Thanks for these instructions. I borrowed a brand new mortising machine from a friend. No instructions. I never would have thought about the dime spacer or ensuring 4 or 2 sides not 3 of the chisel are in touch with wood. Now..........I will apply what I've learned and see how the results are!