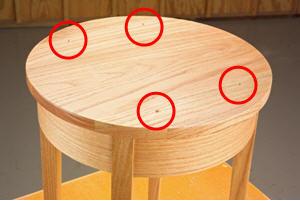
Photo 1. I mistakenly put screws up through this tabletop four times! I thought I had the right length screw. Boy, was I wrong.
www.wwgoa.com
Did you use too long a screw, and now it’s poking through the tabletop? Here’s a ‘swell’ repair solution.Sending a screw up through a tabletop while attaching it to the apron is a disaster, there’s no question about it. I managed to do this four times when I grabbed the wrong length screws from a misplaced bin (Photo 1)! I did everything right: the top was finished and I’d flipped it over on a blanket to protect the surface; I pre-drilled pilot holes for the screws; I even added a little wax to the screws so they would corkscrew smoothly into the table top. I didn’t, however, remember to double check the screw length directly against the thickness of the top. Big mistake.
It may have been easier to just replace the top, but I really liked the grain of this particular red oak table, so I decided to fix it. The holes were relatively small, and oak is a porous wood, so I knew making these holes disappear would probably be easier than repairing a tight grained wood like maple or cherry.
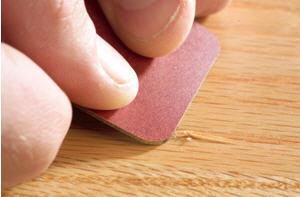
Photo 2. Close inspection reveals small chips that have been pushed up by the screw. I carefully leave the chips intact, so I can use them to fill the void after I remove the screw.
www.wwgoa.com
First, I examined the top and holes. The screws had only punctured the surface and all the small mini-chips were still there (Photo 2). I didn’t sand these off, as I knew I would need them to make this fix blend in perfectly.
Photo 3. I apply distilled water to the holes and to the chips that were pushed up by the screws to swell the fibers of the wood. The syringe allows for water to precisely drip on the mistakes and the surrounding chips.
www.wwgoa.com
I removed the screws and went to work. The first step to fixing the top was to apply distilled water to swell the fibers of the wood. It’s easy to get water exactly where you want it with an inexpensive syringe (Photo 3). I used distilled water because I’d heard that minerals in tap water could react with the tannins in oak, darkening the wood. Although I don’t know if this is true, I decided it’s better to be safe than sorry.
Photo 4. I force the fibers flat and back into place with a thin hard implement, like a credit card. The wet fibers mash back into place pretty well.
www.wwgoa.com
Once the fibers of the wood were dry, I used a small piece of plastic laminate (a credit card would work perfectly) to force the fibers back into place (Photo 4).
Photo 5. I inject glue into the holes from the bottom side of the table to saturate each hole and the small fibers. Once I see glue coming through the hole, I know it’s ready for clamping.
www.wwgoa.com
Then, I used the same syringe to inject glue into the holes from the bottom of the table (Photo 5). I applied enough pressure to the syringe to see the glue emerge from the top side.
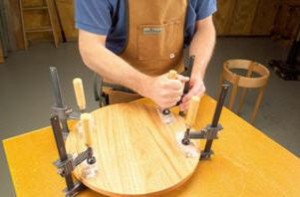
Photo 6: I clamp the fibers by using flat scrap blocks wrapped in plastic so they don’t adhere to the table. I let this glue-up set overnight to make sure the glue dries completely.
www.wwgoa.com
After applying glue to each hole, I clamped the fibers down (Photo 6). I placed a small clamping block wrapped in plastic between the clamp and the tabletop to forcefully push the fibers of the holes flat.I wanted to make sure the fix dried thoroughly, so I let the clamp-up set overnight.By the next morning, the glue was certainly dry, so I removed the clamps .I was pleased to find that my holes had almost completely disappeared. Once I sanded and finished the top, they would be nearly invisible.
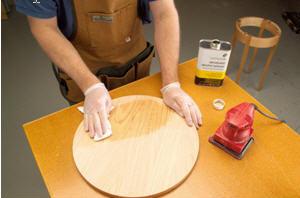
Photo 7. I wipe the top with denatured alcohol to expose any glue spots that remain after the sanding. If any appear, I sand a little more and repeat the process. Once clear of spots, the tabletop is ready for finishing.
www.wwgoa.com
Next, I removed the existing finish, (in this case, polyurethane) and prepared the top. To guarantee that no residual glue remained on the table top, I wiped the top with a rag wet with denatured alcohol (Photo 7). This not only removed sawdust, but exposed any remaining glue that remained. Once the top was clear of glue and debris, it could be refinished and attached to the apron. This time, I remembered to use the right length screw!
Photos By Mike Krivit
Share tips, start a discussion or ask other students a question. If you have a question for an expert, please click here.
Hello,
Thank you for the helpful article. I have a table to fix and would love to try your method. Unfortunately the pictures aren't open up on any platform. Mobile desktop. I tried multiple browsers. Any advice?
Jennifer
This looks a good idea. My son has a large round table with a limed wood finish. When they moved They dismantled the table and put the wrong screws in. So they don't have to do this all over again what do you think of using slowish drying wood glue to swell the fibres and then push down with a credit card and put a weight on it?
Carl Swart
The comments in photo 4 say to mash the wet fibers down. The comments to the right of the phots says to wait till dry?? Contradiction!
George McMillan
What is de-natured alcohol ?
William
It seems that none of the pictures were available to be used as a reference for what had been stated in this document. Very disappointed.
Rick
Really good advise, not needed it yet, but I’m sure I will need it some time.
Rich Manchester
Great solution to a potentially tragic event. Also a good reminder on double checking screw length
beschreib77
Nice job on the repair review.
I humbly question the need for the water. My thinking is the last thing you want is for the fibers to swell. With the need for them to drop back INTO place, if they are fatter now than before it would seem that works against pushing them into the same size hole. It seems that the process of pressing them back into place is mostly responsible for the repair being successful. It would seem less sanding may have been necessary if the fibers were sticking out less. . . . or did I MISS something in the importance of them swelling!
It would be interesting to try this minus the water to see if the water is unnecessary. I also would have thought that in addition to using a credit card to move the fibers back into place placing a small, flat block of wood on top and tapping lightly may have been a better way for a flush repair surface . . .
as to distilled water: the concentration of minerals in water is extremely low, and they are in solution, not suspended solids. The fact that this is a tiny surface area also makes for a low likelihood that even a heavily concentrated solution with excessive solids in it would be visible to the eye.
Marc
Very good info will keep it in my how to fix info folder
JAMES
The photos don't appear in Internet Explorer v11, but do in Chrome. Great article, I can think of several times I started over after using to log a screw. Will certainly use this method before scrapping a piece.
Sign up for our free newsletter today
Get our latest woodworking videos, plans, tips and techniques delivered right to your inbox.
Get exclusive premium content! Sign up for a membership now!
This site uses cookies, web beacons, pixels, tags, and related technologies, as described in our privacy policy and cookie notice, for purposes that may include website operation, analytics, optimizing a user's experience, and third-party advertising or marketing purposes. These technologies may automatically collect and share with third parties information about your use of this site, such as when you access a webpage or complete a purchase on our site. By clicking "GOT IT", you understand and agree to our use of these technologies.


Hello, Thank you for the helpful article. I have a table to fix and would love to try your method. Unfortunately the pictures aren't open up on any platform. Mobile desktop. I tried multiple browsers. Any advice?
This looks a good idea. My son has a large round table with a limed wood finish. When they moved They dismantled the table and put the wrong screws in. So they don't have to do this all over again what do you think of using slowish drying wood glue to swell the fibres and then push down with a credit card and put a weight on it?
The comments in photo 4 say to mash the wet fibers down. The comments to the right of the phots says to wait till dry?? Contradiction!
What is de-natured alcohol ?
It seems that none of the pictures were available to be used as a reference for what had been stated in this document. Very disappointed.
Really good advise, not needed it yet, but I’m sure I will need it some time.
Great solution to a potentially tragic event. Also a good reminder on double checking screw length
Nice job on the repair review. I humbly question the need for the water. My thinking is the last thing you want is for the fibers to swell. With the need for them to drop back INTO place, if they are fatter now than before it would seem that works against pushing them into the same size hole. It seems that the process of pressing them back into place is mostly responsible for the repair being successful. It would seem less sanding may have been necessary if the fibers were sticking out less. . . . or did I MISS something in the importance of them swelling! It would be interesting to try this minus the water to see if the water is unnecessary. I also would have thought that in addition to using a credit card to move the fibers back into place placing a small, flat block of wood on top and tapping lightly may have been a better way for a flush repair surface . . . as to distilled water: the concentration of minerals in water is extremely low, and they are in solution, not suspended solids. The fact that this is a tiny surface area also makes for a low likelihood that even a heavily concentrated solution with excessive solids in it would be visible to the eye.
Very good info will keep it in my how to fix info folder
The photos don't appear in Internet Explorer v11, but do in Chrome. Great article, I can think of several times I started over after using to log a screw. Will certainly use this method before scrapping a piece.