 In my experience, resawing on a bandsaw is one of those things that makes smoke come out of woodworkers' ears. It can, admittedly, be tough to get perfect, especially if you have to go through the steps required for drift compensation. (Sometimes you get the drift, sometimes you don't.)
Here's what'll save your resaw bacon. You don't always have to do drift compensation. The key to dirt simple resawing is a singe point contact fence, which you can easily make.
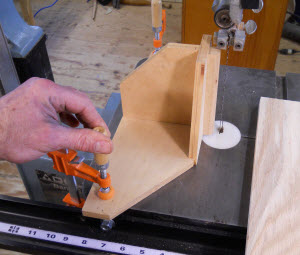
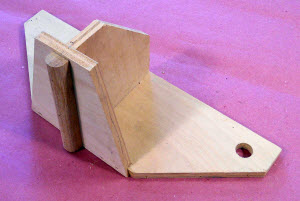 The Fence. The fence is simple. Use 1/2" plywood for the base, face, and brace. Use 3/4" hardwood for the contact point. The height of the face should be close to the width of the material you"ll be resawing. Your best bet is to make a few of these, in 2" increments, so you have fences for narrow, medium, and wide stock.
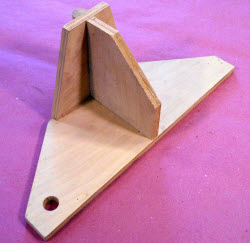 The base should as long as your bandsaw table is deep, or a little more. The brace needs to be cut at a perfect 90-degrees. The hole is for hanging the fence up when you're done.
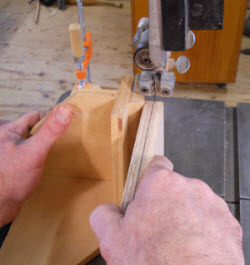
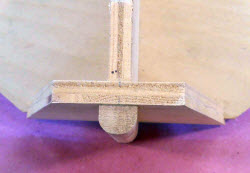 Make the contact point by easing two corners with a 3/8" roundover bit, which produces a bull nose. Do this to a piece that's wider and longer than what you need for the fence. Rip and crosscut it to final size after the roundover is complete. It's OK to make this piece from thinner or thicker stock to match the roundover bit you own. The important thing is getting a bull nose so you create a single contact point.
 Bandsaw Set Up. Before resawing, let's make sure your bandsaw is set up correctly.
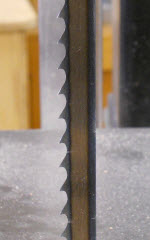
 Choose the right blade. While a 1/4" blade is fine for cutting curves, you need something wider for resawing. Use a blade that's at least 1/2" wide, with 3 or 4 teeth per inch. Resawing is a ripping operation, and requires aggressive teeth to carry the waste out of the cut.
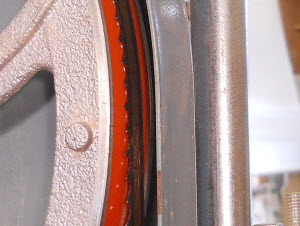
Set the camber on the upper wheel to position the blade in the center of the tire.
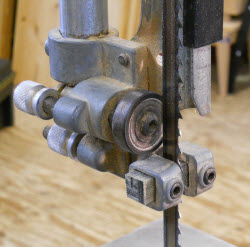 The thrust bearing should be .003" (the thickness of a piece of paper) behind the blade. Steel guide blocks or bearings should be .003" away from the side of the blade. Composite guide blocks can be allowed to kiss against the side of the blade. Make sure you check the set up above and below the table.
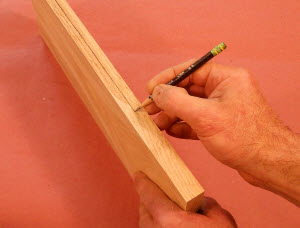 Mark Your Boards. You'll need to mark each piece you want to resaw (a downside to this process). I do this by locating the cut on the edge of the board and, using a pencil and my finger as a marking gauge, mark a line down the length. You can also use a straight edge or marking gauge to do this.
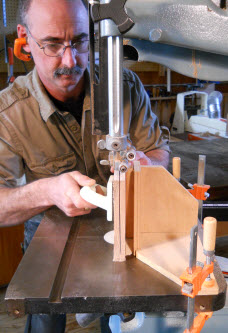
 Position The Fence. The fence needs to be positioned front to back and left to right. The front to back setting is correct when the contact point is 1/4" in front of the teeth of the blade. It's important that the material touches the contact point before it touches the blade.
To position the fence left to right, align the mark you made in the previous step with the blade.
 Clamp one end of your single point fence to the bandsaw table and confirm that the position is correct.
 Clamp the opposite end.
 Making The Cut. Using a push pad to hold the material against the fence, push the piece forward into the blade.
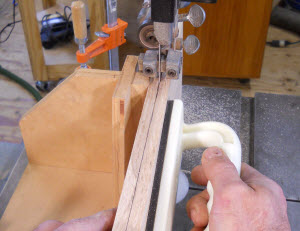 You'll need to steer as you cut, keeping the blade on your pencil line.
 As you near the end of the cut it's safer to pull the material than push it.
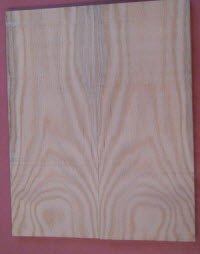 Why Resaw At All? One great reason to resaw is book matching. These two pieces are perfect mirrors of each other because they were cut from the same board by resawing.
You may also resaw on a bandsaw simply because of economics. Got a project that calls for thin pieces? Instead of planing to thickness and sending much of your material into the dust collector, resaw first to get the pieces close.
The Negatives to Single Point. Alright, there's no such thing as a free lunch, or a free resaw. A few downsides to resawing on a bandsaw with a single point fence;
You need to mark every piece you're going to cut.
You can't just ride the material against the fence and go, you need to steer as you cut. This does provide an opportunity to screw up.
If you're resawing pieces to various sizes you'll need to move and reclamp the fence for each cut.
Bottom line? If I'm resawing a board or two I put my single point fence on the saw. If I'm cutting lots of pieces or making a demanding cut, such as cutting thin veneer, I use my conventional fence and do a drift compensation.
Photos By Author
Related Video:Band Saw Resawing

Have several questions. At the ninth pic, to position the fence left to right "align the mark you made in the previous step with the blade." Can you explain? Is it related at all to drift compensation? I presume it's wise to have an understanding of the drift before attempting this resaw method. Do you find the single contact point method more or less reliable for a longish board where it can get awkward to the point of making it a two-man operation? Do you have any references or references relating to thrust bearings and guide blocks you've mentioned?