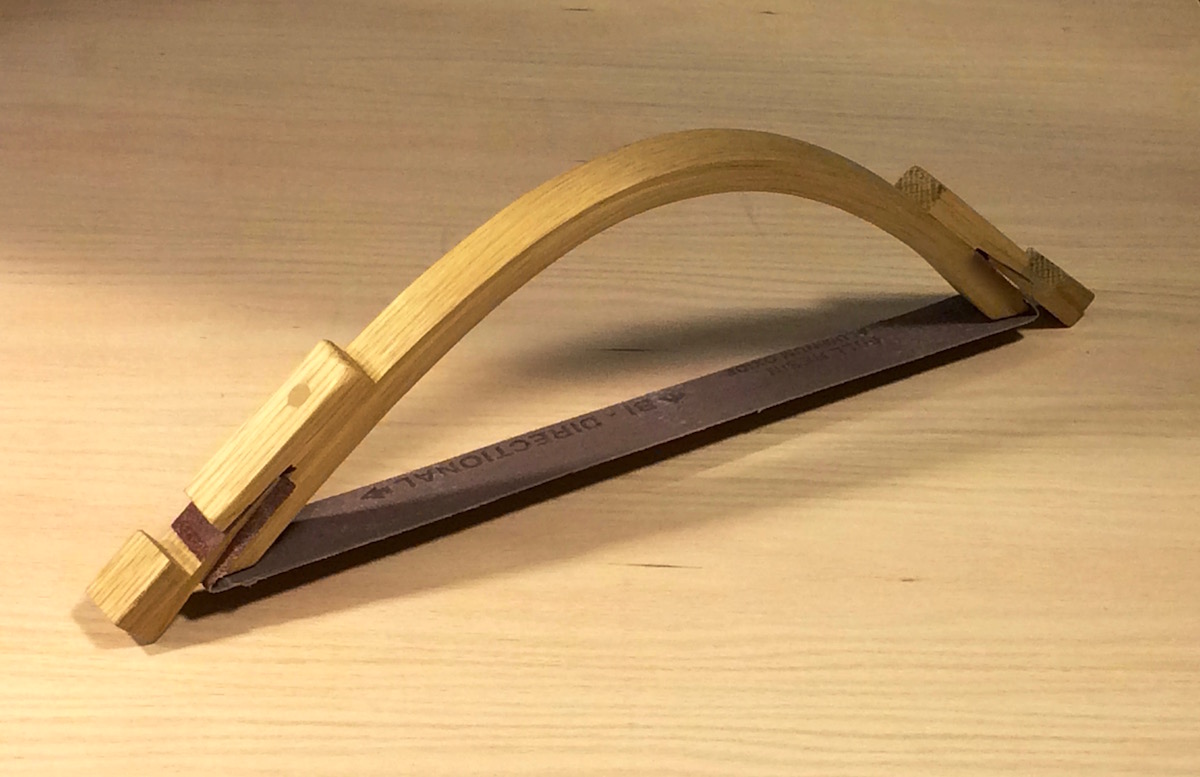
Oftentimes, you need a special blend of hand/eye coordination to get those fine details just right, and typical sanding methods don't always provide it. A bow sander is great for sanding irregular shapes or cleaning up radius corners. This cool tool is made from a lamination of five 1/8” strips of white oak and features a simple wedge locking system. You don’t need any hardware, just a thin strip of sandpaper cut from one of your old 3” x 21” sanding belts.
I’ll show you how to make a simple bending form that presses the glued strips together with homemade wedges so you don’t need to use a single wood clamp. Just follow the steps below and get the dimensions you need from the drawings.
Click here to download a PDF of the drawings.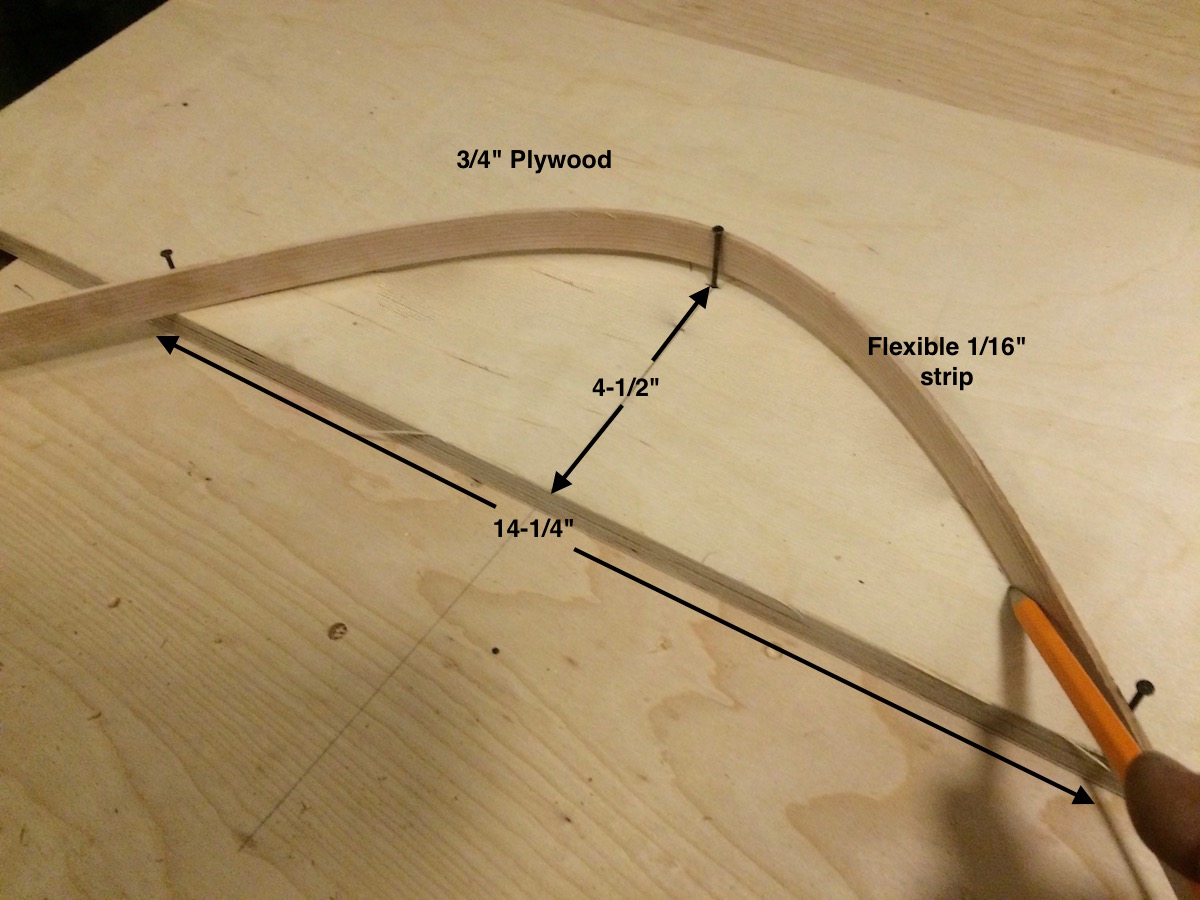
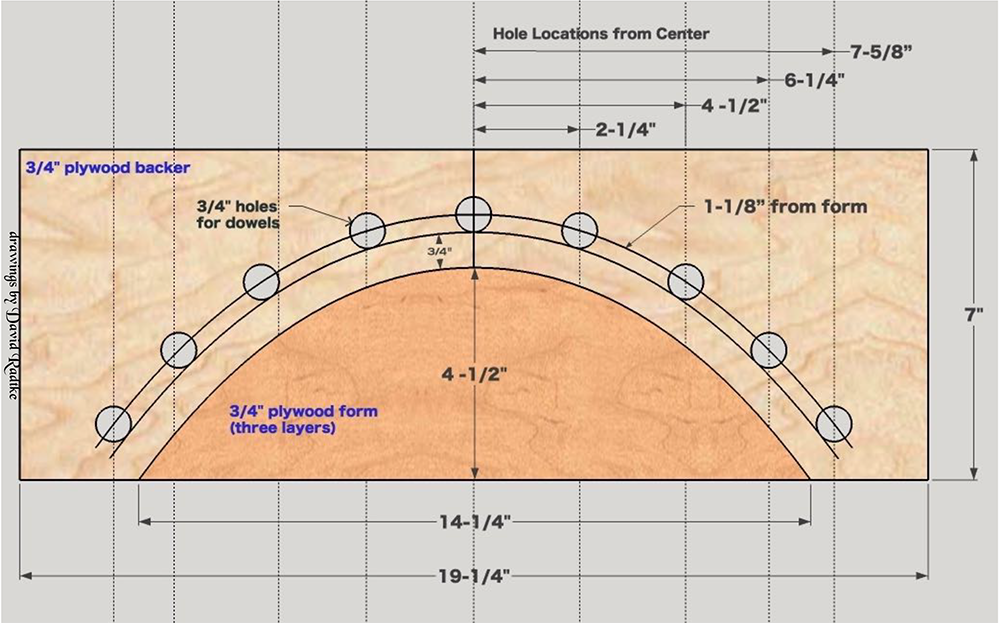
Make the bending form from 3/4” plywood. Cut a flexible wood strip on your table saw and then stretch it around and between nails so the dimensions are as shown. This isn’t a section of a circle. The left and right ends of the curve flatten out more. This shape is better for holding the sanding belt wedges in place.
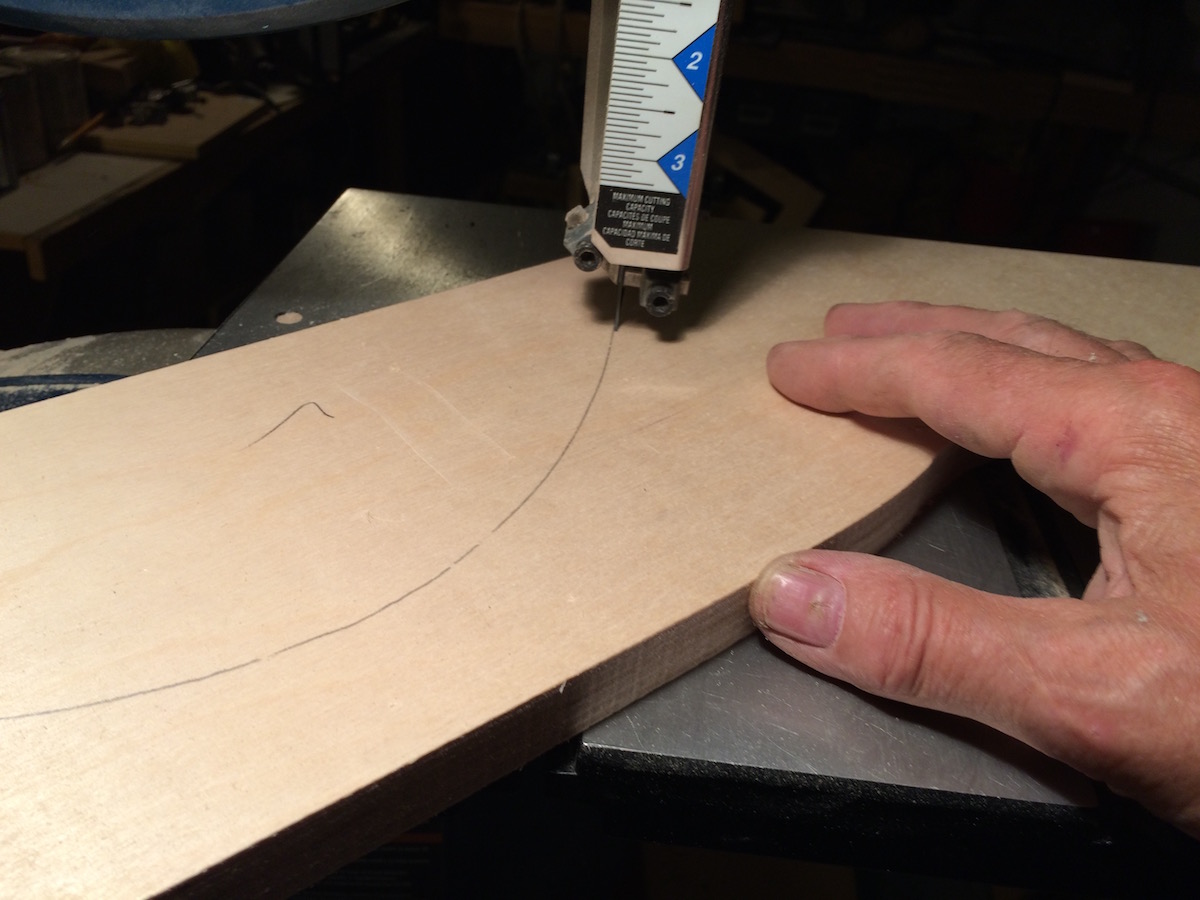
Cut out the plywood shape with your bandsaw or jigsaw, then trace and cut two more pieces. Label the right and left sides of each piece in case the curve is not quite symmetrical.
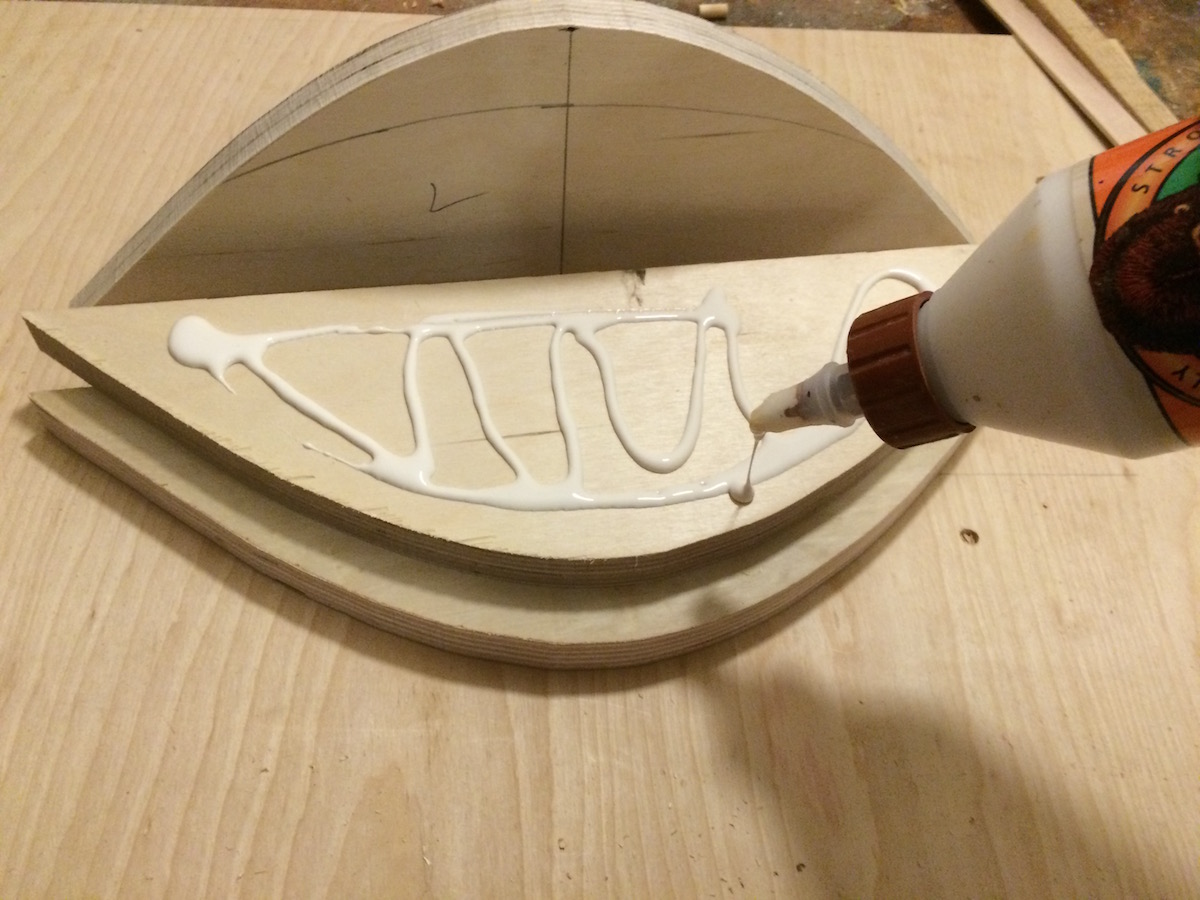
Glue up the ¾” plywood shapes and secure them together with woodscrews driven from both sides.
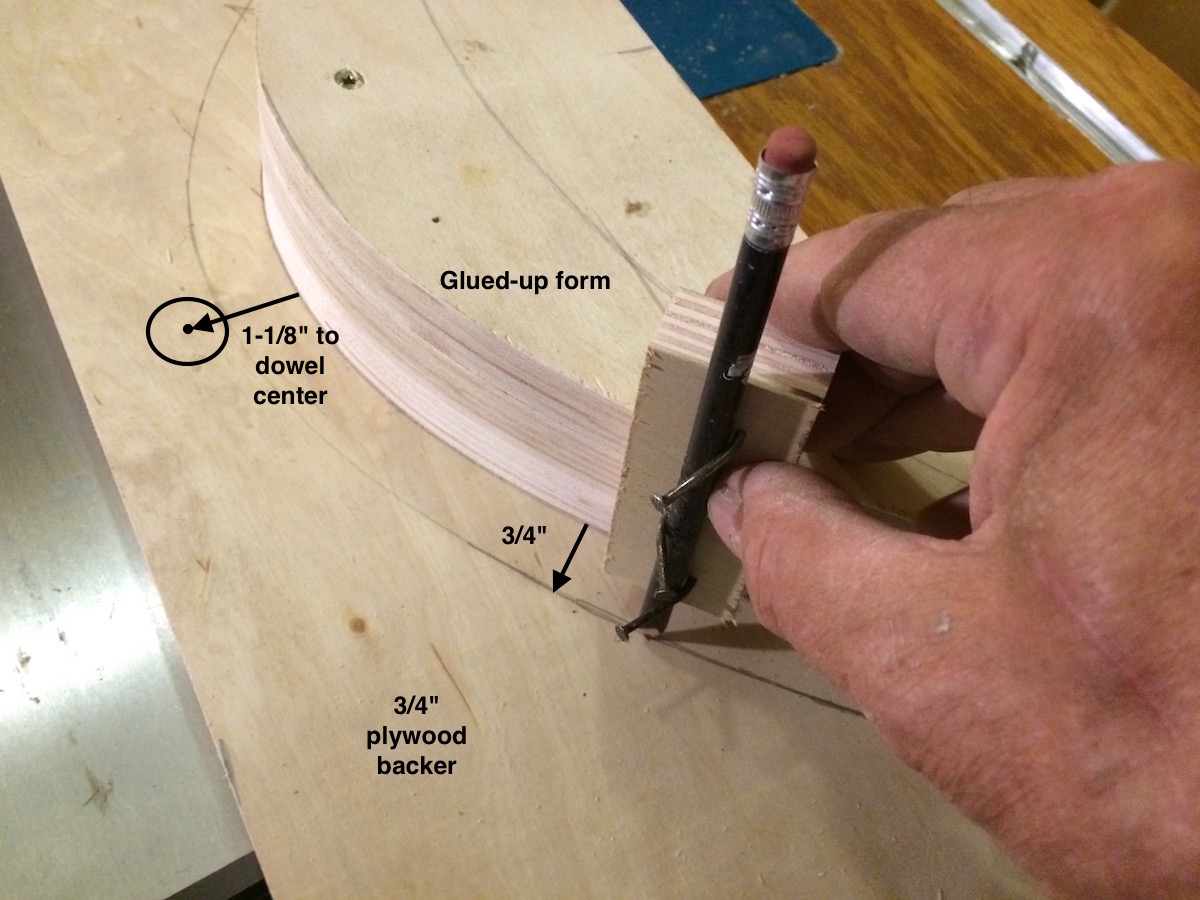
Temporarily screw the curved glued up form assemblies to a 7” x 19-1/4” piece of plywood as shown in the drawing. Scribe two lines along the curve. The first 3/4” space is the clearance you’ll need for laminations. The 1-1/8” scribe will be for aligning the centers of the 3/4” dowel posts.
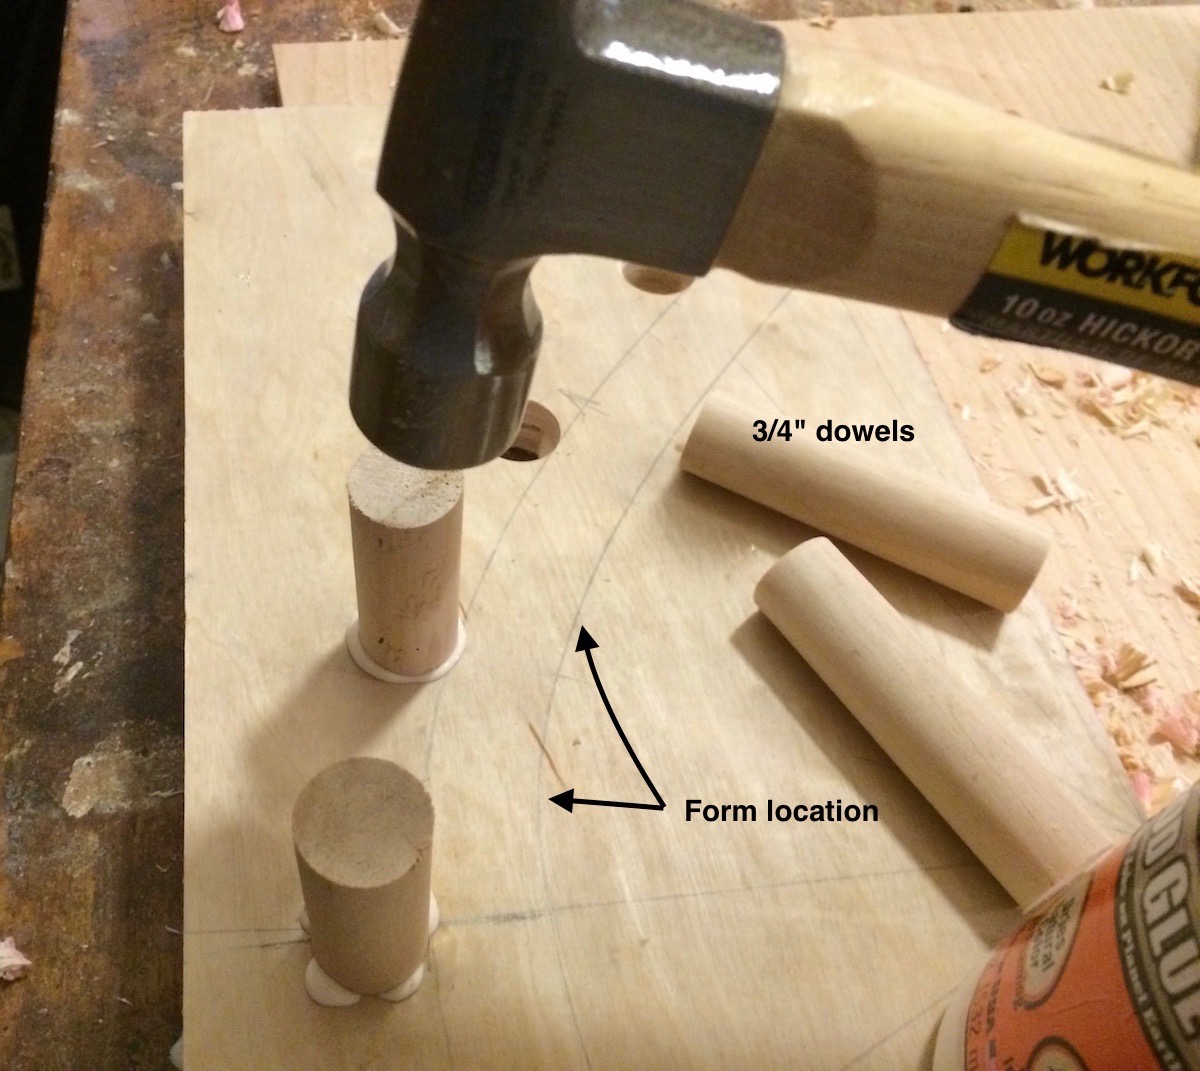
Remove the curved sections of the bending form to give you a little more elbow room for locating the hole centers for the long dowels into the backer board. Refer to the drawing to precisely locate the holes. If you have a drill press, this will work best to get straight perpendicular holes. If you use a hand drill, take care to get them straight. Let the glue set overnight and then permanently screw the curved piece to the backer board.
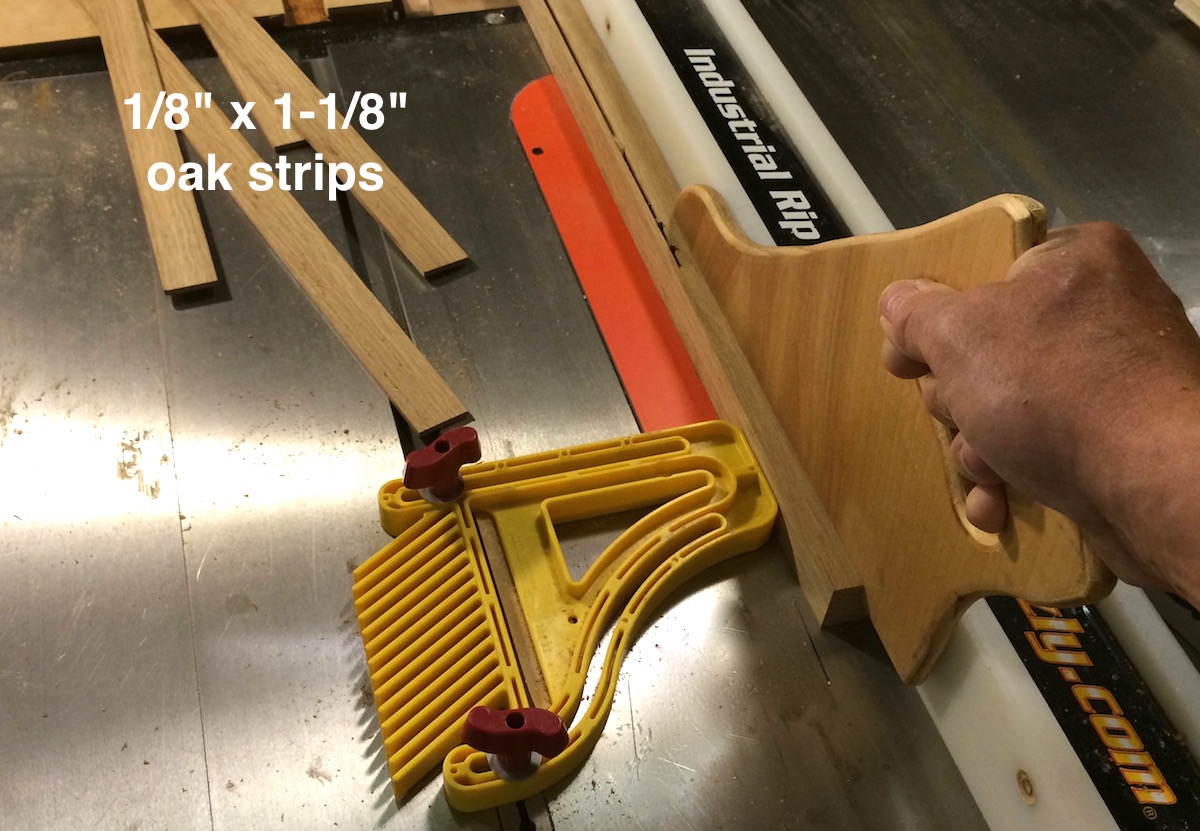
Rip 24” long strips uniformly on your tablesaw. I flipped my featherboard and locked it in place so I could rip a piece, then set my blank against the edge of the featherboard and slide the fence to meet the opposite edge, lock it down and make the next rip. This system gives accurate rips without trying to get them pinched in between the blade and the fence.

Grab the strips and give them a trial run or two into the form. It’ll take a bit of finesse to bend and insert the strips. You may find it helpful the screw the entire form down to a bench to keep it from moving. Once you’ve got the hang of it, spread glue between the layers and slip them into the form. Note: Be sure to apply vegetable oil or paste wax to the form so that the oozing glue doesn’t permanently glue the laminations to your form!
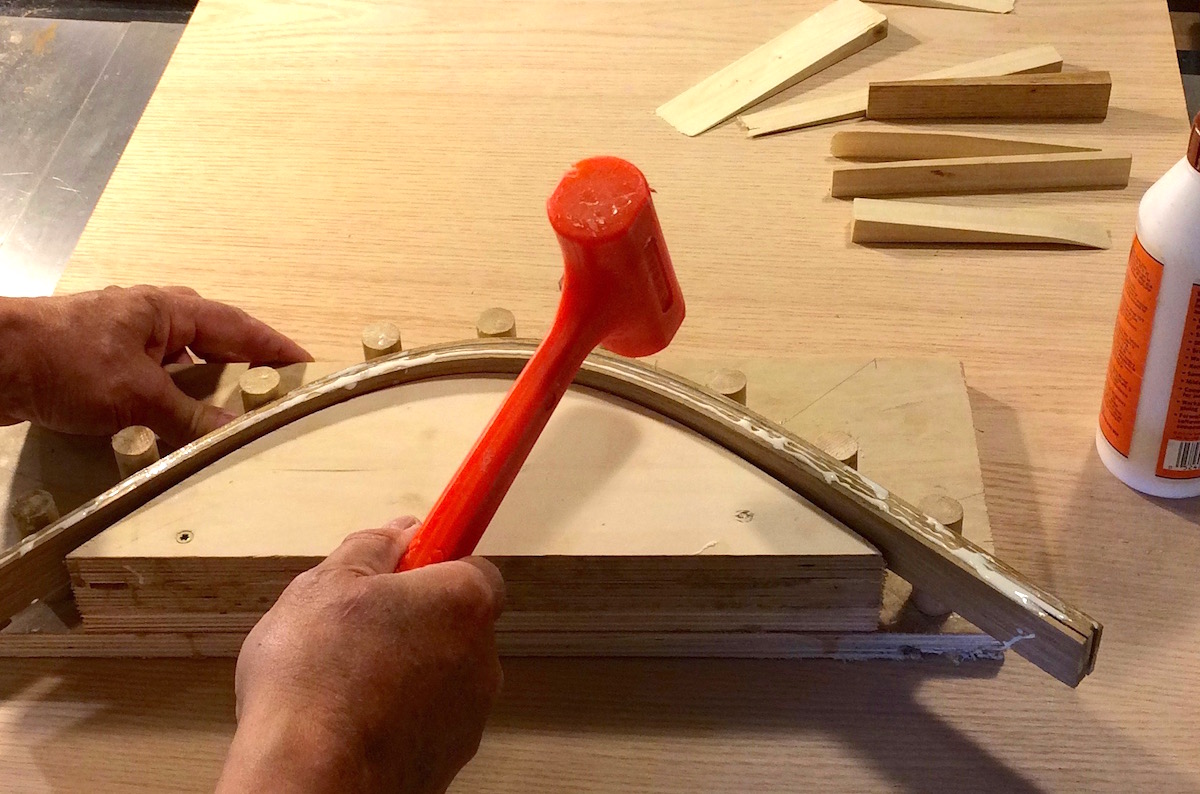
Use a mallet to tap the glued-up laminations down onto the form base. Use a chunk of wood if you need to further tap to even the strips.
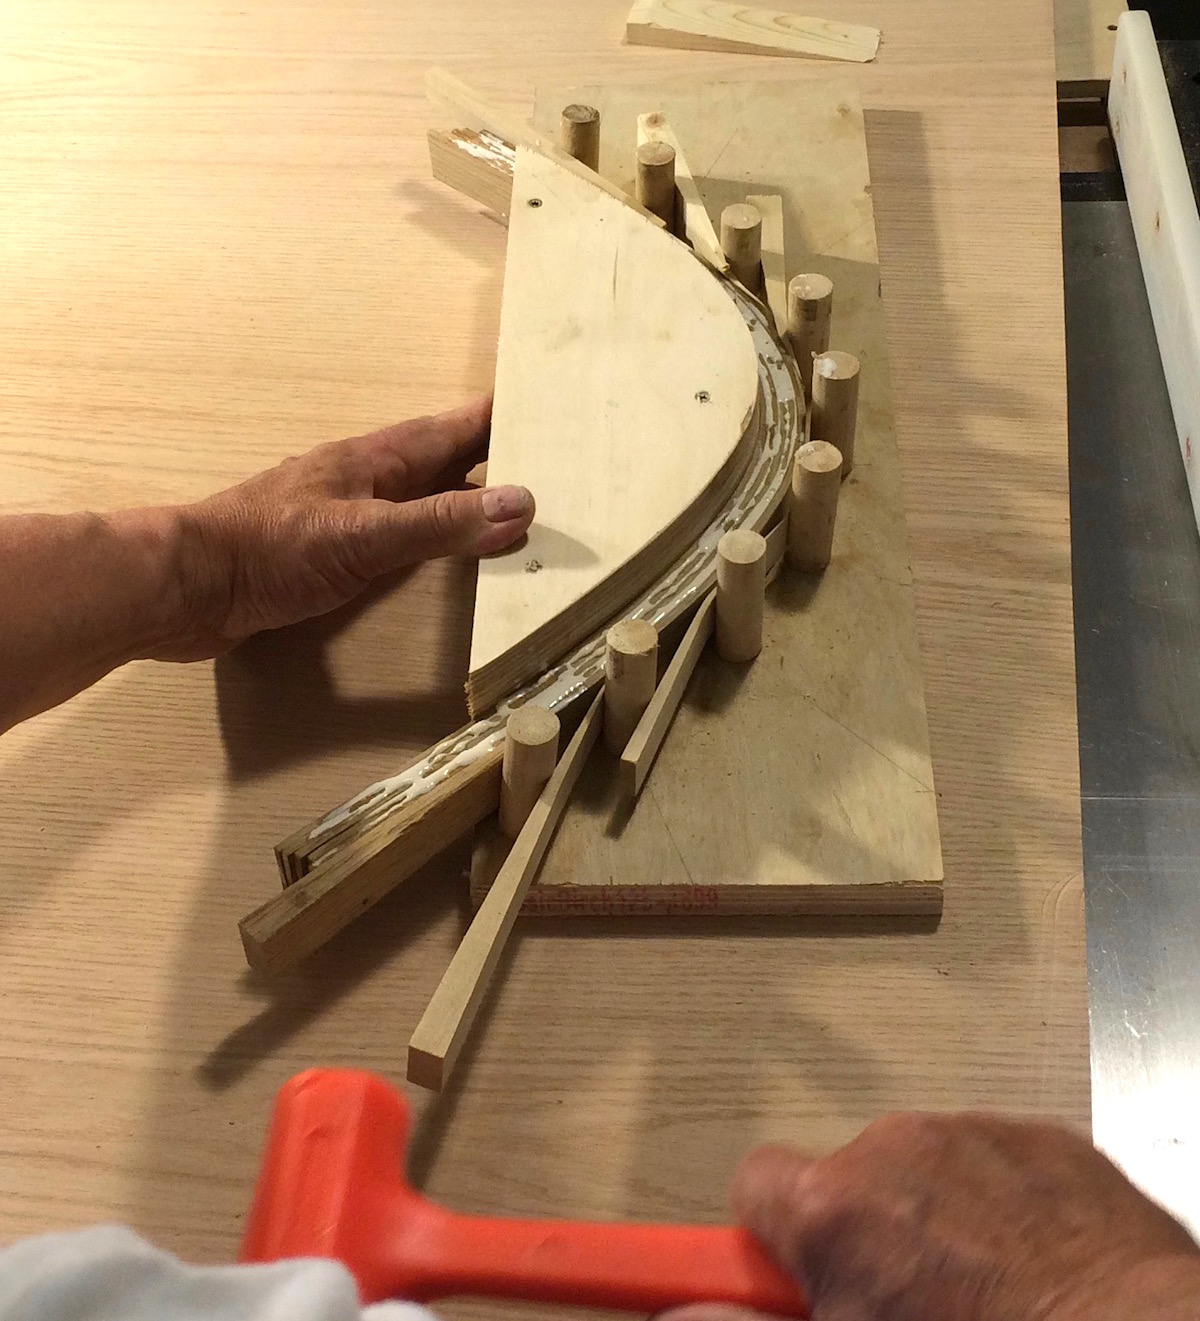
Drive your homemade wedges between the dowels and the glued up strips to press them against the curve. The idea is to close up the voids between the layers for a strong bond. Once you’ve secured the laminations, wait till the next day to remove the wedges. and cut the ends of the laminations even with the edge of the form. Note: If you try to remove it after an hour or two, the pressures in the wood will pull the laminations apart.
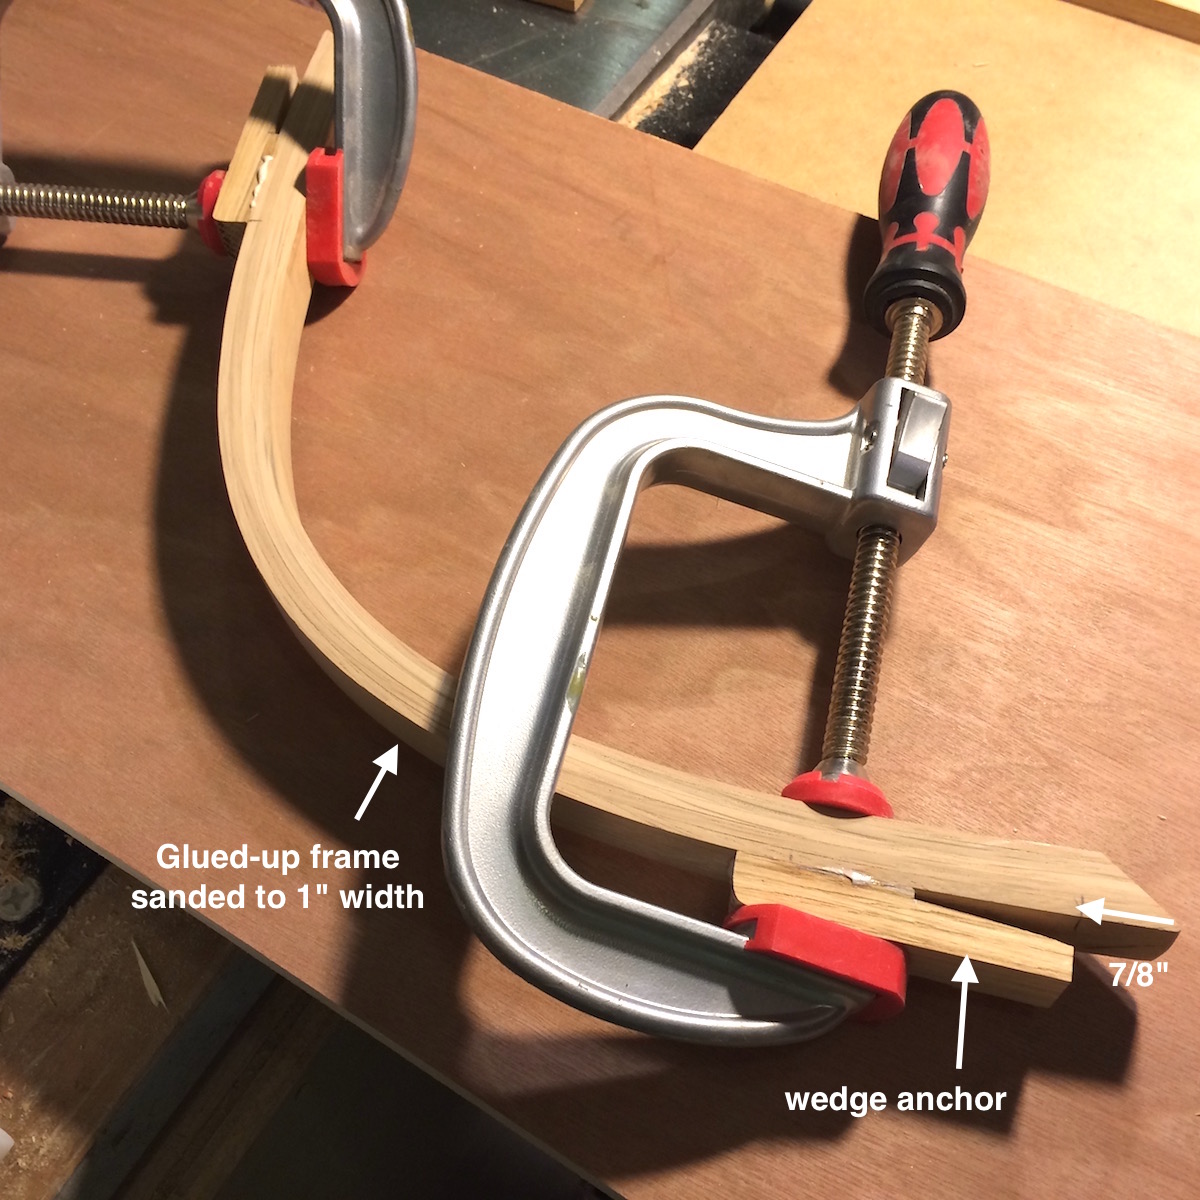
After trimming the frame to length and removing it from the forms, sand both sides flush. Next cut the wedge anchors to the dimensions in the drawing and glue and clamp them to the frame. If the anchors don’t sit flush onto the frame, file a very shallow flat spot on the frame so you get maximum surface bonding of the glue joint.
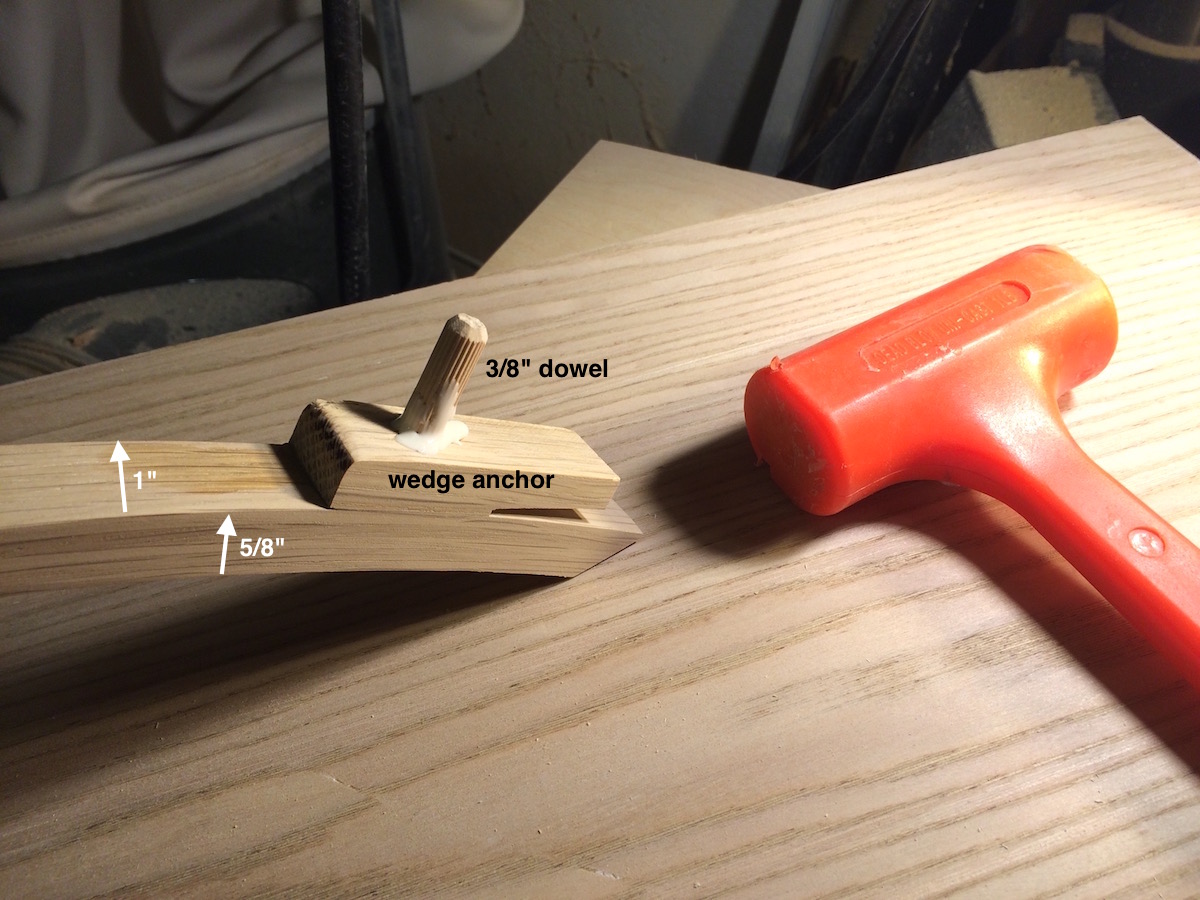
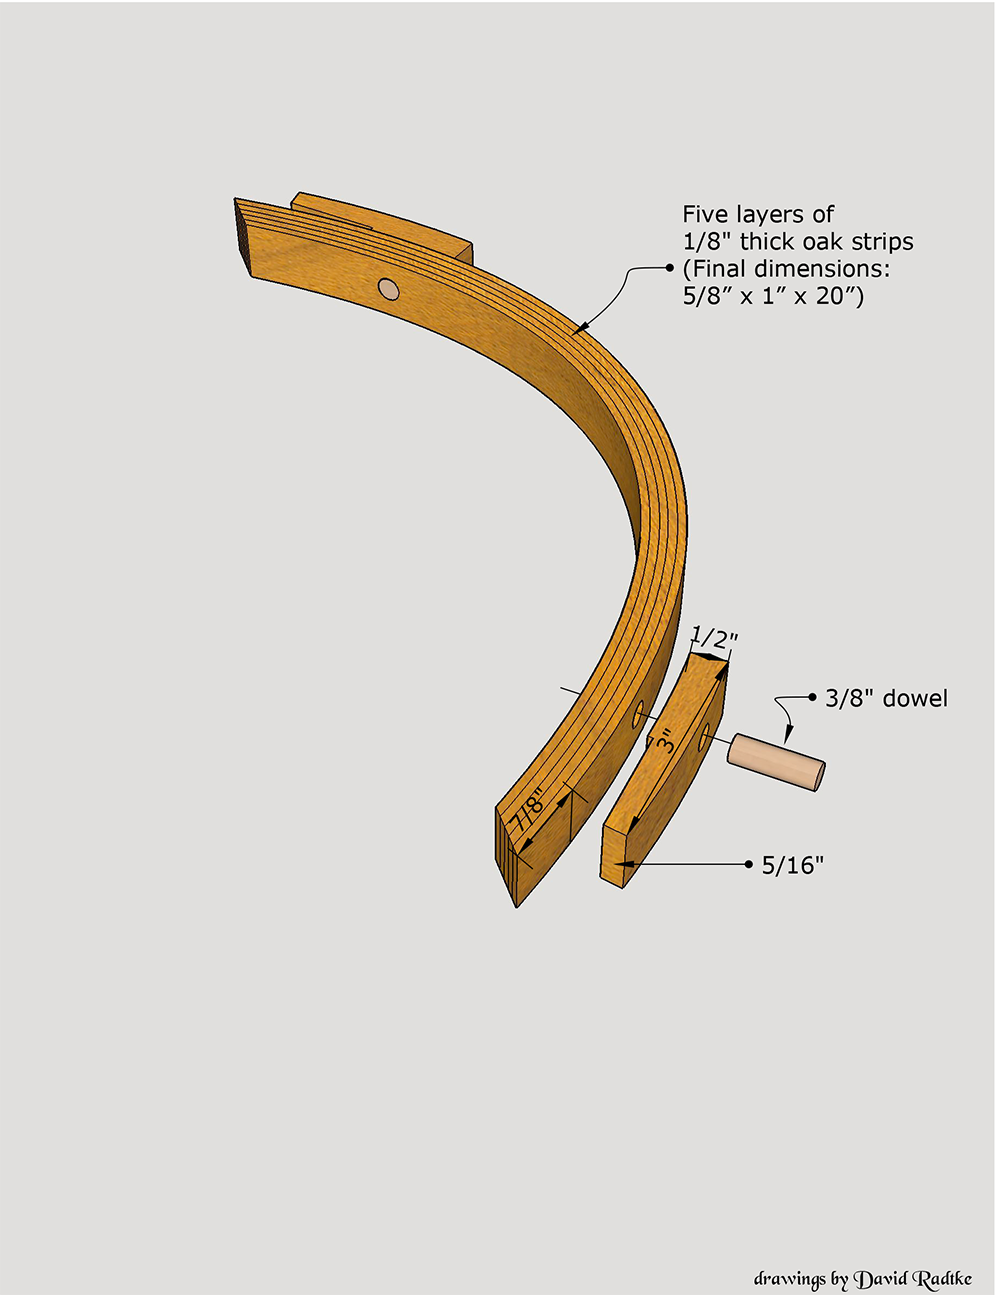
After the glue has set for the wedge anchors, drill a hole in the center of the contact area and then glue and drive a 3/8” dowel through the anchor and into the frame. Saw the dowel flush on both sides. Let the glue dry. The dowel is a necessary part of the anchor to give it strength and holding power under the stress of the wedge that retains the sanding belt.
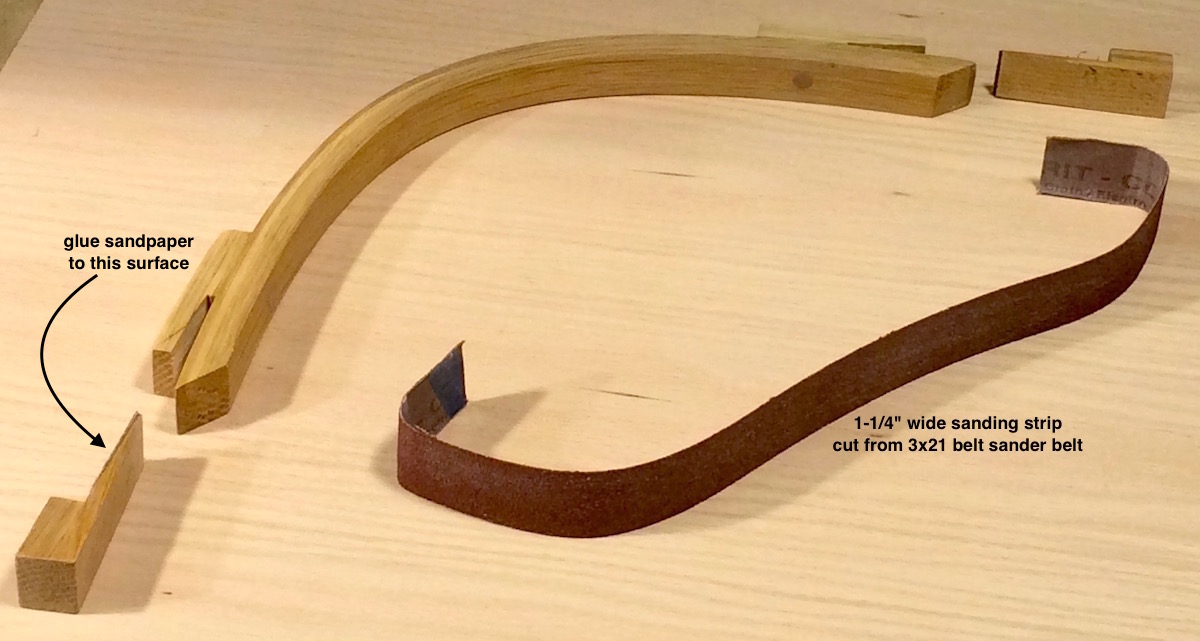
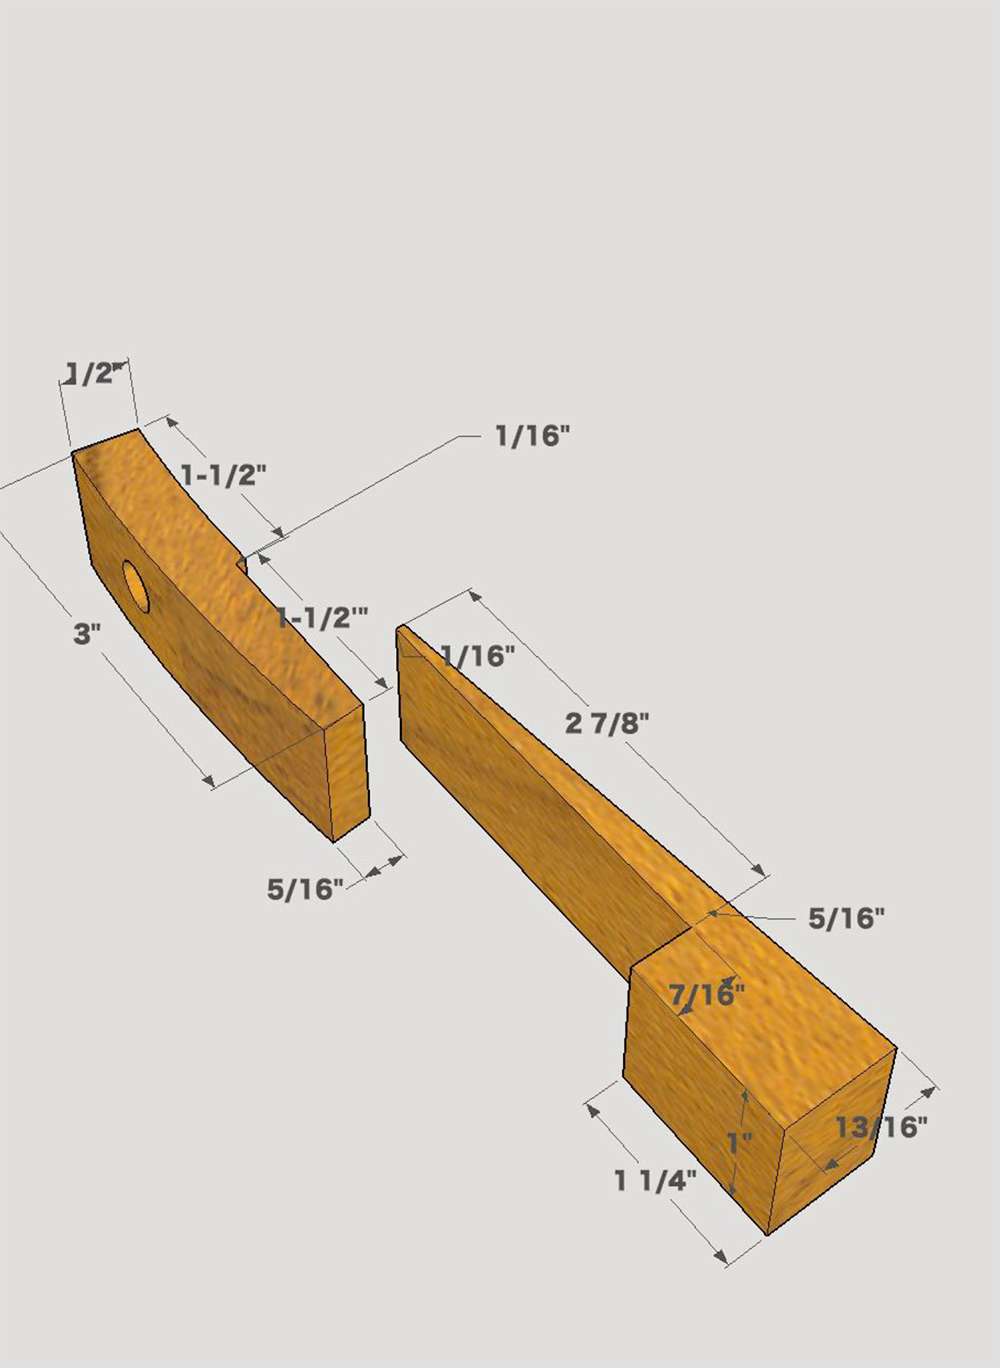
Cut the wedges as shown in the drawing. You may need to fine-tune them to fit well. I glued a piece of sandpaper to the side of the wedge to gain some friction against the anchor. 150-grit seems the best. Cut your sanding belt (cut on the backside of the belt) in half crosswise then mark and rip the strip to a 1-1/4” width. You may need to trim the length a little to fit your frame. You don’t want the strip to completely bottom out into the anchors. Make it a little shy on each end.

When you drive in the wedges into the anchors to trap the belt, give them a tap with a mallet to secure the belt tightly. The sander works great as shown and even better when you clamp the workpiece to a bench so you can guide the sander with two hands.


Fantastic jig for making this frame. My twin grandsons will enjoy making this their first tool and then using it often.
That's a great idea thanks.
thanks for bowsander construction plans. when I want to secure a wood piece I drill a small drill holder into & through the piece I want secured & then find eye stud with my stud finder. & mark stud or piece of wood & drill small hole into wood or sheetrock over wood support & attach the 2 pieces together. Glue may be needed if hanging objects are attached to hangers added to the finished wood support. good way to organize shovels & other garden tools. be sure to give adequate clearance.
Lookin real good, gentleman. Thank you for all the details. Now, I got to get to work.
Been looking for this very same thing. Thank you guys for putting this out!!!
This great ! A project that I can make .. now! Really, I have the Oak, Dowels, Plywood or MDF. Might need a mallet and some need glue. One question: Any chance I could get a PDF of the complete project ? BTY- I forgot I have some end of 2" heavy duty sand paper that has been sitting around the shop looking for a purpose !!
Looks like a nice tool. I will be making one soon.
If you want a larger selection of grits and don't want to destroy a lot of belts you can use 1" wide crocus cloth sanding strips. They are found at stores like NAPA.
Um projeto simples e de extrema eficácia, parabéns.
Seems like a lot of jig for a once in a lifetime build.