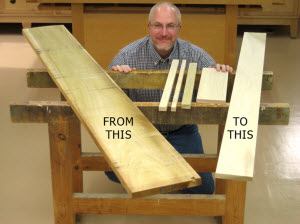
 Hardwood lumber yards offer you wood either rough or surfaced. Rough is how it's cut from the log at the sawmill. There they use giant band saws and circular saws with very coarse saw blades, so the work happens fast. Rough lumber looks like it was sanded with a garden rake! Buying it rough, and then surfacing it yourself has many advantages over buying it S4S (surfaced four sides). You are in control, and you "size" your boards so they are perfect. Building projects with truly flat, straight, and square pieces of wood is vastly easier than trying to shoehorn together warped and twisted pieces, and you will save lots of money by doing the surfacing work yourself. The downsides you ask? It takes much more time, you need some machinery that you may not already own, and you end up with huge piles of shavings that you have to get rid of. My feeling is the benefits greatly outweigh the negatives.
A quick overview of the steps is as follows: Rough cut the length, then the width. Flatten a face, then plane to thickness. Cut the finished width, then cut the finished length.
Machines You Need:
- Power miter saw or radial arm saw with a crosscut blade
- Jointer
- Table saw with a rip blade
- Planer
Your machines need to be well tuned. Test your setups, and check your results during the machining for flatness and square.

Before You Start Tips:
- Look for straight and flat rough boards when you purchase your lumber. Bowed, warped, and/or twisted rough boards are hard to machine, and boards with those problems usually indicate the wood is unstable.
- Buy your rough lumber 1/4" thicker than your finished thickness. In lumberyard terms, that means buy 4/4 to finish at 3/4", or 5/4 to finish at 1".
- Flattening boards for pieces that have very long finished lengths may require starting with 1/2" thicker rough boards. This will allow you to make a few extra passes on the jointer to flatten one face, and still have enough to finish the thickness.
- I pay more and buy the best-graded lumber. I find it easier to work with, and it produces the greatest yield with the least amount of waste. A good rule of thumb is to add 50% for waste to the total finished square footage.
- Don't size your rough lumber until you're ready to use it. Most sized wood that sits around awhile has a tendency to distort.
Analyze your cutting list, and give the highest priority to the longest and widest pieces. Usually the rest of the pieces are easily cut from the wood that remains. Keep in mind that the edges on short pieces are much easier to joint than the edges on long pieces; so whenever possible, rough crosscut the lengths of your pieces first before you start edge jointing. Use rough boards that are at least 1/2" wider than your finished widths. Watch for defects and cut around them. Don't machine pieces that are less than 12" long. That's too dangerous.
These days when I'm jointing, I find it best to remove only 1/32" at a time. Yes, that does mean many more passes to flatten board edges and faces, but the tear out is greatly reduced this way, so I feel it's worth the extra work.
My last word of advice... Don't skimp. It never fails, every time I try and squeeze a finished piece out of a rough piece that's really not big enough, I end up having to start over, and all I've done is waste time and wood!
CAUTION: I removed my saw guard for the table saw photos. Please use yours.
 Let's Size Some Wood:
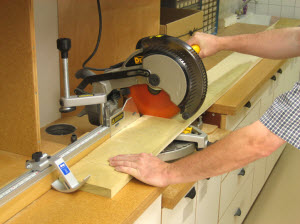
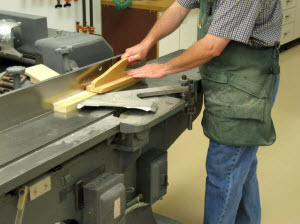
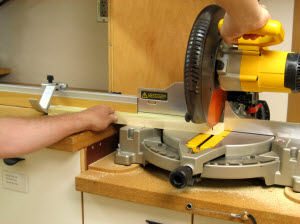
1) Rough crosscut your rough lumber.
Start by cutting an end to remove any end checks. I cut successive 1" chunks off an end until the last cut off piece can't be broken when flexed by hand. Once the first end in good, then cut the piece's rough length 1" longer than its finished length. Make the crosscuts using a miter saw or radial arm saw. The extra 1" is added so when you're cutting the finished length later, you don't leave a thin piece of wood that can get jammed between the saw fence and blade.
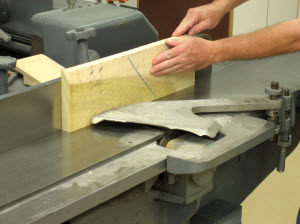
2) Joint and straighten one edge. Set your joiner fence at 90 degrees, and the cutting depth to 1/32". Make multiple passes until the first edge is clean. Orient the board so the ends of the board touch the jointer table, not so it rocks on a high point in the center, and so the grain direction of the board is pointing down and away as shown by my blue crayon line.
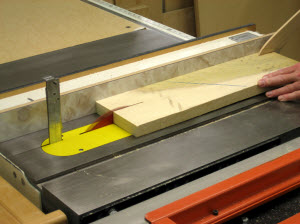
3) Rip the rough width 1/4" wider than the finished width. Run the jointed edge against the fence and rip the board. This board will yield me two 2-1/4" x 18" pieces. A good ripping blade makes the sawing easy.
4) Joint one face of the board flat. Set the depth of the cut to 1/32". Don't force a warped board flat as you joint it. Instead, remove high spots of the stock with several passes until the entire face has been flattened.
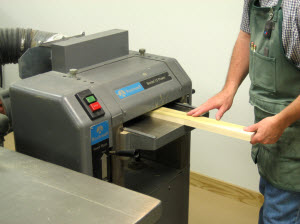
5) Plane the board to its finished thickness. A thickness planer is used for this task. Flip the boards over each time you make a thinner cut. This removes equal amounts from each face and helps maintain the overall flatness. NOTE: My planer is variable speed, so I cut at a fast rate until the board is 1/8" thicker than its finished thickness, then I slow the feed rate down and cut the last 1/16" off each face.
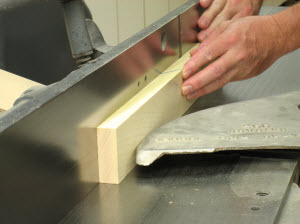
6) Joint one edge square. Make sure your jointer fence is set at 90 degrees and the depth of cut is set to cut 1/32".
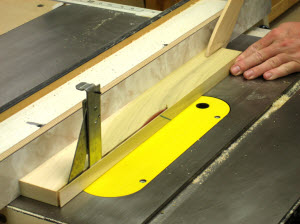
7) Rip to the finished width plus 1/32". Run the jointed edge against the fence. After the board is ripped go back to your jointer and clean up the freshly sawn edge.
8) Joint the ripped edge to remove the last 1/32".
9) Square the ends. Start by trimming one end square, flip the piece around, measure and mark the finished length, and then cut to length and square the other end.
That's all there is to it. Perfect boards every time with very little waste.

A wealth of knowledge in these emails very good
Once you have done this once and you have the tools and technique, you may find all sorts of pleasure in taking random pieces of wood with interesting grain to work with. I have pulled many pieces of firewood from my pile, jointed an interesting face, then it's perpendicular face and ripped it into great pieces used mainly for picture frames. It is important to joint 2 perpendicular faces before moving to the table saw to slice it up. That way the flat sides can be on the surface and fence, and won't twist as you are cutting. That is dangerous, it will bind and maybe kickback. And if you wait days or weeks between jointing and the table saw, you may have to re-joint because it is drying. I cut a lot of trees for firewood and trimming and am always the lookout for interesting grain. I don't bother machining wood that has straight, even grain because I can buy that. It's harder to find real interesting grain at your regular lumberyard, unless you want to pay dearly for it. If you do start working green wood, know that it will warp 95% of the time, so take the time to learn good drying techniques.
Interesting and I can't say that anything presented is actually wrong. But for me it is largely irrelevant. Good luck finding rough-cut lumber anywhere near where I live. I can get S3S within about a 30 minute drive but otherwise it's effectively all S4S. Also, when you figure in all the space and time you are using in what may be a small shop and you don't have a lot of excess time? Doing a bunch of milling can be a big mistake. So yeah, I've got the tools and I still mostly use S4S because that is what I can actually get and while a bunch of milling is sometimes necessary I try to avoid that if I can. Oh, and my wife and neighbors generally don't appreciate the noise of all that milling. Buying S4S may be cheaper if you have good sources of rough-cut lumber, you have a rather large shop, you work at a sufficiently high volume for the savings to pay for the additional milling tools, your shop isn't situated to annoy family and neighbors, and you have the time to be milling wood. For many of us S4S is actually the way to go - and may be the only reasonable choice.
For step 7, I rip to finished width and skip step 8. I feel uneasy about jointing on edge after ripping it to size because it might make the edges unparalleled with each other. Also this ensures a drawer box's 4 sides are all the same height.
this how i do it and the lumber turns out real good
i use my track saw to straight line rip the best edge. joint the straight line ripped edge. flatten one face which face depends on the stock. parallel the two edges on the table saw running the jointed edge against the tablesaw fence and the flattened face down on the saws table`. plane the board by placing the flattened side down on the planer. Then alternate faces until the proper thickness is achieved. crosscut both ends square . along with any snipe. you now have s4s board to cut to width and length.
What is the best and easiest way to straighten a board that is wider than your jointer?
I rough cut Alaskan mill 2" having a hard time flattening any side flat. Spalted maple
When I mill rough lumber, I first run it through my planer to flatten the surface. Then I move to the jointer and run it through the jointer with the planer surface toward the fence. I then move to the table saw, with the planed surface down toward the table, and the jionted edge toward the fence. The final step is to run the board back through the planer to plane it to final thickness. I have had god results this way.
Perhaps this was an editoral/typo error: You must face-joint BEFORE edge-jointing. Otherwise, their is no way to ensure the edge will be perpendicular to the finished faces. The ONLY way to ensure this, other than automated machinery, is to place the jointed face against the jointer's fence while simotaneously jointing the boards' edge. Then ripping can commence on the table saw.