Many woodworkers are afraid of using a belt sander, and you can't blame them. Used incorrectly, a belt sander can ruin, in seconds, a project that you spent days building. I've succeeded in making some reasonably flat boards into moonscapes, thanks to improper use of a belt sander. But I've learned from this, and want to pass some tips along to you on how to use a belt sander. With a little practice, you'll even be willing to use your belt sander on plywood!
Belt Sander Buying Advice


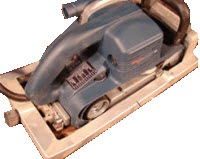
4" x 24" Sander Vs. 3" x 21" Sander
www.wwgoa.comSize
When you're sander shopping, bigger is better. My 4" x 24" sander has a platen that's nearly 35% bigger than a 3" x 21" sander. It's much easier to keep a large platen flat on your work than a small one. Yes, a bigger sander is heavier, but if you're using it primarily on horizontal surfaces, that's not a big deal. If you need to hoist the sander to a vertical surface, a smaller machine will be easier to handle. But if that's only a small part of your woodworking, buy the biggest machine you can handle horizontally.
Belt Sander Sanding Frame
www.wwgoa.comSanding Frame
Consider a sanding frame. A sanding frame acts like training wheels, helping prevent the sander from tipping. Some machines accept them, some don't. If you're shopping, this is a nice feature to keep in mind. If you already own a sander, you could be out of luck if your machine wasn't designed to take a sanding frame.

Belt Sander Speed Settings
www.wwgoa.comSpeed Variation
Look for a machine with variable speed. When you're first learning to use the sander you can run it with a fine paper at low speed so you can't take wood off too quickly. I still use low speed on delicate sanding operations, like when I'm sanding a face frame flush to a plywood cabinet side. Variable speed provides great control.
Setting Up
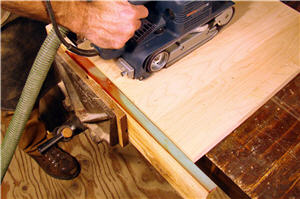
You've got to make certain the board you're working on can't 'run away' from the sander. You can brace it against a stop you've clamped in a vise, above, or use a no-slip router mat, below, available at woodworking specialty stores. You can also squeeze the board between your vise and bench dogs. But don't clamp the board itself down to the table. Working around a clamp is a sure way to ruin the surface.
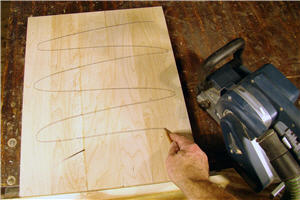
 Mark your work. A random pencil line across the face of your material will help you keep track of where you've sanded and where you haven't. This helps insure uniform removal of material. As soon as the pencil line is sanded off, make another one before continuing to sand.

Using the Sander
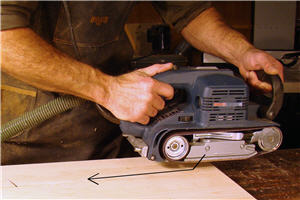
Before you fire up the sander make sure the cord is out of the way. Your goal is to make smooth flowing passes over your material. If you're worried about sucking the cord into a spinning belt (not that I've ever done that), or taking one hand off the machine to move the cord, you won't be a smooth operator. I like to drape the cord up over my shoulder, trailing down my back.Get ready for a smooth landing. Start with the sander lifted slightly off your work. Turn the machine on, then ease it down and back, beginning your first sanding stroke on the board. Think of the way a plane touches down, and try to make the sander contact the work with no turbulence, with the platen parallel to the board. When you're done sanding ease the machine off the work, then let it come to a stop.
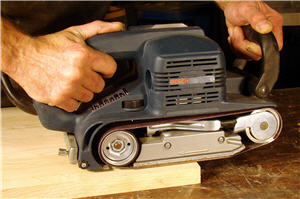
Sand the board by moving the sander forward and back, in the same direction as the grain. At the end of each stroke move over half the width of the platen to begin the next long stroke. Each sanding pass should overlap the previous pass. No need to lean on the sander. Just let the weight of the machine do the work.
When you get to the end of the board make sure the platen doesn't cantilever too far past the edge. Allow 1/3 or less of the platen length to project over the edge. More than that, and the weight of the machine could cause the sander to rock down and round the end.As you sand out to the edge, be careful again of how much platen sticks over the edge. If the sander rocks and rolls, you'll have a rounded edge in a heartbeat.
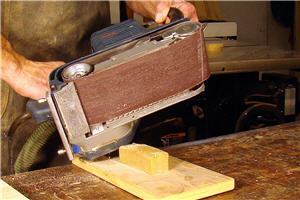
Keep the belt clean. Sawdust builds up quickly in a sanding belt. If you don't do anything about it you'll have sandpaper that's still sharp but can't cut because it's filled up with dust and wood resin. Avoid this problem by using an abrasive cleaning stick. You can find them at woodworking specialty stores and some home centers.
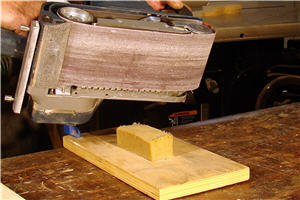
The stick is an eraser for sandpaper. I epoxied one to a board, and then clamp the board to a table near where I'm working. Touch the sander to it every few minutes and you're sawdust-free, as these before and after pictures show.Get your work at the right height. Sometimes this means getting the project on something besides your workbench, especially in the case of large pieces, like this cabinet. If this case were on my bench it would be awkwardly high for sanding, and I'd be more prone to tipping the machine and sanding through the cabinet's veneer.
Finally, take the time to work with, and learn to use, your sander. I always admonish my students 'You wouldn't just pick up a guitar and expect to be able to play it. It takes practice. (As my fingers have painfully learned.) Woodworking takes practice, too.' Set up a board on your bench and run your sander over it. Lay a straight edge across it to see how you did. Refine your technique, and soon the belt sander will become a go-to tool for you.
Photos by Author

Hello, This article is excellent and helpful to me. Because I have learned many things from this blog, and it's advantageous to my woodworking business, you have practically explained Belt Sander, and I like it. Thank you for this informative blog.
<strong>Ticket 21891 I find when roughing to shape, either flat or to a fair camber depending on project. I start with 36 grit on a 45° angle to the grain. Without good side lighting as I step the grits I alternate with/against the grain doing so let's me see my scratches very easily so I don't waste time sanding needlessly or worse don't sand enough. What would your thoughts on this technique be?
Can't agree more with everything you say. Especially like the eraser tip. Thanks. I had a 4 x 24, just like the one in the pictures for close to 30 years when I let it run off the table and it is no more. sigh... Bosch discontinued that one but it seems they may have a new model. Does anyone have experience with their new one? Love to hear a comment or two. Thanks. Jules
Details of sanding frames would be appreciated. I suspect I could build one, given a bit more detail. I suspect a good sanding frame could improve dust collection too. The old sander's built-in chute only gets so much, even if I try to connect a shop vac to it.... Or is a downdraft table the best solution? A belt sander that can be clamped in place on it's side or upside down can be used as a stand-in for a disk sander, when you want that kind of control.
Hi there, of course this paragraph is truly nice and I have learned lot of things from it about blogging. thanks.
I found your presentation very helpful. I have a BOSCH 3270 D Belt sander which works well It is but the dust bag remains empty after a job. Globs of sawdust just gather behind the machine on the work piece. What could be the problem ?