Beginning woodworkers all ask this fundamental question: What is the difference between a jointer and a planer?
The answer is simple, a lot! Is there such a thing as a Jointer Planer? No!
So, what is the difference?
Each machine does a completely different surfacing operation.
A jointer flattens a face or straightens and squares an edge, and a planer thicknesses wood.
Whether you need one, the other, or both can quickly be answered by knowing how they work, what they do, and how much wood surface preparation you pay your lumberyard to do. And you could be a great woodworker without either machine. They are just time savers. Heck, you could use hand planes!
You need to convert your wood stock to usable pieces for your projects. A wood jointer and a planer will help you get there.
- What a Jointer Does & How It Works
- What a Planer Does & How It Works
- Different Levels of Lumberyard-Produced Surface Preparation
What a Jointer Does & How It Works
A jointer makes the face of a warped, twisted, or bowed board flat. After your boards are flat, the jointer can be used to straighten square edges (guard removed for photo).
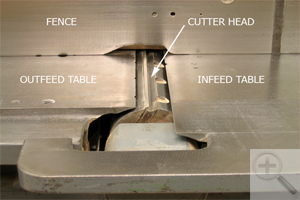 There’s an infeed table and an outfeed table. The tables are aligned in the same plane. A cutter head with knives is mounted between the tables, and its cutting circle (tops of the knives) is aligned flush with the outfeed table.
The infeed table is lowered to a depth equal to the wood you want to remove. Passing a board across the running machine (with the guard in place) removes the wood, and the cut portion of the board is then supported on the outfeed table. A fence is used as a guide when flattening a face and as a support when jointing board edges. The fence is adjustable for different angles, typically up to 45 degrees.
WWGOA does offer instructional videos on how to use a jointer. Also, be sure to see our guide on how to master the jointer.
What a Planer Does & How It Works
A planer is used to make a board that’s been joined flat equal thickness from end to end. Mechanically, it’s more complicated than a jointer, but functionally it’s simpler.
A flattened board is placed on the planer table (bed) and pushed in. The machine’s feed roller grabs the board, pulls it through, and passes a rotating cutter headset above the bed, which removes wood. The distance the bed is set from the cutter head is the resulting thickness.
All planers have limits to how much wood they can remove in one pass, so achieving your finished thickness will likely require multiple passes.
Want to see a planer in action? Check out this unique video that offers an inside view of a wood planer.
Different Levels of Lumberyard-Produced Surface Preparation
Your lumberyard can only do some or all of your required surface preparation for the boards you purchase. The more they do, the more it costs, and the less control you have.
You could take this to the extreme, give them a cut list, and have them size all the pieces, but you’d go broke and have no fun woodworking. I’ll start by telling you how both machines are used to surface rough lumber and then give three more scenarios where your lumberyard does increasingly more of the work for you.
Rough
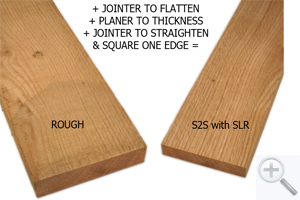 I buy my lumber rough (no surfacing), or surfaced hit & miss, which is how almost all the lumber I buy today comes. That removes 1/16″ and planes the wood, so it’s easy to see the grain and color.
The pieces I need for my projects are “inside” the boards I buy, and I have to machine the boards to make my pieces. I have much greater control over the wood’s shape and flatness when I machine a rough-cut board before using it in my project. One thing is for sure with surfaced wood; it will not be the same size and shape tomorrow.
Sizing rough lumber requires a jointer to flatten one face and a planer to cut the thickness. To cut the width, you use a jointer to square and straighten one edge and then rip the width on a table saw. I rip my boards 1/32″ wide, and then joint off the last 1/32″.
For more helpful tips, read my easy-to-follow guide: 9 Steps to Sizing Rough Lumber.
Surfaced Two Sides (oversized)- S2S.
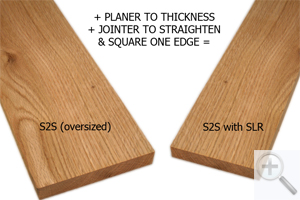 Example: You ask your lumberyard to surface your 4/4 boards to 13/16″ even though you know you will eventually use them as 3/4″ thick boards. They surface the boards using a doubled-head planer that cuts both faces simultaneously and does a pretty good job flattening.
Surfacing this way can save you a lot of time. Then just before using your boards in your project, you will “kiss” the boards down to 3/4″ to clean up any rough surfaces left from the lumberyard machining, remove any dirt and oxidation that might have accumulated over time, and provide a fresh surface, which is critical for gluing. With this type of surfacing, you’ll need a planer for final thickness-ing and a jointer to straighten edges.
Surfaced Two Sides (final thickness)- S2S.
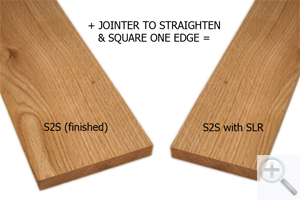 All is the same as above, but this time your lumberyard surfaces your boards to their final thickness.
All you need now is a jointer to straighten edges.
S2S with Straight Line Rip – SLR.
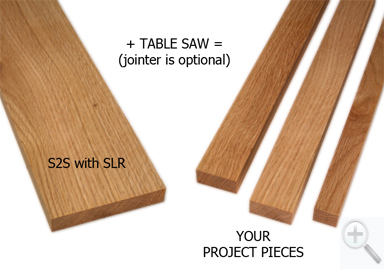 All is the same as S2S, but this time your lumberyard cuts one edge of every board straight and square.
You can now manage without either machine, but having a jointer to remove saw marks and smooth edges is nice.
Think your planer isn’t big enough? Check out these tricks for using a small planer and watch this video on how to get the most out of smaller planer.

Conclusion
Remember, it’s not Jointer Planer. A jointer can make a board’s face and edge straight and true. A planer makes your boards uniform in thickness, with two parallel faces. The operations are different between the two machines.
Owning both machines gives you the greatest control over the flatness and smoothness of the wood you use in your projects. My jointer is a monster at 12-in. wide and 84-in. long. It’s nice for flattening long and wide boards, but it may be overkill if your projects are small. My planer is 13-in. wide, making it the perfect companion to my wide jointer.
All Photos By Author

Question. If I want to make an edge grain cutting board, would it be OK to joint both faces flat for glue up with a jointer, or do I still need to ensure both faces are parallel with a planer? I think for the initial cuts and glue up having each face flat is sufficient,but want to be sure I am not creating any issues by not using a planer. Most of my boards are 4 inches wide or less.
It would be possible to glue this up, but your joints won’t necessarily align on the top, which will make your glue-up slightly tricky (but not impossible) and will require more sanding after the glue up. To make sure that this approach works, you will want to be very careful about marking the face that is used as your reference surface. What I would do is face joint one face and mark it. Then place that face against the fence and joint each edge. Then you can face joint the other face if you want. When you glue up the planks, make sure that the side that you marked is down on the clamps in each case, as that will ensure that your final glue up is flat. If you are not careful with that step, you will potentially have a wavy cutting board.
Paul
Hello. A good quality combination machine can serve both purposes. For example, this unit is known to be good at both jointing and planing: https://amzn.to/36LpXdT . Also, this one is very good at both: https://www.felder-group.com/us-us/products/jointer-planers-jointersplaners/jointer-planer-a3-41.html
I would be wary of the benchtop units that are designed to serve both, however, as the jointer tends to be compromised on lower priced products.
So, if you have a good quality machine that serves both functions, then the question becomes whether it is worth it to you to save the floor space in exchange for spending more time doing the switchover. Typically a good quality combination machine is not cheaper than buying an individual jointer and planer, so the additional value is in the floor space that it saves. My preference is to have a dedicated jointer and planer, but if space is tight and you’re willing to spend some time swapping back and forth, then a combination machine might be a good choice for you.
Thanks
Paul
Woodworkers Guild of America
Thank you, Paul, for your elaborate explanation and direction. It gives and clear idea, and I will keep this in mind while installing a jointer or planer.
Jointer & Planer explained the best I’ve ever heard. Great job!
Yes, there really is a combination jointer/planer https://www.ebay.com/p/JET-JJP8BT-8-Electric-Jointer-Planer/710152681?iid=392276041705
Thank you. This a question i have been asking myself as i plan on a router shortly.
Good article! I always used the jointer first in order to get a perfectly straight edge, because It didn’t matter what process came next. Thanks for the post!
There is indeed such a thing as a jointer/planer. One machine that converts to two separate functions. There are a number of them made by European companies (Felder, Minimax, Baileigh, and many others).
Can I successfully use a “hand held” planner as a jointer if I mount it upside down and use a 90 degree fence on the planner?
Hi. You can try, and you might have success for very short boards, but in general this does not make for a good jointer. This is not much of a precision tool, but rather it is best for rough carpentry applications such as shaving a door to fit, etc. There are good inexpensive and compact jointers on the market that are much better at jointing, such as this one: https://www.amazon.com/gp/product/B004Q0I8YU/ref=as_li_tl?ie=UTF8&tag=toolmetrix00-20&camp=1789&creative=9325&linkCode=as2&creativeASIN=B004Q0I8YU&linkId=7e55e40f8bb0adab864efb508a466354&th=1
Thanks
Paul-WWGOA
Thanks for posting. My dad & I have been arguing the differences between these two. After we watched the video we went online to see what both items will cost us, and when I searched “shop jointers” a list of joiners and jointers came up. And photos posted by the manufacturer or retailer show the same item. Some call it “jointer” and some call it “joiner”. Can you explain this for us? Did someone make a typing error and they are the same thing, or do they do different things?
Thanks!
Hi Andrea. There is definitely some confusion and misuse out there, but the item that you are referring to is correctly described as a jointer. On the other hand, the handheld tool that is used for biscuit joinery is generally referred to a biscuit joiner in the US, whereas you will see it more commonly referred to as a biscuit jointer in Europe.
Thanks
Paul-WWGOA
This is by far the best and succinct explanation of the difference between a planer and jointer that I’ve found on the internet. The order of using these tools would be jointer and then the planer (which takes the side surfaced by the jointer as a reference to make the other side near parallel) I believe.
If one side is flat you can joint the next side square, thanks to the fence… Do that again and the 1st and 3rd side are parallel.
HOW DO i joint an 8″ board on my 6″ jointer?
uaually always happens with reclaimed lumber. That’s where a spiral-head cutter comes in handy. $$$ but saves a ton on knives.
George, Thanks for the explanation of Jointers vs: Planers; which raises a question … What is the proper way to flatten the face of a 7 or 8 inch board on a 6″ jointer like most of us own?
Hi, Mike. A good approach to this is described in this article: https://www.wwgoa.com/article/face-joint-wide-boards/.
How big of a bite do you recommend with the jointer? 1/32, 1/16, 1/8? Say for a soft wood like pine.
Hi, Marty. It depends how much power your jointer has. I’d start out with 1/32″, and see if you feel like you need to be removing more. I prefer to make multiple light passes, and sneak up on the perfect edge. If you are face jointing, definitely take lighter passes, and don’t try to hog off all the material in one pass.
Im fairly knew to jointers so a quick question should I be applying px on th infeed or outfeed table when running stock through
Hi, Ed. Down pressure starts on the infeed side, but after the work piece transitions to the outfeed you will apply your down pressure on the outfeed side. Here is an article for your reference: https://www.wwgoa.com/article/master-the-jointer/
I hear a lot of people are choosing a drum sander over a planer, since it gets more use. You generally plane “just a little”, so multiple passes through a sander gets the needed result. What say you?
Hi, Stan. Drum sanders are great, and yes you could use it instead of a planer but it is a lot slower at removing. If you have a good bandsaw with large capacity you could offset a lot of this by resawing, then drum sanding the final 1/16″ or so.
To give you some perspective on my own use, I have a Woodmaster 718 which is a combination planer and drum sander. I have the helical planer head which gives me a nice surface even on figured wood. Approximately 95% of the time I use it as a planer, and only 5% as a drum sander, so for me if I could only have one it would hands down be a large planer with a helical head. I don’t hesitate to use that to run glued up panels, figured wood, etc. through. The only thing I won’t run through it is end grain, and wood that has previously been finished. With this machine I am limited to stock that is longer than 12″, and it is dangerous to violate that rule so I don’t, so that would be one advantage of a drum sander with a platen feed mechanism, as you can run very small pieces through these which is a nice option to have.
What is a good brand of jointer/planer?
Hi, Gary. From the wording of your question it makes me think you are asking about combination machines. I’m not as familiar with these, but I know that the one from Jet is pretty well regarded. In terms of dedicated jointers and dedicated planers, it depends on your budget. I like the Jet and Powermatic jointers and planers. For a slightly lower budget planer, I like this one: https://www.amazon.com/DEWALT-Two-Speed-Thickness-Package-13-Inch/dp/B003OX9KME/ref=sr_1_2?ie=UTF8&qid=1485540065&sr=8-2&keywords=dewalt+planer
I have a question, seeking clarification on a point you make. Your article is fantastic, by the way, and the video was well explained. Bravo!
When you say you “kiss the boards…to clean up any rough surfaces left from the lumberyard,” are you talking about using the planer to clean up the flat (widest piece of your lumber, such as the 6″ dimension on a 1″x6″?) side? And is so, later in your article you say “having a jointer to remove saw marks” is nice. Which machine would be best for cleaning up crosscut saw marks on the wide plane of the workpiece lumber, for example? Just a bit confused…
I’m happy to see this years-old thread so active. Thanks for maintaining this great site.
Hi, Aldo. When you say you “kiss the boards…to clean up any rough surfaces left from the lumberyard,” are you talking about using the planer to clean up the flat (widest piece of your lumber, such as the 6″ dimension on a 1″x6″?) side?” (WWGOA) Yes, you can use the jointer to clean up one face, then put that face down and run it through the planer. That way both sides are clean, flat and parallel. “Which machine would be best for cleaning up crosscut saw marks on the wide plane of the workpiece lumber, for example?” (WWGOA) If you are referring to cleaning up the end grain of a freshly cut board, neither of these machines would be well suited to this. For that you’ll want to either use a sanding tool or a low angle hand plane.
Why is a hand planer always called planer (wether powered or not) when it mainly flattens a surface?
Hi, Michael. The powered version of this tool is generally referred to as an electric hand planer, while the traditional non powered version is referred to as a hand plane. Either of these tools can be used to flatten a surface or bring a work piece to a desired thickness. So, essentially it can be used for jointing or thickness planing. A long hand plane (Stanley #7 or #8) this is specifically intended for jointing is commonly referred to a jointer plane.
well done i have a planer/jointer and planes great but the jointing was another story on edge thru planer didnt come out even when i put the 2 boards together. great explanation being new to woodworking i joined the group and have learned alot from the videos thanks
what is the price for this machine?
Hello and thank you for your question. The machines in this article are older models which are available only on the used equipment market, and we do not have pricing information available. The jointer was made by Crescent, and the planer is a Rockwell brand. There are many new planers and joiners available, however. You might look at some of the following vendors to see what their current pricing is:
https://jettools.com/
https://powermatic.com/
https://www.grizzly.com/
https://lagunatools.com/
http://www.northfieldwoodworking.com/
I understand some of the above, but why can’t you just use a planer to accomplish both tasks–the flattening/squaring AND the thicknessing?
The main challenge is that the planer uses spring loaded rollers to hold the board flat to the table as it passes through. This means that the board will be flattened by the planer, but after passing through it will spring back to its original shape. By using a jointer first, a flat reference surface will be established. By placing that surface down on the planer bed, the top surface will be planed parallel to the bottom, and you will have a flat board with parallel faces.
You _can_ use a thickness planer to joint a board, but as JHop explained above. It works well as long as the sled you use is rigid. But jointers also are employed for set up an edge square to the flattened surface. Ideally that first jointed surface and edge are at right angles and will serve as your reference face and edge for further conversion. But, you can also surface a board or panel flat and get it squared and the right thickness with a hand plane or planes. It is not difficult to learn and takes a little practice to develop appropriate muscle memory.
jdallender,
I put a short cleat at the back end of my carrier. Glue it down, no screws.
Jhop, that is a pretty creative way to flatten both faces. i will have to try that out. How do you connect the workpiece to the carrier? Double sided tape?
You can use your planer as a jointer, but it takes a little thought. It boils down to needing a “carrier,” or sled to rest your workpiece on. This sled needs to already be flattened, and straight. Here is the one place I absolutely love melamine coated MDF: the base slides through easily on most planers, and you simply wedge the work in place. (There’s a variety of methods out there.) One thing I will add: remember to take the height of the sled into account when setting the height of your first cuts. Once you’ve got the top coplanar with the bottom of the sled, you can remove the workpiece from the sled and start using the planer normally. (Now you just need to find a flat shelf or wall to store your sled on…)
For hardwoods, I buy wood from a cabinet shop, they charge a very nominal amount to plane it to 7/8″. If I need to flatten a long board, I use the jointer, then run all the pieces (flattened face down) through my planer, to get them all uniform. I can usually get them to come out around 3/4″ that way. Mostly, though, the jointer gets a lot of use, the planer very little.
I bet there is always a little anxiety that you might hit a small nail or staple which will mess up the cutter knives.
Very good article. Well explained. Thanks.
Very good article. Well explained. Thanks.
Dennis, I’ve never used power hand planer. You could smooth an edge with a power hand planer, but from what I understand you can’t easily straighten an unstraight edge. The bases of these tools are too short to flatten edges. The long beds of jointers are what makes them effective edge straightening machines.
I have had good luck using my router for edge jointing.
Dennis, I’ve never used power hand planer. You could smooth an edge with a power hand planer, but from what I understand you can’t easily straighten an unstraight edge. The bases of these tools are too short to flatten edges. The long beds of jointers are what makes them effective edge straightening machines.
Can you edge with a power hand planer?
Can you edge with a power hand planer?
That would be possible.
yup. its a cheap trick for ill-equipped shops