Many times we utilize plywood because we need large flat pieces, but what happens when we need to do something crazy like know how to bend plywood for furniture? There are various ways to accomplish this, but the easiest route is using a method called kerf cutting. When I had a client commission me to build a set of arched, built-in cabinets, this is the process I used to make the curved panels necessary to complete the project.
How to Kerf Bend Plywood
Kerf cutting plywood is easy enough in theory—you simply make a series of deep cuts in a piece and then bend the wood around a form.
The tricky part is deciding how many cuts you need to make, what tool is best for the job, and how you’ll keep the wood in its curved shape once it’s off the mold. In this article we’ll dive into the finer points of this topic and equip you with the confidence to try it on your own projects.
To make the kerf cuts, you need to cut deep enough so that there’s between 1/32” and 1/64” of material left uncut. For tighter bends, you’ll want to be closer to 1/64”, and for gentler curves, you can stay around 1/32”.
Since the margin for error is very small and the potential for cutting all the way through your board is quite real, you should use the saw you have the best depth of cut repeatability with. Here’s why: Since most plywood has a slight bow to it, if you use a table saw or radial arm saw, some cuts may end up being deeper or shallower depending on where the board is bowed. This can usually be mitigated by setting a weight on the board or by using a clamp to flatten it out.
Since my boards had a slight bow in them and were roughly 65” long, I didn’t go with the table saw or radial arm saw. For one, I don’t have a crosscut sled wide enough to support the piece 65” to the left and right of the blade on my table saw; and two, I didn’t want to move a weight roughly 150 times per panel to flatten it out and guarantee a consistent depth of cut.
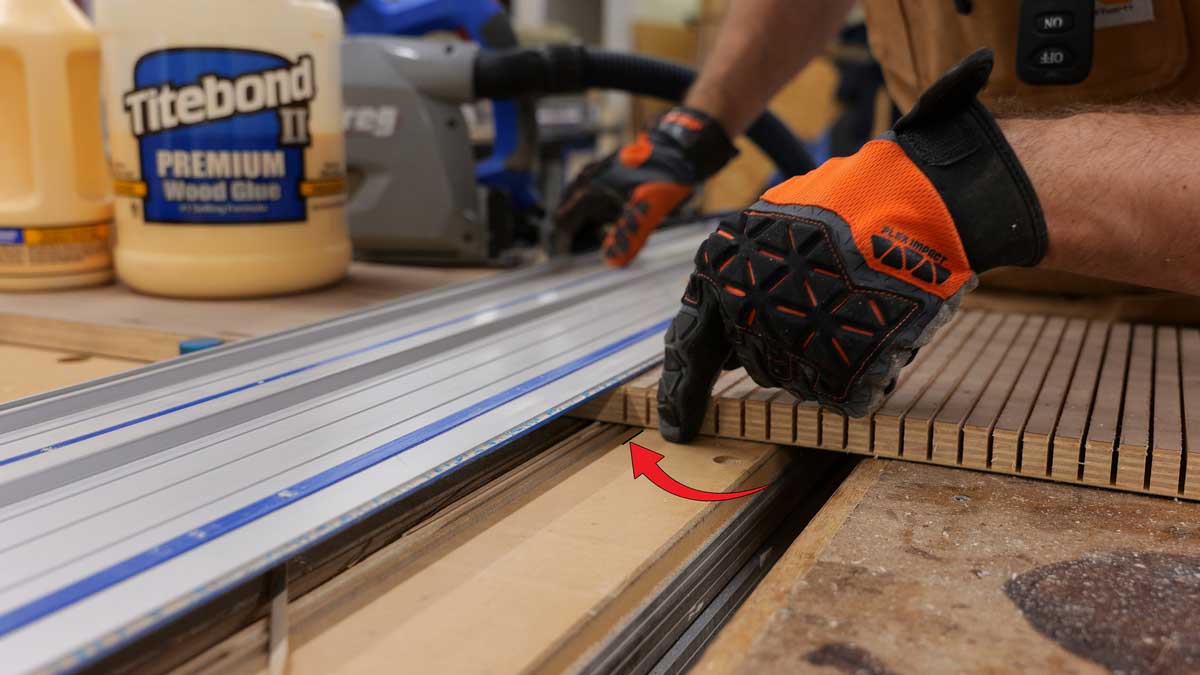
Given those constraints, my best option was to use my track saw because the depth of cut is always going to be the same regardless of whether or not the material is bowed. A circular saw with a straightedge guide could also be employed if a track saw is not available. But, regardless of the tool you use to make your kerf cuts, it’s imperative that as the material is cut it’s continuously supported along its entire length. No one wants to get to cut number 132 and hear their plywood snap.
With my tool of choice decided on, now the burning question is: How close together do these kerf cuts need to be made? For the arch needed on these built-ins, I found that one cut every ⅜” was just right.
I’m sure there’s a formula to determine the exact number of kerf cuts relative to the radius of a curve, but the simpler way to approach this problem is by making some test cuts on a piece of scrap material and seeing how it behaves when you put it onto your form. If it doesn’t lay down easily or feels a bit too stiff, you’ll need to make the cuts closer together, and if it’s too flimsy, you may want to try spacing the cuts a little farther apart.
This balancing act comes down to this: If you make too many cuts, it will take you longer to complete the task, but too few cuts and you won’t be able to bend the wood as needed. Another thing to consider when figuring out how close to make your kerf cuts is whether the uncut side of your piece is on the concave or convex side of the curve. In general, if the kerf cuts are on the outside (convex side) of the curve, your cuts can be farther apart. If they’re on the inside (concave side) of the curve, your cuts will need to be closer together.
Once you establish the necessary spacing for your arch, you’ll want to be reasonably consistent with it. You don’t have to go crazy here. As long as you’re within 1/32” or 1/16” of your target kerf spacing, you shouldn’t see a difference in how well your piece bends.
To make repeatable cuts, one option would be to use an indexing pin that the previously cut kerf locates into to set the distance for your next cut. Another option (and the method I used) is to simply mark your work surface and line up the previously cut kerf with that mark so that the next cut will be made in the correct spot.
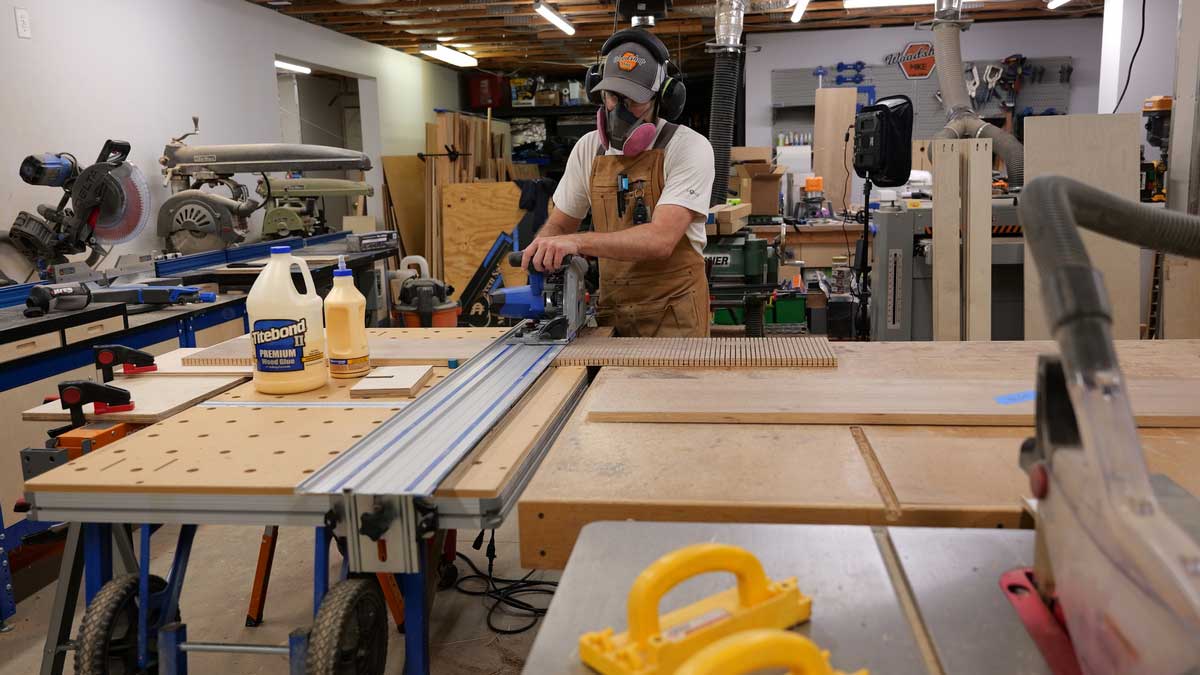
As the cuts are made, the workpiece will become very flimsy and will be prone to breaking. To prevent this, it’s imperative to support the piece over its entire length. I clamped a scrap piece of ¾” plywood under my project piece to support it while it was being cut.
When it comes to making your form, there are a few things to consider. First and foremost, the form needs to be consistent across the bend and support the wood along the kerf lines. This will vary a bit from one project to the next, but for this project, my form was overall 1” longer than necessary to give me a little margin. It also had an additional rib in the center to support the piece and prevent it from potentially sagging in the middle. For a project where ¾" ply is used, I would recommend adding support ribs across the width of your form every 4-6" to ensure adequate support. For thinner materials or when laminating several layers, it’s recommended to have your form fully support the material.
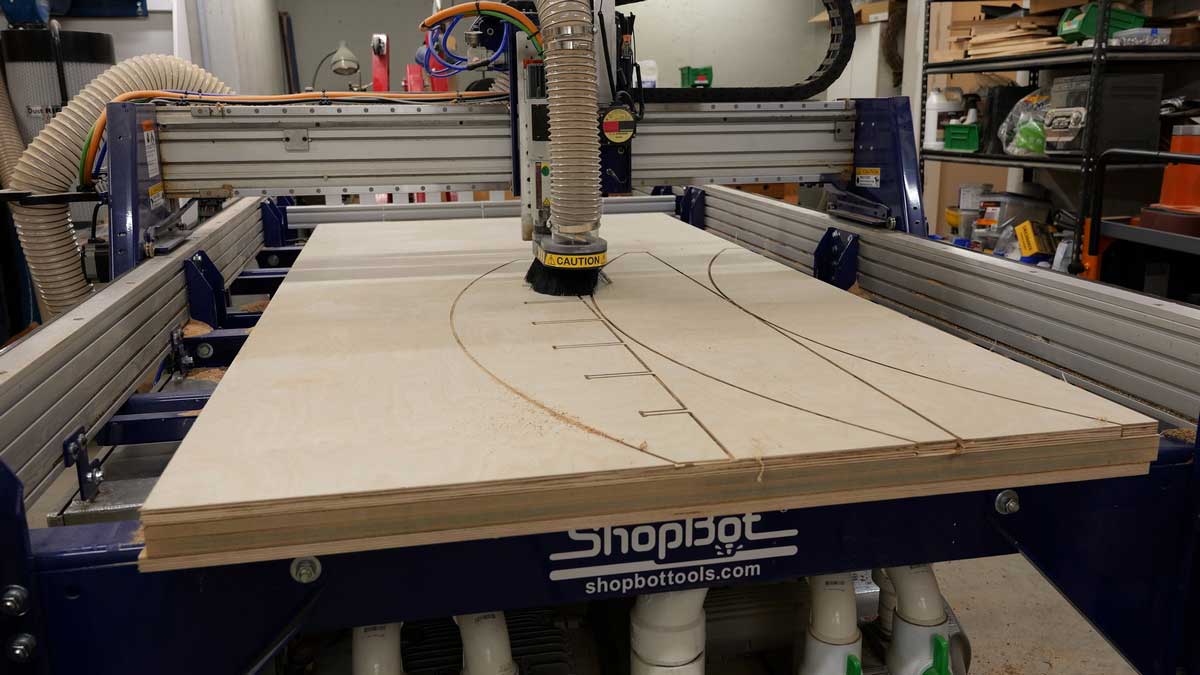
For this project, I cut out all of the parts for my form on my ShopBot CNC from a sheet of ¾” plywood. This made getting a fair curve very easy.
If I didn’t have a CNC to cut out all of the pieces for my form, I would have cut out the profile using my bandsaw and refined it with a sander. Once one profile piece was perfected, I would have then rough cut the remaining profile pieces of my form on the bandsaw and used a templating bit in my router to transfer the profile. Instead of half-lap joinery, I would have just butt jointed the pieces and assembled everything with CA glue and brads.
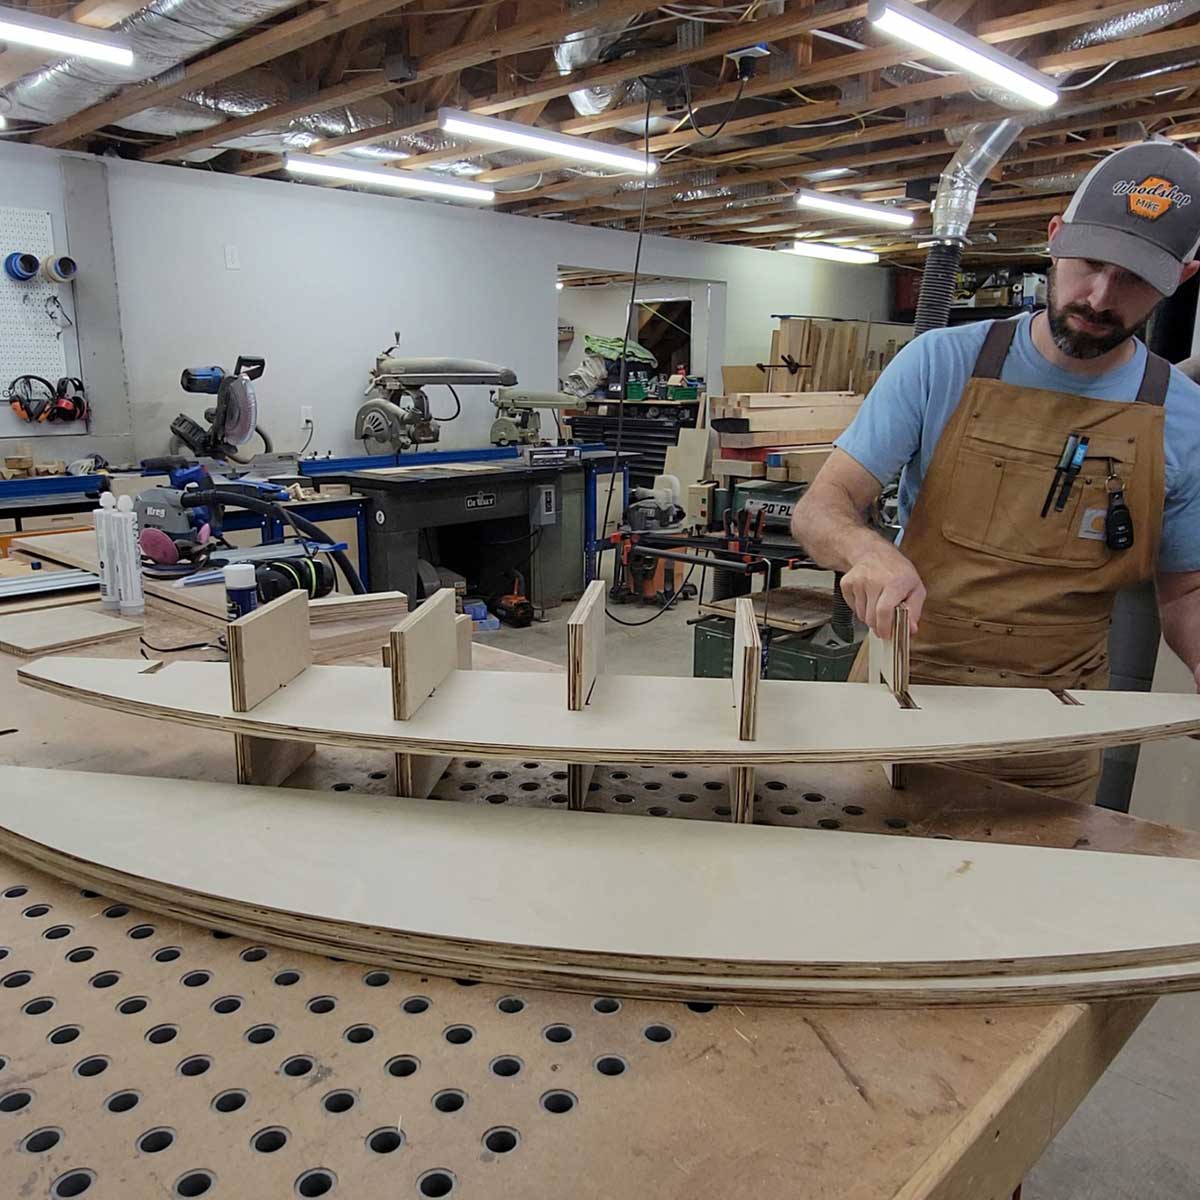
Half-lap joinery holds the struts to the curved components.
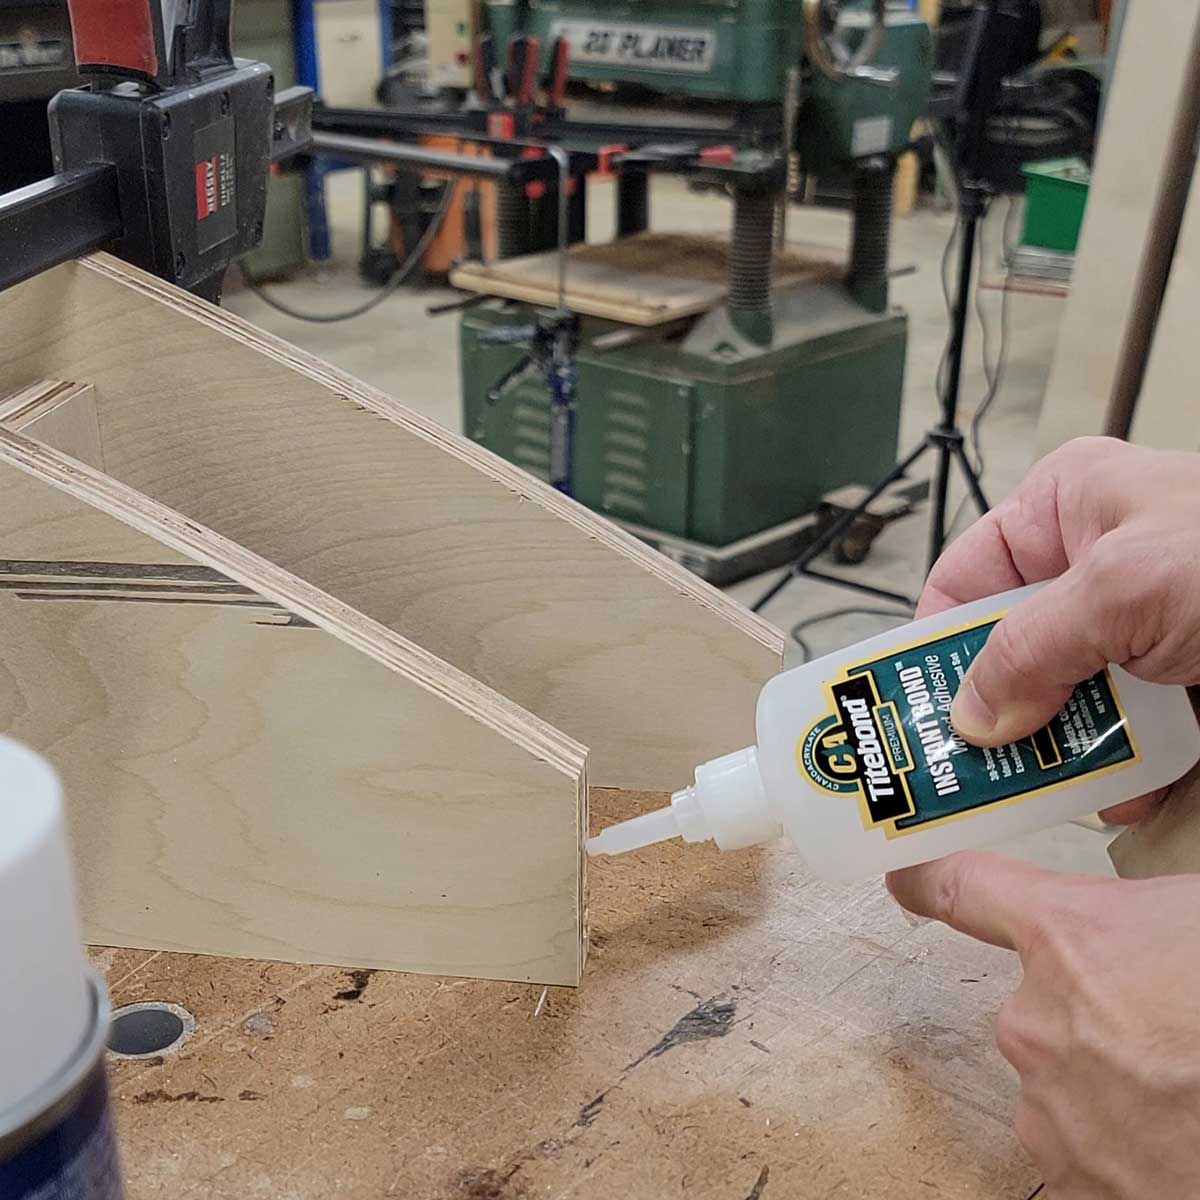
CA glue gave me a nearly instant bond.
Brad nails held it while the CA glue dried.
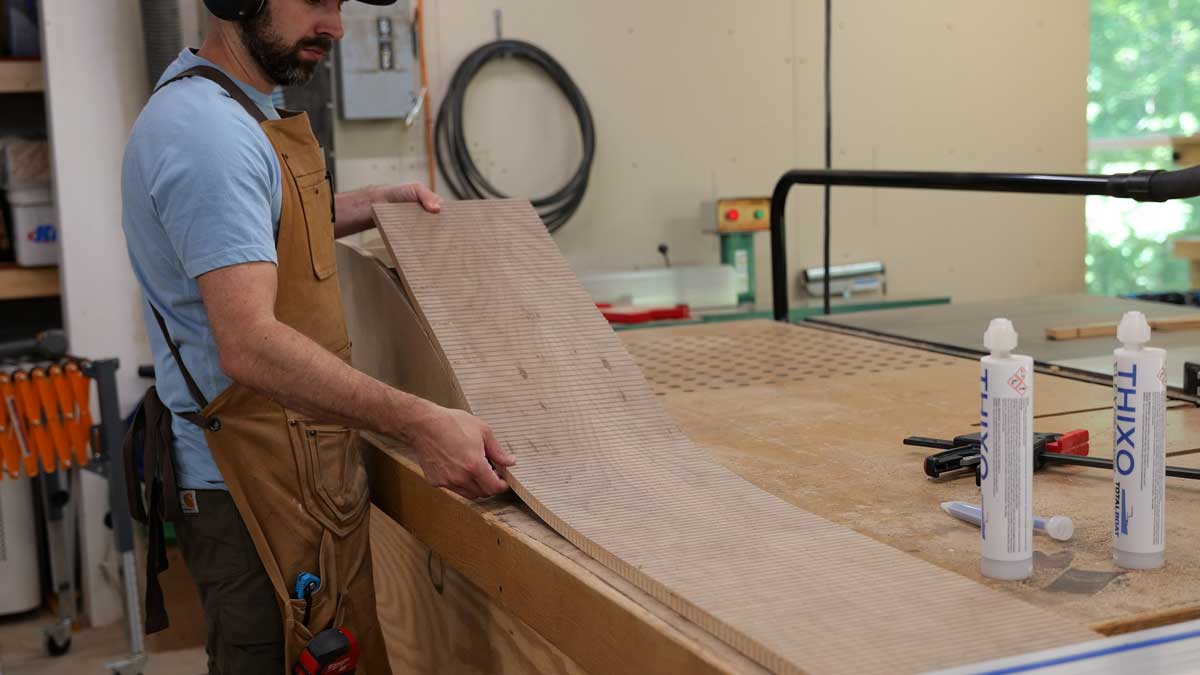
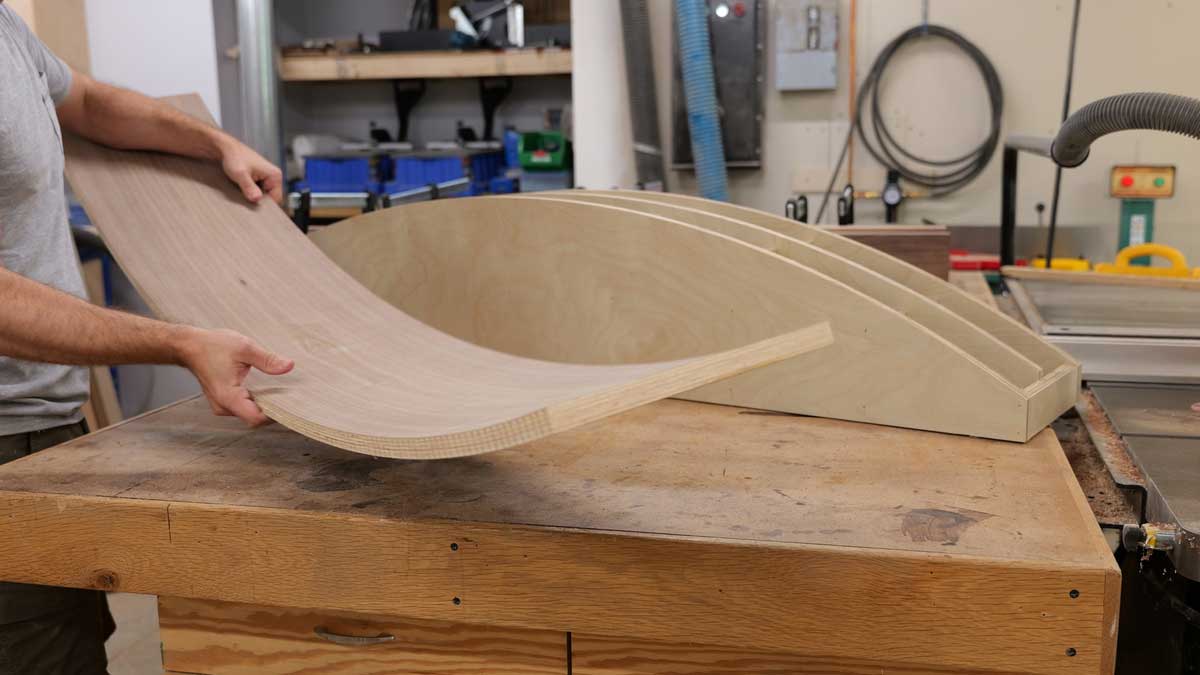
With my form made and my project pieces kerf cut, the next step is to carefully lay the material over the form. When your piece is fully kerf cut it will break very easily, so make sure to fully support it with something like an extra piece of plywood while you move it around the shop or while sliding it onto the form.
(Yep, there are kerfs in the top face of that board. As I lift and flex the end of the ply, the kerfs pinch closed.)
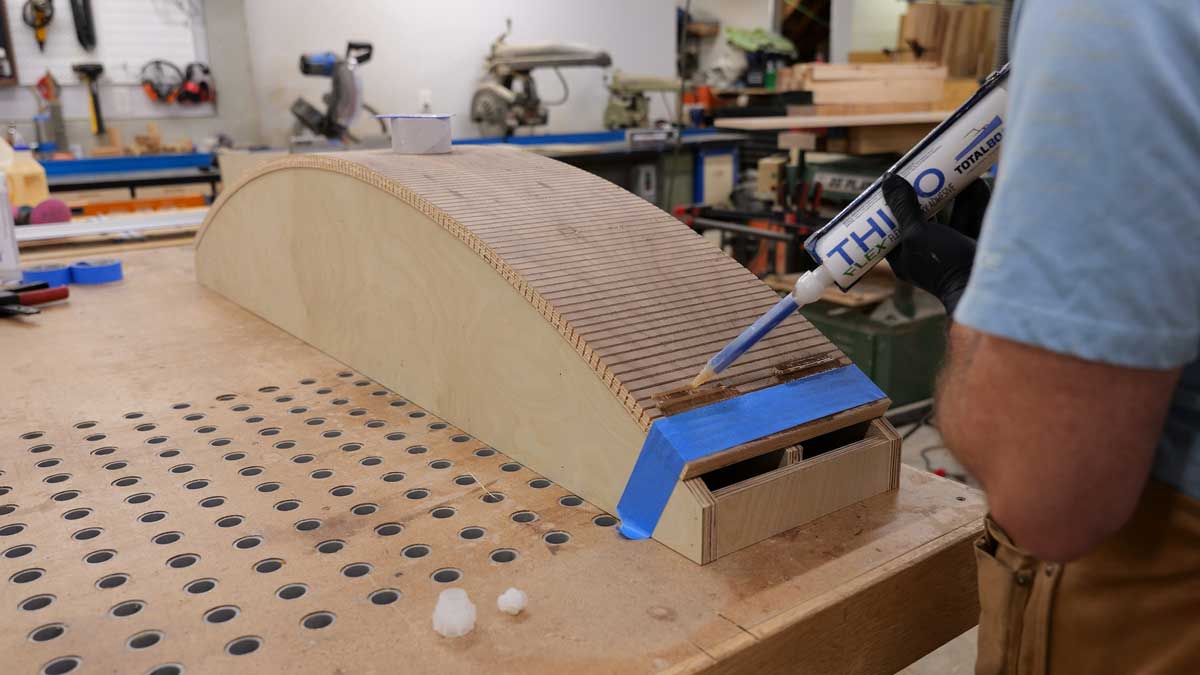
To transform the kerf cut piece back into a rigid piece of plywood, there are a few options you can use. You could glue thin strips of wood into each of the kerfs or use any number of products like Bondo or even Titebond Quick and Thick. I settled on using TotalBoat’s Thixo epoxy (see sources). This epoxy comes in a caulk style tube, has a mixing nozzle so that the product is already mixed as it’s applied to your project, and as the name implies, it is very thick. It ended up working great for this project, and for what it’s worth, I’ve used it for various other unique gluing applications where a very thick gap filling adhesive was needed.
I had briefly considered a more traditional epoxy like TotalBoat’s High Performance epoxy, but my concern was that it would run out of the kerfs and just end up making a mess all over my bench and the form. I was also worried that it would soak through the uncut veneer and cause discoloration or possibly even bond the curved piece to the form. With the Thixo epoxy, it didn’t run or cause any discoloration on the “show side” of my curved piece. Since I only had a few tubes of Thixo in the shop, I applied two 4” long beads per slot to conserve material and then used a squeegee to spread it out.

Once every eight or so kerfs were filled, I taped the plywood firmly to the form with strips of blue painter’s tape and repeated the process until all of the kerf slots were filled.
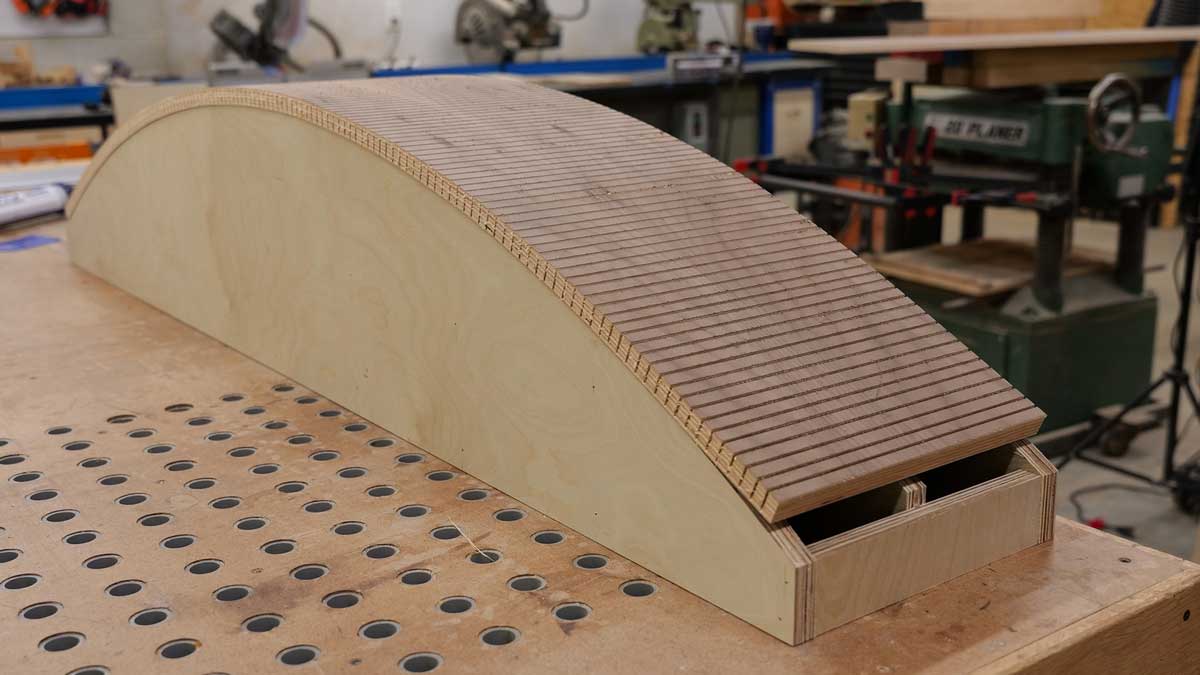
After the epoxy was cured, I had an arched piece that was ready to be trimmed to final size and installed in the top of my cabinet!
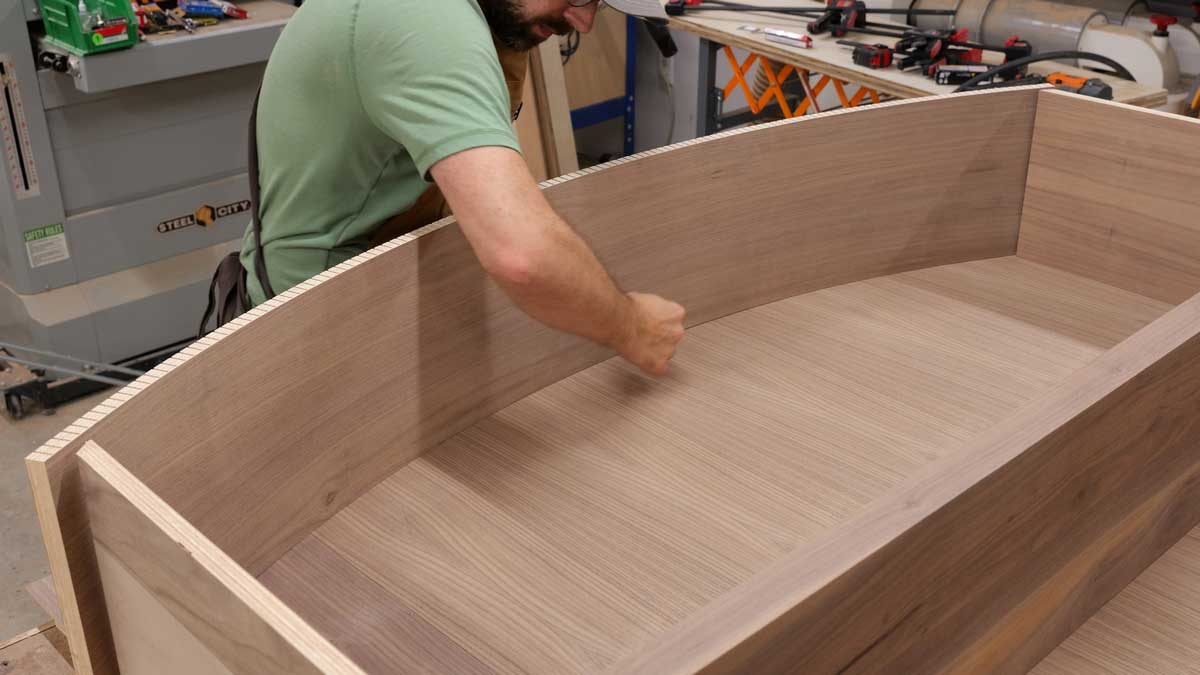
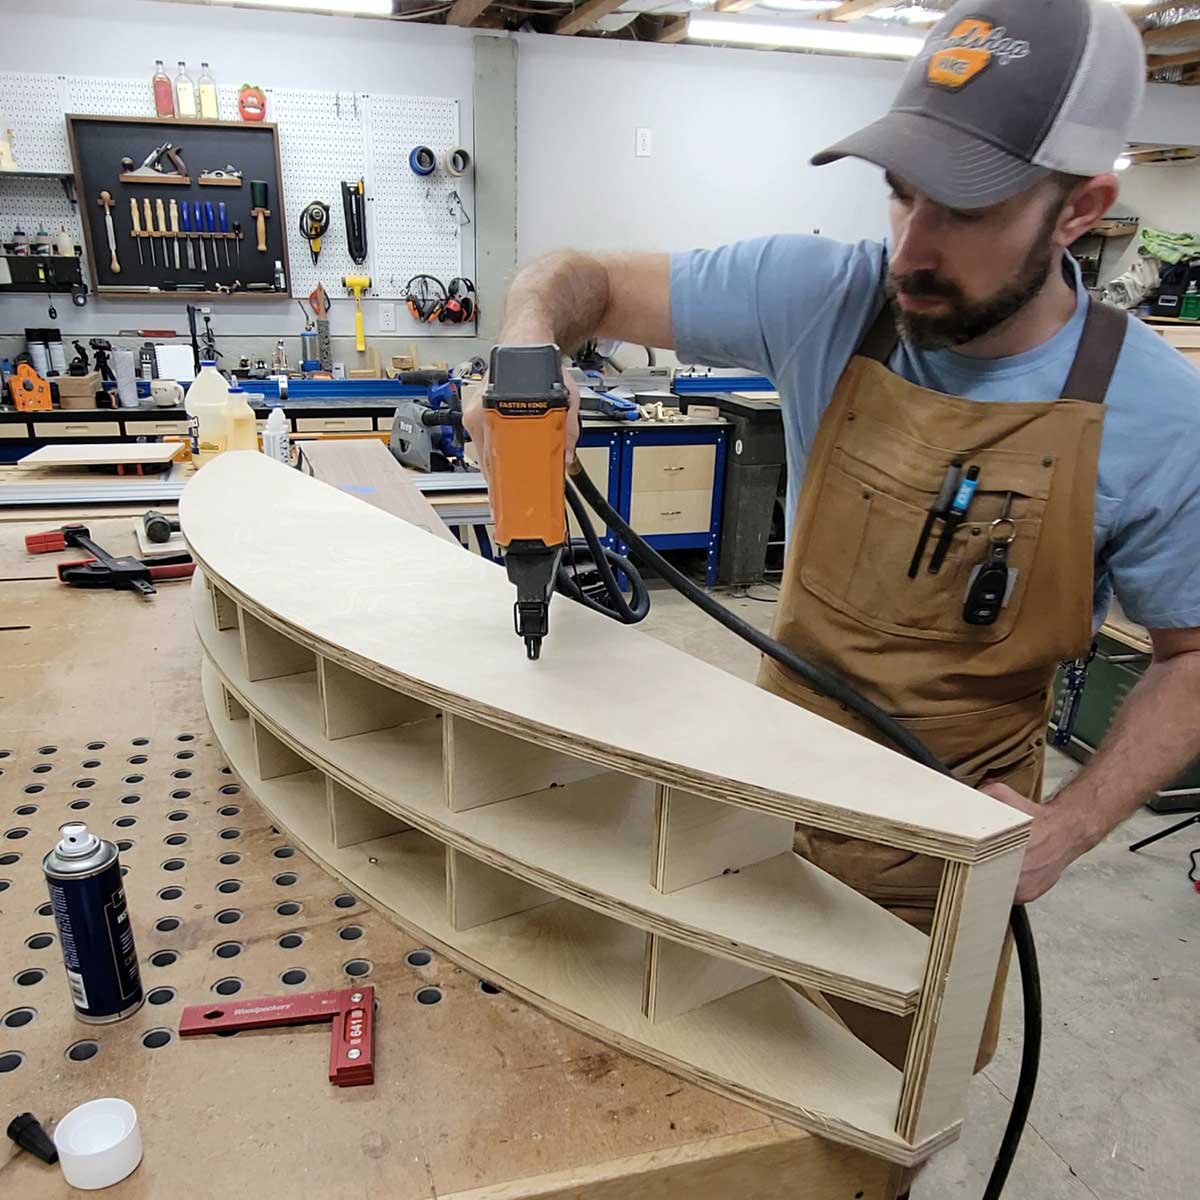
To secure the curved piece at the top of my cabinet, I first set it in place and traced its profile on the back panel.

I then applied CA glue at the top of the cabinet sides (I cut these as close as possible to match the arch) and inset a bit from my reference line to prevent any squeeze out on the back panel. I then sprayed accelerator on the mating surfaces of the curved piece and set it in place.
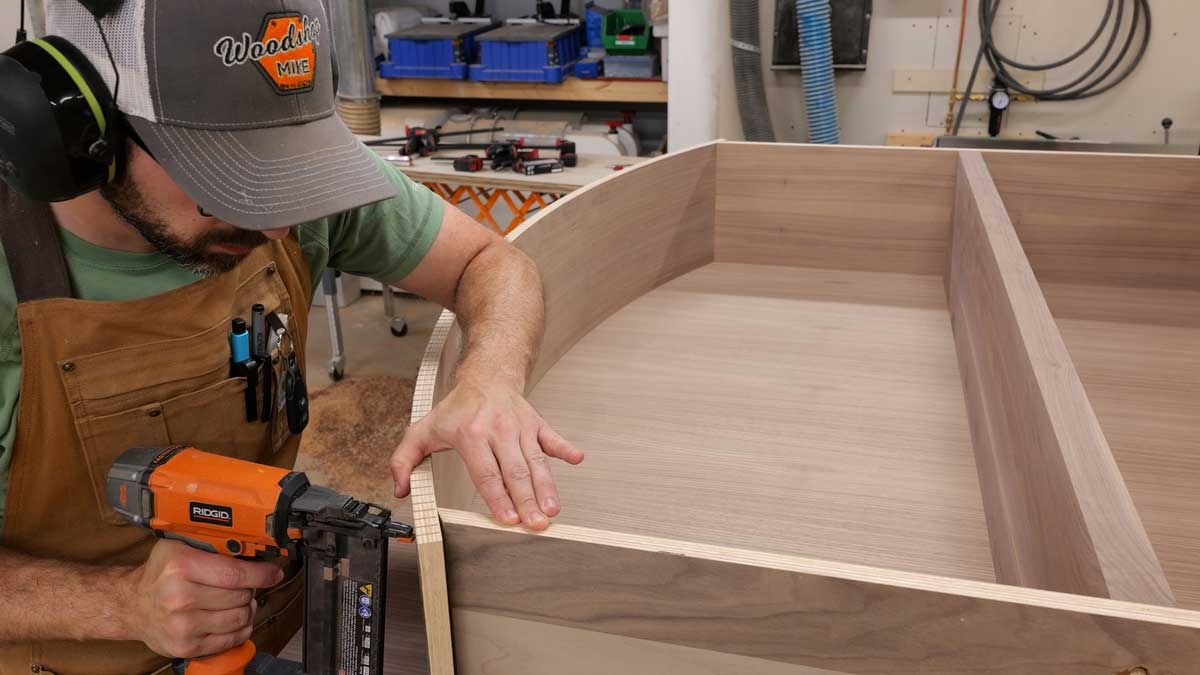
I also shot a few 1 ¼” 18ga brad nails through the arched piece into the cabinet sides for good measure.
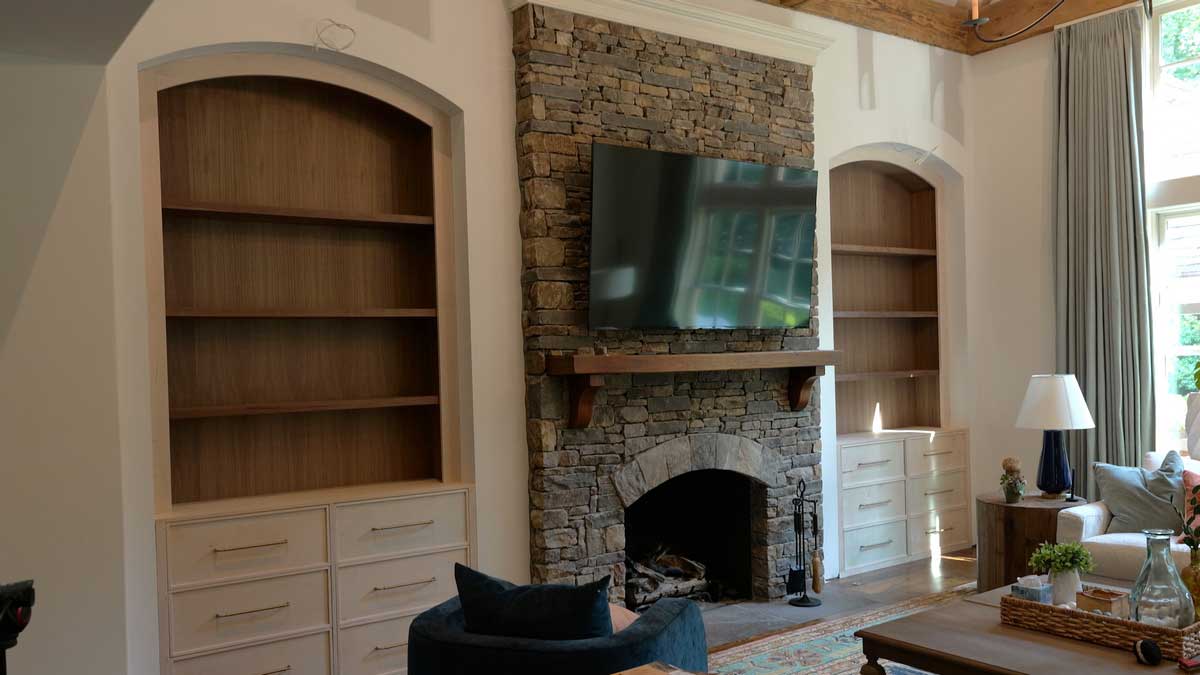
Once the cabinet was installed, I used Titebond Quick and Thick along with a little CA glue and accelerator to bond the arched section of the cabinet and face frame together. With everything in place, the built-ins look great and there’s no way anyone would know there’s over 100 cuts on the back side of the arch!
P.S. If you decide to give Thixo a try (or any other TotalBoat product), you can save 5% on your order at www.totalboat.com using either of these links.

I kerf bent Tamarack along it's width using a wet cloth and an iron. Worked pretty good. It was a very gradual bend.
I agree with David Maxwell: laminating a panel with several 1/8" ply boards is easier, quicker and less risky. I use a PVA adhesive thinned 20% with water, Some of the internal panels can be across-grain for flexibility. I also extend the panels beyond the required length, to keep an even curve right to the ends, then trim to length. Instead of filling the slots with epoxy, have you tried bonding another ply panel over the back face, making your own blockboard? Great session, thanks Mike
Looks absolutely great, I have done this also but not to this big of a project .
A good idea, explained step by step, helps a lot when working with wood.
I've used this technique many times with my radial saw. Once I kerf-cut an 10 foot 2x8 to make a curved step. Now that I have a CNC router, I'm looking at cutting angled kerfs that would fully close up when bent.
What if the curve is seen from the outside? Do you simply reverse the way you lay it over the mold, now squeezing your nerf cuts closed, cover up the knerf cuts visible on the side with another piece of wood which would ultimately add to the overall strength of the now bent piece?
Ever hear of bendable plywood?
Very interesting. Thanks a lot for every detail on how to do it.
Excellent work. I use this technique when making trade fixtures for customers. I've also used it to make large round display pedestals. I also use bendable plywood for extreme curved displays. Great article!
A much easier way, which I have used on a number of projects, is to make a form, and bend multiple thin sheets of plywood, (I used 1/8" plywood on a project with an 8" radius of bend), gluing successive layers on top of each other - ie. laminating several layers of thin plywood together. I also constructed curved brackets supporting a 30" deep slab of oak dining table hung from the wall, by bending thin strips of solid wood, laminated over a form. This is absolutely solid, with no flex in use.