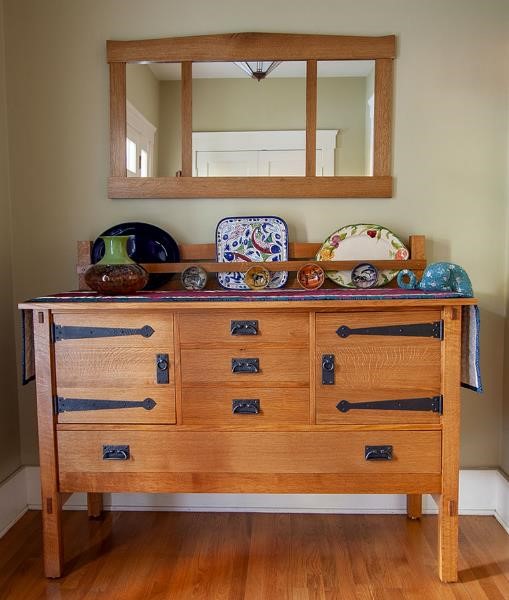
When one looks at Craftsman style furniture, several features stand out. First is the solid heaviness of the design—this is not furniture you casually slide across the room. Second is the cut of the wood: it’s often quarter sawn white oak and as such, the beautiful rays crossing the grain stand out with each piece as unique as a snowflake. Lastly is the wood’s color; a beautiful, deep, honey-brown tone.
If the item is an antique, this coloring of the wood comes not from staining, but from a process called fuming. The dark hues seen on fumed oak come from the chemical reaction between strong ammonia fumes and the tannin that occurs naturally in oak, white oak in particular. The results of fuming are quite different from the patina seen on aged cherry as that is a time-based coloring and fuming will not create a patina. Now you can recreate this antique look safely in your shop.
Gustav Stickley stated in his book “Craftsman Homes” (©1909) that oak boards left in the stable took on a “…beautiful mellow brown tone… due to the ammonia fumes that were naturally present in stables.”
Staining Versus Fuming
Although it is possible to mimic the look of fuming with various stains, it is very easy to differentiate a stained Craftsman-style piece from a fumed piece. The biggest problem is that oak is a very porous wood and a stained piece will show the pigments filling the open pours of the oak. In addition, I find that staining the medullary rays makes them either too light or too dark. I’ve never figured out what the conditions are that give the errant intensity, but I just find the results not desirable. I’ve seen good staining that mimicked fumed wood very well, but it always pales when compared to actual fumed furniture.
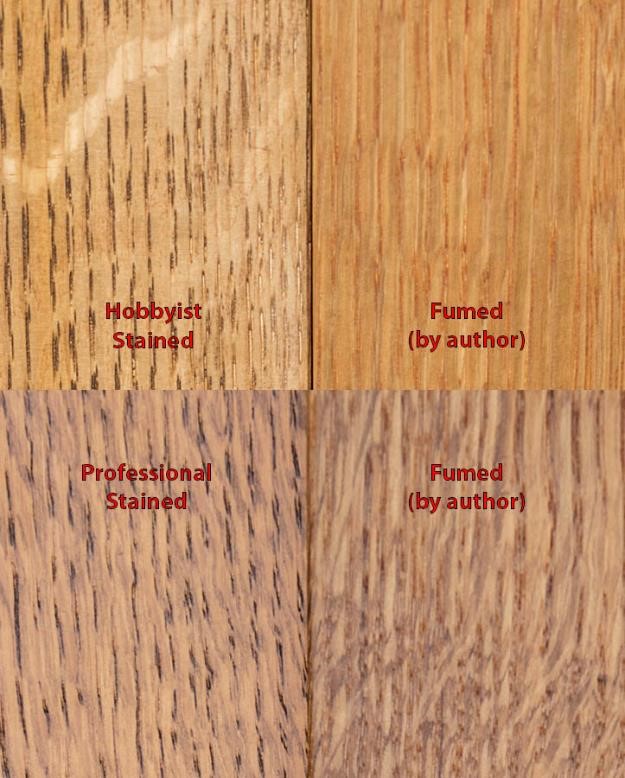
Here is a closeup photo showing two different comparisons with the stained piece on the left and the fumed piece on the right. In both cases I tried to find something I had to best match the stained color. On top are the results of a hobbyist stained piece (following a recipe presented in a national woodworking magazine). On the bottom is a comparison made with a stained item from the Stickley Company (in New York). Both fumed pieces are mine.
There is no doubt that the quality of Stickley Company’s staining is superior to the results with the hobbyist recipe. However, I do not believe that Stickley is going to share their recipe.
The Pros of fuming are:
1. Fumed furniture is easily repairable. The fuming process changes the actual color of the wood several millimeters deep inside grain and up to over a centimeter on end grain. Thus, if you need to sand or scrape a piece after the fuming process, the action is likely to be invisible. Try that with staining.
2. Fuming is sort of like baking a cake: once you place the cake in the oven, you leave it there until done. In the case of fuming, the process is to complete the items construction, place it in your fuming tent (more on that later) with some open ammonia, and leave it alone for 2.5-10 hours. Once completed (and aired out), you can place any kind of finish on it you wish. With stains, you need to be careful not to mix water-based stains with oil-based finishes as well as wait for any given stain to completely dry before finishing.
3. Craftsman furniture typically have a lot of slats, corners, recessed regions, etc., most on all four sides Getting your stain uniform across all of that can be quite a chore.
4. Fuming is pretty much the same color on side-grain as end-grain, so you do not need to worry about having to place a sealing finish on open ends of exposed end-grain such as any edge or a through mortice.
5. Lastly, once you have your fuming tent made and safety equipment ready to go, the process is remarkably easy and always successful. After all, how difficult is it to expose wood to the vapors of a chemical? Also, big or small work will take the same amount of effort, as there is no wiping on and then wiping off any colorant.
The Cons of fuming are:
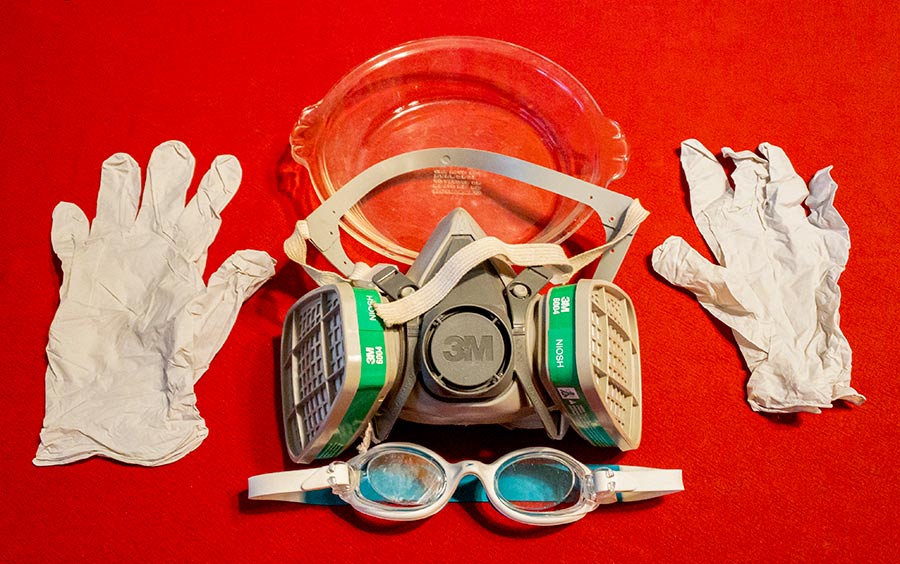
Although fuming is remarkably easy, it is a potentially dangerous process. The good news is that it is not all that difficult to make it safe. To fume, one needs:
1. A safe place to do it. This place should not have a lot of foot traffic and access to open air is mandatory. A garage is typically a good place and a separated garage or workspace is even better. Basements are out of the question. (Safety equipment for fuming is discussed below.)
2. If you have a pool and store your bleach containers in the same location you plan on fuming, MOVE THEM AWAY from that space during the fuming process AND you should NOT store the two chemicals near each other. Mixing ammonia and chlorine together (even the fumes of each) produces a toxic and carcinogenic mixture of chloramines and hydrazine.
3. Fuming will not darken sapwood, only heartwood. Because of this your project may have light strips. If this is not acceptable to you, then do not fume. I look at these artifacts as “wood is wood,” and an opportunity to discuss the wonderful dynamic issues that woodworking provides. This always leads to great discussions.
4. Fuming has the same drawbacks as finishes: if you have glue squeeze or other such issues, these regions will not fume and darken. Whatever tricks you have up your sleeve to prevent squeeze out or deal with squeeze out is mandatory.
5. You know how it’s easy to cut a piece of wood smaller but it’s a challenge to cut a piece of wood larger? Same goes for fuming: if you fume longer than intended and the piece becomes too dark, learn to accept the darker look because it’s not really possible to lighten the wood if it’s too dark. (Remember, since the depth of the effect varies across the entire piece of wood, you cannot reliably sand off a millimeter here and two millimeters there.)
6. Not all oak darkens the same amount. This is a chemical reaction. If one of the components runs out before the other, the reaction stops. This can either be the amount of tannins in the wood or an insufficient amount of ammonia for the time provided. In addition, I’ve found that some white oak has a bit of a yellow tint. This will fume to a darker yellow tint but not as brown as non-tinted white oak. Thus, wood selection for any project should include looking for such mixed original colors of the wood.
Things that you need for fuming:
1. A fuming tent. This can be anything from a (clean) trashcan to a fuming tent to a rental van. I’ve seen suggestions for the use of just a simple trash bag, but I don’t recommend this. You need an open space around the item being fumed for vapors to make uniform contact with the wood. Plastic trash bags are likely to collapse onto the wood, potentially limiting vapor contact at those points thereby potentially creating variations in coloring. Rental vans are OK as they can contain large items and are not going to be affected by the fuming process. However, as they are not airtight, do not park them in areas of foot traffic. Here are plans for making your own different sized fuming tents.
2. Ammonia filters for a gas mask. If you have a gas mask for organic vapors, you are halfway there. This is a must as the fumes from strong ammonium hydroxide can damage lung tissue. See Sources
3. Protective goggles (not safety glasses) that will keep the vapors from your eyes. Swimming goggles are easy, cheap, and great for this and can be found at any sporting goods store. When purchasing, make sure you can create a vacuum from the eyecups against your eyes without the use/need of the head strap. In use you will use the head strap, but you want to make sure that the goggles completely seal off your eyes. Note, if you absolutely must wear glasses, wear them over the goggles, that’s what I did for years. Uncomfortable? A bit, but easily done and it’s not as if you’ll be wearing glasses over goggles for an extended time.
4. Gloves for handling the ammonia. Simple cheap gloves are fine. You simply don’t want the ammonia to make contact and irritate your skin.
5. A shallow glass bowl for holding the ammonia liquid during the fuming process. I use a small 7” glass pie plate. You don’t need much more than a half to three-quarters of a cup of ammonia per each fuming session, but you do want as much of the ammonia exposed to the air within the fuming tent as possible. A pie plate is a better choice than a bowl.
6. Full strength ammonia, about 26–30%. I would not bother to use the ammonia purchased in a grocery store which is only about 5–10%. [Ammonia is a gas at room temperature and is “contained” in water like CO2.] See Sources. [Note: you may see the same item listed as “A” and as “PCA” with the latter at a higher price. Those bottles have the same content but the PCA bottle has a plastic coating over the glass container that will contain the liquid if it is accidentally dropped or hit. It’s your choice as to whether the extra cost is a good idea or not.]
The Fuming Process:
Set yourself up in an area where there will be no foot traffic and a lot of air exposure (a garage is perfect).
Lay a sheet of your 6-mil plastic on the workbench or floor depending on the size of your tent. Assemble your tent so that it sits on the plastic. If the surface is very uneven, you can consider laying some soft foam rubber under the plastic where the tent will sit above the plastic to create a better seal.
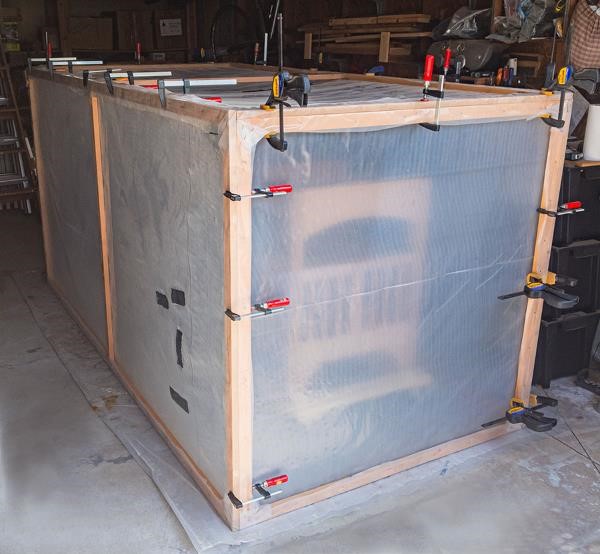
The item(s) you plan to fume need to be completely assembled with all joinery completed and glued in place. If there are drawers and/or doors, remove them so they can be fumed along with the main structure at the same time. Drawers can be placed on painter’s triangles. I have hung items like doors and banisters by placing eyehooks at screw hole locations hanging from temporary structures. Contact with any support (e.g., painters triangles) are best done on the bottom of these items. If the support does contact the wood’s surface, this may decrease the amount of ammonia vapors at that region causing less darkening at that point. If there’s no way to avoid such support, the smaller and pointier (e.g., a nail tip) the contact the better.
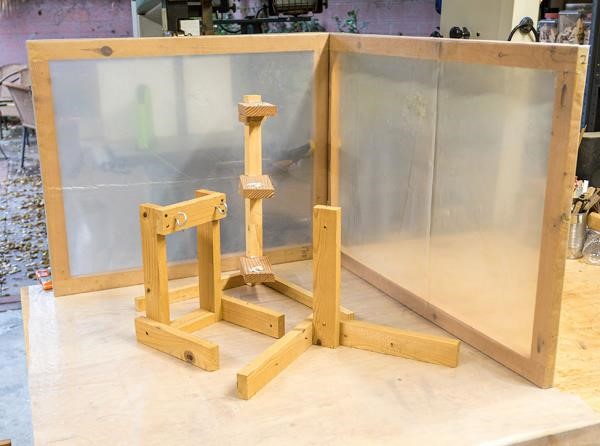
Sample structures I’ve used to support items that are not self-standing and need to be hung or supported for the fuming process.
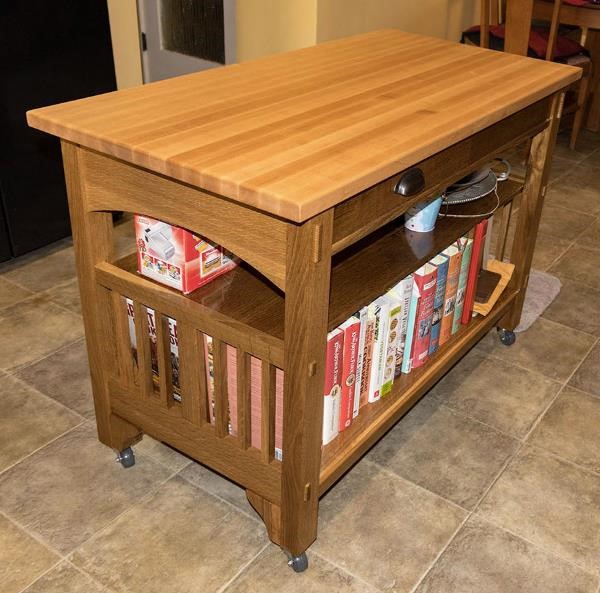
You should remove all “extra” stuff such as any hinges, hardware, drawer slides, AND any extra wood items that are not white oak (that are not glued into the project). For example, any ebony buttons or things that you wouldn’t assemble before adding the finish. Drawer bottoms are an easy example of an item that can be left in for fuming. Above is a photo of a kitchen island with a hard maple top and two drawers. The drawers were pulled out and placed in the fuming tent with the bottom section. The hard maple top and the drawer slides were removed and were not part of the fuming process. Finally, after all of the fuming and finishing was complete, all of the items were then re-assembled to complete the project.
As a side comment, notice the light strips of sapwood that did not darken with the fuming process. Also, you can recognize the end of the island in a previous photo where it is in the fuming tent.
Because the gases will distribute very evenly, there is no concern about how high or low objects are placed within the tent.
After you have assembled your tent and there is only one more tent panel to put in place, place your items that you wish to fume. Distribute them so you have a convenient place to lay your pie place to receive the ammonia. Now, it’s time to put on your protective devices. Once YOU are assembled, carefully pour into your glass pie plate about 1/2–3/4 cup of ammonia. If you are concerned about spilling, place some cloth under the pie place to catch any slop. What is important is that you don’t inadvertently spill the ammonia onto your work, as it will cause a wet discoloration.
After all is in place, close up the last panel of the tent or place the fuming tent over the whole shebang. Leave the area before removing your safety equipment.
When you are satisfied that the fuming has gone on long enough put on your ammonia safety equipment and remove one of the fuming tent’s sides or lift the tent off the work and leave the area so that the ammonia odors can outgas from your furniture. (You can see below for how to deal with the used ammonia.) Be sure you are out of the immediate area before you remove your ammonia safety equipment (about 10-15 feet away is fine). After everything has outgassed and there is no more ammonia smell, you can dismantle your fuming tent.
Some Extra Thoughts:
It’s advisable to test some scrap pieces of the same wood used in your work not only as a test of the fuming process, but more importantly to learn how long it will take. This is especially true on your first few fuming projects. Warmer weather may make the process go faster.
If at all possible, fume all of the items related to a project at the same time. If this is not possible, try and do it around the same time of the year (and/or day) and keep close track of your fuming times.
During your initial testing process, pull a sample out every several hours. The pieces may not show much color (or even have a grayish tinge to them) as you pull them out. However, if you either wipe on a bit of mineral spirits or apply a clear spray finish, you can see what the final color will be. (I sometimes place a strip of masking tape across part the sample to see the before and after finish colors.) For reference, I write the number of hours the item had been in the tent on each sample as I take them out. After you’ve done this a few times, this extra step may not be necessary unless you are unsure of new or odd white oak and just want to verify.
The initial darkening process goes relatively quickly with the fastest change taking place in the first 4 hours or so. Subsequently the change is more gradual. There will be a point where the wood will not get appreciably any darker, but this could take half a day to reach. Again, you need to apply a coat of some kind of finish on the wood to fully see how dark the wood has turned.
Remember, the reason for this tapering off of color change is simply chemical: as the tannins and/or the ammonia are used up, the reactions slows down. This is no different than baking soda and vinegar — once one of the chemicals is used up the reaction stops. However, IF you want to see if adding more ammonia might help the reaction, that by itself is fine. But if you plan on other fuming sessions (for matching furniture), it might be difficult to control the darkening uniformly across two different fuming sessions with changes in the amount of ammonia used.
Once you’ve determined how long you want your work to be fumed, proceed. The good news is that the process is sufficiently slow so that if you miss your end time by even an hour, it really won’t make that much difference.
The remaining ammonia can either be poured back into your container or poured into a bucket of water with a little soap so you can wash your windows. Alternatively, I usually dump the bucket of water out on my driveway with as wide a puddle I can make. The ammonia dissipates very quickly. I live in a very urban neighborhood and I’ve never had any complaints.
Let your work air out overnight. By the next day you shouldn’t smell any remaining ammonia. If you do smell ammonia, just let it air out a bit more. You can now finish the wood any way you want to: finishing oil, lacquer, shellac, water based, or oil-based finishes are all excellent over fumed wood.
Sources:
- Organic Vapor Mask
- Ammonia filters
- Ammonia - Amazon Source 2
- Ammonia - The Science Company

Does this process work well on other light coloured species such as pine, ash or maple? Thank you, Steve Wilson
Does it matter which temperature fuming is done? If it is in an unheated structure during NY state winter will that affect the process and cause the wood to move etc?
Thanks for clearing up some questions I had! 😃👍
Great guide on furniture and how to set up my home. Thanks for this!
Hi, do you happen to know if the wood after being fumed is toxic? I was planning to fume wooden bowls and kitchen utensils but worry about trace ammonia left in the wood. Thanks! Parker
If you're looking to construct a tent for this, please look at this article: https://www.wwgoa.com/article/fuming-tent-construction/
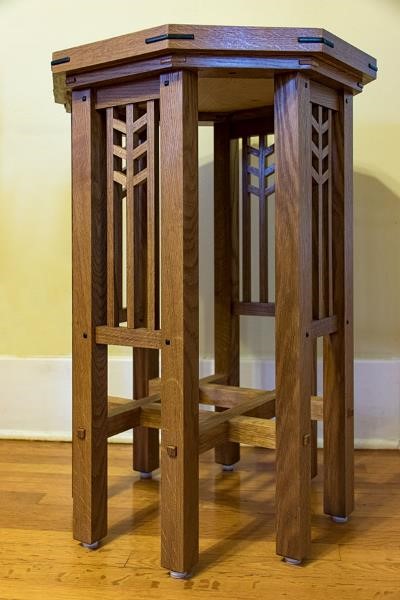
Love the side table. Are there plans for that or is that an original?
This was a great article. Having attempted fuming several pieces myself I really appreciate the color that results from the process. Especially liked the pro and con points for fuming.
Does fuming have the same results with red oak as white oak. I understand red oak has a higher tannin content than white.
I realize white oak is typical for Craftsman furniture. But Will fuming have similar results with red oak, which I believe has higher tannin content?