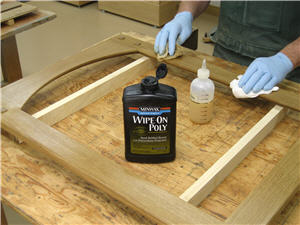
I was excited to try this stuff when I first saw it on the internet. My reasons? Well… since moving my shop to our home, I can no longer use “stinky” finishes; plus, I like the smoothness of wipe on polyurethane, and I especially like the look of clear water based wipe on poly finishes on unstained wood–so this product seemed perfect for me. I searched for it at my local home and hardware store, and I was surprised to find that no one carried it. I checked with Minwax, and they told me it was only sold retail in California. That’s because of the state’s VOC emission limit requirements. But not to worry, they quickly added that it could be mail ordered. So that’s what I did, and my testing began! Specifically, I began testing the Minwax wipe on poly water based product.
Testing Minwax Water Based Wipe On Poly
Following the application directions, I tested on both small and large pieces of wood, and I made some 90-degree corner samples to test the finish since my experience tells me I need to know how to use wipe on water based poly on an inside corner. When I was done, I concluded the finish’s pros were: Very little odor, no concerns of spontaneous combustion, fast drying, recoat in 2 to 3 hours, water cleanup, and the resulting finish has a very delicate satin smooth appearance with great water resistance and durability. In general, I found this wipe on poly to be a great addition to my finishing tool box.
OK, now for the downsides: It dries very fast (yes, this is good and bad), so you must get a coat on quickly, thin, and even. That can be challenging as your surfaces get larger and more complex. It raises the wood grain, which is common with water-based finishes but is manageable and lessens as you add successive coats of finish. And finally, achieving success requires A LOT of practice. In other words, there's a large learning curve, so practice on scrap wood, and start by applying it to smaller flat-surfaced projects. You can always disassemble your project as much as possible before applying any finish. A good rule is never to commit an unfamiliar finish to your project. That is a recipe for disaster. With all of that said, the results are well worth the effort. This stuff looks great when applied right, and a finish can be built and completed much faster than with oil-based finishes, which typically have a longer dry time between coats.
Application Tips for Minwax Water Based Wipe On Poly
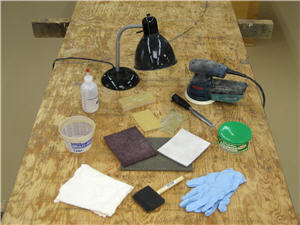
Tools you'll need:
Application: Work light, foam brush, 12" x 12" lint-free rag, finishing gloves, squirt bottle, small plastic container.
Between Coats:
An orbital sander with a 220 grit disc, 220 and 320 grit sandpaper for raised grain, a chisel, and 180 grit hard sanding block for runs, a fine grit sanding sponge, and maroon Scotch-Brite pad for smoothing.
Final Touch Ups:
Gray and white Scotch-Brite pads and automobile polishing compound.
After extensive testing and practice, I made the leap and finished two medicine cabinets I had just built. Doing so gave me a chance to learn even more. Here are the finishing steps and techniques I found worked best: I applied the first coat using a foam brush. That allowed me to go quickly and apply a relatively even thin coat. I was cautious on the inside corners to ensure no finish was pooled there, so minimal finish was applied to the tangent surface. I think much care must be taken when applying the finish on and near the edges. THIN is the key. You can build thin coats on top of thin coats as soon as the first coat is dry. I found that method much more successful than trying to smooth out a thick coat. I would sometimes apply the finish to "sensitive" areas, stop, go work on another piece, then come back and finish the broader surface between the already finished areas. If the overlays are very thin, they hardly show. Also, excessive wiping causes more problems than dealing with a dried run, but you can wipe off a wet run once the surrounding finish has flashed over (first stage of dry).
After a few hours, the first coat was dry, very rough, and ready to smooth. I gave it a quick once over with an orbital sander and a 220-grit disc. I removed any runs with a chisel and 180-grit hard sanding block. I continued sanding by hand with 220-grit sandpaper. Next, I smoothed the finish with a fine-grit sanding sponge and a maroon (fine-grit) Scotch-Brite pad. Then I applied the second coat, again using the foam brush.
The dried second coat was much smoother than the first. I sanded it more gently by hand, using 320 sandpaper and then the maroon Scotch-Brite pad. I ensured all imperfections were removed when preparing to apply the final coat. I applied the third coat using a 12" x 12" lint-free rag. I saturated the rag with the finish and wrung out the excess. I washed my gloves because I learned earlier that the dried finish on my gloves would flake off and land in the wet finish. Needs improvement! I kept the rag loaded evenly by squirting more finish on it often. I first coated the inside corners, let them dry, and then applied the third coat very carefully to the rest using long with-the-grain strokes.
Even with all the care I took applying the finish, there still was a bit of unevenness on my rather complex door frames (see the photo). I smoothed problem areas gently with a gray (ultra fine) Scotch-Brite pad, then brought the sheen up with polishing compound, and then back down again with a white (light duty) Scotch-Brite pad.
Photos By Author
Product Information:
Ordering Information:
Minwax Water Based Wipe On Poly
Mail order from Ace Hotline
800-441-4223
Scotch-Brite Pads and Sanding Sponges
800-383-0130
You might also be interested in
Using Mineral Spirits to Show Wood Grain
Making Your Own Walnut Stain
How Sanding Affects Your Stain Color
Homemade Wood Finish
Adding Tannins to Wood
How to Weather Wood

Do you think that this would be a good finish product for Cornhole Boards. Right now I apply the skin (a vinyl "decal") and then apply 5 thin coats of spar urethane (sanding between coats, of course). Always looking for methods to improve. If your not familiar with cornhole boards, they are 2 ft by 4 ft in size with a 6 inch hole in one end.
I can't believe that you went to that much trouble to create an inferior finish. There are plenty of easier and better ways. That's what happens when you let the bad science tail wag the logical dog. But... thank you for telling the truth and saving others from wasting a lot of time
Would like to have seen the images of the finishes as they were being described. The images shown are not very informative as only the description can be followed!
I just had to make a replacement desktop for a large stand-up desk. Because it was too cold in my garage workshop I had to finish it inside the house and needed an odor free product and found this Minwax product on Amazon. Because of the size of the surface (26x68x1.5) I found this product very hard to apply. The finish starts to set up incredibly fast making it extremely difficult to apply an even coat on the entire surface. After 4 coats and a final sanding and polishing the top looks great.
I haven’t tried this product/process but, having used the brush-on method for many years, I think I’ll stick with brush on. Similarly, applying thin coats is the key to a great finish.
Is the finish food safe? Thank you.
This is awesome information. I can’t wait to try it. I too can’t work around the home with “stink”. My wife will be most grateful!
Will this finish make natural wood table still look like natural wood?
Can the water base wipe on be used over a varnished table top?
Did you attempt using an HVLP?