 Looking for a rock solid way to join drawers that doesn't require a dovetail jig? If you've got a router table, you can easily make a sliding dovetail and get many of the strength advantages a half-blind or through dovetail would provide.
You'll only be able to use sliding dovetails for drawers on which the front will overlay the sides of the opening.
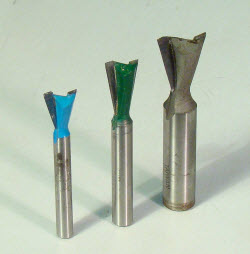 It's A Two-Bit Operation. You'll need two router bits in order to make sliding dovetails.
Any dovetail bit will work. I commonly use a 1/2" 14-degree cutter. The diameter of the dovetail bit needs to be less than the thickness of the drawer sides.
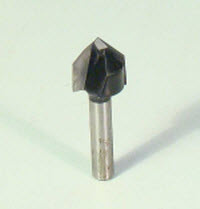 Locating the cuts on the router table is easiest if you also have a V-bit. You won't make any cuts with this bit, just use it for set up.

 Make The Dovetail Slots First. Locate the fence by installing the V-bit and measuring from the point of the bit to the face of the fence. Here's the deal. Because of the shape of the dovetail cutter it's hard to use it to locate the fence. Instead, calculate the distance to the center of the dovetail slot, which is the amount of overlay plus 1/2 the drawer side thickness. Use this number to set the distance from the face of the fence to the point of the V-bit.
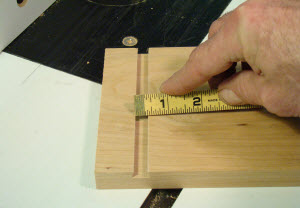
 Install the dovetail bit and set the height to 1/3 the thickness of the drawer front. I prefer to make these set ups using bar stock, instead of a ruler. (See Sources)
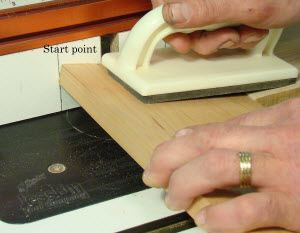
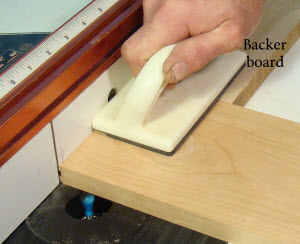 Machine the dovetail slot in the drawer front. Use a push pad to hold the material down. Notice the use of a backer board behind the drawer front to eliminate chipping.
 Make one cut from each end of the board.
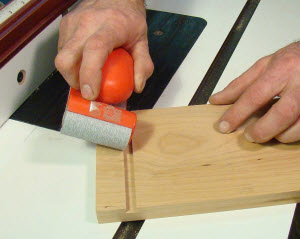 Lightly sand the knife edge of the dovetail slot. Even with a sharp bit there's often fuzz on these corners, which can prevent the tail board from sliding in.
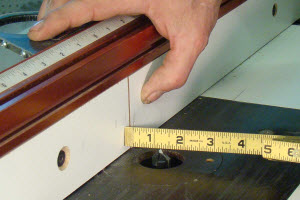
 Make The Tails. Measure across the narrow point of the dovetail slot. Subtract this measurement from the thickness of the drawer sides, and divide by two. In my case the measurement is 3/8" and my drawer sides are 5/8" thick. The difference is 1/4" which, divided by two, leaves 1/8". This is the amount the point of the dovetail bit should project past the face of the fence.
 Position the fence using the distance calculated in the previous step. I'm using 1/8" bar stock. It's better to start this step with a conservative setting (the fence too far forward) so you don't remove too much material. I'm leaving the point of the bit short of the face of the bar stock. This should result in a tail that's too big. The bit height remains the same as in the previous step.
 Cut a test piece. The test pieces must be exactly the same thickness as the project parts. Make one pass, rotate the board, and make another pass.
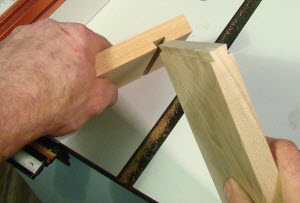 Check your work. You want the tail to slip into the socket with just a little hand pressure. If you used a conservative set up, the tail should be too big.
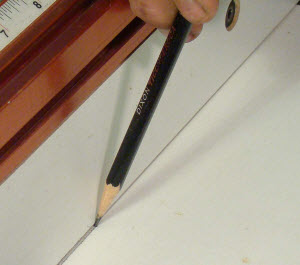 Before adjusting the fence mark its position on the table. This provides a reference point of where you started. If the tail was too big move the fence back, exposing more bit. If the tail was too small move the fence forward, exposing less bit. Remember that small changes in the fence have a large affect on the cut. Moving the fence 1/32" results in a 1/16" change in the tail.
Tails too large can be run a second time. Tails too small need to be cut off so you're starting with fresh material. Adjust the fence and check your work until the fit is perfect.
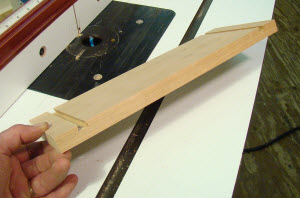
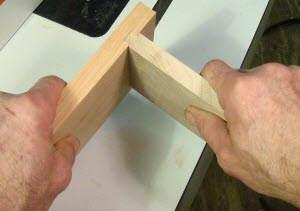 With a perfected fit the tail slides easily into the socket. It's a great feeling when you get to this point.
 Before cutting tails into your drawer sides make a zero clearance fence. Do this by pushing the infeed face of the fence into the running cutter. This will eliminate chipping in the faces of the tail board.
 Stopped Sockets. In some cases you may not want the drawer sides flush with both edges of the drawer front. It's easy to do a stopped socket.
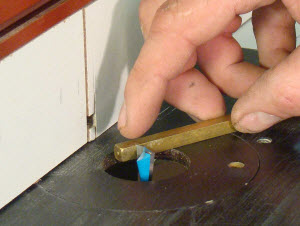
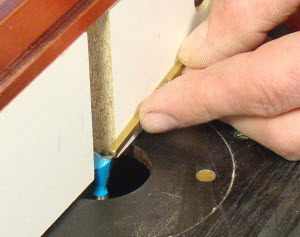
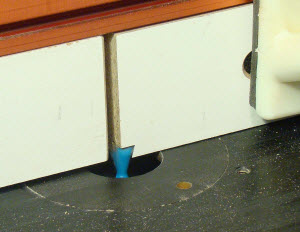
 Start by installing the V-bit and using it to locate the start and stop positions of the blind sockets. Mark the positions on the fence. On the first end you'll need to plunge the material onto the bit to start, then push the board through the cut. Don't forget the backer board to prevent blow out as the bit exits.
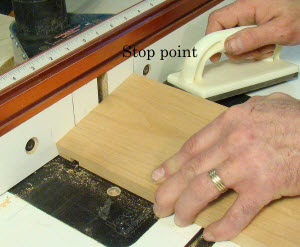 Make the second cut by holding the board flat on the router table and pushing it through the cut until the board hits the stop line. Then lift the drawer front up off the spinning bit.
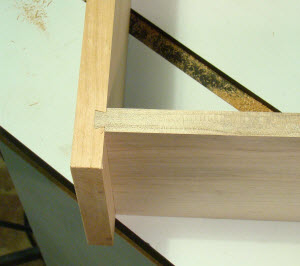
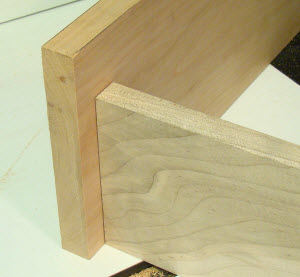
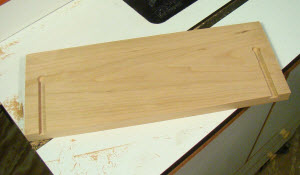 The cuts look like this, with a "keyhole" at the starting point of the first cut and the stopping point of the second cut. If the diameter of the bit is less than the thickness of the drawer sides, the sides will cover the keyholes.
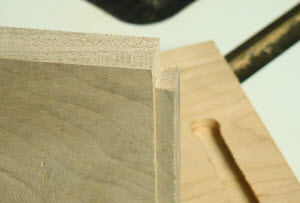 Use a hand saw or band saw to notch the tails on the drawer sides. This creates a shoulder that covers the keyhole.
Photos By Author
Related Video:
Source:
Set Up Gauges/Bar Stock
Woodcraft #836311
(800) 225-1153

how 'bout a print the instruction button?
I would like how to do this
I can't be the only one not figuring this part out... So I do the sliding dovetail sides, front and back on my drawer, and dado a channel for the drawer bottom, how do I get the bottom in the dado when I assemble it? If the joints slide down, the bottom won't go in? I need the bottom to hold tightly, so it needs to be a dado groove, not just a square rabbet notch... The sliding dovetail part makes total sense, thank you SO much for an excellent tutorial :)
The second paragraph above states "The diameter of the dovetail bit needs to be less than the thickness of the drawer sides.". Can you explain this a bit more? I was going to use a 3/4" bit when working with 3/4" lumber. Using a bit that is smaller means the base of the dovetail tenon is also narrower - which potentially reduces it's strength.
Great tutorial. One question: you mentioned needing two dovetail bits, but seemed only to use only one in the tutorial. ?
Good tutorial...especially about using gages instead of a tape measure. However, where did you obtain the hand sander?
Thank you for this tutorial! I made my first sliding dovetails for my daughter's class fundraiser project :) (bookcase).