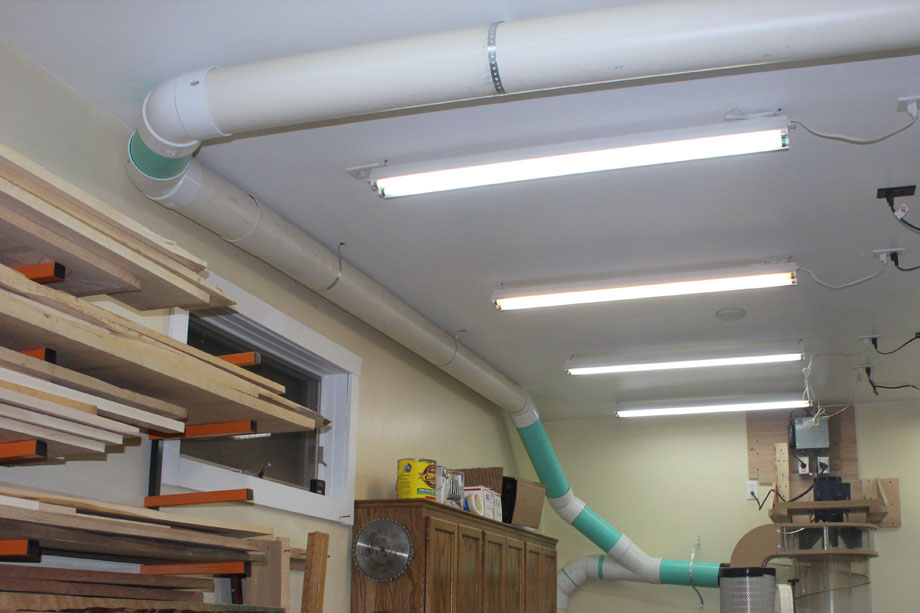
If you have made an investment in a powerful dust collector, that is a great first step toward creating a healthy shop environment. For purposes of this article I will assume that you have worked with your vendor to choose a dust collector that is capable of delivering enough air flow (ideally 1000 cubic feet per minute at 4000 feet per minute) at each tool to remove all of the fine dust that it produces (bare minimum 2HP with 12″ impeller for 400 sq. ft. shop, but do yourself a favor and don’t skimp).
Now you want to make sure that you are doing everything you can to get the most out of it. First, unless you want to jockey a hose from tool to tool each time you make a cut (don’t kid yourself; that’s a pain), you will need to set up ductwork to draw dust from each tool in your shop to your centralized dust collector. Proper duct design is perhaps the least understood topic related to dust collection, and it is critical that you study on this to get it right in your shop. I would argue that many of the products that are sold in this category are not up to the task of removing.
Let the dust collector “do its thing”
Proper ductwork is all about providing a network that allows air to be pulled from each tool individually at ample velocity, and moving enough air volume to remove both the chips and the very fine dust produced. The primary enemy of ideal dust collection is static pressure. In applied terms you can think of static pressure as the force that restricts air flow. The things that increase static pressure in dust collection include smaller ducts, longer distances, bends in the pipe and flexible tubing, so we will focus our efforts in minimizing those things that materially increase static pressure in our systems.
Dust collection duct design is a complex science, and I am going to intentionally oversimplify it because I think the basics can be lost in the gory detail, and by following a few basic guidelines it is easy enough to achieve air flow that is “good enough”. Toward my goal of oversimplification, I offer the “D.O.G. Simple” method of small shop dust collection ductwork design:
– D = Direct; keep your duct runs as short as possible. Longer runs create higher static pressure and poorer performance.– O = Open; bigger diameter pipes allow more air movement and introduce less static pressure, assuming you have a dust collector that can move air fast enough through the pipe.
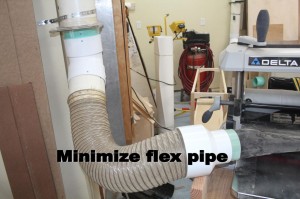
– G = Gentle; to make it easier for dust to travel through pipes, use smooth wall pipes (minimize flex pipe), and when turns are necessary, make them as gentle and gradual as possible.
First, choose your weapon: PVC or Metal
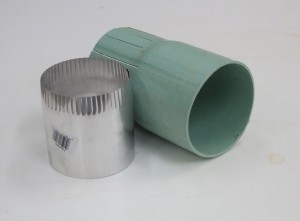
First you need to choose a material for your duct work. Either PVC or metal will work well. If you choose metal, you should use 26 gauge or thicker so it doesn’t have the potential to collapse under suction pressure. Also, consider spiral pipe which is more durable and easier to seal, although more costly. The HVAC piping in most home centers is 30 gauge or thinner, so it is not a good choice for dust collection. You will need to buy from either a dust collection vendor or a HVAC vendor who carries heavier gauge ductwork. Buying local might provide savings due to the high shipping costs of large pipes.
If you choose PVC, be aware that there are different thicknesses on the market, and you should go with the thinnest stuff you can find. This will generally be referred to as “Sewer and Drain”, sometimes referred to as ASTM d-3034 or ASTM D-2729. The thinner and lighter the PVC, the easier to work with. Do not get schedule 40 or 80, because these are expensive and heavy, and all of the extra mass is wasted on dust collection which places extremely low pressure on PVC relative to plumbing applications which generally dictate schedule 40 or 80. To maximize your air flow, focus most of your design efforts around 6″ pipe, sometimes 4″ when you need to, but nothing smaller than that for stationary tools.
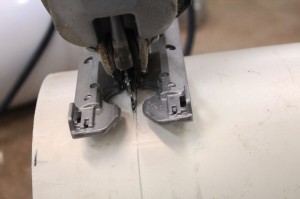
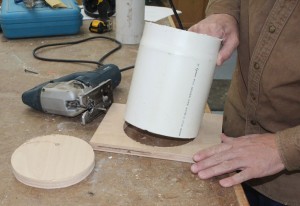
I use PVC because I find it to be much cheaper in my area, and I prefer working with it over metal. But if I didn’t have good access to PVC pipe and fittings, I would be comfortable going with metal as well. To cut PVC I simply use a jig saw with whatever wood cutting blade I happen to have on the saw, and it zips right through it.
Does PVC need to be grounded (or can it be grounded)?
These are hotly debated topics all over the internet. I have never heard of an actual example of a fire resulting from static discharge, but there is a potential that you may get static electricity shocks from your PVC duct system if you live in a dry climate. If this is your situation you can find many suggestions around the internet for grounding your PVC ductwork. I have never gotten a shock in 10 years of running PVC ducting in two different shops, so I have never bothered with grounding mine.The D.O.G. Simple Method in Detail
“D” is for Direct.
Make your duct runs straight and direct with as few turns as possible. Arrange your tools in such a way that the bigger dust producers (table saw, planer, etc.) are closest to the dust collector, as airflow will be greatest on your shortest runs. One common mistake is to run ductwork that follows the perimeter of the room, which requires longer runs and more turns in the ductwork for some tools, and performance suffers as a result.“O” is for Open. Size matters in dust collection. If your duct is too small, you won’t move adequate air volume to remove fine dust, but if it is too large, you won’t get sufficient air speed to remove anything. Therefore it is important to have your duct layout in mind when you buy your dust collector, and have your vendor suggest a model that can deliver enough suction at your tools. If you have chosen a dust collector with enough suction for your shop configuration, then the simplest approach with PVC is to run 6″ pipe wherever it is feasible, and 4″ pipe wherever you find it necessary. That means you will likely have to modify tool ports on some tools, which I will discuss a bit later in the article. It is not that hard, and it is well worth the effort. With metal ducting there are additional sizes available, and you can make more gradual steps down to potentially squeeze a bit more performance out of your system, but if you have appropriately sized your dust collector, you will be able to derive adequate air flow using 6″ and 4″ pipes.
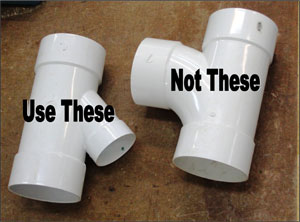
“G” is for Gentle. The goal is to make long gentle transitions so that dust doesn’t slow down too much going around curves and through reductions in pipe size. Pretend you are designing a race car track, and you want to keep the cars going at high speeds into the turn, because once they slow down it is hard to get them moving fast again, and we want to avoid a pileup of cars, or in our case, dust. Specific choices that help promote gentle dust paths include:
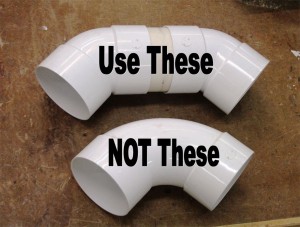


Minimize the flex pipe. Run hard pipe as close to the tool as possible, and use just the flex pipe you need for convenience in case you need to move the tool. Also, choose a good quality flex pipe with smooth interior walls that was designed specifically for dust collection. Some of the cheaper stuff I have used is extremely rigid, making it terrible to work with. Good flex pipe is expensive, so I am sufficiently motivated to minimize it for that reason as well.
Other ducting suggestions
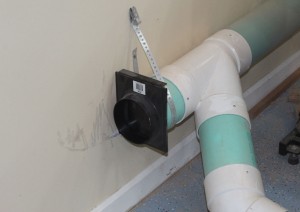
Extra ports. When you set up your ductwork consider installing additional ports at logical locations for possible future expansion. It is easier to do it now rather than pulling your ducts apart later. You can add a blast gate so you are ready to go, or simply place a cap on the pipe which is a bit cheaper. This can also provide a nice cleanout in a convenient location should something ever get lodged in your ductwork.
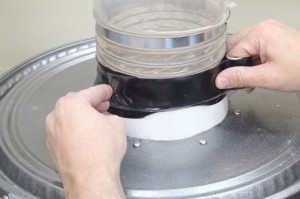
Seal the joints? If you use PVC, particularly 6″ where there is so much overlap at the joints, you shouldn’t need to seal most of your joints. In a couple key areas, such as where the duct work connects to the dust collector, I use X-Treme tape to seal the joint. This tape does not leave glue residue, so when you rework your ducting it is easy to remove and does not require cleanup. I don’t like using duct tape, or caulk, on ducts as I feel it is not necessary on PVC. On metal you will likely need to seal the joints to minimize leaking.
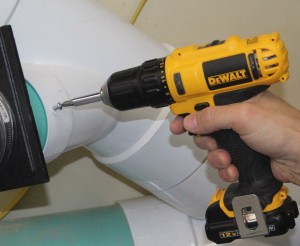
Add screws wherever needed to secure joints. On vertical runs, and some horizontal runs where connections are slightly loose, I put a couple #8 x 1/2″ self tapping sheet metal screws into the joint to hold it securely. These are easily removed when rearranging ducts.
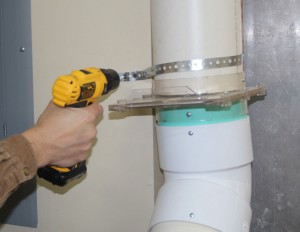
Attach ducts to a stud using plumber’s strapping. Regular old metal plumber’s strap provides an effective and economical means of securing ducts to your walls and ceiling. Attach using 1-1/4″ drywall screws. A couple straps per 10 feet of pipe should be adequate to hold everything solid.
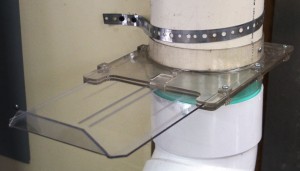
Blast gates. There are many options out there. If you use metal ducts, you should use metal blast gates. I use some metal ones on my PVC ducts as well because they are more durable than the cheap plastic ones. If I were starting from scratch I would use the blast gates from Clear Vue Cyclones for all of my 6″ ducts, because they are far better quality than the cheap plastic ones, and they provide better air flow because they sit on the outside of the pipe rather than the inside. I have also seen plans for shop made blast gates using PVC and plywood which are quite cool, but I haven’t been able to justify the time to build these.
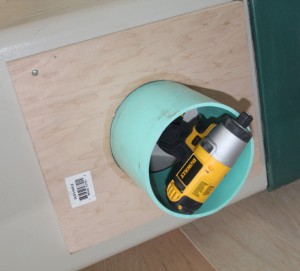
Tool ports. I encourage you to accept the fact that most tools come with insufficient tool ports. In the last five years or so, this seems to be improving, but is still not great. Keeping in mind that ideally you will place a 6″ port as close to where the dust is being produced as possible, and I have never purchased a tool that had a standard 6″ port, or even an optional one for that matter. So, you will have to make your own ports, and in some cases, cut holes in your tools to accommodate the port. The picture shows a shop made 6″ port on a jointer, with a drill stuck in it to illustrate the massive size. That port allows massive air movement, and allows my dust collector to pull everything that is not attached to the tool.

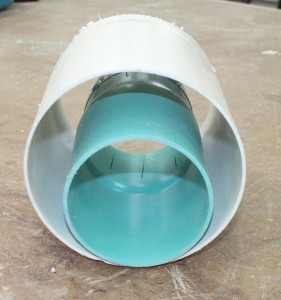
Quick disconnect with standard PVC coupler. Here is an effective ways to make quick disconnect fittings for 4″ and 6″ PVC. Use a standard PVC coupler to slip easily over the opening on your shop made tool port. Then insert your flex pipe into the other end of the coupler. I have found this to be a perfect fit on both 4″ and 6″ ducting, requiring only a pressure fit to stay on, with little noticeable air leak. If the fit is a bit loose, you could use X-treme tape or duct tape to hold it solidly and seal it. I like these much better than commercially available quick disconnect systems, plus I have not seen commercially available quick disconnects for 6″ ducting. With a good system for quick disconnect, it is simple to share a duct between two tools if you prefer, and it allows you to keep your flex hose runs shorter to minimize static pressure because moving a tool for cleaning, maintenance, etc. only requires a simple disconnect process.
Summary
If you want to dive into more detail on this topic, some of the dust collection vendors offer guidelines and services in this area, and independent researchers such as Bill Pentz provide extensive information on this topic as well. For most small shop environments, however, I am confident that if you follow these basic guidelines to design your ductwork and power it with a dust collector that is capable of pulling through an adequate volume of air, you will be pleased (or even amazed) with the performance.
Once designed your system to deliver enough air flow, the next thing you need to think about is how to best corral the dust at each tool. Some tools provide adequate dust collection ports, while others (most) don’t and you will need to devise your own enhancements. In a separate article I will walk through the dust collection design at each tool in my shop to help you complete your dust collection system design.
Watch the next newsletter for specifics on how I optimized dust collection at various tools in my shop.
Photos By Author
Source:
X-Treme Tape, Self fusing silicone rubber tape 20 ft. roll, $14.99
800-867-8968
is aluminum flexible pipe a good alternative to steel
Hi Richard,
Here is the experts response, thank you for the question:
I haven’t tried it, but it seems like it might be too soft and could potentially collapse. For aluminum to work it would have to be a lot thicker, which would make it pretty expensive.
Paul
Woodworkers Guild of America
Thank you for your advice
It was interesting in learning a few more tips and tricks.
I’m opening a shop and will be doing this in the next couple of weeks,
Thanks
Good article, good suggestions.
But I have a 2 questions; 1) If your DC intake port is roughly positioned in the “middle’ of your wall, which way would be better to run your lines. On the floor?, on the ceiling?, or same level as the intake port? 2) if you do run your trunk line (main line) on the ceiling or in the middle should you include a slight angle on the run like you would a sewage drain? I believe that to be a drop of 1/4″/ft.
Hey Michael,
Our expert Paul has some tips for you:
The less bends and vertical climb the better, so I’d leave it at the same level as the intake if you can. You don’t have to worry about a slight angle on your duct runs. Won’t make any difference with air.
Paul
Here’s a link to sign up for our Premium Membership to access the full benefits of the site:
https://www.wwgoa.com/?add-to-cart-multi=1&products=1195090&skipcart=1&coupon=c20716&vscid=c20716&skipcart=1336083/?nabc=0&SubscriberKeyHash={{SubKeyHash}}
If you have any additional questions please chat, email or call us at 1-855-253-0822.
Happy Woodworking!
Madeline
Woodworkers Guild of America Video Membership
I just installed a dust collector with a 7″ OD pipe, how do I hook it up to a plastic system? all I can find is 6 inch pipe.
Scott,
You’ll probably have to use metal for your first transition. I’ve had to do this on some dust collectors.
Here’s an option: https://www.homedepot.com/p/7-in-to-6-in-Round-Reducer-R7X6/100117561
The fit probably won’t be perfect, so you’ll have to adapt by wrapping with duct tape or similar.
-Paul
Woodworkers Guild of America
I have a small shop and will only be using one tool at a time,
I would like to run ducts for a central dust collection system though
What size hp would you recommend for that, my whole shop is 18×22’ so none of the runs can be super long, I was thinking of getting a 2hp from harbor freight to hold me over until I could afford a cyclone would that be a good idea? Or would it be better to wait till I have a enough for a cyclone and then run bigger pipes for the whole system?
Hi Noah. You might get by with the HF unit, but it would be borderline. If you go that route, I’d suggest upgrading the filter to something in the 1 micron range.
Thanks
Paul-Woodworkers Guild of America
I Just moved and starting to put together my shop in the basement. I have not finalized tool locations so I am flexible on arrangements and laying out a collection system. Any recommendations on layout of tools to minimize cost?
Hi Mike. To the extent possible, put your tools with the greatest CFM requirements closest to the dust collector. In my shop that is a table saw, miter saw and planer, but that can vary depending on the actual tools that you own.
Thanks
Paul-Woodworkers Guild of America
Helping my son set up a wood shop in a makerspace. He has a Delta 50-761 (2100 cfm, 2hp, 8 in-H2O static pressure drop). The max run is 57′ horizontal plus 10′ vertical. I’ve gone through the design calcs, and it looks like it will work with 4″ ducting, but after reading this article I’m wondering if he should relocate the DC to reduce the lengths. Problem is, the wiring is all done for the DC in a certain place in the shop. Any thoughts?
Hi Ted. That’s a long duct run for a 2 HP machine, assuming that it has some bends to it as well. I would relocate to shorten the lengths if possible. Otherwise, you’ll definitely get some air flow, but you’ll probably be down in the 200 – 300 CFM range at the end of the run which will be marginal but better than nothing. You’ll have to keep an eye on low spots in the line and disconnect after a month or so to see if you have dust settling in the line which can become a major problem over time. I know this from experience.
Thanks
Paul-Woodworkers Guild of America
Thanks, Paul. My original design that added up to 57′ had a main run going around the periphery of the shop, which I now realize is a bad idea. There are four tools. The jointer and planer are the closest to the dust collector, both within a 14′ horizontal run. The table saw is farther away, and the chop saw is a bit farther. I’ve reconfigured the design to have a dedicated straight 20′ run to the table saw, and either a 14′ continuation to the chop saw, or a third dedicated 31′ run to it. Does that sound better?
Also, the dust collector has three 4″ ports. I’m planning to use 6″ ducts to the tools, and 4″ for the vertical runs to keep the velocity up. If I have three separate lines, I’d need a 6″-4″ reducer going into each of the three ports on the collector. Does that make sense?
Hi Ted. In answer to your first question. Yes, that sounds better. For your second question. If you are going to run 6″ then it won’t be wise to use the 4″ ports on the DC. Normally you can remove that and have a single 6″ (or whatever) larger port. If you trunk it down to 4″ right at the DC, then it won’t gain you anything to open it back up to 6″ for the main trunk, and you’ll probably see such low velocity that dust will settle in the line. I would either go all 4″, or remove the 6x4x4x4 reducer and go 6″ for your main trunk. My feeling is that a 2 HP dust collector (if I’m remembering your original question accurately) is going to be marginal at best in pulling air along a 34′ x 6″ main trunk. I’d be concerned about velocity dropping too low and having dust settling in the line.
Thanks
Paul-Woodworkers Guild of America
I ran 6” sdr pipe 24 feet from my jet dust dog (1100) DC to my miter saw box and noted a Velocity ft/min of 950. Do you recommend reducing the run to 4” to the miter saw box to increase air velocity? I have 6” from the DC to my table saw and drum sander which is 5 feet from my DC but the miter saw is 23’ feet away. Where do you recommend I down size to the 4” line?
Hello. You are not pulling air through that pipe fast enough with 24′ of 6″ pipe. Your target is 4000 ft/min, and you’ll start to have serious problems at anything below 2000. I had that exact DC and ran 6″ ducts that were much shorter than yours, and when I took the ducts apart to move I found that massive amounts of dust had settled in the ducts. I think you should either get a bigger dust collector, or figure out a way to have shorter duct runs. You won’t do yourself any favors by trying to stretch a 1.5 HP machine to do the work that would require a 3 – 5 HP unit. Reducing the ducts at the drop will give you faster velocity at the tool, but it will slow down the overall velocity in the main trunk where you are already struggling.
Thanks
Paul-WWGOA
Very good info
Your advice on tees and y pieces is wrong, the ones you say to pick are more turbulent and add more static to the system over the ones say to not pick. Using the ones you say NOT to use will allow the air system to operate more efficientl.
Thanks! good ideas!
New shop in new house, so I installed a Harbor Freight DC, Oneida Dust Deputy, 4″ ABS for most of system, and a blast gate at each drop. A remote control really helps. An old shop vacuum barrel collects the dust and chips under the dust deputy. I have emptied the barrel a couple of times and only have a trace amount of dust in the DC bag. They sell plastic hangers for the ABS pipe that is convenient to hang my pipe, instead of attaching the plumber straps.
How to buy a router
I enjoyed the topic of dust collection system, I like to know more to see if I can design my own systems. I know how much dust woodworking produces, even with hand tools, and I love to read and hear other ideas on dust collection systems.
I just bought a dust collector with 4 in. port I think I will make it 6 in. now before starting to build thanks for the tips.
I have a big harbor frieght dust collector for the big machines. For the smaller machines I use a big shop vac! I dont need to do all that piping and nothing is in the way!
I would tend to dispute the 6″ pipe and the theory of max air volume. I would think that the speed that the air flows through the pipe and dragging the dust with it would be a better standard. True, a large pipe has less resistance, but a smaller pipe allows for faster air travel through the pipe. If it drags the air from the tool at the far end of the system it should be adequate to move the dust through the rest of the pipe.
You must have a very large air movement system.
Also do not discount air restrictions after the power. A simple system like a shop vac has a bag to collect the dust and provides a large restrictive force. I live in the country and can exhaust my dust directly outside without the catch bag restriction.
When comparing types of material for my dust collection pipes, my local plumbing store recommended dryer vent pipe. This seem to make excellent sense when they explained PVC is meant to move water (a heavier substance) and dryer vent pipe is specifically designed to move air (a lighter substance). What are your feeling?
I disagree with your suggestion of using screws whenever possible to secure joints. The sharp point and threads of the screw inside the ductwork will tend to catch and hold onto small pieces of wood chips that can build up over time. If using PVC, why not cement them together? If using metal, as I did, try using pop rivets instead of screws. The part left inside the ductwork is smooth and shallow and won’t catch small pieces. Then make sure to seal the joint with aluminum tape.
Paul, thank you for some very helpful advice. I wish Paul and WGOA had been there when I first started laying out my dust collection in my shop. I searched the internet and read books to do the best I could and I see I managed to get some things right. I know now though I used too much flex hose that’s for sure! I am looking forward to the second installment about connecting various tools to the system as that is always a pain since tool mfg’s can’t seem to agree on a standard. After years of searching the plumbing depts for fittings to connect different tools I now look at how a tool will connect BEFORE I buy it and sometimes buy the brand that put more forethought into connecting to my dust collection system.
check out grizley they have a very good dust pipe assortment TOP SHELF !!!!!!! i have it and like it a lot , works very good !!!!!
While I liked your piece overall I know from handling PVC daily that in generates enough static you shouldn’t ignore the risk. And if you were using a four inch line a low cost take off is the plastic end caps found in rolls of carpet at your builders supply. They fit right in four inch vacuum hose and their only shortfall is the two 3/4 inch square slots they cut in them for some reason. They have a wide flange to allow attachment to the housing and given they are thrown away weekly it’s hard to beat the cost. Also the store I work for stocks some 26 gauge duct work, 4 inch and 6 inch y’s still have to be ordered in but if customers ordered enough of these they might become an in stock item.
Buy as big as you can and you will only have to buy once.
I combined a cyclone with a bag style dust collector and placed both in the room next to my shop to keep the noise level down. Keeping in mind that I’m the only one using the shop and the fact that I can only run one machine at a time I ran 4 inch PVC to each machine. I placed a blast gate at each machine along with a pushbutton start stop station. Velocity is high enough to move dust as well as planer chips and lathe shavings. To prevent static charge and shocks I lined the PVC and fittings with a strip of aluminum foil duct tape with the ends wrapped around the pipe ends and fitting ends so that continuity is maintained from the machine all the way to the dust collector which is electrically grounded. I used the standard PVC J hooks used to hang plumbing pipe to hang the pipe and 4″ flex to connect from the blast gate to the machines.
I am about to build a woodworking shop
The more info about dust collection I can get the better
Where can I find all of yours
Thanks
I use 2″ ball values ( that are used in plumbing application) instead of blast gate. They open all the way and don’t have any buildup like gate valves (even to good metal ones).
Very good ingo
Great advice ! Thanks !
Thank you for all the great information. I’ve been doing research for over 6 months and this is the first site that dealt with enough information on dust collection systems ducting. I got a great deal of information. Thank you
I have a Clearview cyclone can I run the dust container off the bottom at a 45 degree to a barrel outside the wall
I would think so, but I would suggest contacting the folks at Clear Vue with this question to be sure. Paul
Paul-WWGOA
Great article. After much research about metal vs. occurs, you made this an easy decision for me. Although my shop is in the painting stage, I can assure you I will be implementing the ideas in this article.
Hi, I read your article on dust collection and have a couple questions, 1-I will be using 6″ pvc. Is it wise to take a 4″ run off the 6 ” then branch off to say a planer and a table saw or should each run be separate. I have a radial arm saw with a 2 ” port so should I run 6 ” all the way to it. I have an 8 foot stroke sander as well as a small belt sander and blow up sander, would I need to run separate runs to each of these. They are side by side in my shop. The stroke sander is the worst tool for dust and not sure what is the best way to set up the collection piping on it.I currently am usuing a cheap dust bag with 4″ ports and I run 1 port to each end of the stroke sander, its not working. I am in the country with a bush beside my shop so I plan on piping directly to the out side with the out let
Hi Ron. Thanks for reaching out with your questions. I would recommend a separate drop for each tool. In other words, you are better off if you have a single blast gate designated for each tool, and therefore each tool gets the full air flow from the dust collector. For the stroke sander you will probably want to build a shroud of some sort, and position it directly behind where the dust flies off on the left end as you face the machine. I would build a shroud, or buy one, and experiment with positioning it.
Thanks
Paul-WWGOA
very good article. Wish I had read a a long time ago. I have learned all this and more by going it alone with my first system. On my third now and it works great. Not quite done yet but what a difference hen you get big pipes and a powerful blower. I also exhaust the cyclone outside so I don’t have to deal with filters and breathing very small particles. John the Handyman in Las Vegas.
The dust collector I have has a 5″ port. Would it be better to use 4″ or 6″ pvc, since 5″ is not available.
Hi Timothy. My guess is that a dust collector with a 5″ inlet will not move enough air to maintain adequate line speed for 6″ pipe. You are probably better off going with 4″.
Thanks
Paul-WWGOA
I have a smaller 11/2 hp dust collector with a 4″ inlet port on it. is this the maximum duct size that i can use or should i still use 6″ for the main runs and 4″ for the branches.
Hi Rick. If your input port is 4” I would not run any 6” ducts, as the air flow is already reduced by the 4” and it will be difficult to maintain adequate line speed if you expand the pipe.
Thanks
Paul-WWGOA
I like this so far
very helpful! I bought the 6″ pc pipe and fittings some time back to connect to my 3hp cyclone and now I feel more confident to begin installation and stop moving the 4″ hose from tool to tool!
Good article. Very helpful as I plan out a system. What are the blast gates used for?
Blast gates are setup at each tool, and you only have it open when you are using that tool; all other gates remained closed. That provides the full concentration of suction right at the tool you are using, to get you maximum dust collection from that tool. If you left all of the gates open you would have very poor air flow at each tool.
Paul-WWGOA
I’ve had a 2HP cyclone dust collector for years, it’s a collection of home improvement store galvanized pipe (probably a combination of 26-30 gauge, I never really check) and high quality smooth elbows and wyes purchased from a variety of mail order sources. No doubt it’s run many times with all the blast gates closed and there is absolutely no way that any of the pipes are in any danger of collapsing. As you state regarding PVC/ABS pipe “dust collection which places extremely low pressure ” the negative pressure is way too low to collapse anything. Use metal pipe with whatever fittings you choose to afford and make sure to ground it in at least one place. It’s probably no more expensive than plastic.
I build a 4″system and made my own gate, and i’m very happy with them. I incorated 12 v switch system to start the system automatically.
Would 2″ PVC piping work when connected to a 12 gal shop vac? Basically, I have a 10″ table saw, a 10″ miter saw and a small router table that I want to connect to such a system. The shop/garage is 16’x24′. Would such a small system work, in your opinion?
Hi Jim. It would collect some of the heavier debris but would not do much to collect the fine dust that causes health problems. I would recommend at a minimum a 1.5 HP dust collector with a 1 micron filter and a short 4″ hose that you would connect to each tool.
Thanks
Paul-WWGOA
Hi,
I dont know if you can answer my question. I want to make piping for my 1200 cfm dust collector. At the output of the collector, there will be 2 lanes. The left lane will be on 4 inch pvc duct for about 14 feet with about four 45 degrees elbows. The right lane will be on 6 inch pvc for about 30 feet (with a 5 feet of vertical duct on the 30 feet) with about four 45 degrees elbows. At the end of the 30 feet, it will have about 16 feet of 4 inch pvc to reach the tools. Only one tool at the time will work on this collector.
Do you think that will have enough power?
Thanks a lot
Steve Ross
Hi Steve,
Can you tell me what dust collector this is? Manufacturer ratings for CFM are inconsistent, and if I know which machine you have I’ll have better estimate of what kind of performance you’ll see through that configuration.
Happy Woodworking,
Kate
WWGOA
You answered several questions I had about setting up a dust collection system in my shop. Tahnks for writing the article, it was very good for me.
Is part 2 of this article out? Could I have a link for it? Thank you
Love your DC. Love your approach. This was exactly what I was going to do until I put my lawyer’s hat on and started asking questions. I learned that no insurance company will cover a fire that they can claim arose from a dust collection system not made from grounded metal piping. Put aside the whole fire risk or not question and ask the other question of insurance coverage. The problem is that insurance companies have an unshakable conviction that non metal ducting is an unreasonable fire hazard. So unless you can get your insurer to put in writing, that you are covered ~ ~ ~ ~ ~ ~ ~ ~
Great bit of information on a subject we all need to take care of
Love the system but for one thing: Insurance companies (Pretty sure every single one of them) will not cover a house fire if there is a non metallic DC system and they can claim that the fire started there. They allow no substitutions like ground wires straps etc. They only cover metal ducts that are grounded. What are the odds that a DC will cause a fire? Maybe remote. I don’t know I only know that they won’t cover it if they can lay the blame there.
PVC duct systems are common in hobbyist woodworking shops but users are encouraged to perform their own due diligence to verify their insurance coverage.
While I agree with most of your article, I strongly caution any use of PVC pipe in a wood dust collection system. Non-metalic duct is prohibited by both OSHA and NFPA-664 due to potential static electricity issues. Just because you may not have had any issues in the past does not mean that you are capturing the dust safely. My suggestion is to use only metal duct, make sure the dust collector will provide 4,500 Fpm (feet per minute) velocity in the duct and only capture wood dust with your dust collector. These simple steps will drastically reduce your dust explosion risks.
Here is a copy of info from Shop Fox, a popular portable dust collector.
System Grounding
Since plastic hose is abundant, relatively inexpensive,
easily assembled and air tight, it is a very popular
material for conveying dust from woodworking machines
to the dust collector. We recommend using flexible hose
(flex-hose) to connect the woodworking machine to the
dust collector. However, plastic flex-hose and plastic duct
are an insulator, and dust particles moving against the
walls of the plastic duct create a static electrical build
up. This charge will build until it discharges to a ground.
If a grounding medium is not available to prevent static
electrical build up, the electrical charge will arc to the
nearest grounded source. This electrical discharge may
cause an explosion and subsequent fire inside the system.
To protect against static electrical build up inside a nonconducting
duct, a bare copper wire should be placed
inside the duct along its length and grounded to the dust
collector. You must also confirm that the dust collector
is continuously grounded through the electrical circuit to
the electric service panel.
If you connect the dust collector to more than one
machine by way of a non-conducting branching duct
system and blast gates, the system must still be grounded
as mentioned above. We recommend inserting a
continuous bare copper ground wire (see Figure 40) inside
the entire duct system and attaching the wire to each
grounded woodworking machine and dust collector.
Be sure that you extend the bare copper wire down all
branches of the system. Do not forget to connect the
wires to each other with wire nuts when two branches
meet at a “Y” or “T” connection.
Ensure that the entire system is grounded. If using plastic
blast gates to direct air flow, the grounding wire must
be jumped (see Figure 41) around the blast gate without
interruption to the grounding system.
We also recommend wrapping the outside of all plastic
ducts with bare copper wire to ground the outside of the
system against static electrical build up. Wire connections
at Y’s and T’s should be made with wire nuts.
Attach the bare ground wire to each stationary
woodworking machine and attach to the dust collector
frame with a ground screw, as shown in Figure 40.
Ensure that each machine is continuously grounded to the
grounding terminal in your electric service panel.
Here is an example if instruction from Shop Fox, a popular portable dust collector manufacturer. System Grounding
Since plastic hose is abundant, relatively inexpensive,
easily assembled and air tight, it is a very popular
material for conveying dust from woodworking machines
to the dust collector. We recommend using flexible hose
(flex-hose) to connect the woodworking machine to the
dust collector. However, plastic flex-hose and plastic duct
are an insulator, and dust particles moving against the
walls of the plastic duct create a static electrical build
up. This charge will build until it discharges to a ground.
If a grounding medium is not available to prevent static
electrical build up, the electrical charge will arc to the
nearest grounded source. This electrical discharge may
cause an explosion and subsequent fire inside the system.
To protect against static electrical build up inside a nonconducting
duct, a bare copper wire should be placed
inside the duct along its length and grounded to the dust
collector. You must also confirm that the dust collector
is continuously grounded through the electrical circuit to
the electric service panel.
If you connect the dust collector to more than one
machine by way of a non-conducting branching duct
system and blast gates, the system must still be grounded
as mentioned above. We recommend inserting a
continuous bare copper ground wire (see Figure 40) inside
the entire duct system and attaching the wire to each
grounded woodworking machine and dust collector.
Be sure that you extend the bare copper wire down all
branches of the system. Do not forget to connect the
wires to each other with wire nuts when two branches
meet at a “Y” or “T” connection.
Ensure that the entire system is grounded. If using plastic
blast gates to direct air flow, the grounding wire must
be jumped (see Figure 41) around the blast gate without
interruption to the grounding system.
We also recommend wrapping the outside of all plastic
ducts with bare copper wire to ground the outside of the
system against static electrical build up. Wire connections
at Y’s and T’s should be made with wire nuts.
Attach the bare ground wire to each stationary
woodworking machine and attach to the dust collector
frame with a ground screw, as shown in Figure 40.
Ensure that each machine is continuously grounded to the dust collector frame with a ground screw, as shown in Figure 40.
Ensure that each machine is continuously grounded to the
grounding terminal in your electric service panel.
Re: Grounding- I have worked in an industrial woodworking environment for 35 years. I have done a lot of research on this recently, and I must warn you is is VERY IMPORTANT to ground your pipes and system. There is almost zero danger of an electric shock to a human, but very big hazard of having a dust explosion! That tiny static shock you might feel is plenty to cause a cloud of dust to blow up. This is on OSHA’s hot list for a good reason. Moving air causes enormous amounts of static electricity. Typical metal ductwork can dissipate this fairly easily, as it is often attached to metal building structure parts. PVC can not ground by itself, and the fact that it is a good insulator increases the static buildup much higher than metal. If you already have PVC, at least run a bare copper wire along the outside of the duct to ground. It would be better if it was on the inside, but this is not always practical. In many areas it is strictly against code to use PVC for this purpose. Good luck, and work safe.
Great advice! I am setting up a new wood shop and haven’t decided where the different tools will be located. I am going to use a 5hp Super Dust Gorilla so as never to be wanting more power. I want to use pvc ducting and your article gives me a good start. Before I go looking for the pipe; does it come in 8″ dia.?
Hi Bruce, Yes, PVC is available in 8″, but depending on what supply houses you have in your area it might have to be special ordered. Be sure to get the stuff with the thinnest walls that you can find. If you end up with schedule 80 or even schedule 40 in an 8″ pipe, it will be quite heavy and make installation a bit rigorous. You will definitely move some serious air if you run an 8″ main trunk from that dust collector!
Hi Paul-
Please see the comments I have left on grounding the dust collection system. Feel free to comment, this is an important subject. Thanks !
Hi Scott, thanks for sharing your thoughts on this. It is good to hear that there is continuing research on this important topic. I have not personally done scientific analysis in this area, but anecdotally I am not aware of a prevalence of explosions due to non-grounded PVC ducting. If your research findings or demonstrative evidence are available on-line please feel free to post a link so that other readers can view this information to help them make an informed choice in this area as they set up their dust collection systems. This is the beauty of on-line articles; the ability to keep the discussion going long after the articles are published. I love it!
Without going on too long here, see the directions from Shop Fox above. Most if not all collectors come with a warning like this. Usually when we see a cloud of dust in the shop, we think about not breathing in too much of it. The real danger is having a spark occur at the same time. the spark can come from turning on or off any electric switch or motor, or the gas hot water heater in the corner of your basement shop. But don’t wait until your homeowners insurance refuses to pay for your claim, if you are alive to deal with it.
One of the other members here wrote that he saw and felt a very large spark when he was dumping his bags. This would be easily able to cause an explosion if the right amount of dust was floating in the air at the time.
Grounding your existing ductwork would not be expensive or time consuming. Its like having ABS in your car, you might not know how many times it saves you. But you surely will know when it does not. Just like working in your shop for 20 years with no problem, or driving 50,000 miles with no accident, does not mean it can’t happen to you.
These are good points, Scott, and I understand the theoretical risk; wood dust is flammable, and under the right conditions it can ignite. I’m not an expert on the volatility of wood dust and the practical likelihood that it will explode when exposed to electrostatic discharge, but I just haven’t seen evidence to suggest that it is likely under normal conditions in small shop dust collection systems. I am a safety conscious woodworker, and I am open to being influenced by such data, but I haven’t seen it yet. The comparison to the health risks of breathing dust and driving dangers are fair to an extent, although there is a lot of evidence to suggest that those items in fact can be statistically linked to health problems and injury. With the prevalence of PVC used in dust collection systems around the US, if the risk is in fact statistically significant there should be numerous examples of explosions resulting from this. I have seen this topic debated in woodworking forums for nearly two decades, but I have not seen any compelling evidence to support the theoretical risk. Having said all that, I’ll end with a couple final thoughts. First, I would like to review your research findings if they provide examples of explosions caused by non-grounded PVC ducting. If there is emerging data in this area then I want to be informed, and I believe that there will be widespread interest across our readership as well. Secondly, if you have a means of demonstrating the explosiveness of wood dust in simulated small shop ductwork, I would like to collaborate with you to produce a video on this topic if you are interested, as this would be received extremely well by the woodworking community. Thanks again for sharing your thoughts on this.
After doing more research, I will admit that you are correct in most cases. My concern is not with dust that is moving inside the duct, but with the static that is discharged when nearby events such as cleanup with an air hose, sweeping, or emptying dust bags creates a dust cloud. I did find an article by Rod Cole, who works at MIT, and has extensive knowledge on the subject. This supports the use of PVC as safe.
http://home.comcast.net/~rodec/woodworking/articles/DC_myths.html
Thanks for stimulating me to work on this more, and for everyone else’s safety. Be careful out there.
Thanks, one of the best and simplistic explanations on the web. And I’ve been searching for awhile.
I have a powermatic model 73 with 2-4 in inlets would using 6in main line over power the unit?
Hi Frank, thanks for the kind words. The Powermatic 73 is a 1.5 HP unit, which puts it right on the edge as to whether it will deliver enough air speed through 6″ duct to prevent the accumulation of debris in the duct. It depends on the impeller size and several other variables, and I’d suggest running your question by Powermatic, but my guess is that you would be ok running a short main trunk of 6″, dropping down to 4″ for the tools. Essentially this would reduce static pressure in the overall system with increased air speed right at the tool itself. I would keep the use of flex pipe to an absolute minimum. Also, I suggest installing a couple extra elbows at various places in the system that can be used to inspect the ducting for dust build-up. If you are getting this you will want to either upgrade your dust collector or replace the 6″ with 4″ pipe to increase the air speed.
Hi, many thanks for the informative discussion. I had a smaller (in length) 4″ flexible tube dust collecting system in a previous workshop and, although I did not install an earthing wire, I could feel the hairs on my arms move when I was close to the ducting.
I totally agree with the comments on gentle curves and corners and have found that this minimises chances of clogging the duct on flexible systems. I am in the process of setting up a new workshop and will be looking at a PVC rigid pipe system this time. The design discussed above in the “Other ducting suggestions / Extra ports” provides good access for clearing any log jams as well as facilitating extension. As I will probably end up with a right-angle run with the dust collector at the right angle, one on each arm should suffice.
At his stage, I will probably purchase a 2Hp dust collector. A model available from my local supplier (Canberra, Australia) includes a large collector/filter bag combination with two 4″ inlet ports.
Earthing? I am inclined to include it at the design stage as the ducting will be less accessible after construction.
Once again, many thanks for the informative discussion.
Regards,
Peter E
Hi Peter,
Thanks for the comments. I agree; if you plan to ground the ducting, it would be far better to do it as you install it rather than waiting until later.
Hi Dan, glad you found it useful, and thanks for the feedback.
Thanks for this. Came here looking for a good way to strap the pipe to ceiling/wall and found that plus more good info. Appreciate you sharing this.
Since upgrading to a more powerful dust collector I have gotten some minor shocks at the tools during the dry MN winter, but nothing to be concerned about. I did receive a major shock when I overfilled my plastic dust collector and ran it for a while before I realized it. All those wood shavings swirling in a plastic funnel was a wicked combination. When I reached out to touch it, the spark arched about 6″ and snapped quite loudly. So I wrapped a ground wire around the dust collector a couple times and grounded it. I have overfilled the dust collector a few times since, but no more shocks of that magnitude.
I have never gotten a shock in 10 years of running PVC ducting in two
different shops, so I have never bothered with grounding mine.
Good call, Chuck. :)
SWMBO first, soap… eventually. I will let you know, though.
The soap seems like a worthwhile trick to try. I’d be interested in hearing how it works.
Paul – Yes, my flex is a very tight fit into the coupling. I have one bell end of pipe that I managed to get flex onto, though if I wanted it to connect more deeply I would have needed a heat gun. I did figure out how to help with the couplings – I remembered back thirty-#$%^#@& years ago and replacing the handlebar grips on my bicycle. Remove the old ones with a razor knife, then lube up the new ones with a little liquid dish soap. It’s slippery enough, and once it dries it’s stickier than using nothing. A win-win. Gonna give it a try in a day or two. SWMBO just returned from visiting relatives for a few weeks and giving up a little shop time this week should help me to maintain tranquility. Thanks for all your help this week.
Hi Chuck,
Are you saying that it is a tight fit but it is difficult to slip the flex pipe into the coupler? Mine was not difficult to get in there. I just tucked one side in, and then reached through the other end of the coupler and pull the flex pipe into the coupler. If it is super tight I would cut a slit into the flex, cutting through a couple strands of the wire that wraps around it, and that should help you get it started. Once it is started hopefully it will slide the rest of the way in without a problem. If that doesn’t give you enough wiggle room you might need to either try different flex pipe that might have a different diameter. Another option would be to make your own coupler out of plywood or MDF. Or, use the bell end of the pipe as a coupler using the approach that I described previously. It’s not as quick as using the coupler, but it is not too bad.
Paul, I just got around to trying a friction fit with the 6″ coupling and the flex. Geez, my machine tool teacher would call that an Interference Fit. I think this will definitely be the way to go.
Ummm, any suggestions on getting the flex into the coupling? :-)
Paul, I just got around to trying a friction fit with the 6″ coupling and the flex. Geez, my machine tool teacher would call that an Interference Fit. I think this will definitely be the way to go.
Ummm, any suggestions on getting the flex into the coupling? :-)
Chuck,
One option might be to attach a coupler, and then you would have multiple options to attach to that depending upon which tool you were using it on. You could configure a reducer and piece of 4″ flex hose for 4″ ports, and connect directly to the 6″ ports with the coupler.
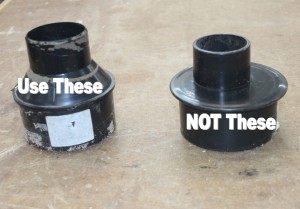
As far as attaching the flex pipe to the coupler, I just tuck it inside and there is enough friction to hold it on place. On the 4″ it is a bit looser, so I have used duct tape to secure it. Another way to do the quick disconnect is to use the bell connection at the end of the PVC pipe, rather than the coupler. In the second picture in the article, the green PVC is actually the bell coupler at the end of the pipe. I slip the PVC over the small end, and then the bell slips over the dust port on the tool. This approach provides enough friction to hold them solidly.
Thanks, Paul. I’m still flip-flopping over which piece of PVC (pipe or fitting) I want attached to the flex, based on what is going where in the shop and how much moving will happen. I am just finishing up my separator, so I will probably start running duct tomorrow, but that still gives me some time to decide before I start cutting pipes to length. How do you attach the flex inside the coupling?
Hi Chuck,
Yes, you can get it over the top of PVC, but I like the flexibility of using the couplers because it provides a great quick disconnect system. If you have trouble slipping the flex tube over the PVC just cut some slits into the PVC as you see shown in the 2nd picture in this article. Then apply a band clamp to compress the PVC so that it will easily slip down into the flex tube. If it is still tight you can warm up the flex tube a bit with a heat gun.
Paul, I am also about to set up a 6″ system. I looked thru your pics and text and don’t see anywhere where you have 6″ flex over PVC pipe, only inside PVC fittings. Does the flex not fit over the pipe? This would mean I will need a fitting (at least a coupling) everywhere I want to use flex hose. Any guidance would be appreciated. Thanks.
Hi ptgibbs,
Thanks for the feedback. I use a remote control that was provided as an accessory from Clear Vue Cyclones. I bought a few extra remotes and I have them mounted near all of my primary tools.
Hi ptgibbs,
Thanks for the feedback. I use a remote control that was provided as an accessory from Clear Vue Cyclones. I bought a few extra remotes and I have them mounted near all of my primary tools.
Hey Paul – best article on setting up DC I’ve read yet! I was also wondering how you configured the on/off system for your tools? Did you integrate the switches in your equipment? Do you have a remote? Paul
Hi Travis,
Cool! Sounds like a great system and really quiet. Would love to see a pic once you are up and running…
Paul
Hi Travis,
Cool! Sounds like a great system and really quiet. Would love to see a pic once you are up and running…
Paul
Hi Paul; here’s an update on my comment from a month ago. I took yours and others’ advice and purchased a system with capacity for the future: a 3HP cyclone type that I’ll use with a 5 inch dia. hose for now, but will be able to plumb in drops in the future if I move to a larger shop. The unit has lots of capacity, a very high MERV rating for the filter and low noise rating (75 dbA at 10 ft.). Thanks so much for your advice! Travis
Texan63, which DC did you end up purchasing?
Hi Paul; here’s an update on my comment from a month ago. I took yours and others’ advice and purchased a system with capacity for the future: a 3HP cyclone type that I’ll use with a 5 inch dia. hose for now, but will be able to plumb in drops in the future if I move to a larger shop. The unit has lots of capacity, a very high MERV rating for the filter and low noise rating (75 dbA at 10 ft.). Thanks so much for your advice! Travis
Hi Brent, I would be skeptical of a CFM rating that high on a 4hp machine, as many manufacturers use highly inflated CFM ratings which are probably based on a theoretical max, or something like that. I would encourage you to do some research on the specific machine to see if any owners are using pipe larger than 6″, and see how their performance is. Look for someone who can provide both FPM and CFM. You need to keep the air velocity up or dust will settle in the pipe and build up over time, which is the risk of oversizing the pipe. But if you can maintain adequate FPM through a larger trunk, and branch off to tools with smaller pipe, that is a winner. You might also try getting an air flow meter and experimenting with some various size pipes to see what you find. If you start dipping below 4000 FPM, you should reduce the size of pipe. Bigger is better until you get below that threshold. The results were quite interesting when I tested before & after my Clear Vue upgrade: http://local.wordpress/articles/product-reviews/stepping-up-to-better-dust-collection/
Hello Don, Great article! I currently have a 4 H.P. DC, with suction capacity of 3560 CFM and Static Pressure 16.8. It can be used with a 9 inch manifold with 4 – 4inch fittings or by removing the manifold and the connecting the DC directly to the main. My shop is located in a basement and space is tight so I have to use the manifold. I am planing to build a new dedicated shop and have many drawings of my tools placement and ducts layout. My plan is not to use the manifold and use a main instead. My question should I take advantage and use the largest duct I can find for the main then branch off of it with smaller ones? Or should I stick with the 6 inch ducts? I know the answer is basically on the length of the main and static pressure and design. I just keep going back and forth what to do off the main. In any case I am leaning heavily towards using PVC. In my research I found some web sites that may interest your readers. ‘Grounding PVC and Other Dust Collection Myths’ by Rod Cole: http://home.comcast.net/~rodec/woodworking/articles/DC_myths.html Source for those hard to find PVC fittings: http://www.pexsupply.com/PVC-Fittings-470000 Source self made blast gates: http://benchmark.20m.com/articles/BlastGate/blastgatebuilding.html Thanks, Brent
Hi MTAV,
The lack of resources on this topic is disheartening. I think you will find that woodworking retailers are slowly getting up to speed on dust collection, but they are not on the cutting edge of research in this area. My guess is that 6″ PVC is so expensive and cumbersome for them to handle and ship, and it is relatively inexpensive at home centers, so it is hard for small retailers to get into this business. A 10′ length of 6″ PVC costs about $20 at a big box store, and it probably costs $100 to ship it to someone’s home. Companies that specialize in dust collection are much better versed on duct design, and in general where you find snaplock pipe they sell larger size pipe.
As far as piping that dust collector for 6″, it depends on the actual CFM capability of the system (most DCs are rated much higher than they actually deliver), and the length of your duct runs. For short runs I think it will be fine, but for long runs you might not have the power to maintain 4000 fpm necessary to pull the finest dust. I would try to arrange your tools so that the big dust producers are closest to the DC, and pipe them using 6″. For tools that are farther away, you might need to drop down to 4″ to keep the air velocity up.
I’m in the process of re-modelling my workshop and include a ducted system. I was just going to use 4″ duct as that is what is pushed by all the woodworking vendors on their sites and catalogs……now you have me thinking about 6″!!! I have a 2Hp 1200CFM DC. If 6″ is the way to go why then don’t the stores sell fittings for this size….go figure!
I have been using a central dust collector system for over 10 years, utilizing both PVC and HVAC ducting. Great success with both. When using the HVAC ducting I recommend taping ALL joints and seams as this reduces air leaks and improves preformance.
As ar as static discharge, living in the South it is typically humid, but there are some days I get zapped while using my orbital sander with the dust collection hose attached. Its fun.
Standard,
I would be interested in seeing your shop made blast gates if you are willing to post a photo of them in the Forum area.
Standard,
I would be interested in seeing your shop made blast gates if you are willing to post a photo of them in the Forum area.
I have used PVC for 15 years at least with no problem. I do recommend a direct connection to all machines and a open connection to portable machines that are used sometimes. every thing that is in the article is great, I made my blast gates from wood and metal with no problems, I use a first primary collection container before my dust bag to catch larger items so they do not go through my dist collection fan and you do not have to empty the dust bag as often. good luck
Hi texan,
Thanks for the feedback. As to your question, you can probably guess what I would suggest which is a bigger DC and a ducting system. The benefits are significant. I go back and forth from tool to tool so frequently that I am nearly certain I would make many “quick cuts” without dust collection if I were setup that way. I also think that if you stick with woodworking long enough you will eventually upgrade your DC and add a ducting system, so if you believe that you will be doing woodworking in your current location for more than a year or two, I would consider biting the bullet now and getting into a system that will meet your needs for many years as it will actually save you money in the long run and give you a better experience up front. But I recognize the investment in time and $ is significant, so portable dust collection is a worthy consideration as well. If I were to get a portable system, I would do one of two things. Either buy one used from someone who has recently upgraded (there are lots of them out there in my area) or buy one that has enough power to collect from a ducting system if you decide to add that later. That way your investment is protected when you expand the system later, and all you need to buy are a bunch of plastic tubes and fittings.
Great article and timely for me as I’m considering a dust collection system for my small workshop (one car garage stall) . The big issue is whether I should go with a bigger DC to support plumbing drops for each machine or a smaller DC unit and drag a hose around to each machine. Suggestions anyone??
Go for the bigger machine and pipe to each tool. If you’re human, you won’t plug it in to each machine every time you do a cut, and will wind up breathing dust for those “just a quick cut” moments.
This is very interesting.
Could you use copper pipe? As it is quite cheap here in the UK?
This is very interesting.