Make Your Own Wooden Sign


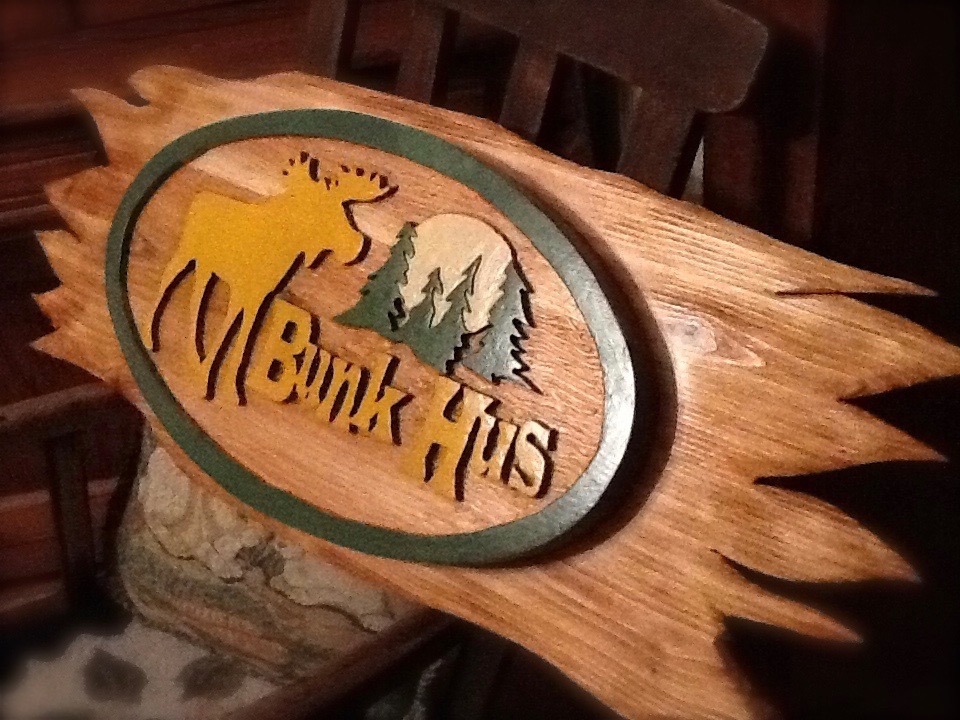
Some friends of mine have a cabin in the north woods with an out building for extra overnight guests to bunk up for the evening. It’s a great place to fall asleep on a moonlit night listening to the cooing owls and the foxes rustling through the brush. Both friends have a Swedish heritage so by committee we came up with a name for the bunkhouse and decided it needed a sign.

I got out a pen and paper, sketched several ideas, and came up with the sign you see here. I transferred my idea to a drawing program on the computer and enlarged it, and printed it out in two pages on a large printer. You can also print oversize images by going to Staples, uploading your design, and they’ll print it for you.

Another alternative, you can go a local print shop for help.


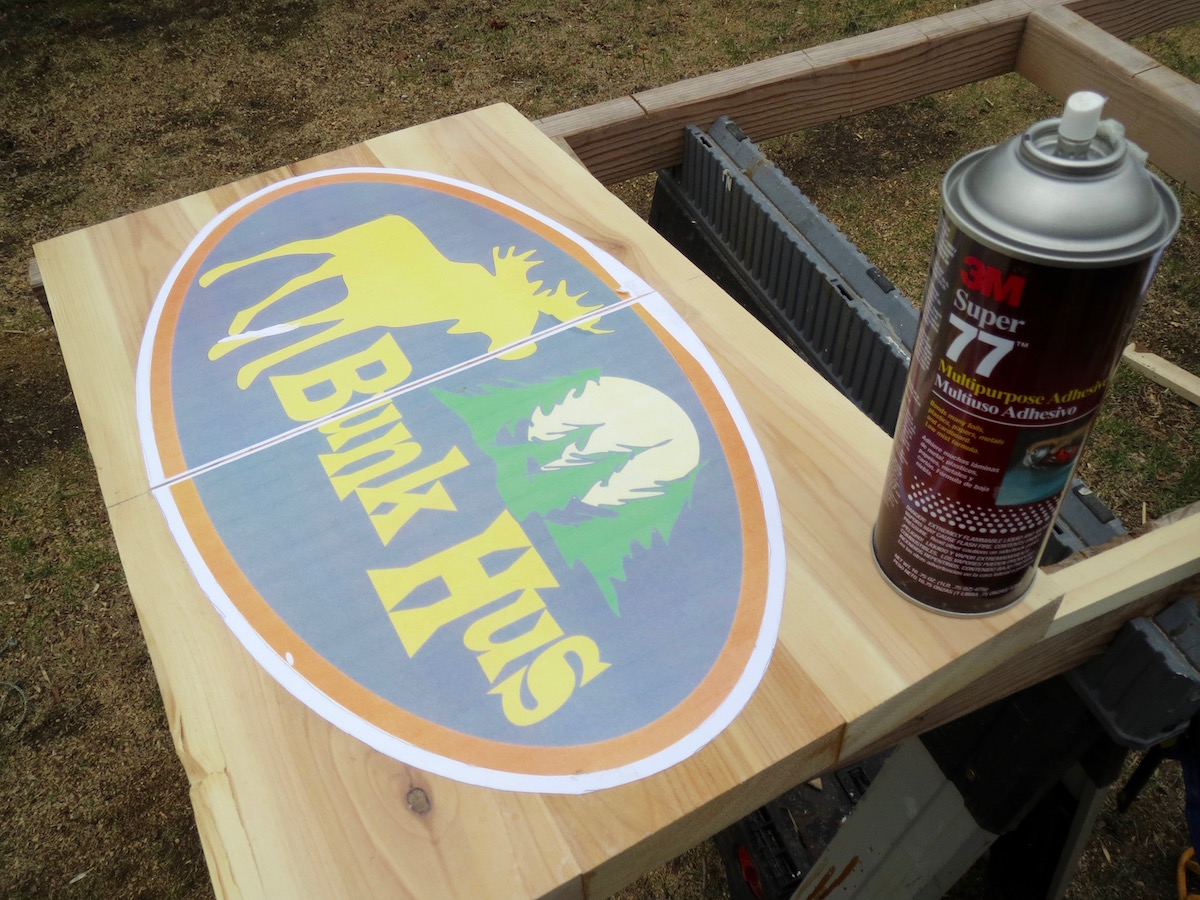
When you have your design printed, mount it to your wood blank with a spray adhesive. I bought a cedar deck board, cut it to shorter lengths, and then ripped the rounded edges off with my tablesaw. Once the edges were jointed I glued and clamped the boards to make up the panel.


To start routing, it’s a good idea to drill a 3/16” diameter hole the depth that you’re going to rout. This will let you drop your router into the hole without stressing the fragile bit. I’d do it this way even if I were using a plunge router. These 1/8” bits will only rout to a depth of 3/16” but I found that to be the perfect depth for this sign. Once you start routing, hold the router handles firmly and rest your forearms on the workpiece to stabilize the router. Move it slowly along the edge of your design. If you push it too fast, you’ll end up breaking the bit or burning the wood and overheating the bit.


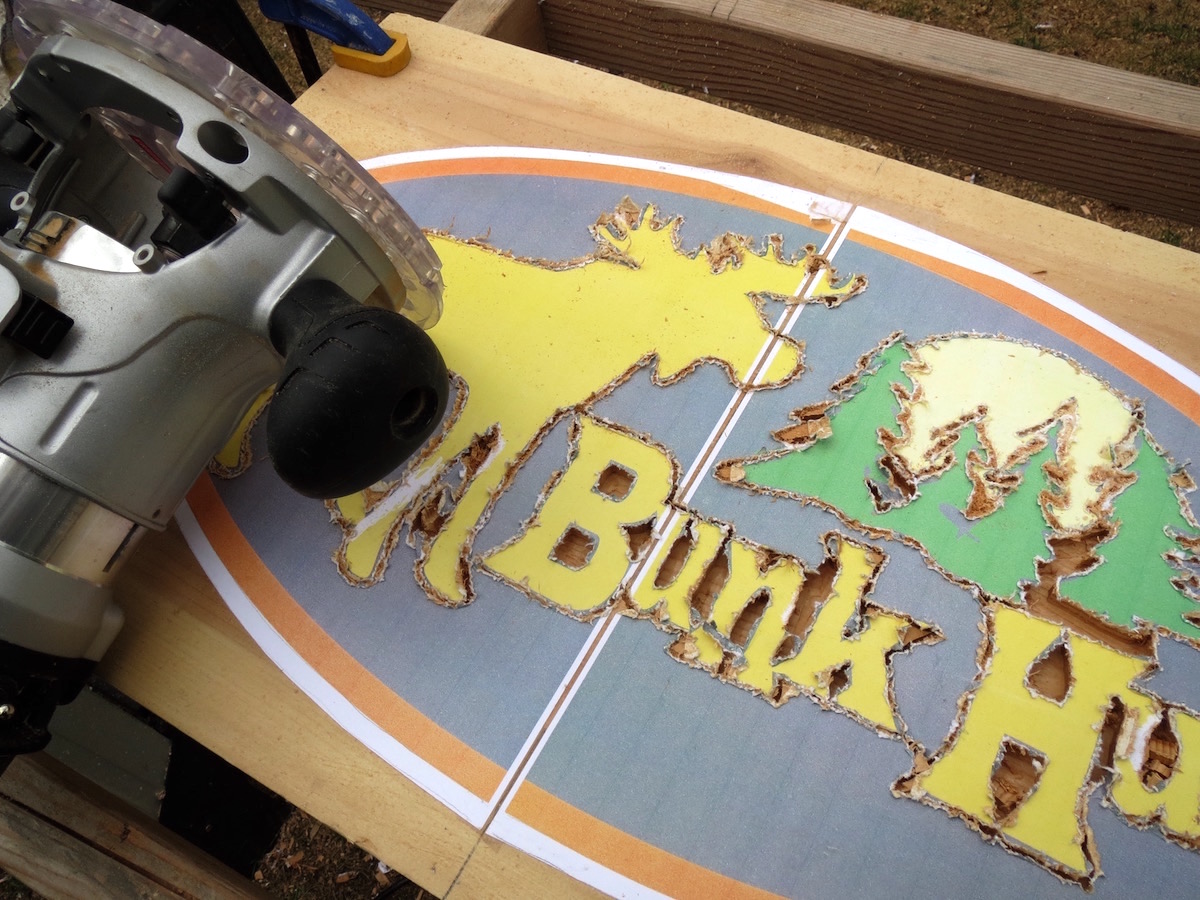
Use the 1/8” cutter only to define the shapes, not to remove all the waste. It took me about 30 minutes and two bits to rout around all the lettering and the shapes in this design. Then install the 1/4″ bit to remove more material faster. Be sure to set the depth of the bit to exactly the same depth as the 1/8” cutter.


Routing with the 1/4″ bit goes much faster but you’ll still need to keep your forearms on the workpiece to stabilize the router to keep it from wandering during a climb cut. Go slow and steady to widen the area and work your way into the background of the design. I finished the routing using the ¼” straight bit, but you could also switch to a 3/4″ diameter bit if you have a lot of background to remove. Just remember to plan ahead and leave enough unrouted material to keep the router base stable. An upcut spiral router bit will work well for this project. Have a shop vacuum handy to clean up the debris from time to time.


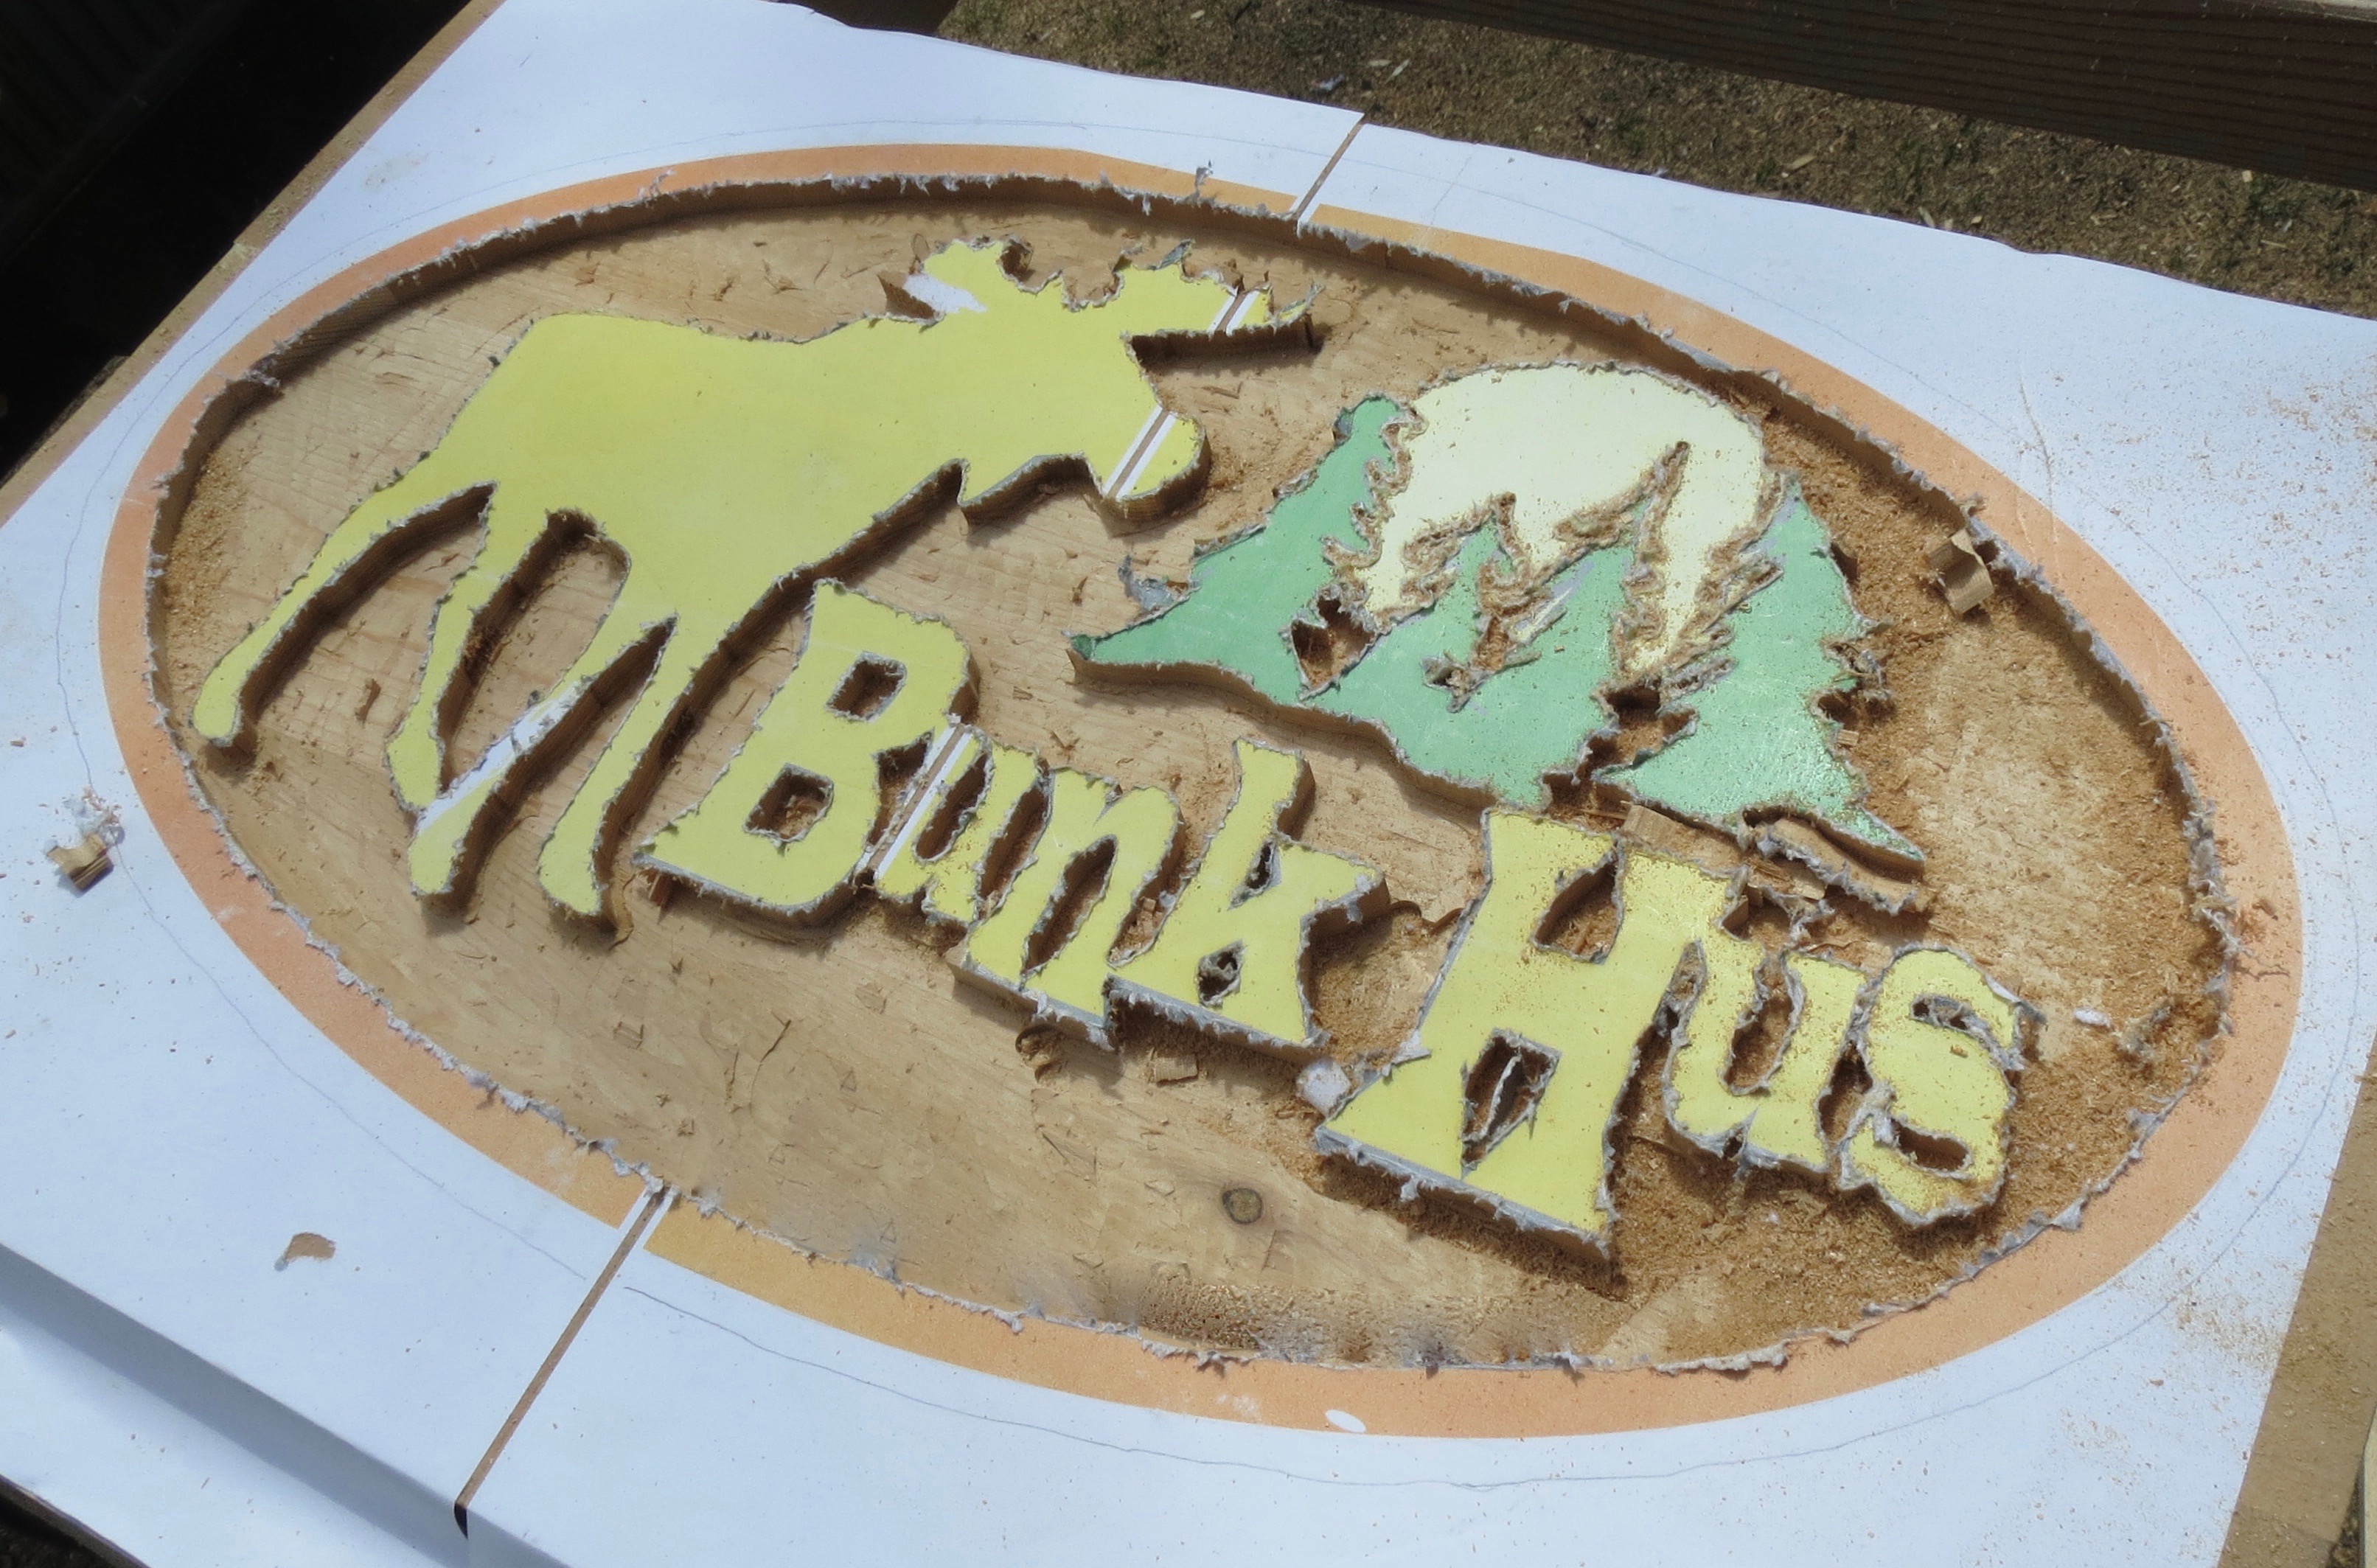
When the routing is complete, go back and check for any spots you might have missed. We’ll be using a Dremel tool later to clean up any rough edges.


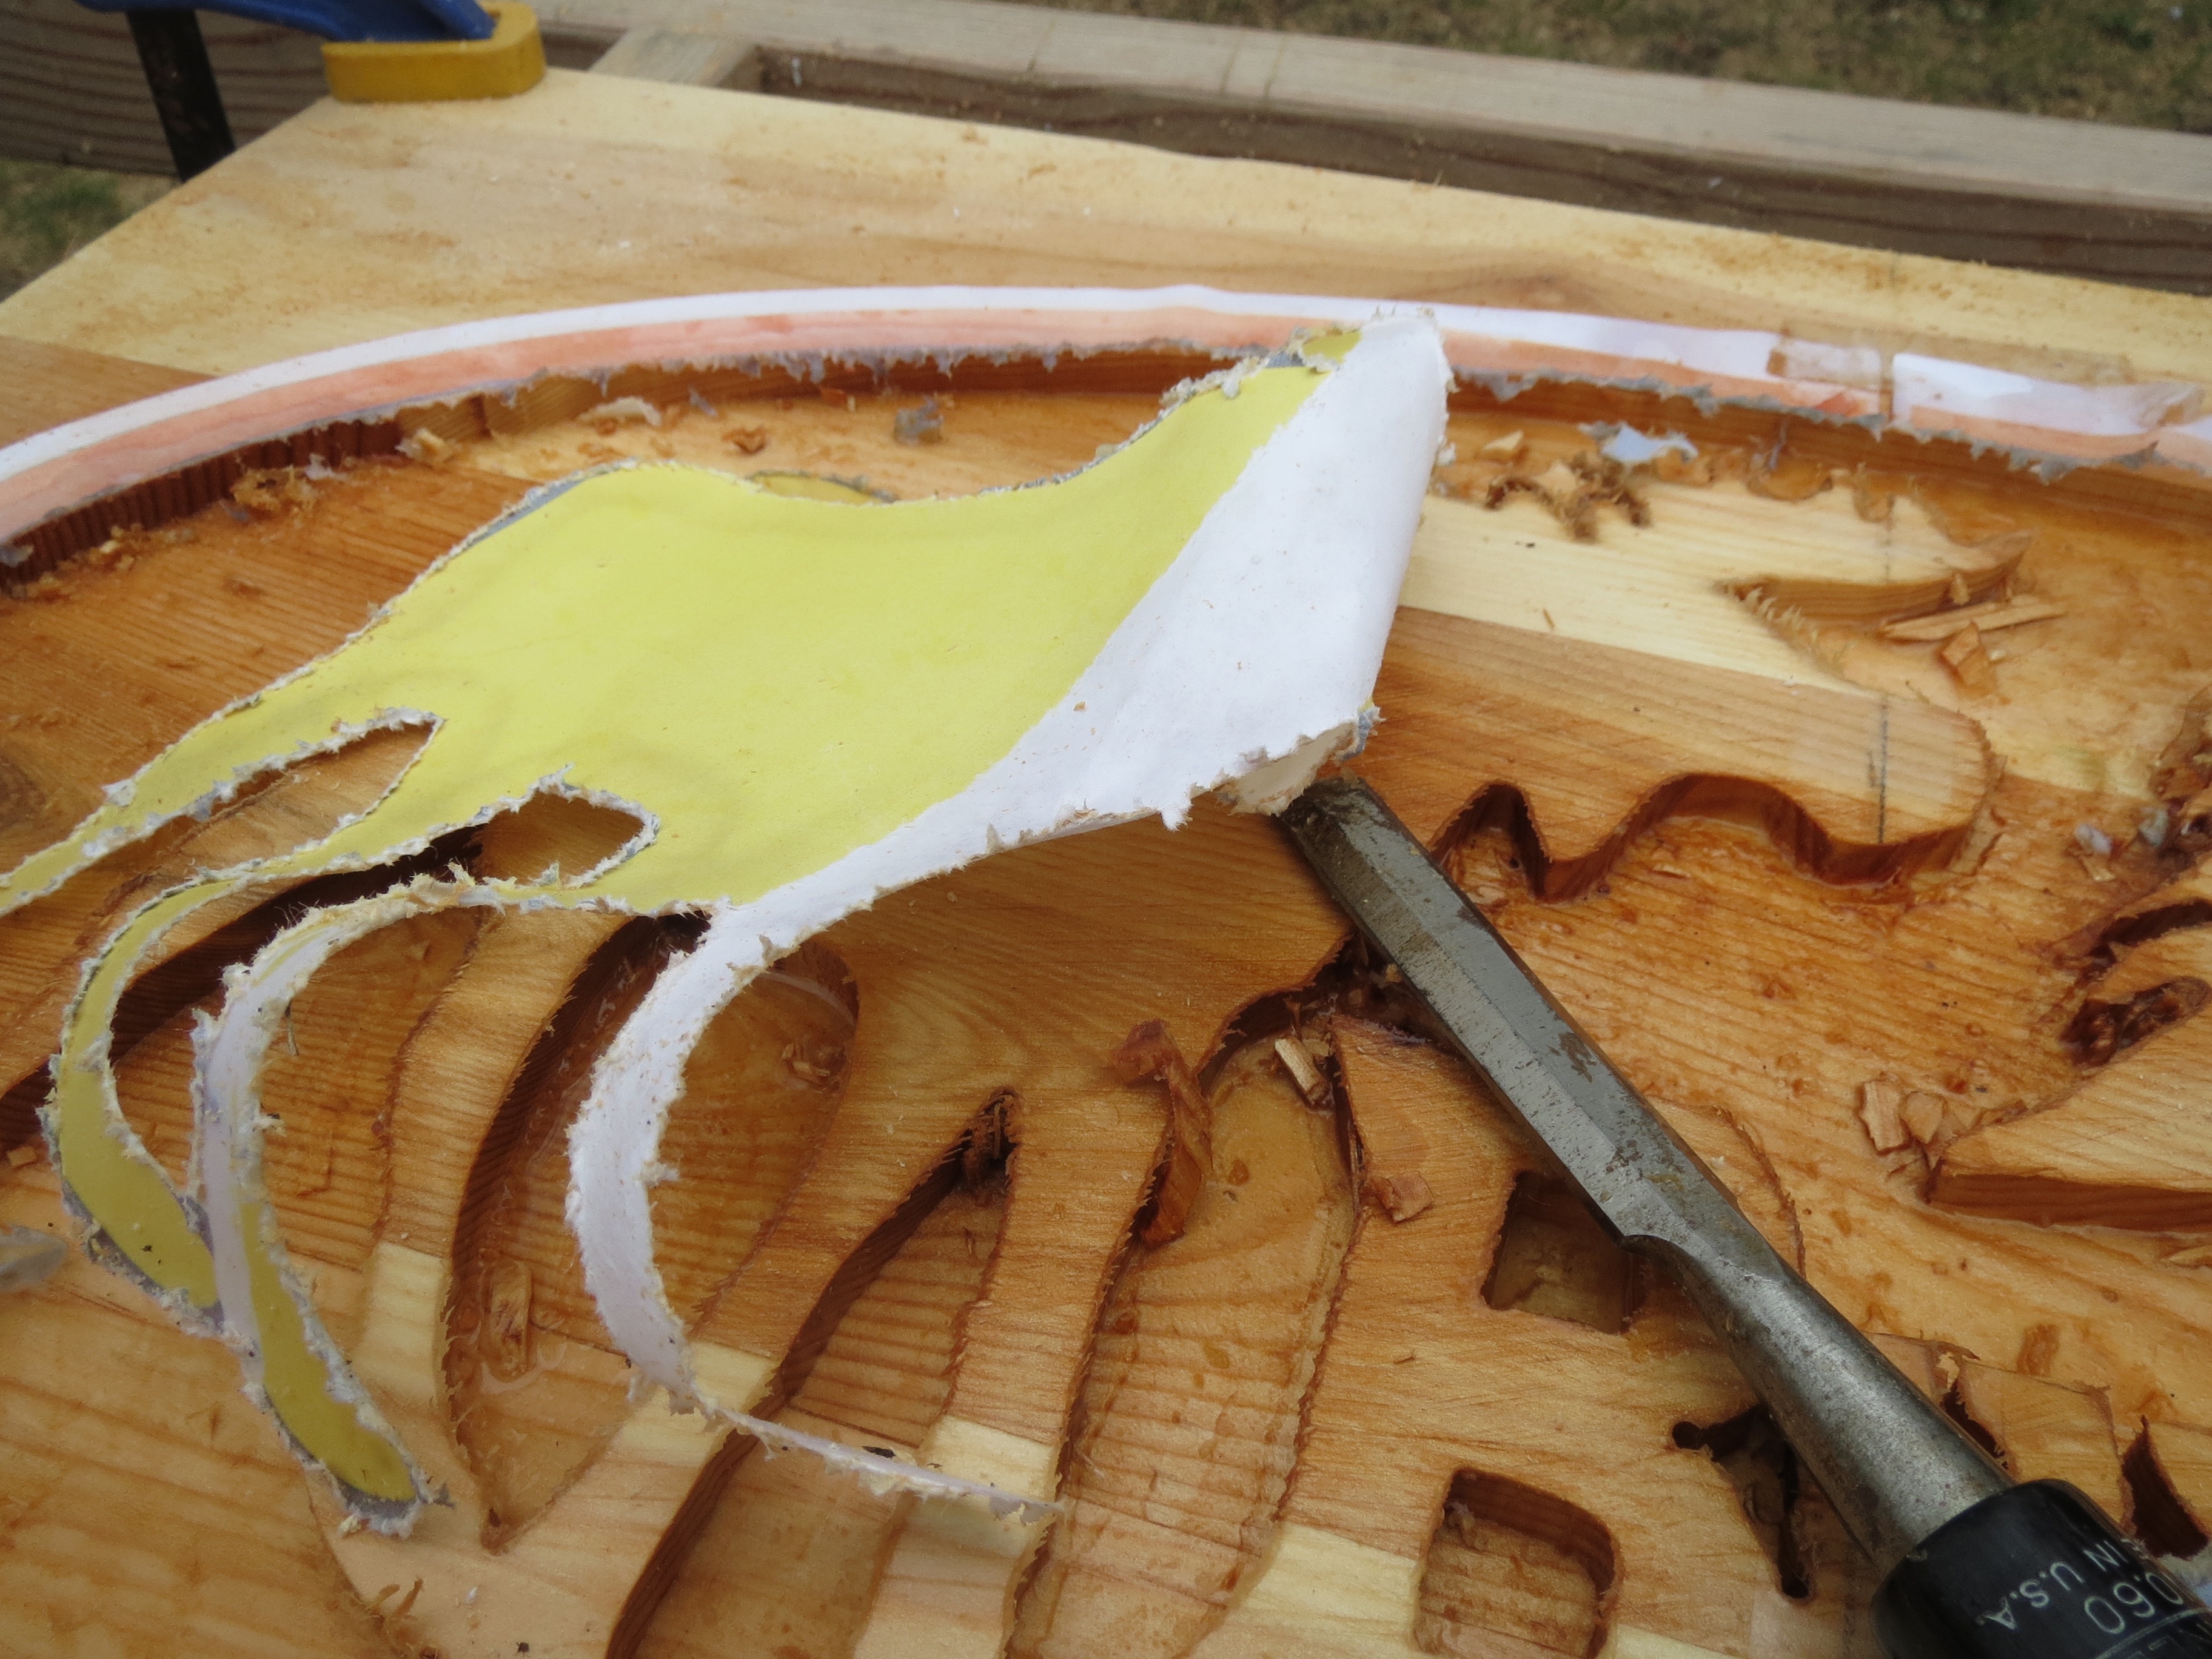
Removing the remaining paper is easy. Just soak the paper with acetone or lacquer thinner and peel it off with an old chisel or putty knife. Let the wood dry before the next step.


Cut the outer oval shape with your jigsaw or band saw. Clean up the edges of the lettering with a Dremel rotary tool outfitted with a small drum sander. You’ll also need to do a little hand sanding in tight areas.


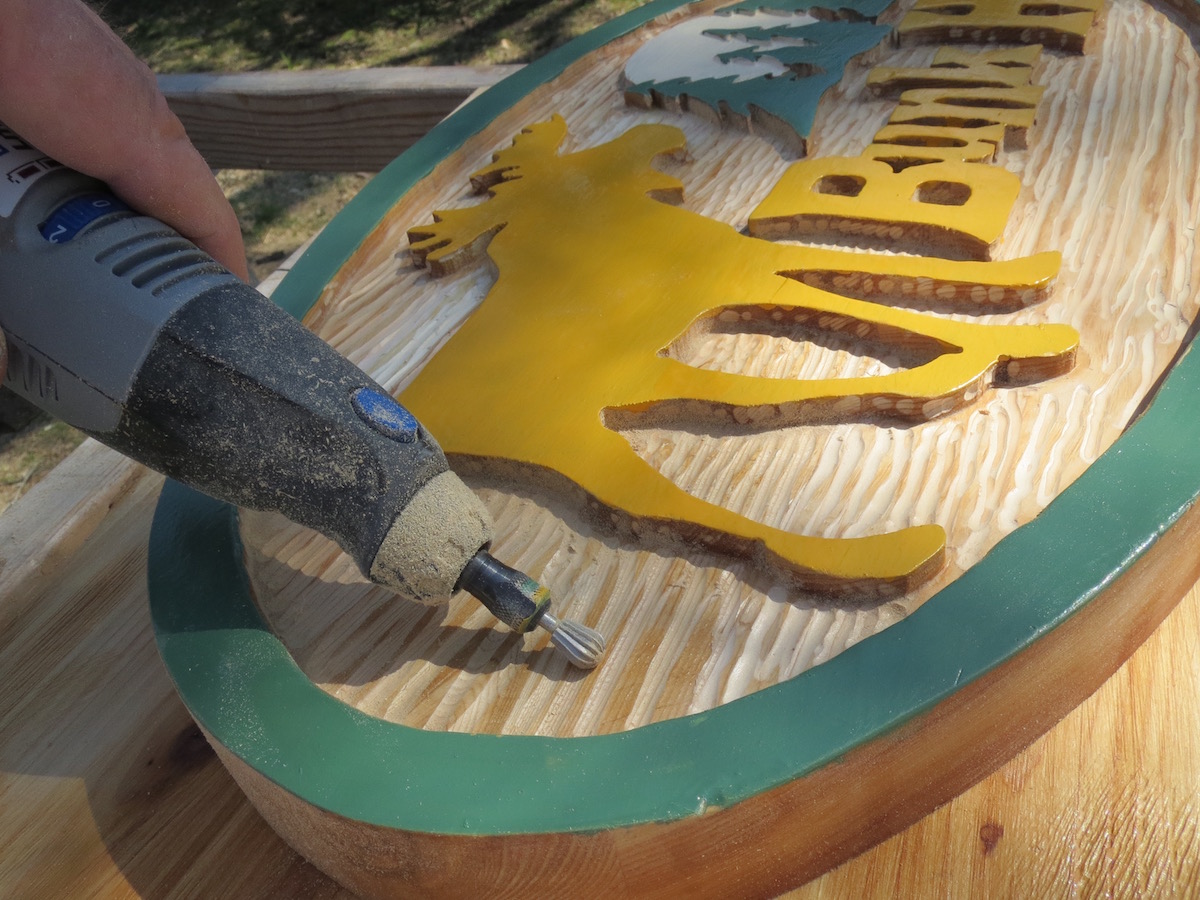
After the initial painting, I decided to give the background a unifying texture with a burr bit (Dremel #134) in horizontal strokes. The effect left a more “hand-carved” appearance.


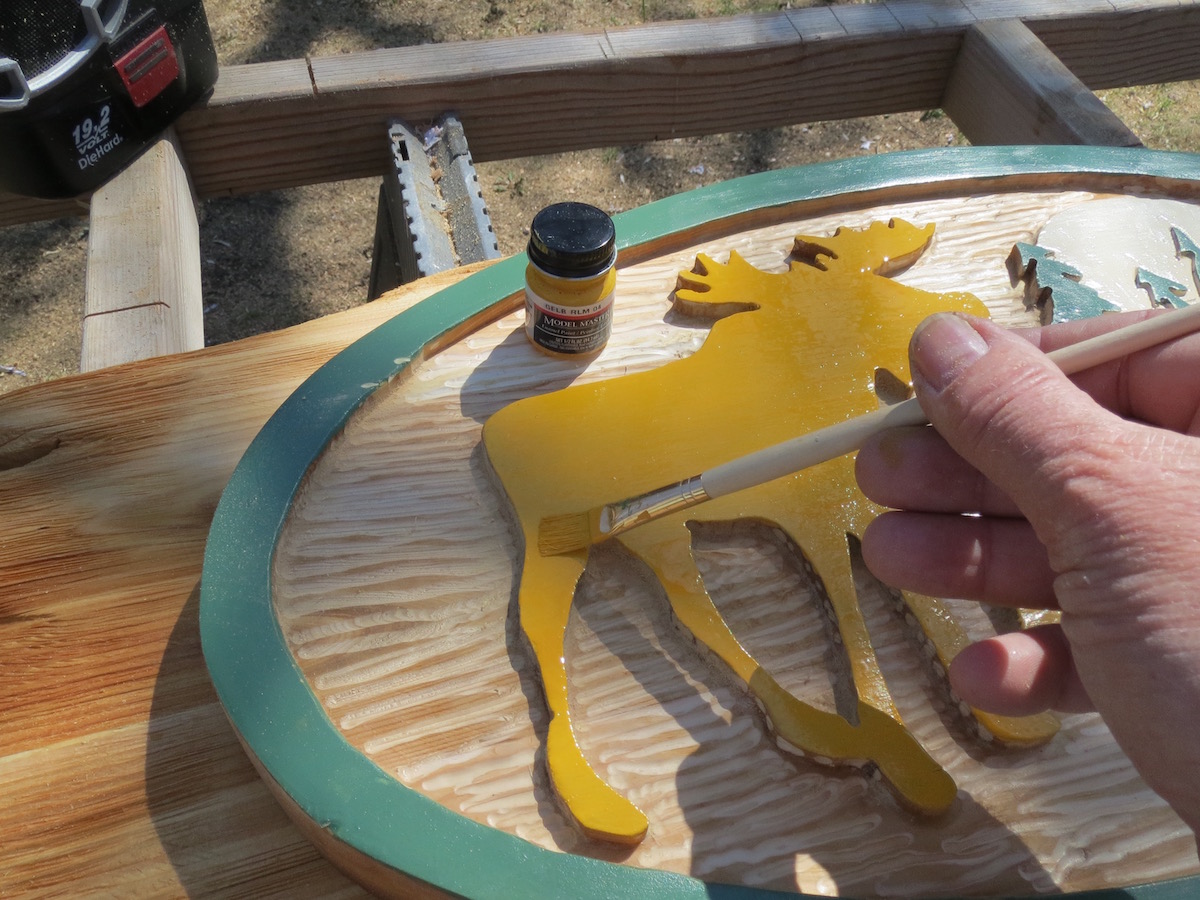
I gave the foreground of the design a second coat of enamel paint. I purchased small amounts of paint from a local hobby store.


To make the sign larger and give it a rustic feel, I glued up another panel made from 3/4″ thick cedar boards. I cut the edges to simulate a roughhewn look and then textured the cedar with a stiff wire wheel attached to the drill. The bristles wear away the early wood and leave a very weathered aged look to the surface. Once that was complete, I screwed the main sign to the backer from behind and then gave the whole sign two coats of spar varnish over the painted and unpainted parts. The spar varnish will seal it and protect it from moisture and UV rays.


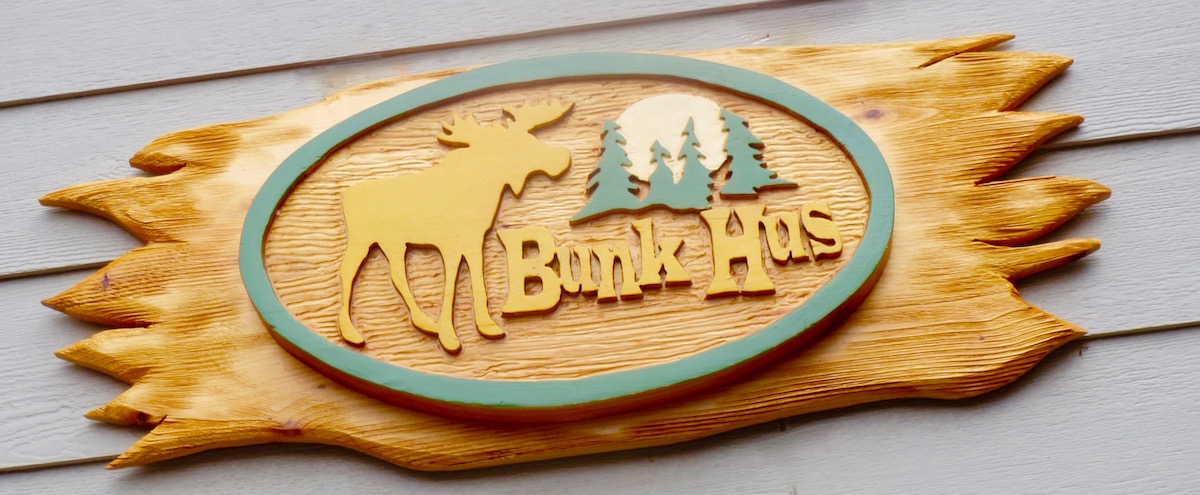
You can rout keyholes on the back or just screw some picture hanging hardware on the backside to mount it to a wall or hang it with rope or chain from above.

woodworking projects download
Make a comment
  • (will not be published)

65 Responses to “Make Your Own Wooden Sign”

    • Customer Service

      Hi James. It’s a great choice because it’s resistant to decay, which means it will last longer. Other options might include pressure treated lumber and white oak. With pressure treated material, be sure to wait a year before applying finish, to allow it to properly dry.
      Paul
      Woodworkers Guild of America

      Reply
  1. Neal Grossman

    Neat little project…..Question, I’m a big (GF) General Finishes fan. In your opinion if you both the spar varnish and GF zexterior 450 which one would you recommend/use?
    And why?
    Thanks…..btw I ask because I live in Western
    NC its almost like a rain forest here particularly come summer.

    Reply
  2. Scott

    All you guys touting cnc…”o I could do it in 30min on my cnc” Great good for you…what a craftsman you are!!

    Reply
    • Earl J (Maui Boy)

      Aloha Scott…
      some rather like to push the mower around the yard for the close trimmed edges it permits…
      while others would rather ride their mowers around the yard and finish in time to see the opening quarter of the early Sunday afternoon NFL games… (grin)
      * * *
      There are many factors to consider… and everyone has their own perspective on the technique that would fit their style and final outcome…
      * * *
      I absolutely hold no grudges against any person – man or woman – who still enjoys working with raw wood for any sort of project – 𝑪𝑵𝑪 𝒐𝒓 𝑯𝒂𝒎𝒎𝒆𝒓𝑵𝑪𝒉𝒊𝒔𝒆𝒍 – makes no difference to me… I’m just glad to see anyone working with raw wood…!
      * * *

      Until that time. . .

      Reply
  3. shepherdboy12

    very well done!!! inspiring to me and I feel confident to take on a sign job if it comes my way now. Thanks for also conveying the heart behind this project- what a gift!

    Reply
  4. Bill

    Ya know the feeling you get when you make something with your hands………………well as you start up the ladder from hand tools, to power, to CNC I believed your satisfaction level decreases. Also the cost of a CNC is extreme if you are not going to make signs commercially………………………Just Saying

    Reply
  5. Dale Boyer

    Without getting into the “CNC isn’t real woodworking” argument, for those of you wanting to try this at home (without a CNC)… you can get a better initial outline cut with a 20 or 30-degree “pointed” bit vs. a straight cut, and you won’t have to use two of them. With practice, you can easily make signs of this type that rival a CNC. I highly recommend joining the Facebook page “Hand Routed Carvings 4 Newbies” and checking out Dave and Eric Rhoten’s YouTube channel and web page (makeawoodsign.com).
    Sure, a CNC can make a perfect sign, but there’s nothing like knowing your own hands did this. Even better when someone asks you what kind of CNC you used! Carve on!!

    Reply
    • Earl J (Maui Boy)

      Aloha Dale…
      I’ve been a fan of Dave and Eric for several years… I concur with your recommendation…
      A little late… but they are still making videos over wooden sign making…
      * * *

      Until that time. . .

      Reply
    • Customer Service

      Hey Roger,

      Our expert Paul says the following:

      Regular paper is fine. The spray adhesive holds it securely.

      Happy Woodworking!
      Madeline
      Woodworkers Guild of America Video Membership

      Reply
  6. Mike Cornwell

    I have done several signs this way. Some by using a gouge after using a small router but to outline everything. Try using different routing depths to create a 3-D effect.

    Reply
  7. Vince

    Thank you for sharing your sign making process without a CNC machine. This was a great help, and I can not wait to try.

    Reply
    • Customer Service

      Dear David,

      Thank you for your patience. In response to your question-

      It is spar varnish, applied on both painted and non-painted surfaces.
      https://amzn.to/2GveYsW

      Paul
      Woodworkers Guild of America

      Reply
    • Customer Service

      Hi John,

      I am sorry we do not have anything available for a hand held mirror at this time.

      Thanks,

      Becky
      WoodWorkers Guild of America Video Membership

      Reply
    • Earl J (Maui Boy)

      John Otilli, and our favorite Latin lurker, et al.,
      search YouTube for…

      “make handheld wooden mirror”

      * * *
      Many variations will display… pick one…
      * * *

      Until that time. . .

      Reply
  8. Mikal Burkoski

    Very nice, using your same technique with making your pattern, I think you could get at least the same effect ~ if not better, using a scroll saw as opposed to the router Call me old fashioned, but I don’t understand how using a cnc machine qualifies as woodworking. Save your money, stick to the tried and true and be proud of your hand make work.

    Reply
  9. chuck Vermillion

    Send me some free hand routing,outdoor signs, router, sign making.

    Reply
    • Earl J (Maui Boy)

      Aloha y’all…
      Search for Eric Rhoten (OR … MakeAWoodSign) on YouTube…
      I’m a big fan… I think many handmade guys would like what you’ll find there.
      * * *
      Born on Valley Isle,
      Home now, North Carolina:
      Aloha y’all. . .
      * * *

      Until that time. . .

      Reply
  10. David

    I was glad to find this, very clever. Looking forward to putting these techniques to work.

    Reply
  11. IVAMAY

    Awesome, I’ve been struggling with a project for awhile now, nothing looked right, however, I do believe you just gave me the answer I needed to get this this done & my friend will FINALLY have their birthday present THIS YEAR!

    Reply
  12. Michael

    That is very well made. looking forward to making my own sign now. Thank you.

    Reply
  13. john glenn

    Great sign and will be doing one shortly. I see a lot of “woodworkers?” use CNC machines, take the artistry out of woodworking by letting a machine to the work. I enjoy doing woodworking and do not let a machine do it for me.

    Reply
    • Doug

      Good for you! I greatly appreciate the art of traditional woodworking however I also love power tools and modern ways of working. Both have their place and neither is better than the other. It’s hard to make a living with traditional woodworking. AS a man trying to support a family, I have to use every mechanical advantage possible, and that will include a CNC machine as soon as I can afford it. So my point is, please don’t be arrogant by acting as if you are above using power tools. It all depends on what you are trying to accomplish.

      Reply
      • mwlahn

        I agree with you totally! Using a hand-held router could be considered “cheating” to someone who prefers to do it totally with hand chisels! They’re all just tools. I’m just getting into woodworking as I near retirement and certainly aren’t about to invest heavily in it, so this is great to see how to do something so beautiful as this with just basic tools (and much creativity!).

        Reply
  14. John

    Very nice technique for those of us who don’t have a CNC machine. Can’t wait to try it.

    Reply
  15. Bob Mayfield

    VERY NICE! Perfect for our Wisconsin deer hunt going on now. I may have to use that design and make one. Thank you for sharing.

    Reply
  16. Kip

    This is cool but when you have a CNC machine this is not going to happen. I could do this on my CNC 30 minutes

    Reply
    • Jim

      As I looked at this project I was thinking the same thing. I’ve made signs free handed with a router in the past but was never satified with the outcome. Finally I bought a CNC machine last year and never looked back. There really is no subsitute for a CNC plus once your design is done you can recreate another EXACTLY the same anytime with little effort.

      Reply
      • tim neidel

        New at this, what type cnc did you buy and how much do they run, was interested for the reason I like to make more than one item of the same. Thanks

        Reply
      • John S

        I was a machinist before I retired. Would love to get a CNC just to make signs. Cost may be prohibitive, what about the ones I see that say make your own? What is your story on getting a cnc and the cost. Thanks a so much

        Reply
        • Customer Service

          Hi John.

          Sorry, but I don’t have any experience with build-your-own-CNC set ups. There are lots of CNC forums. My guess would be you could get some info and reviews on one of those.

          Whether you build or buy, think about the size of projects you plan on doing. That’ll let you determine how big a bed you’ll need on the machine you buy. You can keep costs down by getting a CNC that uses a router, as opposed to a spindle. But in the long run a spindle will provide longer service, and has more torque than a router. Spindles typically have infinitely variable rpm, giving you more options on controlling bit speed. Some machines allow you to start with a router and upgrade to a spindle later. I like routers/spindles that accept both 1/4″ and 1/2″ shank router bits.

          Many CNC router manufacturers recommend VCarve Pro software for the design and toolpath work. VCarve is fairly intuitive to learn, and there’s lots of great info about it on the web.

          Be sure to check out our videos on benchtop CNC https://www.wwgoa.com/videos/benchtop-cnc/ (https://www.wwgoa.com/videos/benchtop-cnc/) and our CNC class https://www.wwgoa.com/class/benchtop-cnc-fundamentals-dvd-book/
          Thanks
          George-WWGOA

          Reply
    • Kirk

      And CNC is not art or hand made is it? Not even close. CNC looks like crap compared to this. Hand made is the way to go and takes major skill, CNC takes no brians or talent.

      Reply
      • Paul Johnson

        I am assuming that you do not have a CNC machine. It is just a tool, it does not design, it does not choose woods, glues, colors or finishes. It is nothing more than a fancy router. I have done both hand and CNC routed signs. They both take brains, creativity and skill.

        Reply
        • Don Crawford

          You have never tried using a CNC the ability to design using an auto cad program and produce on a CNC router takes a lot more skill. Both are great.

          Reply
  17. Mark

    That looks great David. Thanks for showing the technique. I make similar signs, but I cheat with a CNC machine. I thought that George had one.

    Reply