Here's the situation: Lumberyards and hobby/hardware stores often sell lumber S2S, which means the wide surfaces are jointed and planed, but the edges are rough from the sawmill or follow the shape of the tree. Do you pass these boards up because you don't have a jointer? If you own a router, start buying that lumber, because there is an easy solution to this problem!

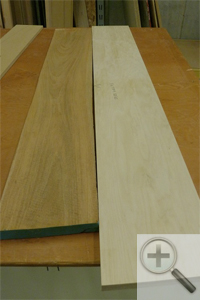 I found this beautiful, 9" wide Mahogany board at the lumberyard. When cut in half and glued-up, it could make the perfect top for a bedside table. When laid next to the factory edge (denoted in permanent marker) of a piece of Baltic Birch plywood, you can really tell how wavy the edge is. The other edge is just as bad. It didn't have a straight edge to run against the fence of a table saw, but even if it did, a table saw doesn't leave a clean enough surface for edge gluing. The router has a perfect bit for this problem: the pattern bit.
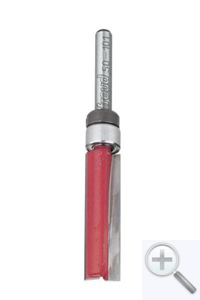 The pattern bit is designed with cutting knives and a smooth-rolling bearing which has the same diameter. There are many sizes of pattern bits, each varying in diameter, height, and number of cutting knives. I chose one with a 1-1/4" cutting height because I was trimming a piece of wood 1" thick. The bearing could even be located on the bottom of the bit (called a flush trim bit), but the principle is always the same: when the bearing is pushed up against a pattern, the knives cut the exact same shape as the pattern. While originally designed for complex or curvy shapes, it works equally well following a straight edge.
 To begin I trace a straight line on the edge of the Mahogany board using a straightedge. The pattern bit is most efficient when taking off 1/16" at a time, so I'll have to remove almost 1/2" in some spots. Initially I use my jigsaw to cut the excess waste. I try to cut within 1/16" of the line.
 Now that most of the waste has been trimmed off with the jigsaw, I'm ready for the accuracy of the pattern bit. I align the factory edge of a piece of Baltic Birch plywood on top of my Mahogany board and hang the assembly off the edge of my workbench. I clamp the two boards tightly. While the factory edge of any piece of plywood can work can work, I find high quality Baltic Birch to be the best. It has 13 layers of glued up wood and is void free, so the bearing on the router bit always has a perfect edge to follow.
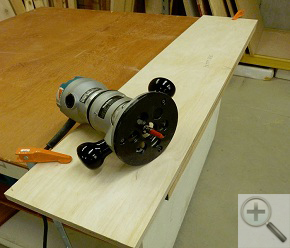
 Here is a bottom view of the process. The bearing follows the plywood while the knives trim the edge of the mahogany into a perfectly straight line. The photo is a little deceiving. Although it doesn't look like it, the bit really is reaching to the bottom face of the board.
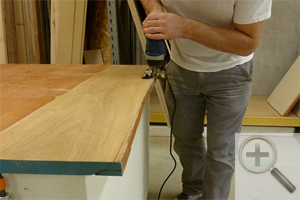
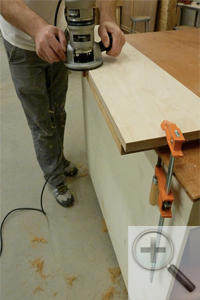 Here is a top view of the trimming process. I work slowly and deliberately, making sure to keep the router from tipping. Even light hopping against the fence can create slight indentations on the glue edge.
 The proof! Once I trim the edge, I cut a straight edge on the other side using the table saw and then glue up the two pieces. The glue edge is just as good as using a jointer.
This is an excellent technique to master, especially if you don't have a jointer. There are lots of situations where you can apply this process. Think back to that piece of wood you bought that had straight and parallel edges, and then after a week or two acclimating in the shop the board developed a warp. I once had a piece of wood that was case-hardened (dried unevenly from inside to outside). When I sent it through the table saw, it warped and bound. Without a jointer, this could have been a problem...but nothing a pattern bit couldn't handle.
Photos By Author
Source:
Freud 50-101 Pattern Router Bit Top Bearing 1/2"D 1-1/4"CL 1/4"SH
Item #834275
$31.50
Woodcraft
www.woodcraft.com
(800) 225-1153

Could this bit be used for 1/2” or 3/4” thick wood? If not what would you recommend. Thanks
I have 2 beautiful mahogany boards, completely clear, that are 2 and a quarter “ thick, 24” wide and 14’ long. I am going to make a large dining table and I have been worried about how I would be able to pass the boards through my 8” jointer. Is this router method the preferred way for me to join the 2 boards?
I like this idea better than the common use of a split fence on a router table, where the outfeed half is slightly proud of the incoming half. Maybe it's because I never quite understood how to do it the other way, and yet to get it to work.
i like this idea...never thought of it myself, i alway's owned a dedicated jointer...until recently when i moved from wisconsin to Arkansas two years ago space was limited and well most of my tools are still in wisconsin...i have a small and by small i mean small shop area a little bigger than your mid sized shed. so space is ay a premium
Would aluminum angle work as the straightedge?