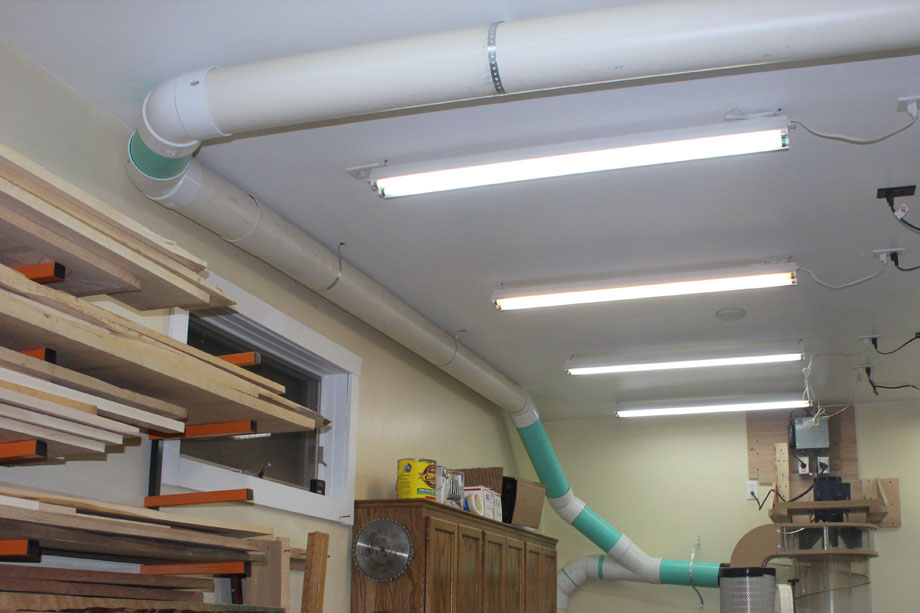
If you have made an investment in a powerful dust collector, that is a great first step toward creating a healthy shop environment. For purposes of this article I will assume that you have worked with your vendor to choose a dust collector that is capable of delivering enough air flow (ideally 1000 cubic feet per minute at 4000 feet per minute) at each tool to remove all of the fine dust that it produces (bare minimum 2HP with 12″ impeller for 400 sq. ft. shop, but do yourself a favor and don’t skimp).
Now you want to make sure that you are doing everything you can to get the most out of it. First, unless you want to jockey a hose from tool to tool each time you make a cut (don’t kid yourself; that’s a pain), you will need to set up ductwork to draw dust from each tool in your shop to your centralized dust collector. Proper duct design is perhaps the least understood topic related to dust collection, and it is critical that you study on this to get it right in your shop. I would argue that many of the products that are sold in this category are not up to the task of removing.

Let the dust collector “do its thing”
Proper ductwork is all about providing a network that allows air to be pulled from each tool individually at ample velocity, and moving enough air volume to remove both the chips and the very fine dust produced. The primary enemy of ideal dust collection is static pressure. In applied terms you can think of static pressure as the force that restricts air flow. The things that increase static pressure in dust collection include smaller ducts, longer distances, bends in the pipe and flexible tubing, so we will focus our efforts in minimizing those things that materially increase static pressure in our systems.
Dust collection duct design is a complex science, and I am going to intentionally oversimplify it because I think the basics can be lost in the gory detail, and by following a few basic guidelines it is easy enough to achieve air flow that is “good enough”. Toward my goal of oversimplification, I offer the “D.O.G. Simple” method of small shop dust collection ductwork design:
– D = Direct; keep your duct runs as short as possible. Longer runs create higher static pressure and poorer performance.– O = Open; bigger diameter pipes allow more air movement and introduce less static pressure, assuming you have a dust collector that can move air fast enough through the pipe.
– G = Gentle; to make it easier for dust to travel through pipes, use smooth wall pipes (minimize flex pipe), and when turns are necessary, make them as gentle and gradual as possible.
First, choose your weapon: PVC or Metal
First you need to choose a material for your duct work. Either PVC or metal will work well. If you choose metal, you should use 26 gauge or thicker so it doesn’t have the potential to collapse under suction pressure. Also, consider spiral pipe which is more durable and easier to seal, although more costly. The HVAC piping in most home centers is 30 gauge or thinner, so it is not a good choice for dust collection. You will need to buy from either a dust collection vendor or a HVAC vendor who carries heavier gauge ductwork. Buying local might provide savings due to the high shipping costs of large pipes.
If you choose PVC, be aware that there are different thicknesses on the market, and you should go with the thinnest stuff you can find. This will generally be referred to as “Sewer and Drain”, sometimes referred to as ASTM d-3034 or ASTM D-2729. The thinner and lighter the PVC, the easier to work with. Do not get schedule 40 or 80, because these are expensive and heavy, and all of the extra mass is wasted on dust collection which places extremely low pressure on PVC relative to plumbing applications which generally dictate schedule 40 or 80. To maximize your air flow, focus most of your design efforts around 6″ pipe, sometimes 4″ when you need to, but nothing smaller than that for stationary tools.
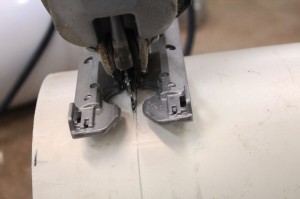
I use PVC because I find it to be much cheaper in my area, and I prefer working with it over metal. But if I didn’t have good access to PVC pipe and fittings, I would be comfortable going with metal as well. To cut PVC I simply use a jig saw with whatever wood cutting blade I happen to have on the saw, and it zips right through it.
Does PVC need to be grounded (or can it be grounded)?
These are hotly debated topics all over the internet. I have never heard of an actual example of a fire resulting from static discharge, but there is a potential that you may get static electricity shocks from your PVC duct system if you live in a dry climate. If this is your situation you can find many suggestions around the internet for grounding your PVC ductwork. I have never gotten a shock in 10 years of running PVC ducting in two different shops, so I have never bothered with grounding mine.The D.O.G. Simple Method in Detail
“D” is for Direct.
Make your duct runs straight and direct with as few turns as possible. Arrange your tools in such a way that the bigger dust producers (table saw, planer, etc.) are closest to the dust collector, as airflow will be greatest on your shortest runs. One common mistake is to run ductwork that follows the perimeter of the room, which requires longer runs and more turns in the ductwork for some tools, and performance suffers as a result.“O” is for Open. Size matters in dust collection. If your duct is too small, you won’t move adequate air volume to remove fine dust, but if it is too large, you won’t get sufficient air speed to remove anything. Therefore it is important to have your duct layout in mind when you buy your dust collector, and have your vendor suggest a model that can deliver enough suction at your tools. If you have chosen a dust collector with enough suction for your shop configuration, then the simplest approach with PVC is to run 6″ pipe wherever it is feasible, and 4″ pipe wherever you find it necessary. That means you will likely have to modify tool ports on some tools, which I will discuss a bit later in the article. It is not that hard, and it is well worth the effort. With metal ducting there are additional sizes available, and you can make more gradual steps down to potentially squeeze a bit more performance out of your system, but if you have appropriately sized your dust collector, you will be able to derive adequate air flow using 6″ and 4″ pipes.
“G” is for Gentle. The goal is to make long gentle transitions so that dust doesn’t slow down too much going around curves and through reductions in pipe size. Pretend you are designing a race car track, and you want to keep the cars going at high speeds into the turn, because once they slow down it is hard to get them moving fast again, and we want to avoid a pileup of cars, or in our case, dust. Specific choices that help promote gentle dust paths include:
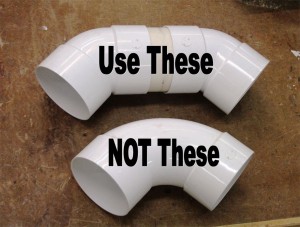 45s not 90s. Rather than a short radius 90 degree turn, incorporate two 45 degree bends with a section of straight pipe in the middle, which will allow the particles to scream right through the turn. If you can find elbows that are specially designed as “long sweep” elbows, you can use these, but they are not commonly available in my area.
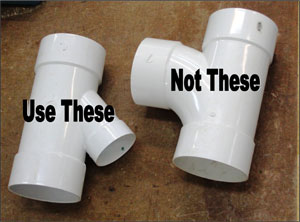 Wyes not Tees. For the same reason as the elbows discussion, when you need to split the pipe into multiple runs, use a wye fitting rather than a tee, followed by a section of straight pipe, and then another 45 degree turn if necessary. Again, this will allow the dust to move through here without slowing down as much and potentially building up in the pipe over time. I have particularly found this beneficial for my table saw, where I routinely get longer pieces (thin rips that fall through the throat plate) pulled through the ductwork.
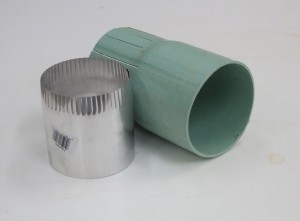
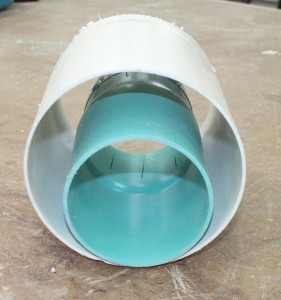
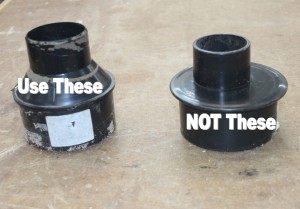 Tapered vs. abrupt reducers. When you need to drop down to a smaller duct size in line, use a reducer with a smooth taper rather than an abrupt reduction. This will promote better air flow and reduce turbulence in the pipe.
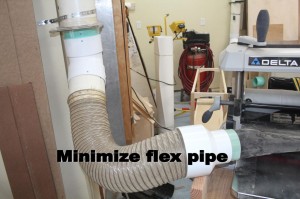
Minimize the flex pipe. Run hard pipe as close to the tool as possible, and use just the flex pipe you need for convenience in case you need to move the tool. Also, choose a good quality flex pipe with smooth interior walls that was designed specifically for dust collection. Some of the cheaper stuff I have used is extremely rigid, making it terrible to work with. Good flex pipe is expensive, so I am sufficiently motivated to minimize it for that reason as well.
Other ducting suggestions
Extra ports. When you set up your ductwork consider installing additional ports at logical locations for possible future expansion. It is easier to do it now rather than pulling your ducts apart later. You can add a blast gate so you are ready to go, or simply place a cap on the pipe which is a bit cheaper. This can also provide a nice cleanout in a convenient location should something ever get lodged in your ductwork.
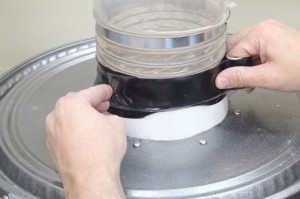
Seal the joints? If you use PVC, particularly 6″ where there is so much overlap at the joints, you shouldn’t need to seal most of your joints. In a couple key areas, such as where the duct work connects to the dust collector, I use X-Treme tape to seal the joint. This tape does not leave glue residue, so when you rework your ducting it is easy to remove and does not require cleanup. I don’t like using duct tape, or caulk, on ducts as I feel it is not necessary on PVC. On metal you will likely need to seal the joints to minimize leaking.
Add screws wherever needed to secure joints. On vertical runs, and some horizontal runs where connections are slightly loose, I put a couple #8 x 1/2″ self tapping sheet metal screws into the joint to hold it securely. These are easily removed when rearranging ducts.
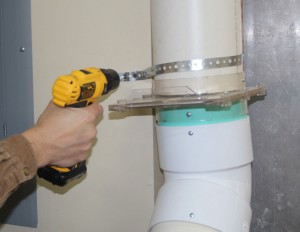
Attach ducts to a stud using plumber’s strapping. Regular old metal plumber’s strap provides an effective and economical means of securing ducts to your walls and ceiling. Attach using 1-1/4″ drywall screws. A couple straps per 10 feet of pipe should be adequate to hold everything solid.
Blast gates. There are many options out there. If you use metal ducts, you should use metal blast gates. I use some metal ones on my PVC ducts as well because they are more durable than the cheap plastic ones. If I were starting from scratch I would use the blast gates from Clear Vue Cyclones for all of my 6″ ducts, because they are far better quality than the cheap plastic ones, and they provide better air flow because they sit on the outside of the pipe rather than the inside. I have also seen plans for shop made blast gates using PVC and plywood which are quite cool, but I haven’t been able to justify the time to build these.
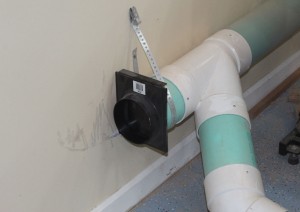
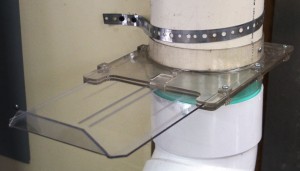
Tool ports. I encourage you to accept the fact that most tools come with insufficient tool ports. In the last five years or so, this seems to be improving, but is still not great. Keeping in mind that ideally you will place a 6″ port as close to where the dust is being produced as possible, and I have never purchased a tool that had a standard 6″ port, or even an optional one for that matter. So, you will have to make your own ports, and in some cases, cut holes in your tools to accommodate the port. The picture shows a shop made 6″ port on a jointer, with a drill stuck in it to illustrate the massive size. That port allows massive air movement, and allows my dust collector to pull everything that is not attached to the tool.
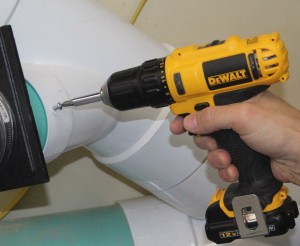
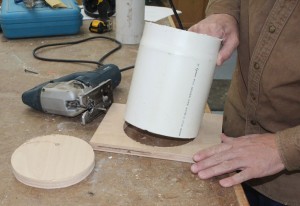
 Simple to make. Take a 6″ piece of PVC, set it on a piece of plywood or MDF, trace a line around the outside of the pipe, and cut the hole. Set the PVC in the hole and caulk it on the outside. Then place ” foam weather stripping around the perimeter of the plywood, and use sheet metal screws to attach to your tool. If the stock port opening on the tool isn’t large enough, or isn’t there, use a jigsaw with appropriate metal cutting blade to modify or create the opening.
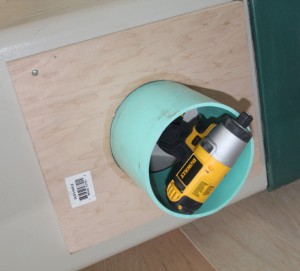
Quick disconnect with standard PVC coupler. Here is an effective ways to make quick disconnect fittings for 4″ and 6″ PVC. Use a standard PVC coupler to slip easily over the opening on your shop made tool port. Then insert your flex pipe into the other end of the coupler. I have found this to be a perfect fit on both 4″ and 6″ ducting, requiring only a pressure fit to stay on, with little noticeable air leak. If the fit is a bit loose, you could use X-treme tape or duct tape to hold it solidly and seal it. I like these much better than commercially available quick disconnect systems, plus I have not seen commercially available quick disconnects for 6″ ducting. With a good system for quick disconnect, it is simple to share a duct between two tools if you prefer, and it allows you to keep your flex hose runs shorter to minimize static pressure because moving a tool for cleaning, maintenance, etc. only requires a simple disconnect process.
Summary
If you want to dive into more detail on this topic, some of the dust collection vendors offer guidelines and services in this area, and independent researchers such as Bill Pentz provide extensive information on this topic as well. For most small shop environments, however, I am confident that if you follow these basic guidelines to design your ductwork and power it with a dust collector that is capable of pulling through an adequate volume of air, you will be pleased (or even amazed) with the performance.
Once designed your system to deliver enough air flow, the next thing you need to think about is how to best corral the dust at each tool. Some tools provide adequate dust collection ports, while others (most) don’t and you will need to devise your own enhancements. In a separate article I will walk through the dust collection design at each tool in my shop to help you complete your dust collection system design.
Watch the next newsletter for specifics on how I optimized dust collection at various tools in my shop.
Photos By Author
Source:
X-Treme Tape, Self fusing silicone rubber tape 20 ft. roll, $14.99
800-867-8968

is aluminum flexible pipe a good alternative to steel
Thank you for your advice
It was interesting in learning a few more tips and tricks. I'm opening a shop and will be doing this in the next couple of weeks, Thanks
Good article, good suggestions. But I have a 2 questions; 1) If your DC intake port is roughly positioned in the "middle' of your wall, which way would be better to run your lines. On the floor?, on the ceiling?, or same level as the intake port? 2) if you do run your trunk line (main line) on the ceiling or in the middle should you include a slight angle on the run like you would a sewage drain? I believe that to be a drop of 1/4"/ft.
I just installed a dust collector with a 7" OD pipe, how do I hook it up to a plastic system? all I can find is 6 inch pipe.
I have a small shop and will only be using one tool at a time, I would like to run ducts for a central dust collection system though What size hp would you recommend for that, my whole shop is 18x22’ so none of the runs can be super long, I was thinking of getting a 2hp from harbor freight to hold me over until I could afford a cyclone would that be a good idea? Or would it be better to wait till I have a enough for a cyclone and then run bigger pipes for the whole system?
I Just moved and starting to put together my shop in the basement. I have not finalized tool locations so I am flexible on arrangements and laying out a collection system. Any recommendations on layout of tools to minimize cost?
Helping my son set up a wood shop in a makerspace. He has a Delta 50-761 (2100 cfm, 2hp, 8 in-H2O static pressure drop). The max run is 57' horizontal plus 10' vertical. I've gone through the design calcs, and it looks like it will work with 4" ducting, but after reading this article I'm wondering if he should relocate the DC to reduce the lengths. Problem is, the wiring is all done for the DC in a certain place in the shop. Any thoughts?
I ran 6” sdr pipe 24 feet from my jet dust dog (1100) DC to my miter saw box and noted a Velocity ft/min of 950. Do you recommend reducing the run to 4” to the miter saw box to increase air velocity? I have 6” from the DC to my table saw and drum sander which is 5 feet from my DC but the miter saw is 23’ feet away. Where do you recommend I down size to the 4” line?
Very good info