 CLASSIC THONET CHAIR NEEDS A REPAIR. A client contacted me with an interesting request. He had owned a classic Thonet brand laminated wood chair for a number of years, which he bought at a garage sale for a song. Everything seemed to be in good condition when he bought it, however upon further inspection, the back-rest stay had delaminated and cracked. He asked me if I could make a new one to replace the old, broken one. He’d searched for years to find a woodworker to tackle the task and was thrilled when I accepted the challenge.
 A CRACKED LAMINATION! The stays looked fine, but a close survey revealed a stress crack where the screws held the stay to the seat. The crack didn’t go all the way through the lamination, however the seat back flexed too much, and was in danger of breaking at any time.
 ROLL GLUE TO LAMINATE THE FORM. The first step in fabricating a bent-wood lamination is to make a form blank. For this project, I made a two-part form that sandwiches my laminations during glue-up (Some complex bent laminations might require three or four segments to direct clamping pressure in the right directions). I measure my back-rest stay and make my form blank slightly bigger. I roll thin layers of glue between 3 sheets of 3/4″ MDF and lay them on top of each other.
 USE SCREWS TO CLAMP THE FORM. Keeping parts aligned while clamping is a real trick. The sandwiched layers of MDF need to be held tightly together, and screws are the perfect solution. I drill four pilot holes through the three pieces of MDF, then drive four 2 inch long screws while putting pressure down on the pieces of MDF.
 TRACE THE SHAPE OF THE STAY. Bent laminations tend to spring back, or open up, just a little bit after the glue dries. I clamp the original seat-stay on each end to make the radius of the bend just a little tighter than the original radius. Then I trace the profile of the seat-stay onto the form blank.
 BANDSAW THE TWO PART FORM. Once the glue is totally dry, the form blank is ready to cut into the male and female parts on the bandsaw. I feed the blank slowly, and stay just inside the lines I’ve drawn. The more accurate the cut, the less clean-up I’ll have to do on the sander. If I needed the form for more than one piece, I would brush it with a coat of polyurethane to protect if from absorbing moisture during glue-up.
 CUT VENEER INTO STRIPS. To cut my individual laminations, I marked a straight line on veneer with a rule and cut it with a utility knife. While it is possible to make your own veneer on a bandsaw, I prefer to buy sheets of un-backed THICK veneer from Certainly Wood out of New York. The quality is excellent and the veneers are available in many species and thickness. I bought enough 1/16″ thick veneer to make three bent laminations, just to be sure.
 ROLL GLUE ONTO THE LAMINATIONS. OK, here’s the crux of this project! It is crucial to set up this step before rolling glue onto the laminations. I do a dry clamp first to make sure none of the pieces crack while bending over the form. Next, I lay all of the pieces down and fill a rolling pan with glue (I prefer Titebond III, which has 15 minutes of open time) thinned with about 5% water. This helps the glue roll quickly and smoothly. I put on a pair of latex gloves to protect my hands from glue when I’m loading the wet laminations into the form. The phone is off the hook and I take a deep breath. I flip the first piece over and quickly roll an even coat of glue over the entire face. I do the same to the mating face and flip it on top of the first piece. I continue until there are no more pieces and then dump the roller into the pan. This is a mess! I grab the nine pieces and align them before I finesse them into the slightly closed form and begin tightening the clamps.
 CLAMP WHILE FINESSING THE LAMINATIONS. The pieces want to slide all over, and glue is dripping everywhere. Every two or three turns of the clamps I re-align the sliding laminations. Eventually, as I alternately tighten the clamps, the laminations mate with each other and glue begins squeezing out of the top, so I know I’m getting a tight bond between laminations. Once tight, I can sit back and relax.
 REMOVE THE FORM. The moment of truth! I’ve waited about two hours, which is long enough for the laminations to bond tightly, but not too long for the laminations to permanently bond to the form. I crack open the form and the lamination looks great. It sticks a little bit to the female side of the form, but I rap it with a hammer and it breaks loose.
 THE ROUGH LAMINATION WITH WET GLUE. Once the lamination is removed from the form, I scrape the wet glue off of the table and the form, and then I let the glue on my lamination dry overnight. I can’t wait to clean this up tomorrow morning!
 MARK A LINE. Now I need to clean up the sides of the lamination. I lay the rough seat stay down on my bench and check to see if it sits square to the table top. Since it does, I scribe a pencil line along the bottom to define a straight line perpendicular to the face of the seat stay.
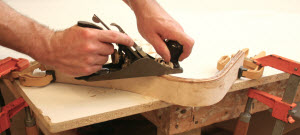 PLANE TO THE LINE. I don’t have access to an expensive workbench, but that doesn’t stop me from woodworking! I tighten small clamps to the ends of the lamination and clamp the clamps down to the table. I gently hand plane around the radius of the seat stay and plane flush to the line. This operation can be executed with a belt sander, too.
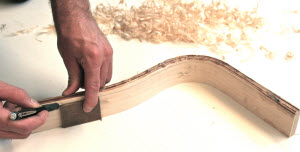 SCRIBE A PARALLEL EDGE. Once I have the first edge planed square, I strike a line to define the other edge of the seat-stay using a small block that is the same width as the original seat-stay. I flip the stay over and plane the second edge parallel to the first.
 TRANSFER HOLE POSITION. By laying the original on top of the new lamination, I can transfer the position of the holes as well as the gentle curve on the top of the seat-stay.
 BORE THE PILOT HOLES ON THE DRILL PRESS. Once the holes are marked, I use the drill press to bore out pilot holes for attaching the chair back to the seat-stay.
 ATTACH THE SEAT-STAY TO THE CHAIR. After matching and staining the seat-stays, I position the new stay and screw it to the bottom of the chair. I flip the chair over to make sure the seat back remains centered between the arms of the chair as I fasten the screws.
Photos By Author
Source:
716-655-0206
716-655-3446

Thanks,I enjoyed
Hi Seth Keller, THANK YOU FOR POSTING YOUR LAMINATION REPAIR PROCESS ON THE THONET CHAIRS. (WE HAD THOUGHT THE FABRICATION WOULD REQUIRE SOAKING WOOD AND BENDING WITH A HOT FORM SUCH AS WE'VE SEEN IN GUITAR BODY CONSTRUCTION.) WE HAVE 5 THONET CHAIRS WITH WHAT APPEARS TO BE THE SAME SHAPE SUPPORT, AND ALL HAVE DELAMINATED DURING THE PAST 60 YEARS OF USE IN OUR PARTNER'S WONDERFUL FAMILY LIFE. THEY HAVE MNOW PASSED ON AND WE HAVE INHERITED THE CHAIRS. WE LOVE THE CHAIRS AND WOULD LIKE TO Ask you whether you would consider making the replacement parts for us, or refer to a craftsperson who would be qualified and interested? We are located in Rockland County, NY.