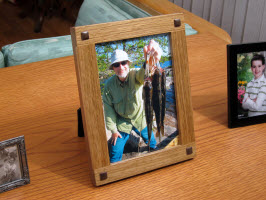
 So you got yourself in a bind and you still need to make a few last minute gifts for the holidays? This attractive, straight-grain rift-sawn white oak and walnut picture frame, with its decorative protruding plugs, is probably just what you’re looking for. Learning how to build a picture frame and finishing it will take you about 4 hours over 2 nights. To super simplify the construction, you start by buying a cheap picture frame from a department store. I went to Target and bought a “Room Essentials” brand “Style” frame, #074152037. For $8, I got the glass already sized, the back with it’s horizontal or vertical stand and wall hangers, and the turn buttons and bracket to hold all the “guts” in the frame. Go to your local Target Store and ask for that frame by its item number, or find another that will work. Just make sure you buy one that uses overlay turn buttons, and has a 1/8″ thick back. This simplifies the process when you’re learning how to build a picture frame.

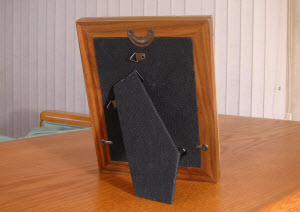
The picture frame’s back and glass are taken from a store bought picture frame, which makes building this frame much easier.
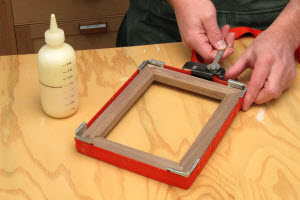
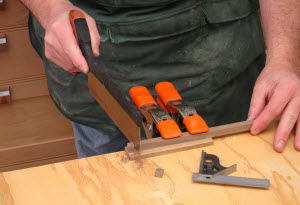
Assemble the mitered walnut frame. Use a band clamp or masking tape to hold the pieces together as the glue dries. Make sure the corners are tight and the frame is flat.
How to Build a Picture Frame
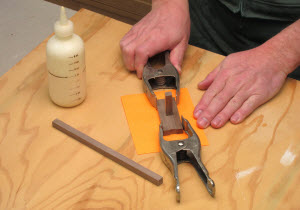
Cut the walnut frame pieces (A & B) to size (Cutting List) and miter their corners. Make the width of these pieces just a smidgeon (1/64″ to 1/32″) narrower than 7/8″. This will ensure the frame inside dimension is at least 5″ x 7″, so the glass and back will fit in your assembled frame. Double-check these dimensions. Glue the frame together (Photo 1). Sand the top and bottom of the walnut frame. Make the white oak frame front pieces (C), and glue them on top of the walnut frame (Photo 2). Sand the edges smooth and clean up any oozed glue in the rabbet. Drill the plug holes (Photo 3). Finish sand the frame and ease the sharp edges.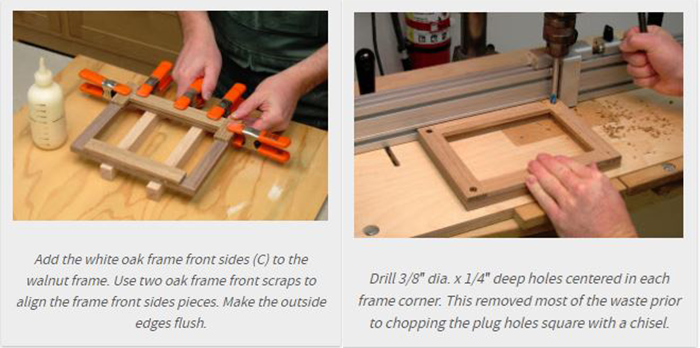
Make the square hole chopping jig from four pieces cut off the plug stock stick. Glue the pieces together using another piece to define the square hole in the jig’s center. Pull that piece out after the glue has set for a few minutes.
Making the Plug Stock & Square Hold Chopping Jig
Cut a 3/8″ x 3/8″ x 20″ piece of walnut to use for your plug stock and chopping jig. Accuracy is important; use a micrometer to confirm that the width and thickness are equal and visually inspect the ends to confirm the piece is square. Slightly larger than .375″ square is good to ensure the plugs completely cover the holes drilled in the frame face.Make the square hole chopping jig next. I devised this jig after my last attempt to chop square holes was less than 100% successful! The jig makes this task much easier and near foolproof. Cut two 3″long pieces and three 1-5/16″ long pieces from the plug stock stick. Make sure the ends of these pieces are absolutely square. Assemble the chopping jig (Photo 4) (Download the PDF of the exploded view of the picture frame and cut list at the beginning or end of this article). Sand the faces of the chopping jig to remove any glue.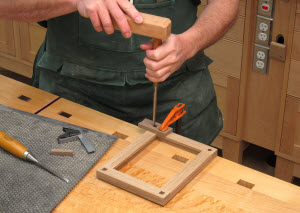
Chop the square holes using the chopping jog and a 3/8″ or 1/4″ wide chisel. Align, center, and square the chopping jig over each hole, then clamp it in place tight to keep it from shifting as you chop.
Saw the 5/16″ long plugs off the plug stock sticks. Two plugs are cut from each end. This allows you to make a “mirrored” look of the end grain when the plugs are set in the frame.
Make the Plugs and Finish.
Sand the ends of the plug stock stick, making them “pillow” shaped and smooth. I sanded a pyramid, then smoothed that using a foam sanding pad. Cut the plugs (D) to length (photo 6). Glue and tap the plugs in the frame. Be sure to orient the grain so they are mirrored images of each other. Apply two coats of clear spray lacquer. Make the backer (F) and filler (G). Make extra backers to fill the full depth of the frame rabbet if necessary. Remove the turn buttons and bracket from the store bought frame and attached them to your frame. Let the finish dry, wrap the frame, and put it under the tree! If you’re thirsty for more woodworking projects that will keep you busy, make sure to browse our site as we have plenty of options to keep you busy in the shop.Photos & Illustrations By Author
Download the Craftsman Style 5×7 Picture Frame cut list and instructions

This is great for its simplicity and retaining the A&C look. However, and making the construction even simpler and more sturdy, instead of using miters on the back pieces, reverse the rail and stile joints on the back pieces. This would eliminate the need for "accurate" miter joints as well. Just got a Lodge Certificate that will be in one of these. Already have the "five and dime" picture frame for the accessories.
Hi ... I really enjoy the instructions and information. Thanks so much. Meredith