Butter Board and Spreader Set

butter board and knife intro

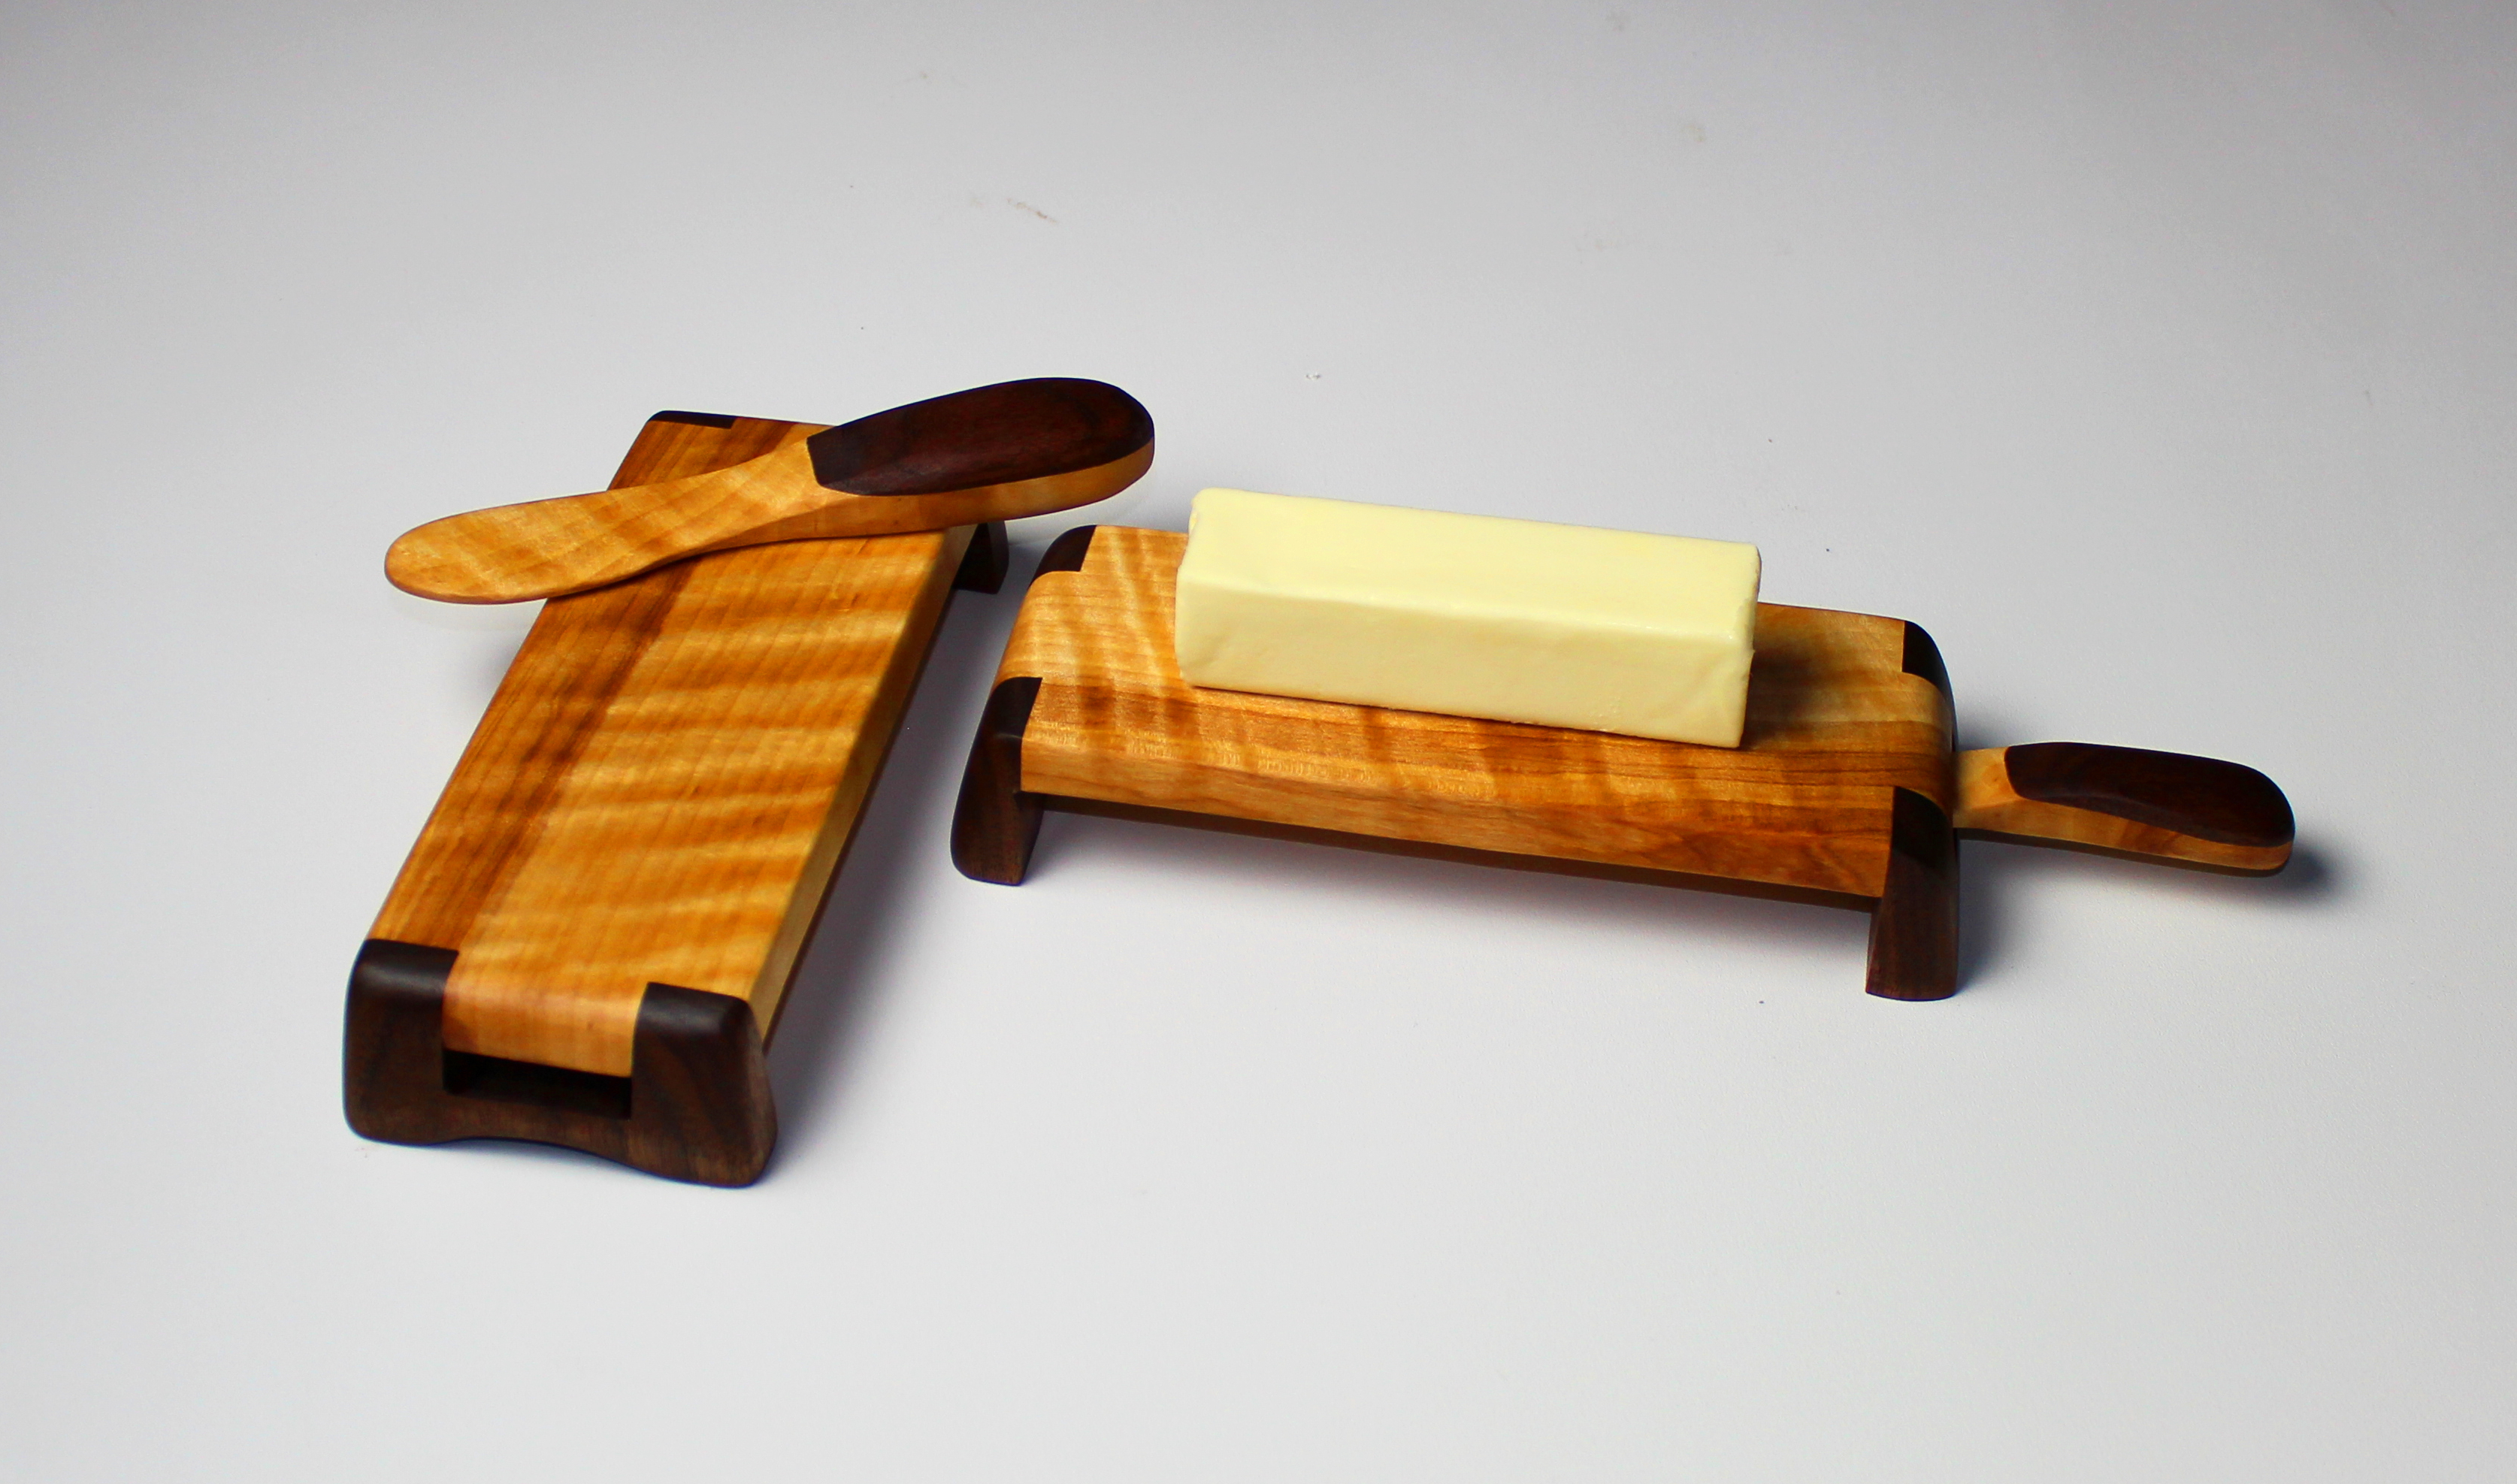
This butter board and spreader set provides a great accent to a special meal. From a woodworking perspective, it is easy to crank out a bunch of these in a single day, and the project also provides a great use for scrap wood.

The convenient on-board storage also provides a nice home for the spreader while not in use. The spreader also doubles as a handle that can be used to pass the set around the dinner table. This project is designed for batch production, and you can easily get caught up on your holiday “shopping” in a single day by utilizing each setup to make a bunch of identical parts.

Small projects like this provide a great use for leftover pieces of special wood such as the curly birch used here. For the base I used some small pieces of walnut that I salvaged from my scrap pile.

Let’s build the base first

butter board and knife - leg butter board and knife - top

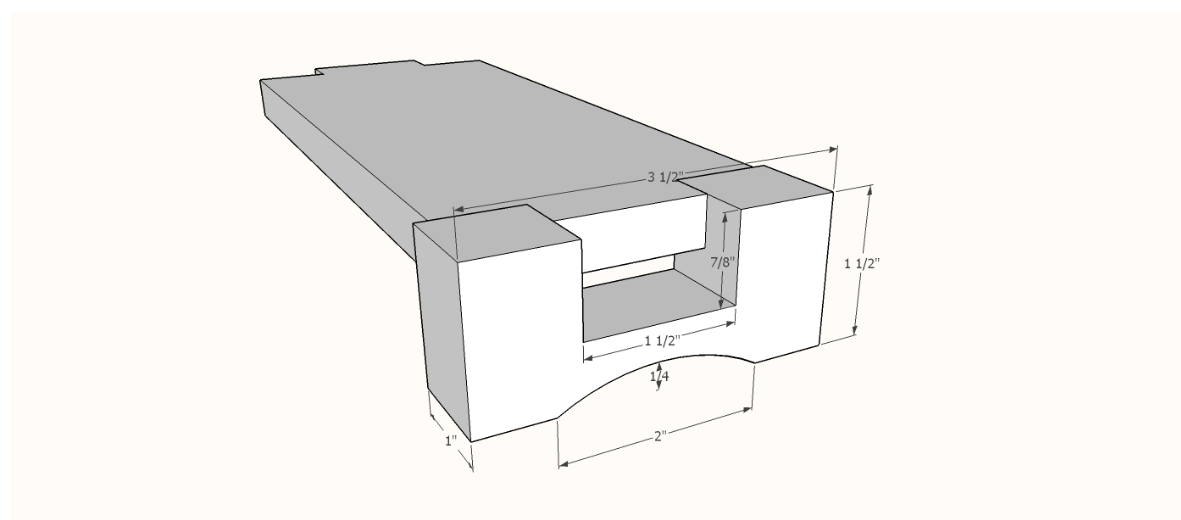
Note that the leg is extra thick, and projects beyond the tenon, to allow an angled cut being made later.
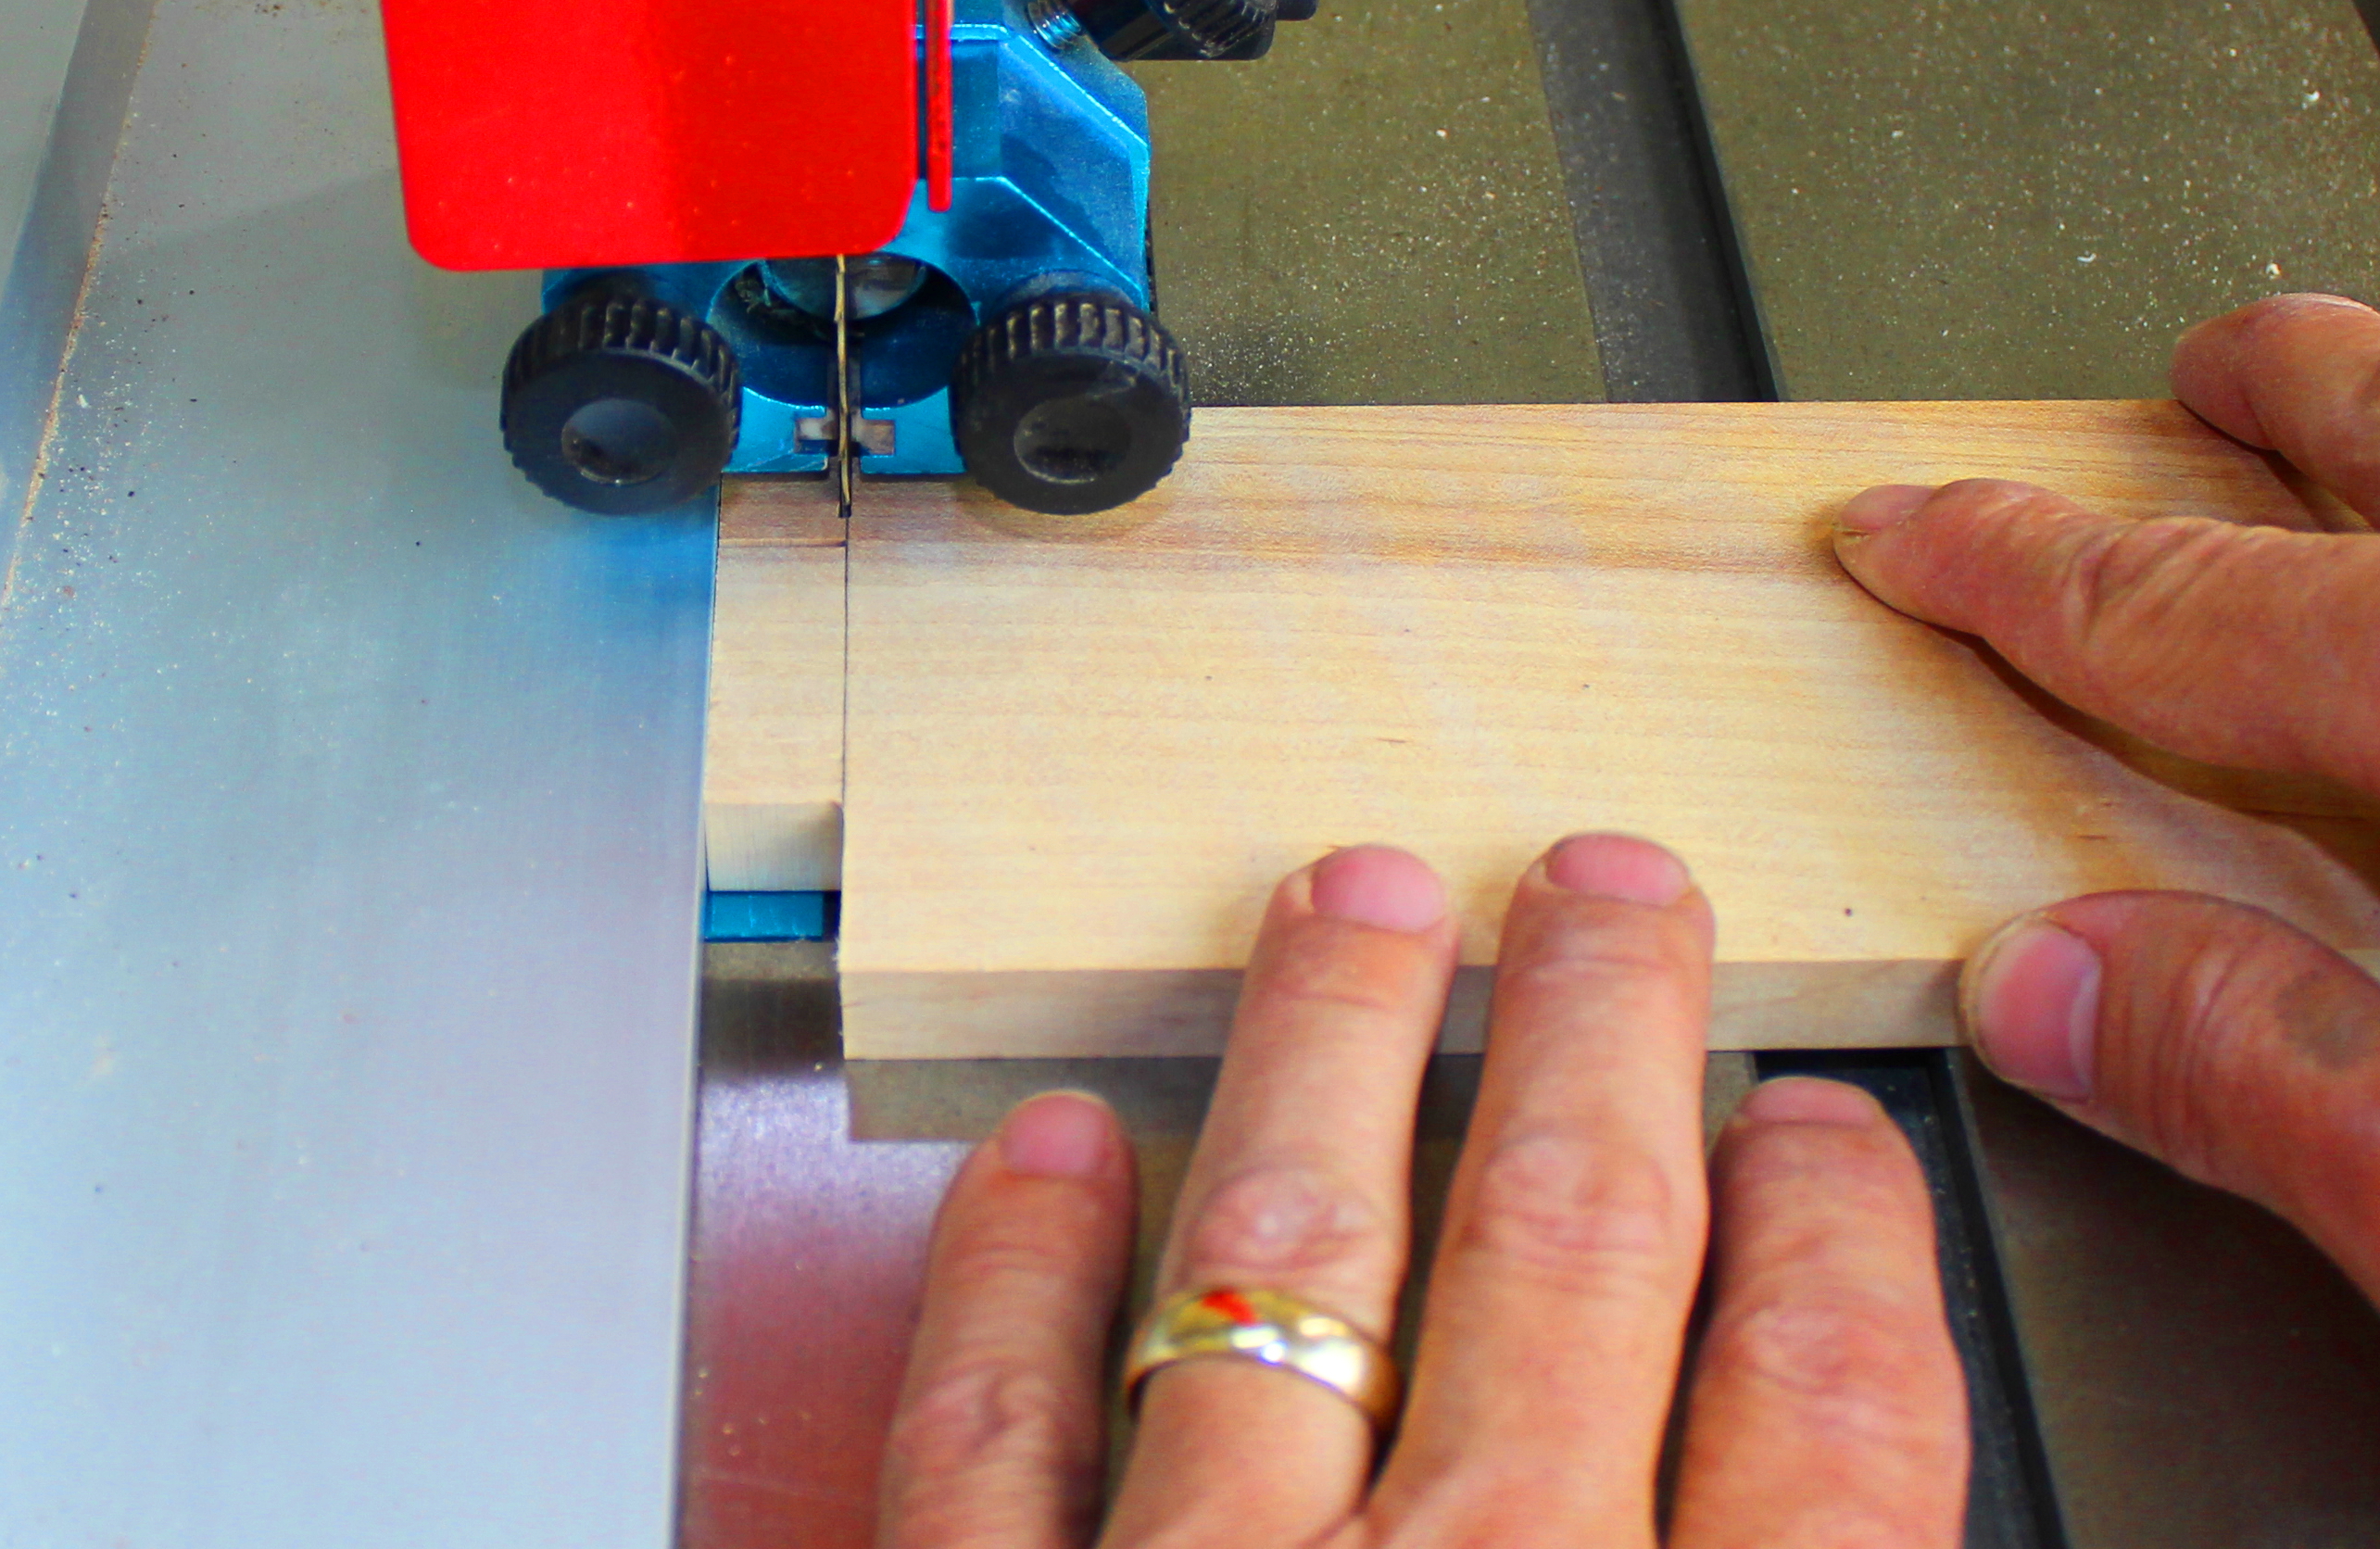
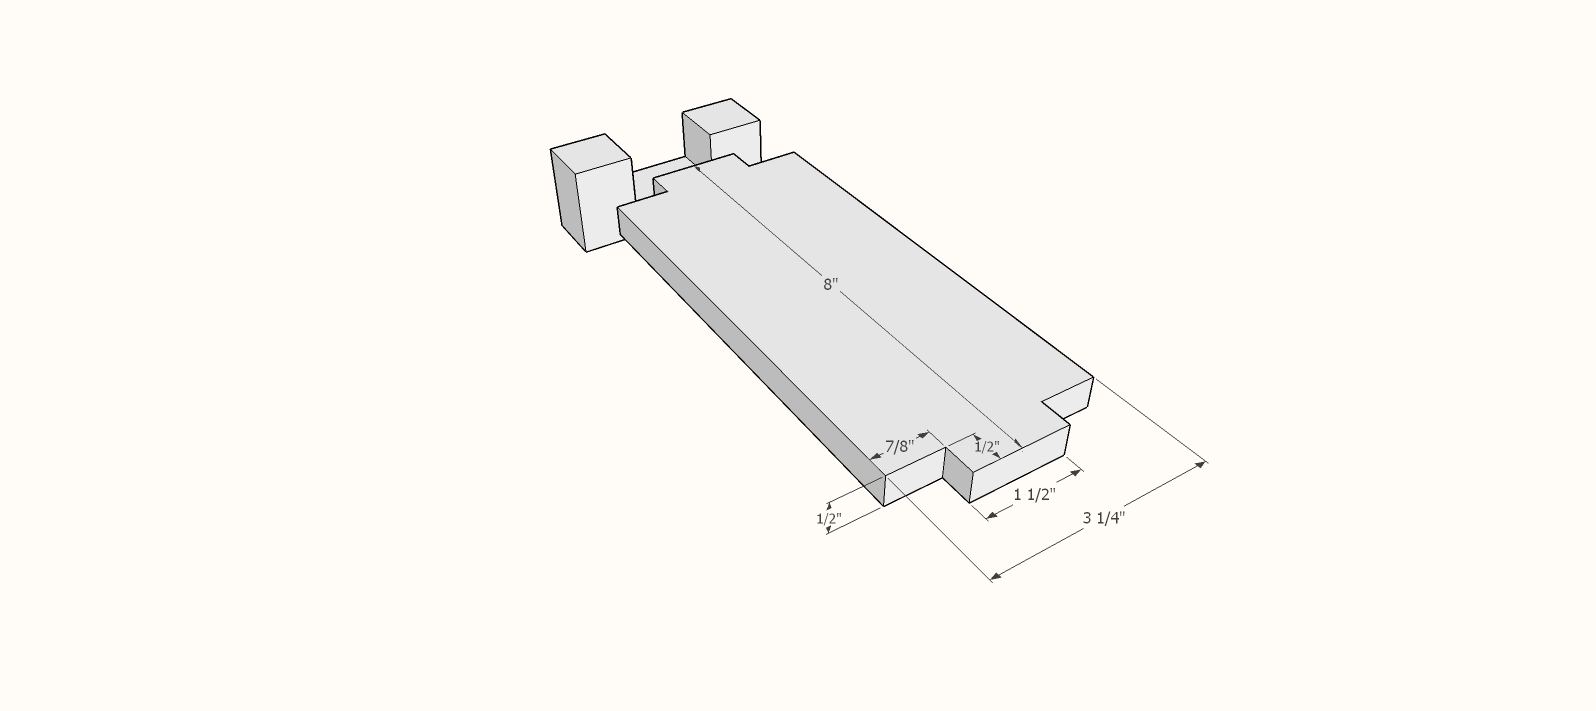
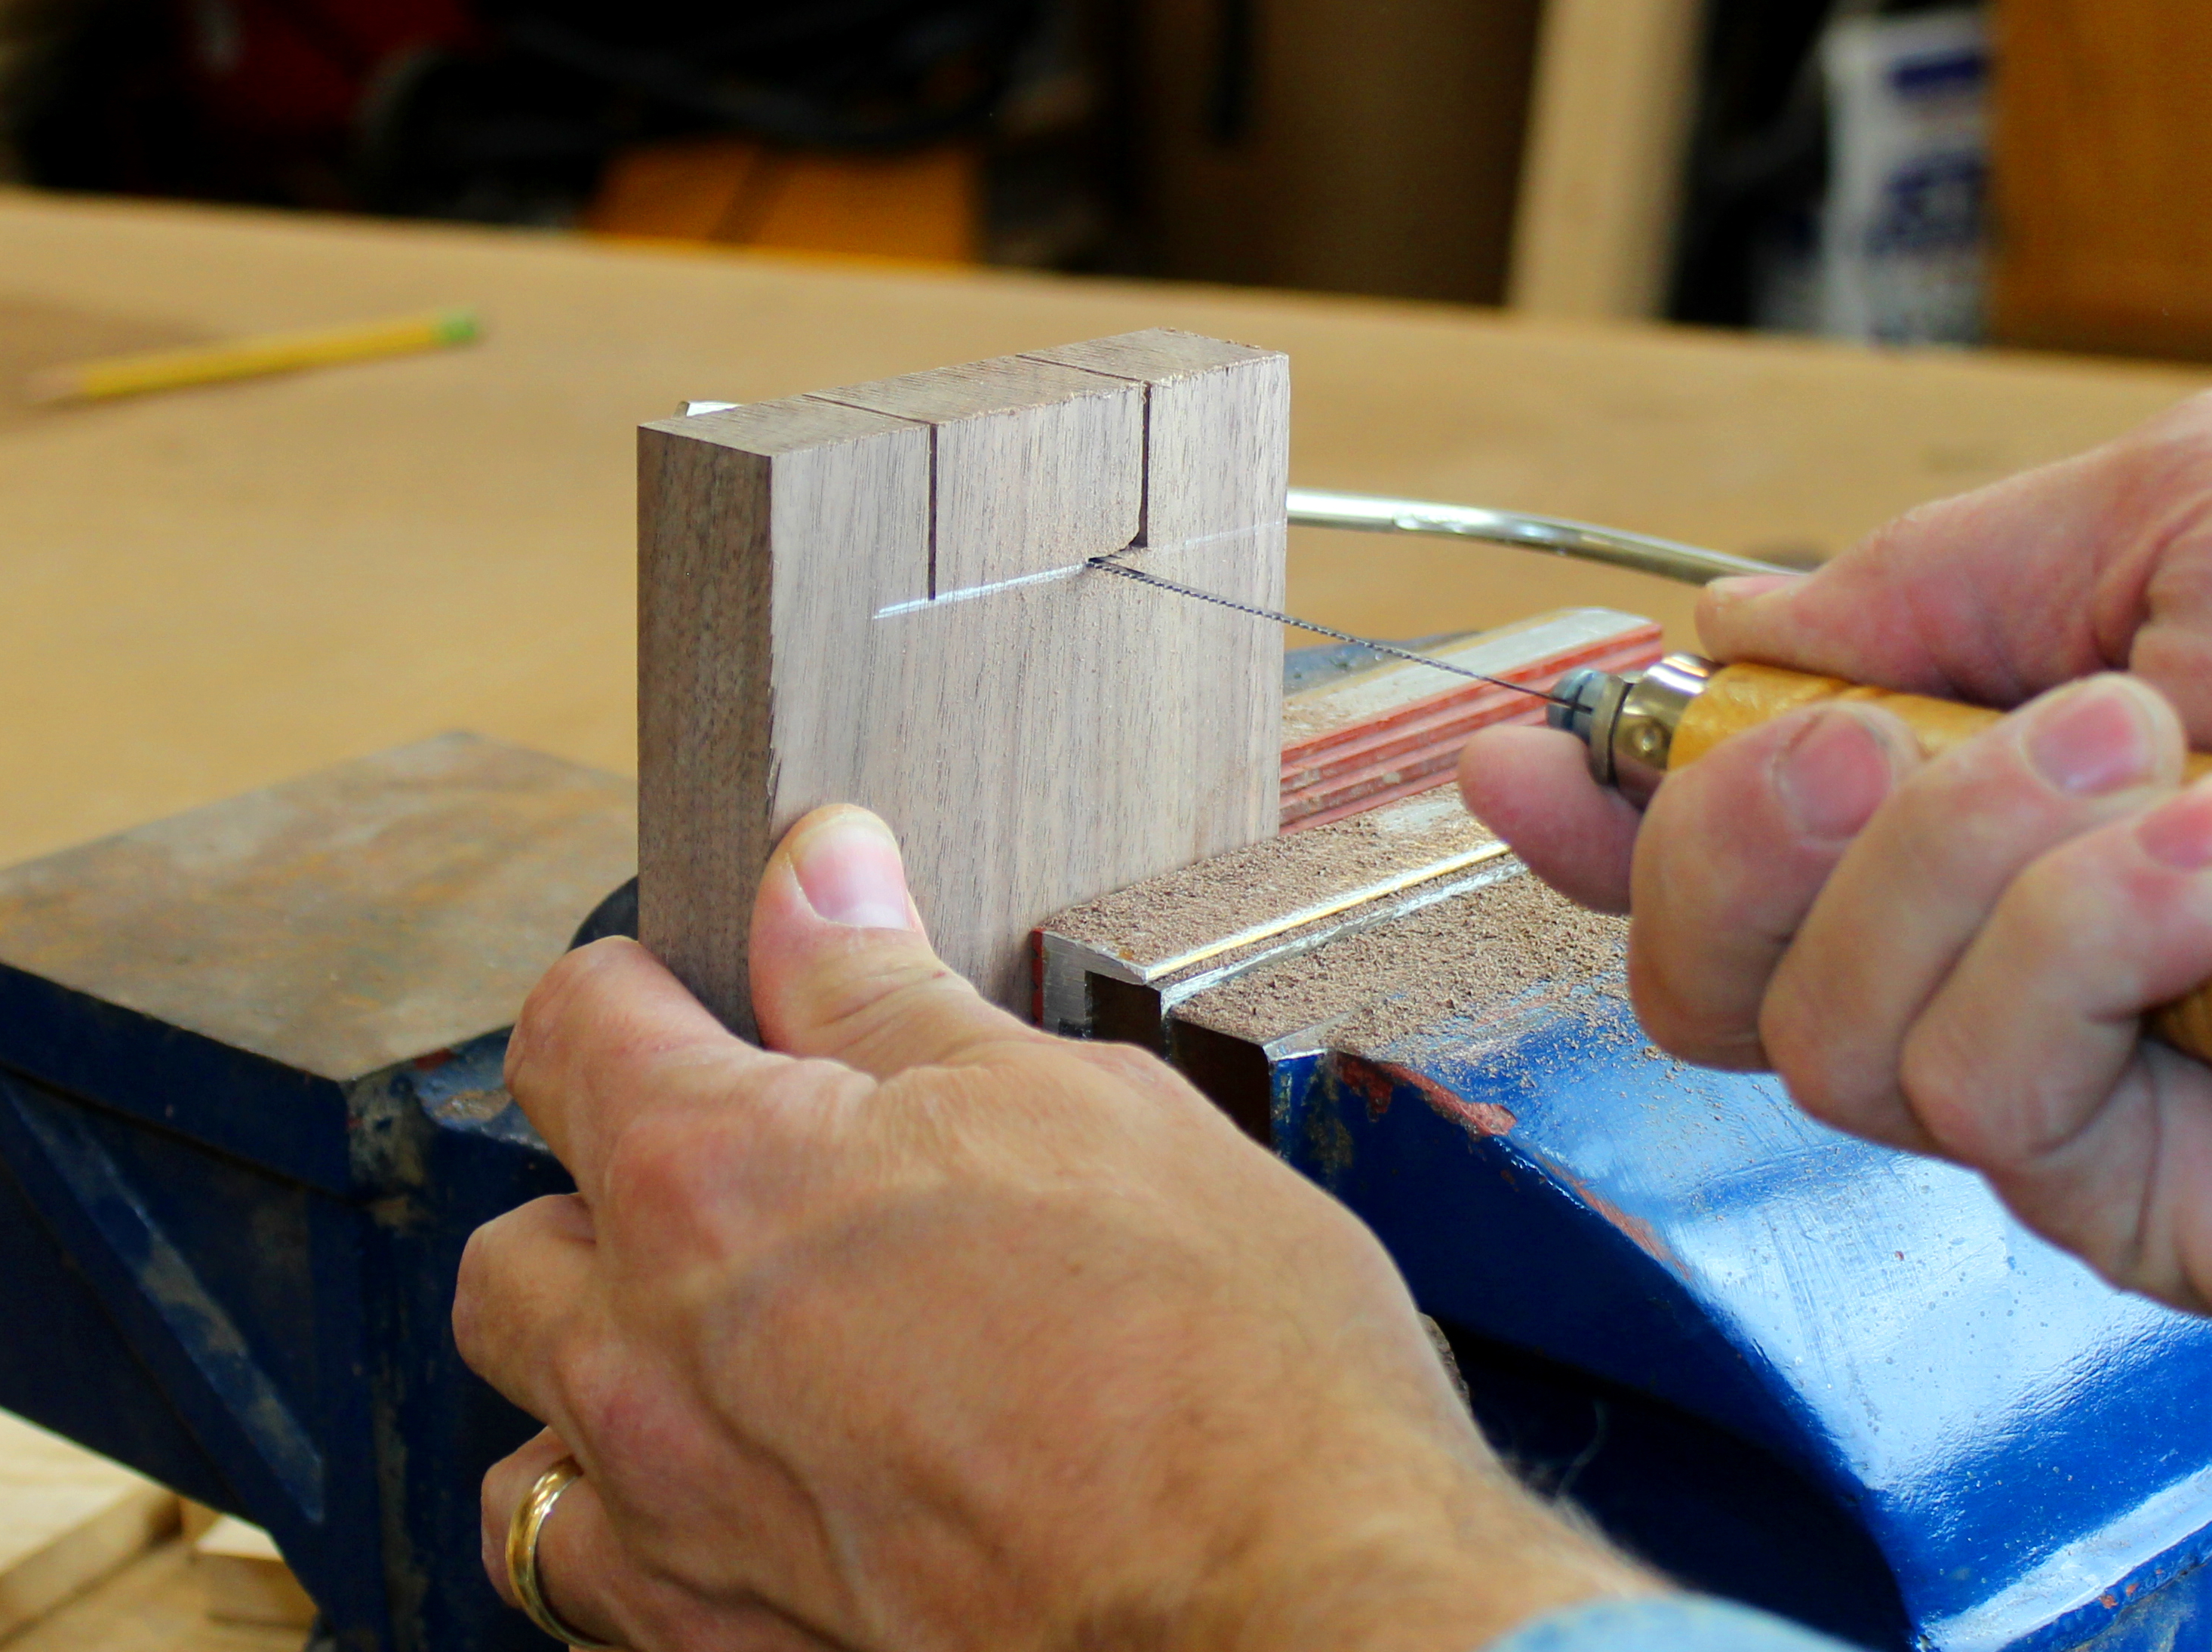
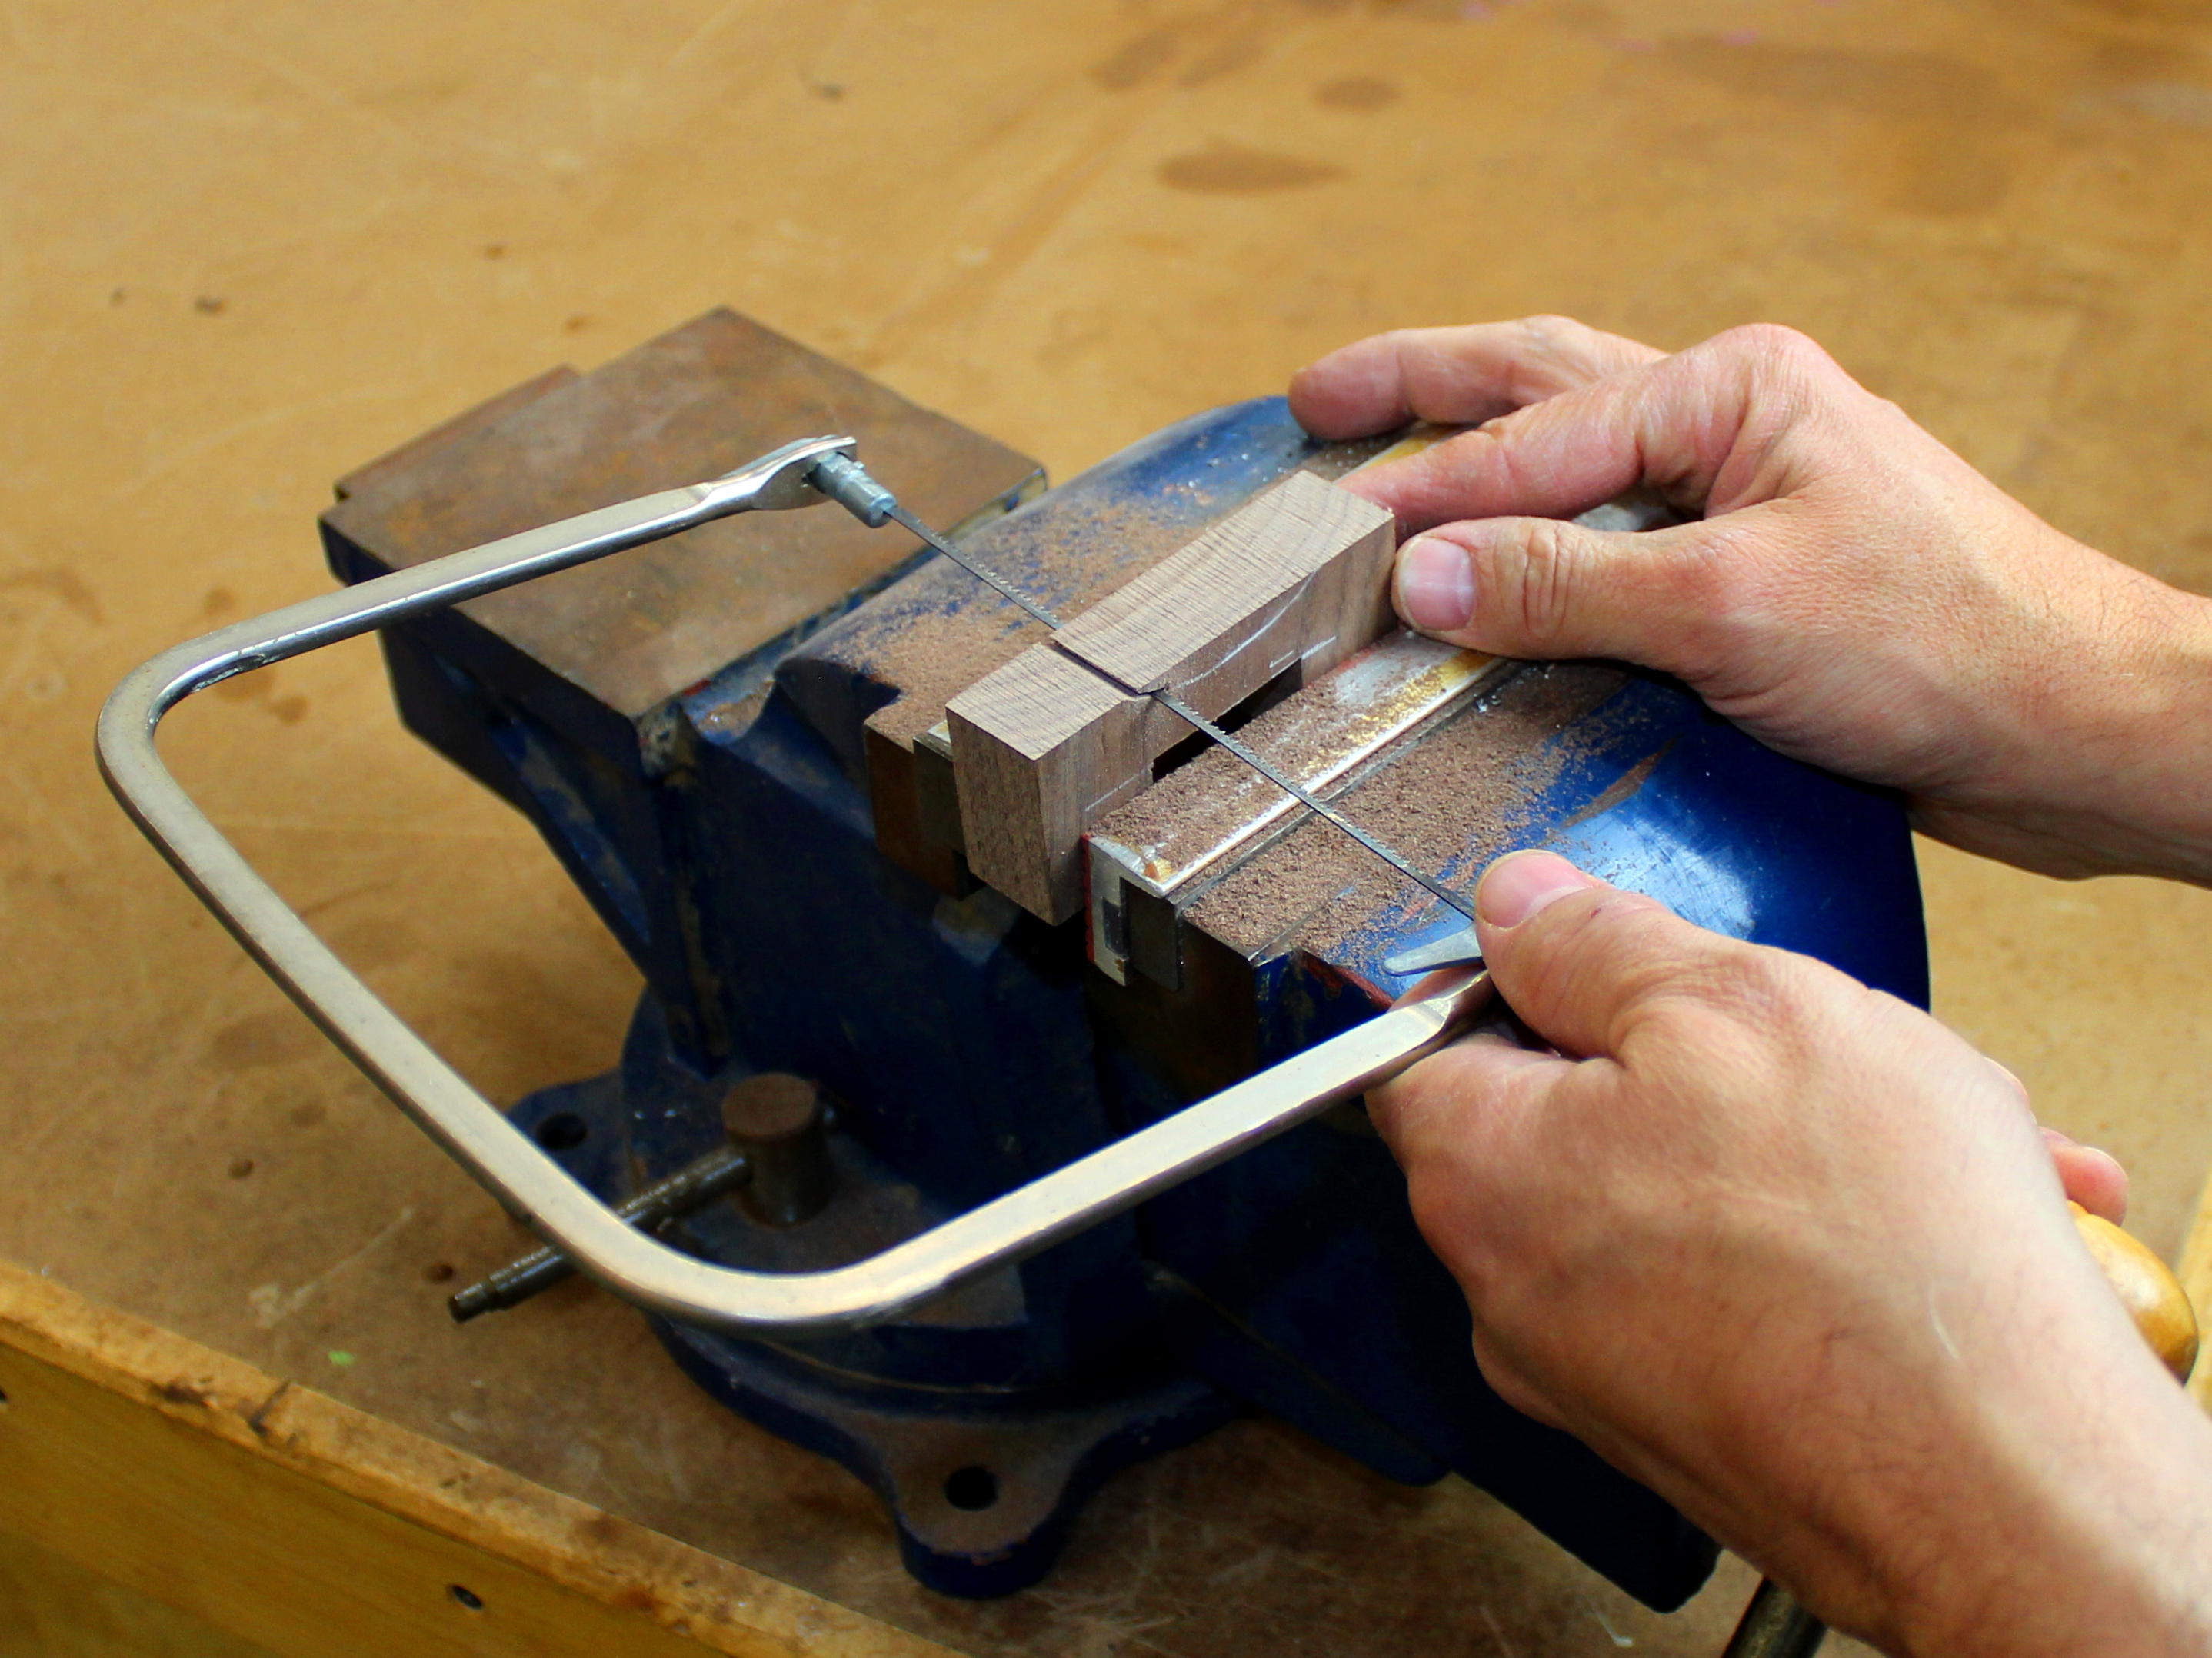
tenon cut on top

Cut finger joints

I used the band saw extensively on this project, as it provides clean cuts, accuracy, and good safety while dealing with small pieces. Test the fit carefully on scrap pieces so that you get the perfect fit on the finger joints. Once you get each setup dialed in, you can run a bunch of these relatively quickly. Careful setup on the band saw is key here. Take your time at each setup, and do not cut past your lines. Leave the leg pieces long for safe handling until the finger joints are cut and fitted to the top piece.

scroll cut

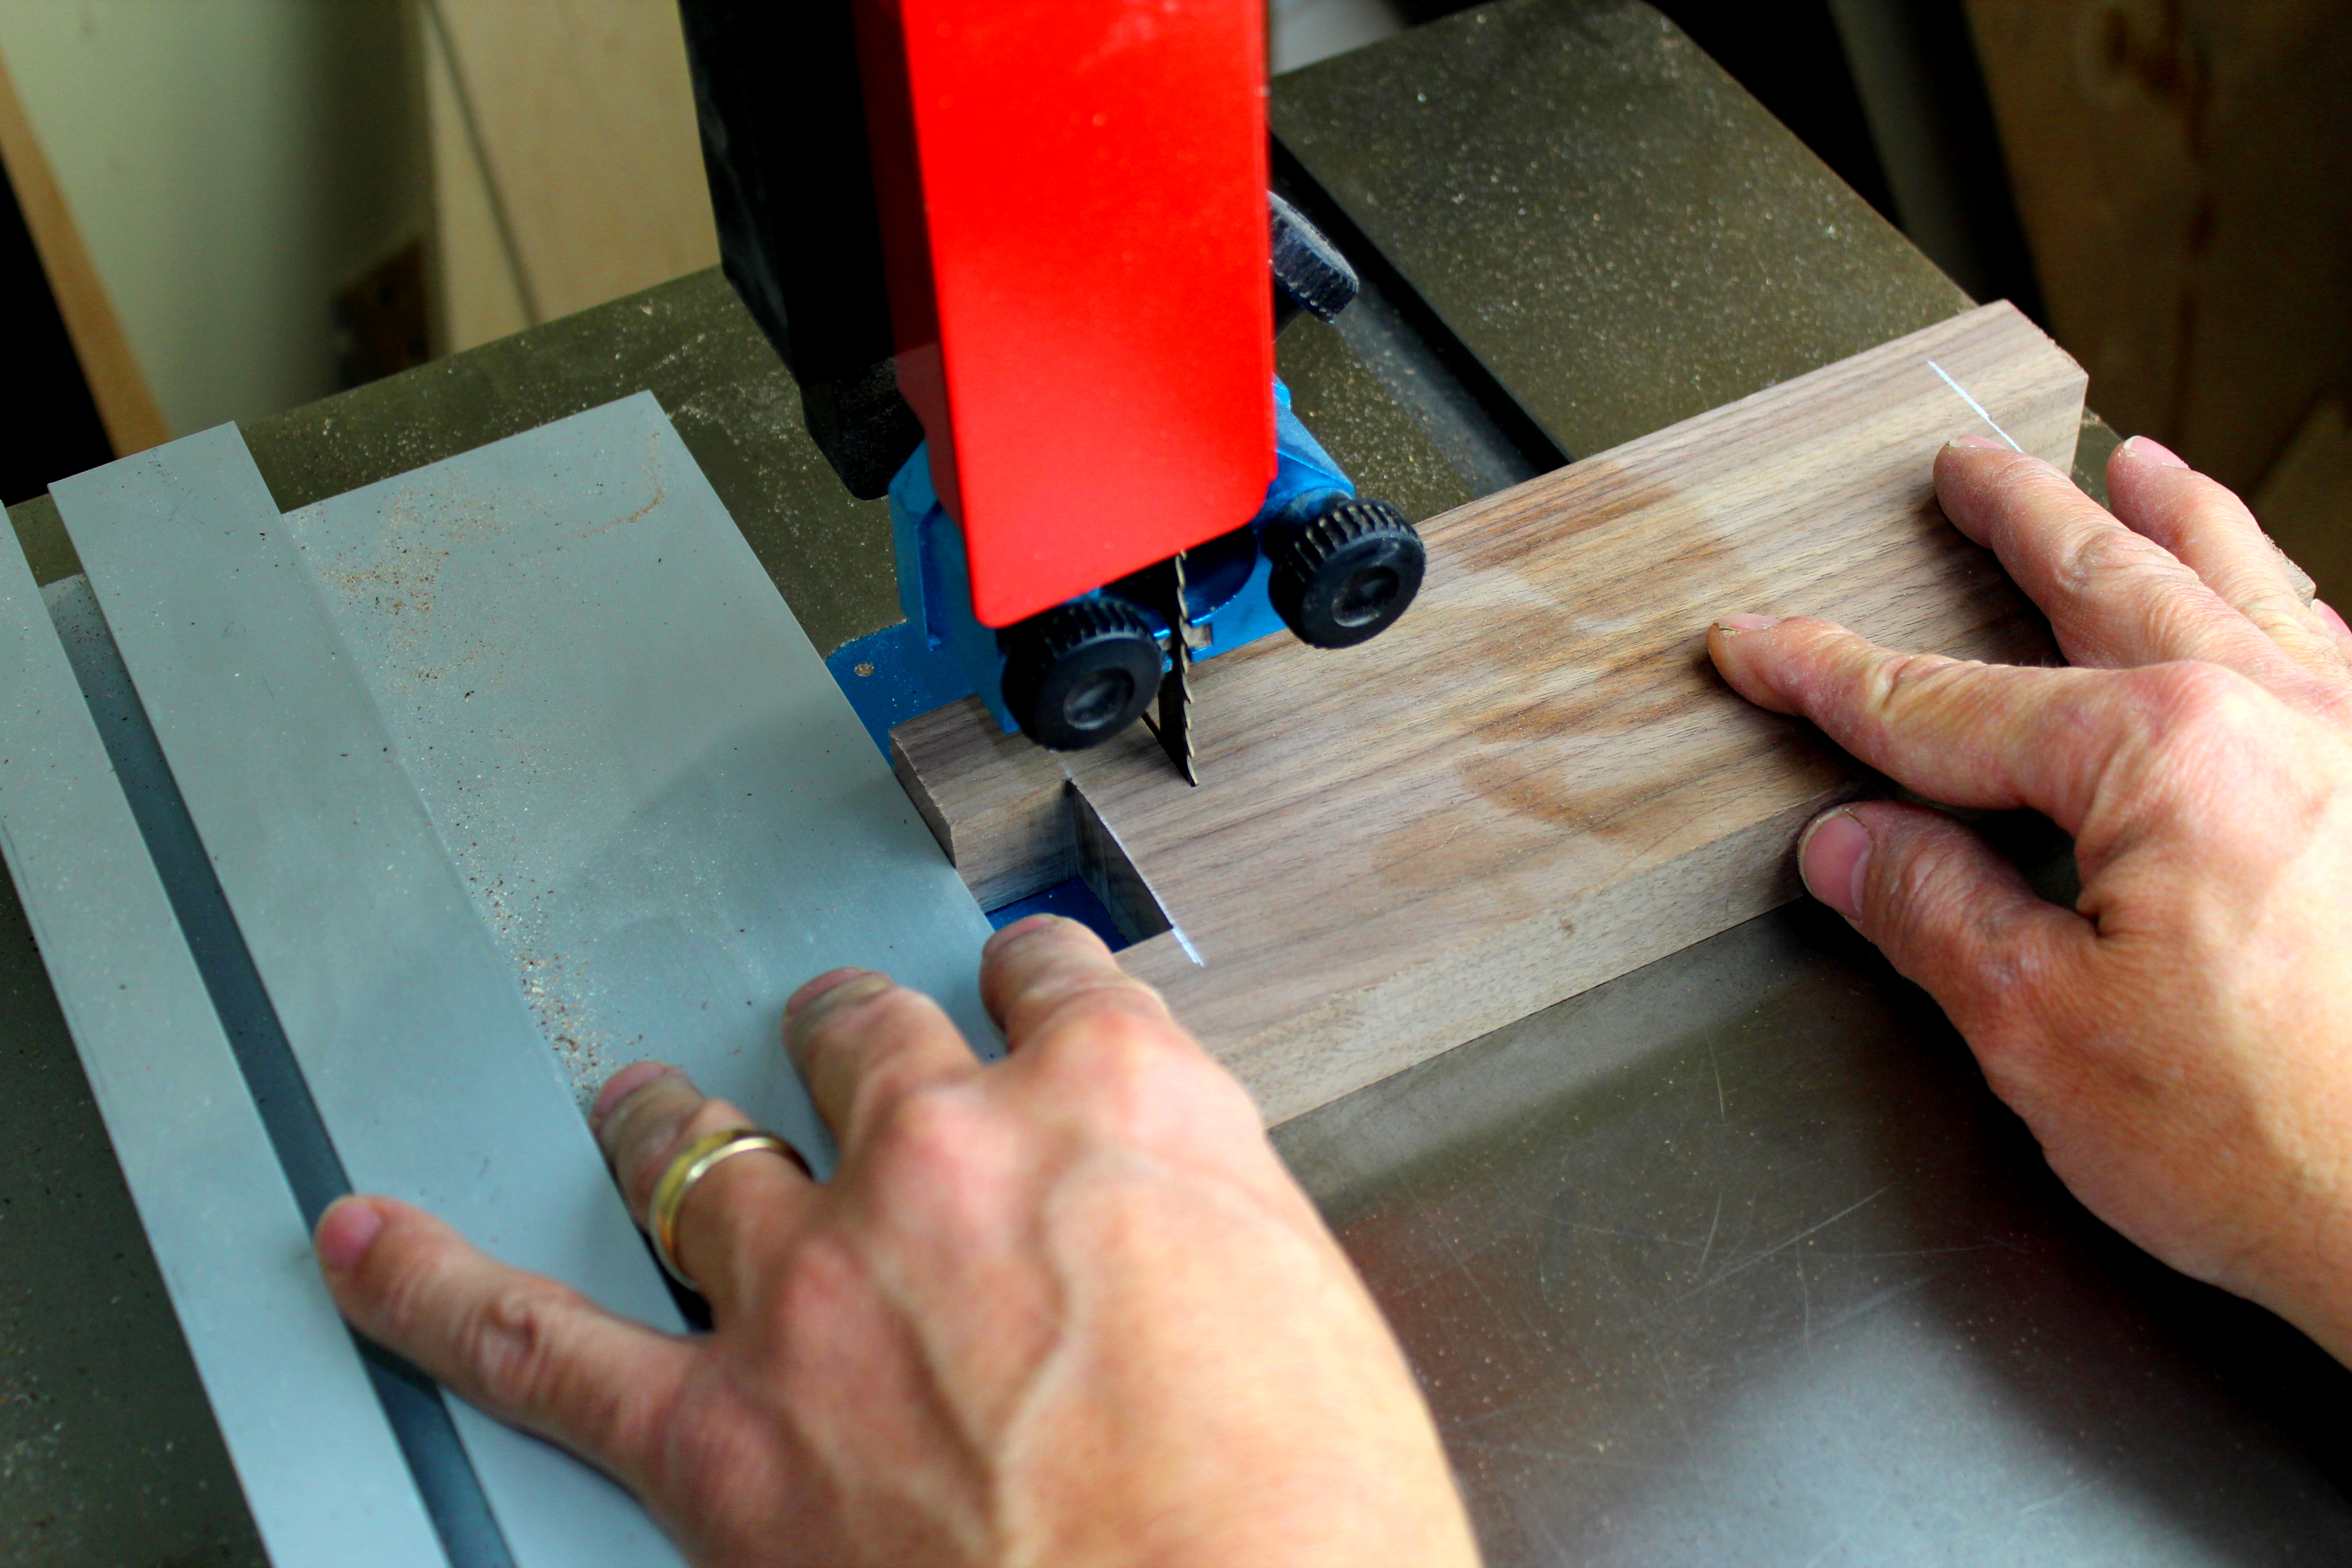
Remove waste on legs

Use a coping saw or scroll saw to remove waste, cutting carefully to each line. If you can get a good crisp line, then no cleanup will be necessary. If you need to clean up your cut, use a sharp chisel and pare straight down onto a sacrificial backer board.

cut off leg

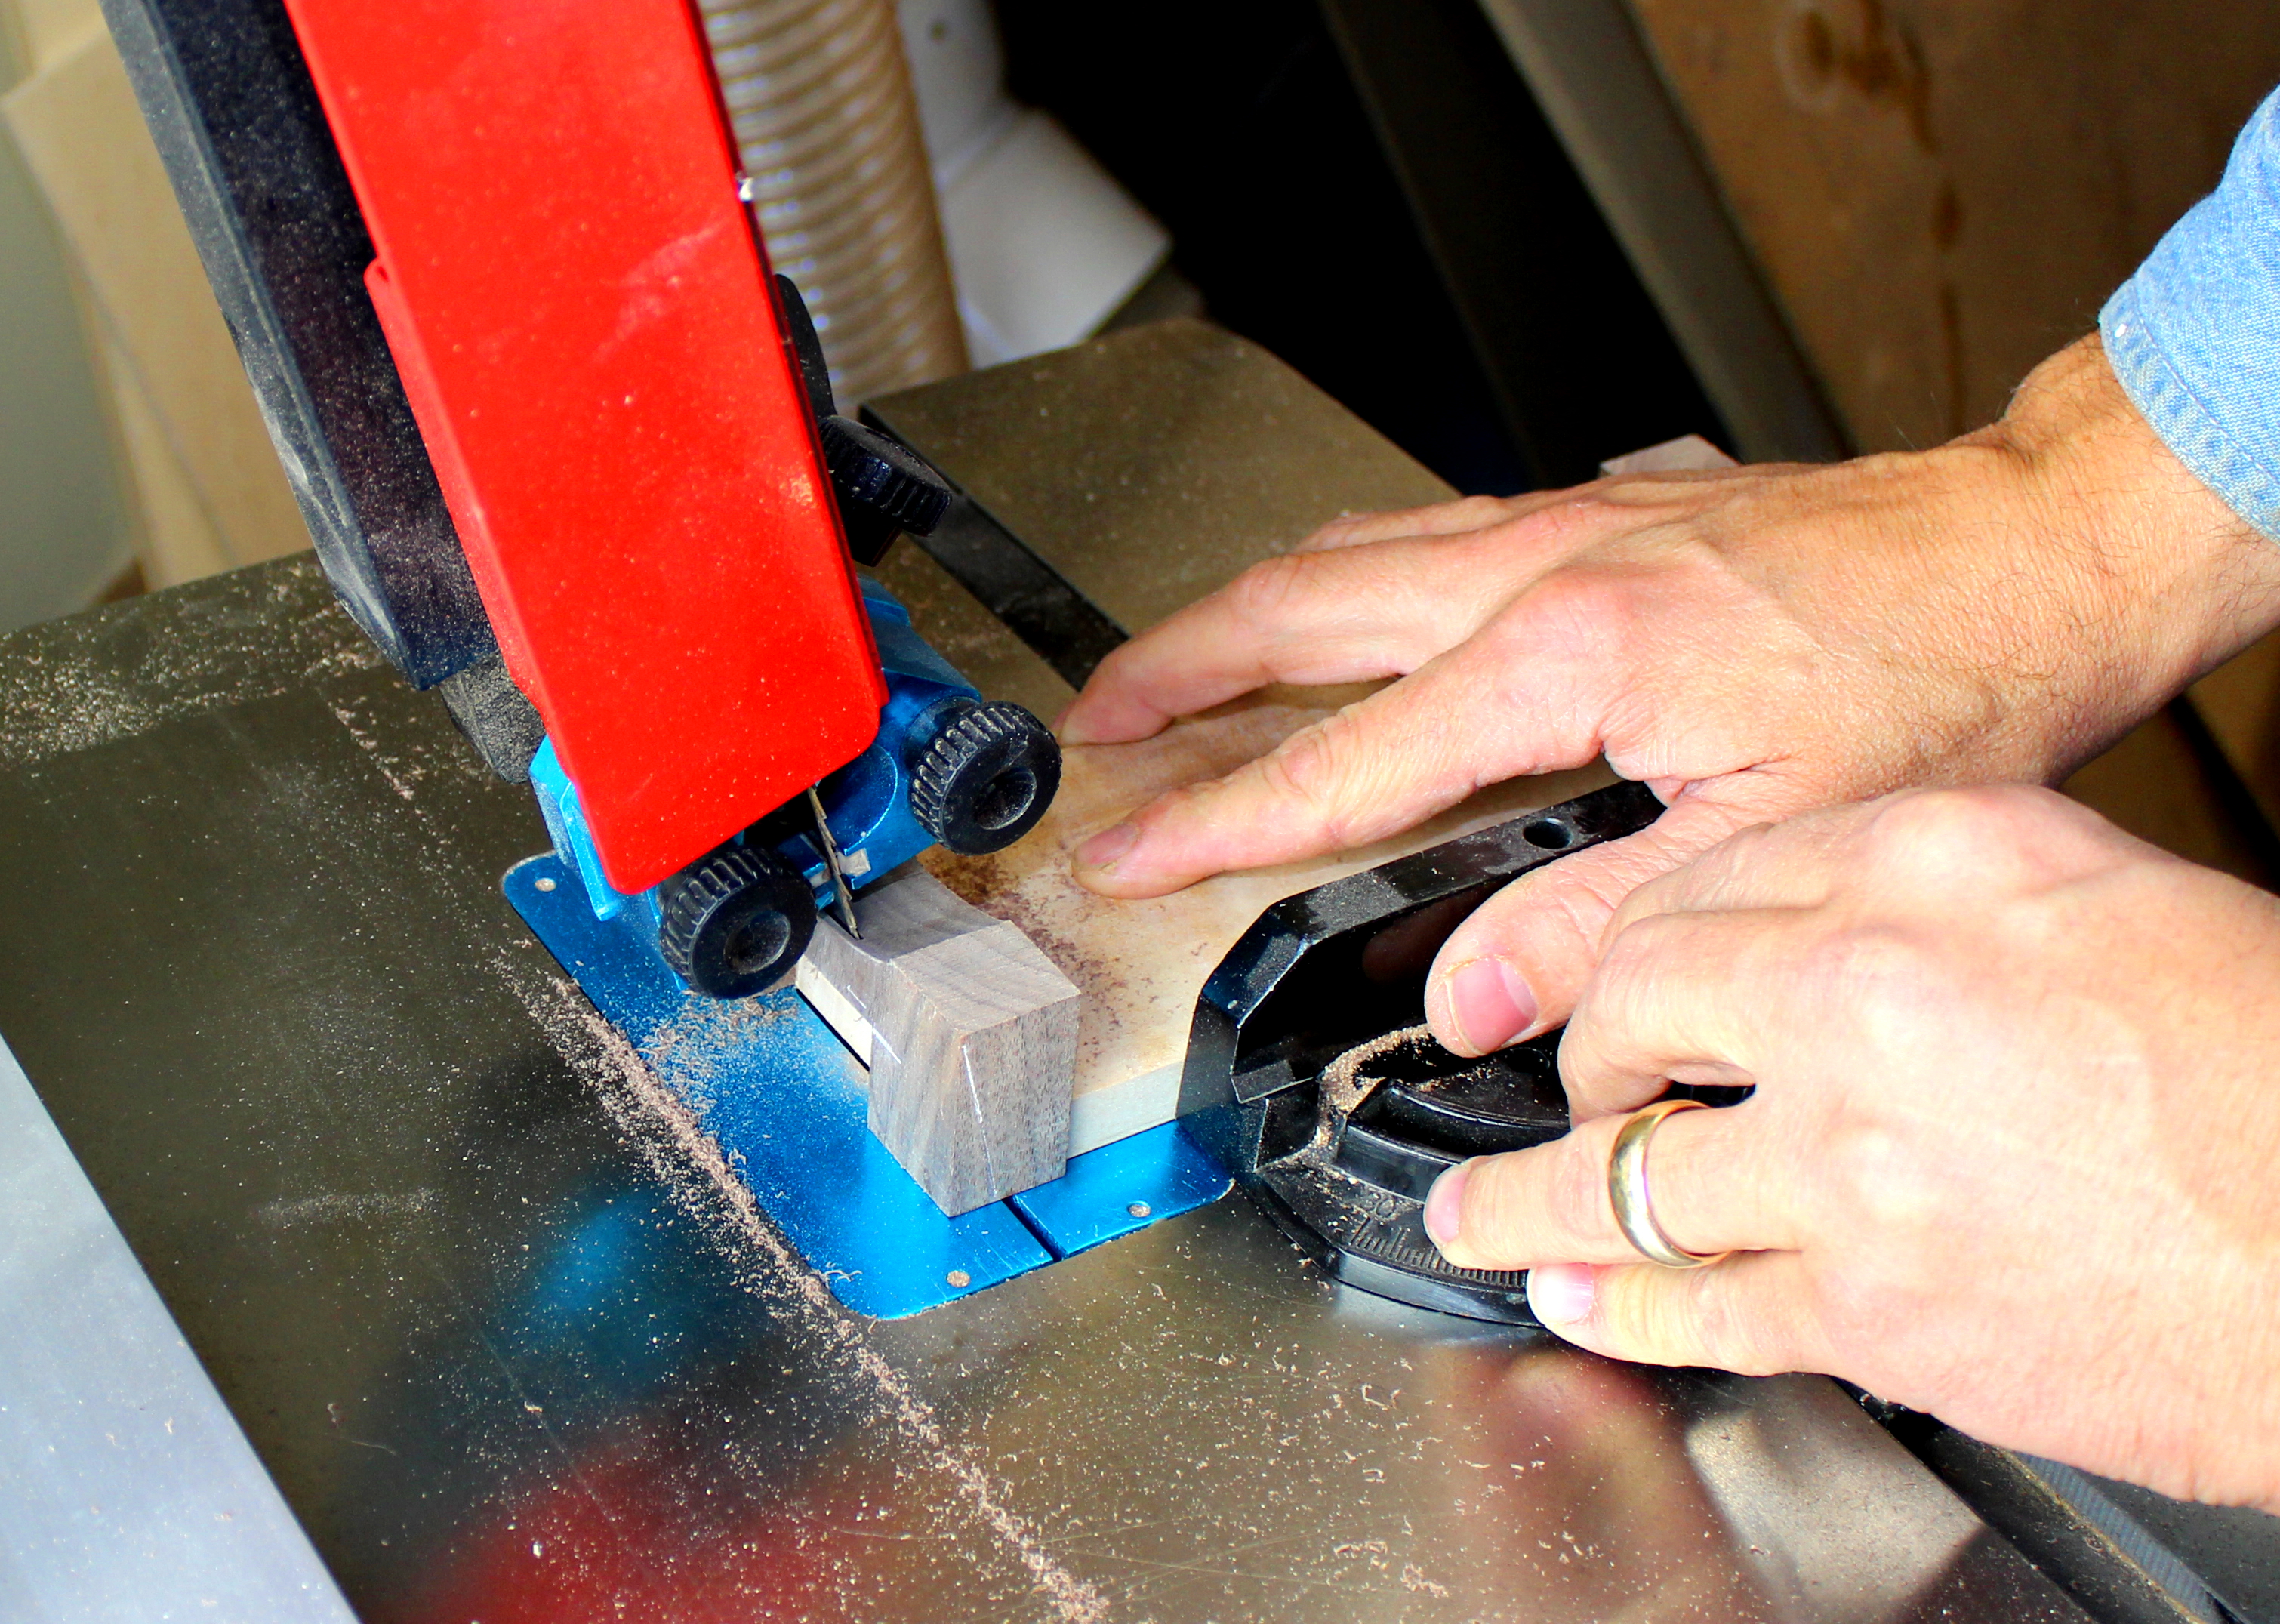
Cut the legs to length

Set your fence to 1-1/2” to get consistency in leg height.

cut arch on leg

Cut the arch

Using the pattern provided, or a coffee can or other round object, draw an arched line on each leg piece and cut using a scroll saw or coping saw.

glue up base

Glue and clamp the assembly

Put a light coating of glue on all mating parts, and clamp using minimal pressure. Be sure that the components remain square during assembly. Carefully remove glue from within the knife storage slot with a small screw driver and damp cloth.

cut angle on base

Cut tapers

Cut the ends at a 15 degree angle, with the angle tapering in toward the top. Cut the sides to a 10 degree angle, also tapering in at the top.

sand and shape base

Sand all surfaces

Sanding is an important part of shaping the final piece. Round over all edges to give the pieces a curvaceous appearance, to match the spreader.

Turning our attention to the spreader…

The spreader is a simple project, which starts with a two board glue-up, followed by some curvy cuts on the band saw.
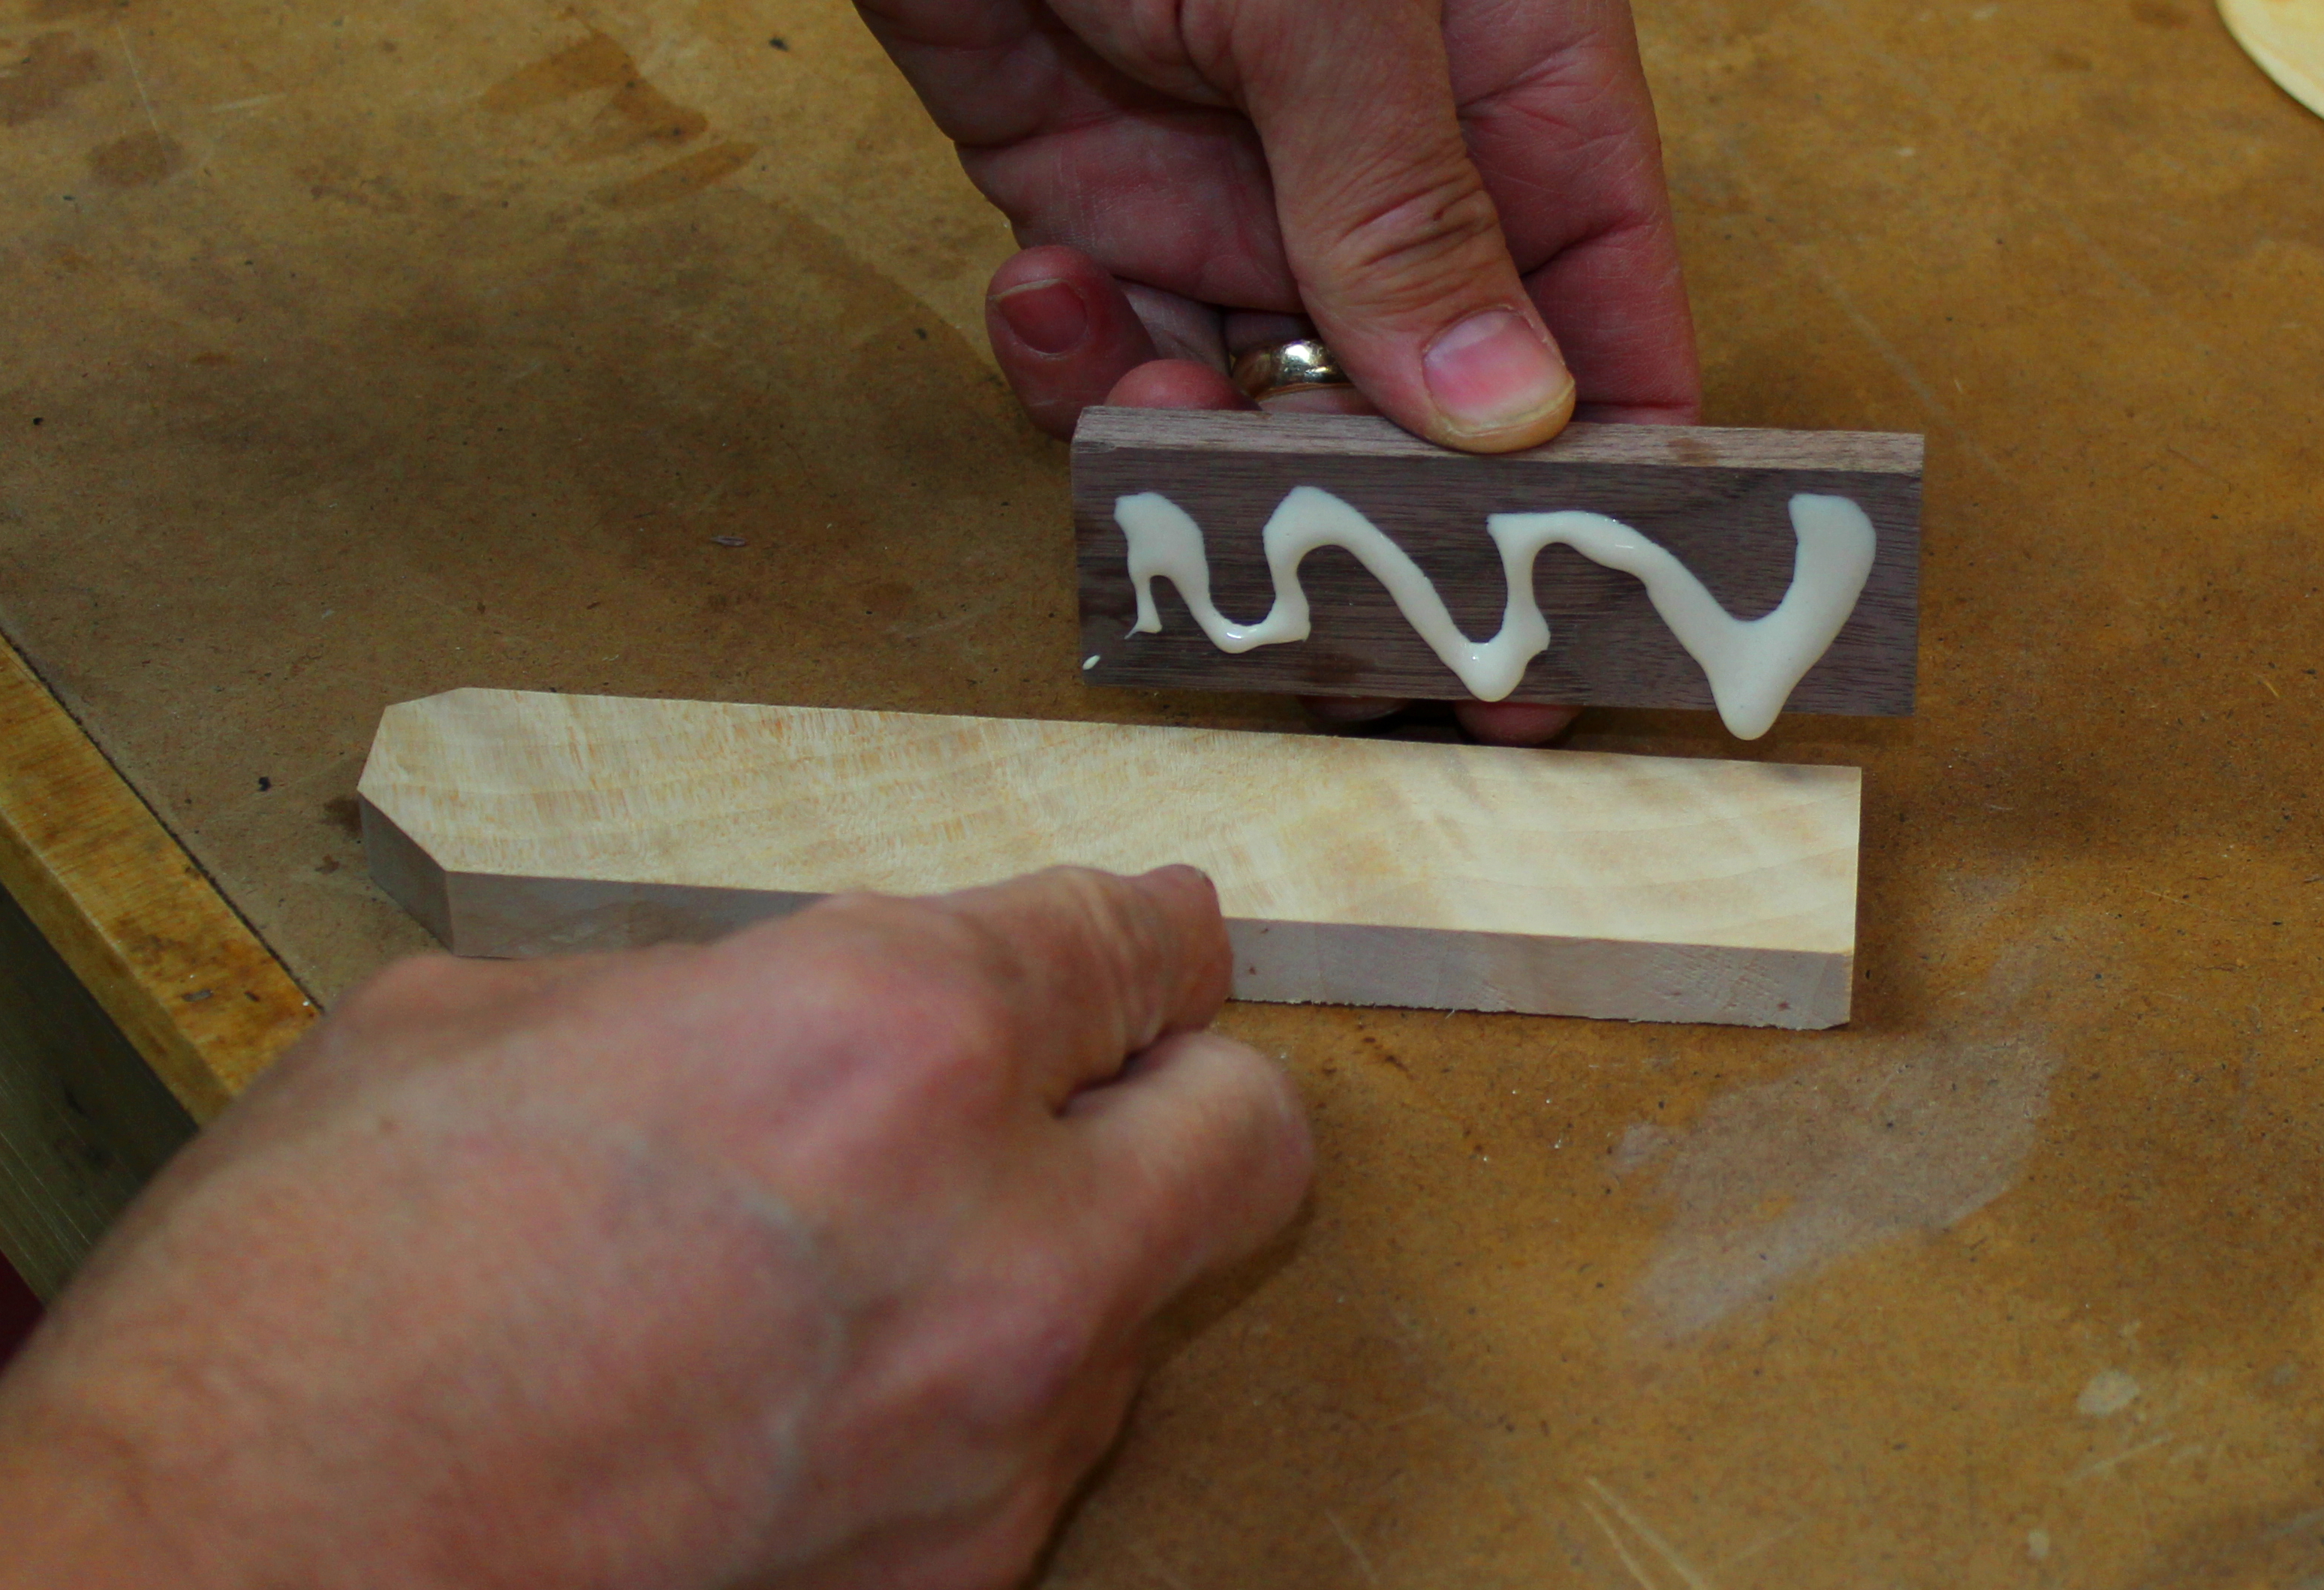
knife glue up

Glue up blanks

Cut and glue pieces of contrasting wood as shown in diagram.

knife profile

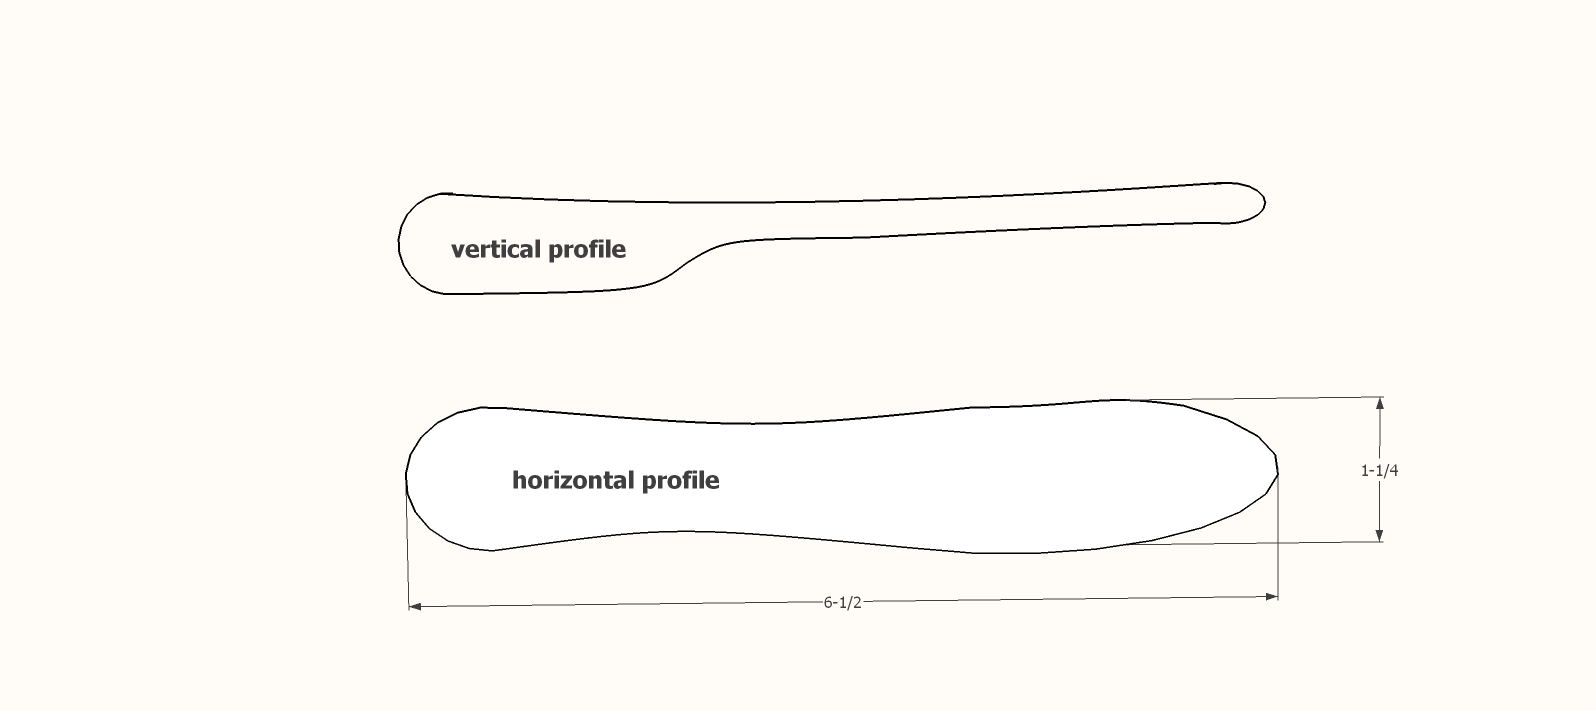
Click here to download the templates for this project.

Trace horizontal outline

I like to use a white charcoal pencil on the dark wood, and a normal pencil on the light wood, for better visibility during cutting.

Make cuts

Cut out the shape, leaving the line. Next stand the piece up and trace the vertical profile, or just cut it free hand as it is a simple shape. Again, it is important to leave the line so that you can sand to final shape.
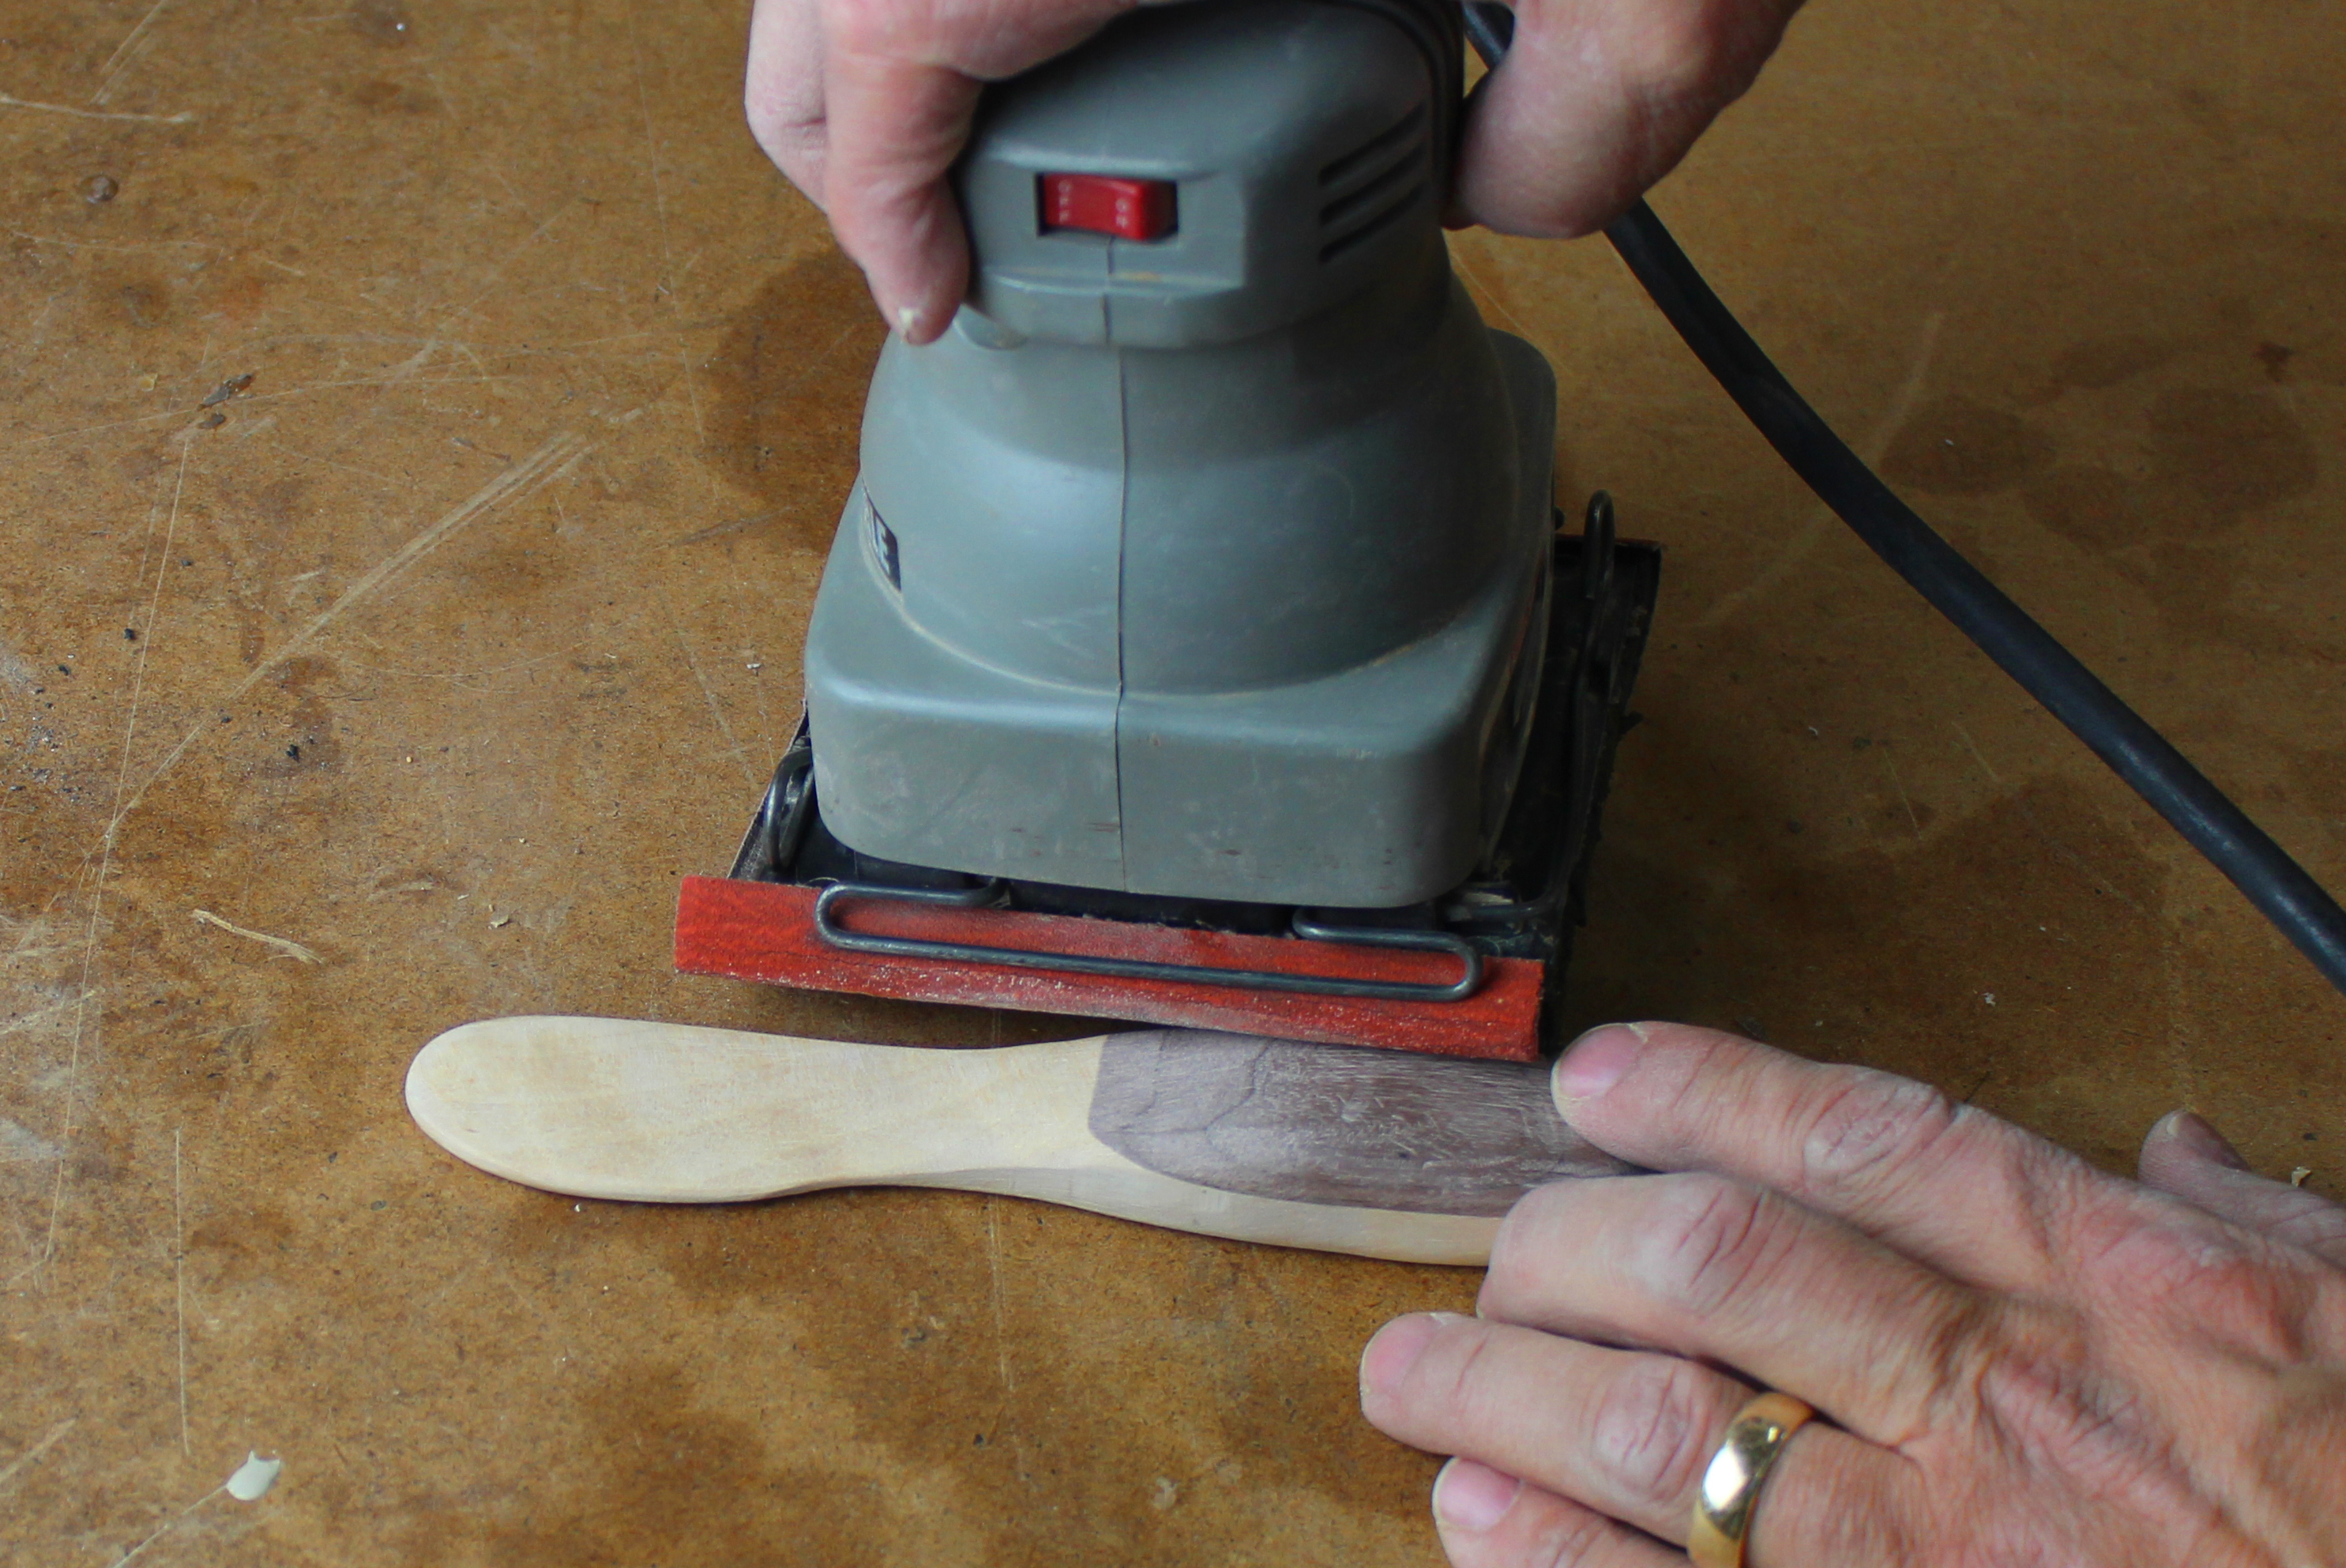
sand knife

Sanding

Carefully sand, first with an aggressive grit, such as 80, to define the overall shape. Then progress through grits up to 220, taking time to smooth and round over all edges.
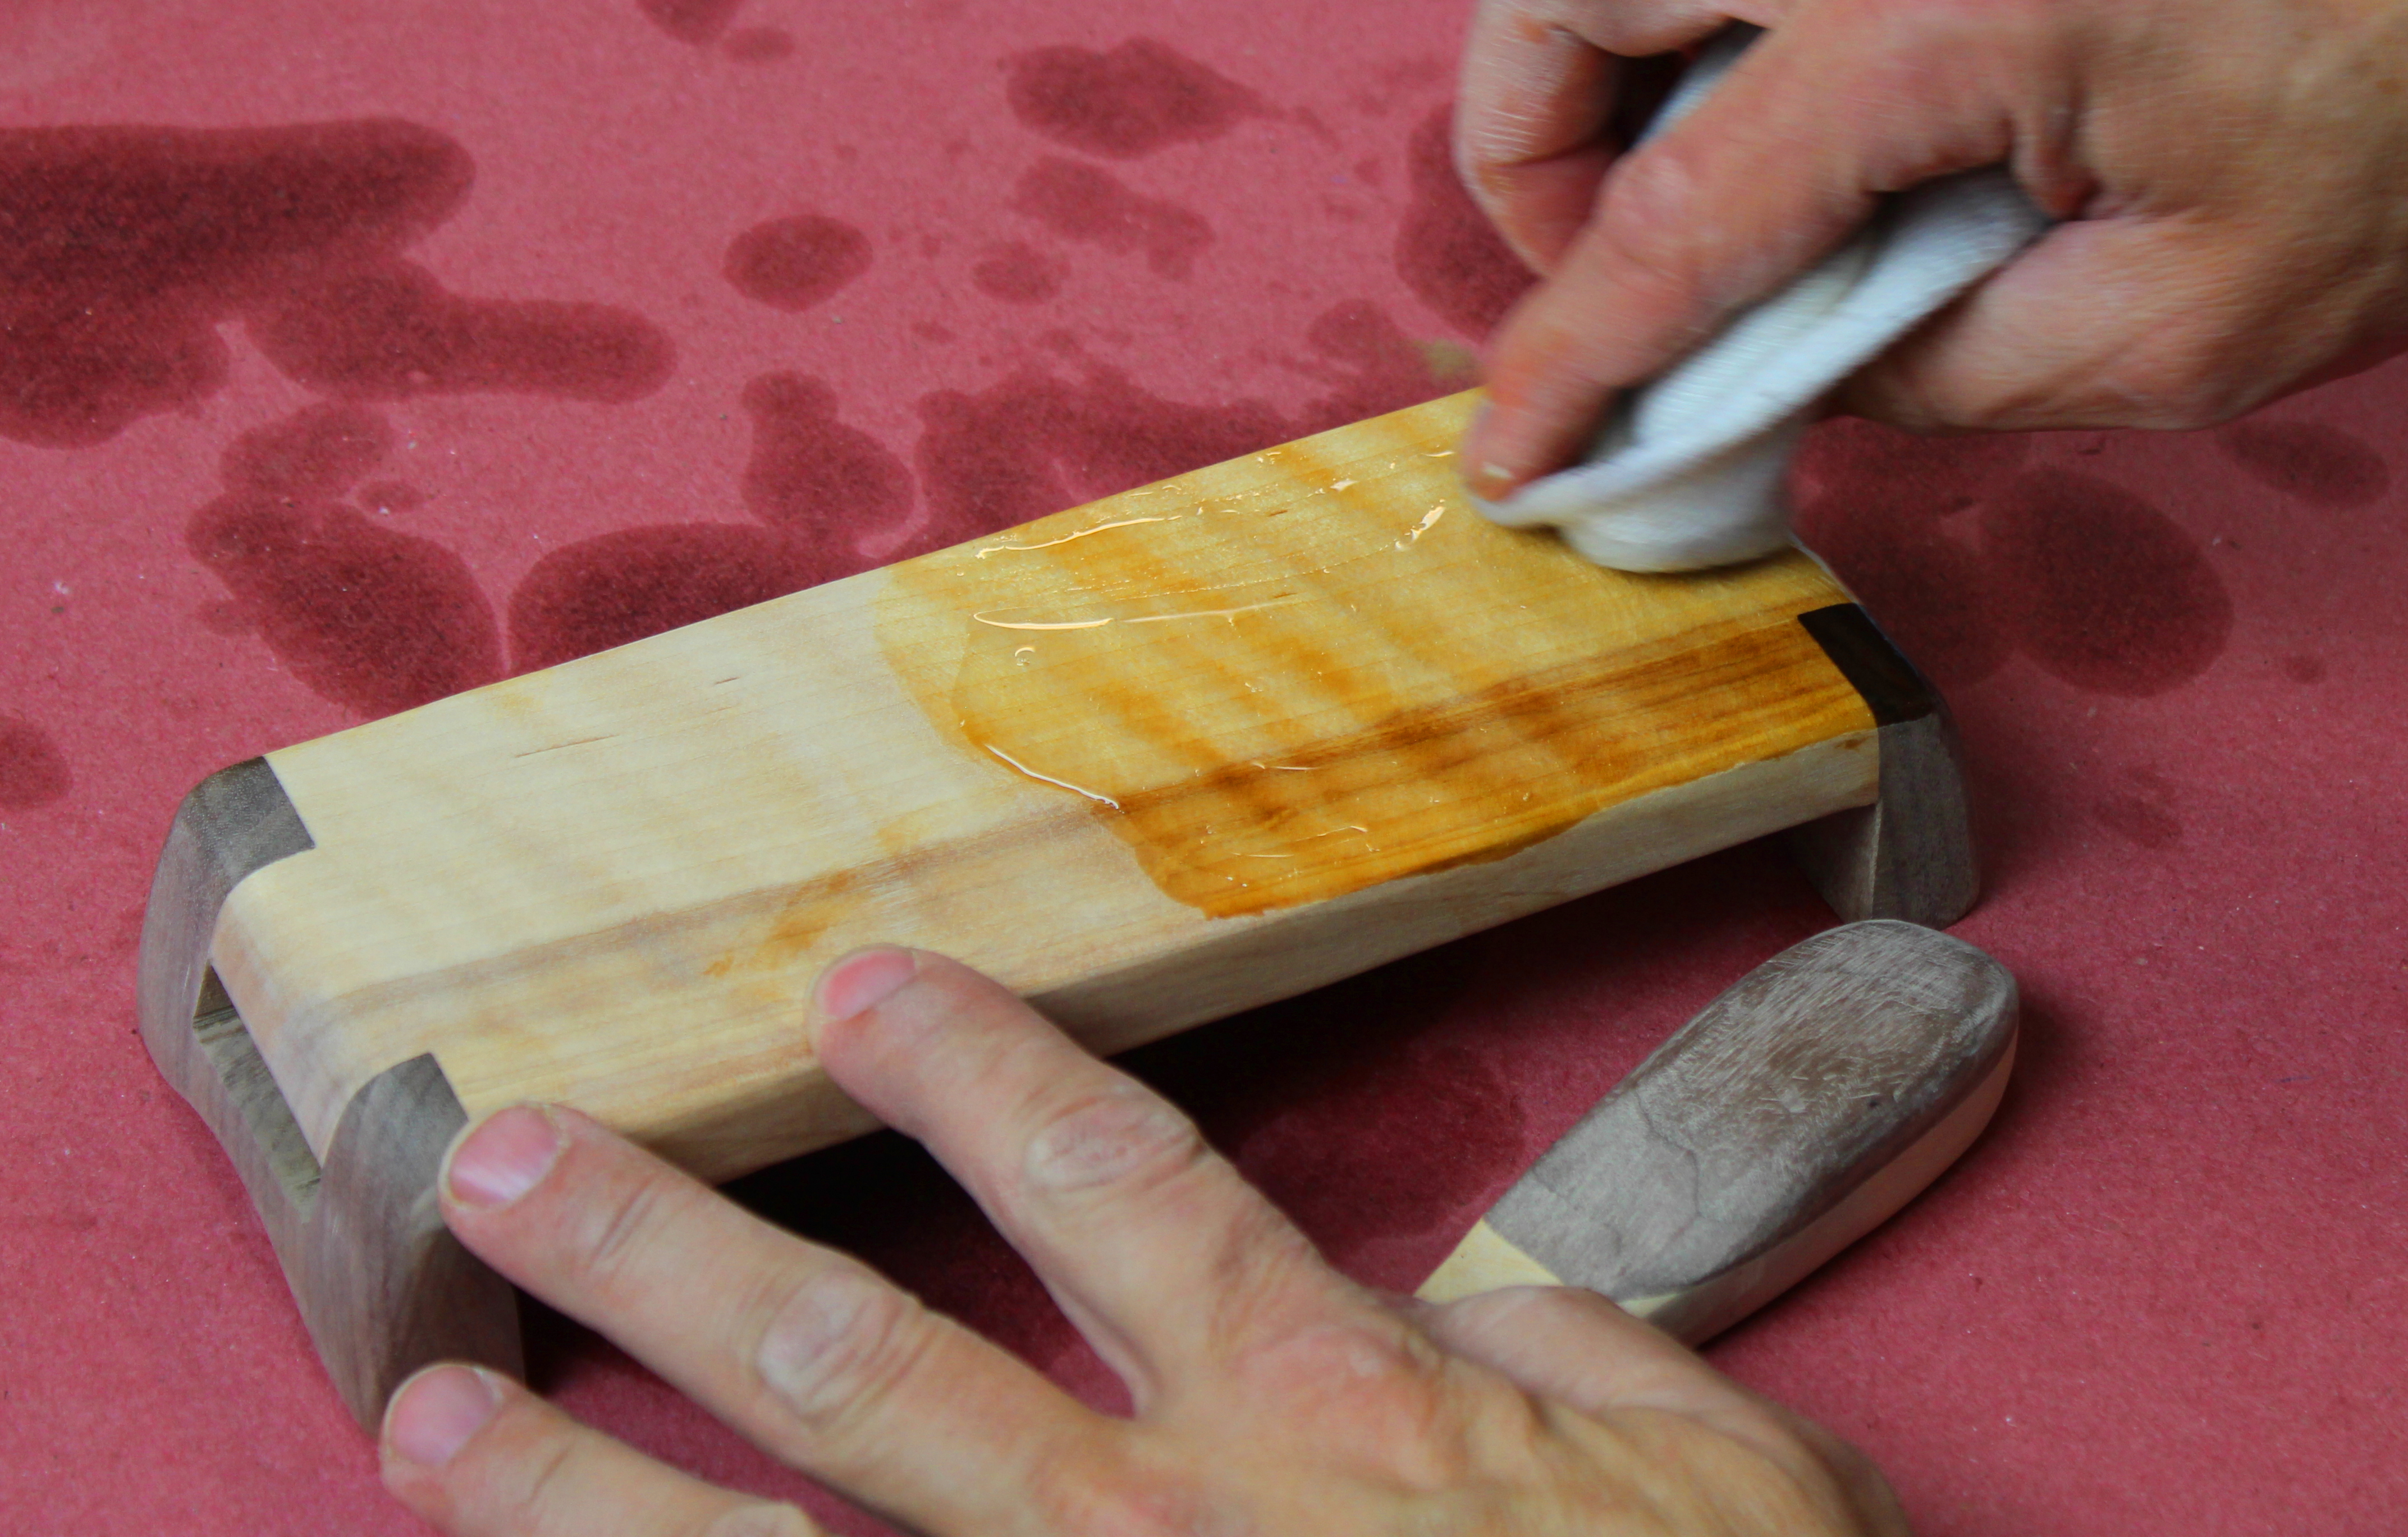
finish

Finishing

Use a food-safe finish such as mineral oil (shown here) or a salad bowl finish to bring your project to a lustrous glow.

Reply to Michael
  • (will not be published)

85 Responses to “Butter Board and Spreader Set”

    • Customer Service

      Hello! Everything you need to complete this project is included in the article. There is a link within the post to print out the Butter Spreader Pattern as well. If you need further assistance, please reach out to customer service. Thanks!

      Reply
    • Customer Service

      Hello Rejean,
      Thank you for contacting us. I am happy to hear you are interested in becoming a Premium member. Some of the great benefits of our Premium membership includes access to our full-length videos, articles, and discounts on products in our SHOP.

      I am excited to have you become a member of our online community. Please click on the link below to accept this special offer:

      https://go.wwgoa.com/C25551

      If you have any other questions, please chat, email, or contact Customer Service at 1-855-253-0822.
      Sincerely,

      Joan
      Woodworkers guild of America Video Membership

      Reply
    • Customer Service

      Hi Finley,

      Thank you for contacting us. You do have some plans and projects with your Gold membership, click on the Browse tab and look under PLans and Projects.

      If you have any other concerns, please contact us at 1-855-253-0822, or chat with us on our site.

      We greatly appreciate your business!

      Sincerely,

      Joan
      Woodworkers Guild of America Video Membership

      Reply
  1. Virginia

    This is truly beautiful. It was unclear at first that we weren’t making 3 pieces, but two that store together. I plan to give this a try.

    Reply
    • Customer Service

      Hi Larry. I am sorry you are having trouble downloading. Please try using a different browser. If you are still having trouble, please give our customer service team a call at 1-855-253-0822.
      Thanks
      Jean-Woodworkers Guild of America Video Membership

      Reply
  2. Ed

    Hi Paul, I tried to use of piece of live edge red oak with black walnut for the end/legs. The issue I’m having is the sides aren’t square to cut from. I used a small hand square to mark one end and measure to the other end and made my cuts with a hand saw. My parts didn’t fit or glue up well. Any suggestions on a better way for me to get look I want with joints that fit well. I can send a picture if that would help. FYI I am a guild member. But a beginner

    Reply
    • Customer Service

      Hi Ed. I don’t think that the live edge aspect should be problematic. You are approaching it the right way. As I see it the challenge that you are likely having is to cut crisply to a line with a hand saw. This simply takes practice. I would suggest practicing on some scrap to see if you can get comfortable with making the cut before doing it on the actual project. Another suggestion is to “leave the line” and pare to it using a sharp chisel. Sneak up on the perfect fit, testing regularly until it slides in with just a bit of friction. Don’t force it with a super tight fit or the wood will crack. By sneaking up on the fit you can get a very nice joint with no large gaps.
      Thanks
      Paul-Woodworkers Guild of America

      Reply
      • ed2

        Hi Paul. Thanks for suggestions. I might also try gluing or tape my live edge peace to a square board as well before I cut the ends. I think it would help if I had paid a little more attention to details. It turned out good enough for my wife to want it on the counter.

        Reply
  3. Nick Brand

    These projects look like a lot of fun, i would love to be a part of this group of wood lovers!!

    Reply
    • Customer Service

      Hi Olivr. We are happy to hear you would like to join the membership. Here is a promotional offer for the premium membership. If you have any questions, please contact our customer service team at 1-855-253-0822.

      https://go.wwgoa.com/C16101

      Thanks
      Jean-Woodworkers Guild of America Video Membership

      Reply
  4. Robert MacKechnie

    I think it would a good starting spot for me. What types of wood kind could you use? Could I please have a set of plans.NB Ticket 23228

    Reply
    • Customer Service

      Dear Robert,

      Thank you for your patience. In response to your question-

      Any wood would be fine, but I’d suggest using woods with small or closed pores for the surface that the butter sits on. That will make it easier to clean up. I used maple and walnut in the article, but cherry and birch would all be good options as well.

      We’d love to have you be a part of our community. We are convinced you will enjoy the benefits of becoming a member and having access to the best instructional how to videos and professional tips. We would like to offer you a special promotion for your first-year membership.
      https://go.wwgoa.com/C15959

      Sincerely,

      Paul
      Woodworkers Guild of America Video Membership

      Reply
  5. Martin

    I was looking through the read at first it seemed a lot of detail then I took another look and it is easy. I need to make 3 to get my Christmas shopping done. Thanks for the idea Martin

    Reply
    • Customer Service

      Hello. We have created a download with the butter spreader template, and have posted a link at the bottom of the article. Let us know if you have any other questions.
      Thanks
      Jean-WWGOA Video Membership

      Reply
  6. Allen Michael

    Very well-made and an intricate finish! Totally agree with the use of band saw for this project, especially with the small details needed for it. Thank you for sharing this!

    Reply
  7. Ian Rickard

    What a lovely project for me to start with. I have been inching to do some woodworking and find joy in the creative side of this hobby. Although my skills are low, I feel this is something I can achieve with low cost. The included detail is perfect and sufficient to get the job done. Thanks for this. Have a fabulous week ahead.

    Reply
  8. Robert

    As has been discussed at great length, why are there no plans with ALL dimensions given? It would be nice to know the thickness and width of the legs. And the thickness of the material for the spreader as well as the thickness of the finished product. I tried downloading the template for this project and the link did not work. Not impressed with the whole experience!

    Reply
    • Customer Service

      Hi Robert. I am sorry, we were having a technical issue with the link for this. You should now be able to access this. Let us know if you are still having problems. We are sorry for any inconvenience.
      Thanks
      Jean
      WWGOA Video Membership

      Reply
  9. Boston Shilling

    Terrific plans and a really great looking product! I made a batch for Christmas gifts this year and they went over very well!

    I’d like to produce these for sale and would like to discuss licensing. Please email me at ebaykid1978@gmail.com or call me anytime at 540.416.8738

    Thanks so much!
    Boston Shilling

    Reply
  10. Donna Motherwell

    I’m interested in making this project but the article didn’t show any photos except the initial one and there are no plans that show up. Help!

    Reply
    • Customer Service

      Hi, Donna. You will need to make sure you are logged in as a member in order to access the referenced information.

      Reply
  11. Aaron Farmer

    Thanks for the idea and plans! I actually took an idea from your barrel box and incorporated it with the dish! It’s working out great! Ill post it on my Facebook after Christmas.

    Reply
  12. tjj321

    How are you cutting the 10 degree taper on the sides? I used my bandsaw with fence but once the first leg passed through the blade, the assembly moved to the left by the 1/8 inch amount which the leg width exceeded the top width. I then tried using the miter gauge, but its distance from the blade made it too difficult to control the cut.

    Reply
    • Customer Service

      Hi, Michael. You will need to be logged into your membership account in order to access the plan. If you have any further questions, please contact us at 1-855-253-0822.

      Reply
    • Customer Service

      That is because the sides are cut at a taper, wider at the bottom than at the top, it is purely for aesthetic reasons.

      Reply
    • Customer Service

      We would like to let you know that your feedback has been forwarded to the proper department; your comments are important to us and help with the development of our online video streaming community.

      Reply
  13. Janete Oliveira

    Great little project! One question: I’m not sure I could figure out the height of the spreader from the diagram.

    Reply
    • Customer Service

      Hi, Janete. Thank you for your feedback on this project. The height of the spreader is 1-1/4″. The illustration near the bottom of the article can be used as a template, and it also provides the dimensions.

      Reply
    • Customer Service

      Hi, Pete. You will need to be logged into your membership account in order to access the plans. If you have any further questions, please contact us at 1-855-253-0822.

      Reply
  14. Kale

    I am starting to work unplugged and this butter board and spreader would be a great starter I think.

    Reply
  15. mixasi

    These are very elegant and nice articles, as many others developed by Paul Mayer. One fault only: the template of this project does not exist on the reference page. Pity.

    Reply
    • Customer Service

      Hi, Jim. The image is embedded into the article for your convenience. You can download it, embed it into MS Word, Powerpoint or a desktop publishing application and size it appropriately using the dimensions that we have included in the file.

      Reply
  16. colin king

    This would be a really good project for a couple of our guy’s in our Mens Shed.

    Reply
  17. Delmonique

    Absolutely stunning. I will try this will maple and patouk. I have scraps from my first cutting board. It was rather lumpy so I took it apart. Then I was able to finally purchase a planer and my own table saw. So ready for my new weekend project.

    Reply
  18. Tim Bacevic

    I’m a beginner and I’m tring to build this. any bandsaw tips so the cuts turn out right?

    Reply
    • WWGOA Team

      Thanks for the question. Here are a few suggestions to get you through the project:
      – Go slow and don’t feed the stock faster than the bandsaw wants to cut it, or the cut line will wander.- Be sure that you are using sharp blade. The blade used in this story was a super sharp 1/2″ 3TPI Timberwolf blade. You don’t have to use that specific one, but I offer that as a reference for you.- If you are having a hard time cross-cutting to a perfectly straight line, cut just up to the line and pare to the line using a sharp chisel.- On the cut where you tilt the bandsaw table and cut the ends at a 15 degree table, get a good grip on the work piece and make that cut very slowly. That is probably the trickiest cut on the project. If you have a sharp blade and take your time, you should get through it fine. If you’re bandsaw is not working well here you could make this cut on a table saw as well if you have one.
      Good luck, and please send us a picture when you are finished!

      Reply
  19. David

    For those like me who prefer to have a pdf of projects so individual pages can be printed as needed to help build the projects, Apple computers can save a pdf of any web page. Just select “Print” then click on the PDF dropdown in the bottom left of the print dialog and select “Save as PDF” and click OK. Play with the check boxes for “Print backgrounds” and “Print headers and footers” to get content you need and to eliminate what you don’t need.

    I’m sure there is software for Windows that lets you do this but I have no idea what it might be, since I DON’T do Windows these days. It’s built in to the Mac OS by Apple. For any of you who are Windows sufferers who don’t have a way to create pdfs from web pages, have a friend with a Mac create the file for you.

    If you have Adobe Acrobat in addition to Adobe Reader you can also combine pages such as the project web pages and any pdf plans or templates so everything is one file. My pdf of this project with the addition of the spreader template ended up being 13 pages.

    Reply
    • Paul Mayer

      Hi Orven, The butter knife goes in to the opening that appears in the walnut leg pieces, just below the top on each end. You can see the opening in the top photo of the story on the butter board on the left side of the photo.

      To cut the butter knife, simply print out the template provided, use spray adhesive to temporarily attach it to your glued up knife blank, and cut using a bandsaw and a 1/4″ blade. Hope that helps!

      Reply
  20. jsdaut

    I really like this and like others have said the plans would be nice, I realize they are shown but I think a pdf file with the full size drawings of the spreader would be nice just to ensure proper sizing. I think the base can be built based on the info in the article.

    Reply
    • Paul Mayer

      Hi Jsdaut, Thanks for the suggestion. We have created a download with the butter spreader template, and have posted a link at the bottom of the article. Cheers, Paul

      Reply
  21. peter fortin

    I am also just a beginner, i love this simple looking project. the question that i have is this. on the legs the middle cut is 1.5 inches wide , what is the hieght of the middle cut ?

    Reply
    • WWGOA Team

      Great catch, and apologies for the omission. We will update the drawing shortly. The measurement that you are seeking is 7/8″. The attached drawing reflects the update.

      Reply
    • Paul Mayer

      Thanks, Ramon. Congrats on getting started with woodworking! Post a pick to the WWGOA FaceBook page if you end up building these. Also, please let us know if you have questions as you get started.

      Reply
    • Paul Mayer

      Hi Sherman, Thanks for your comment. Is there specific additional information that we can provide, beyond what we have included in this article?

      Reply
    • Paul Mayer

      Hi Joe, thanks for your comment. My intention was to include everything right here in this article that you might need for building this project. Can you describe what additional detail you are looking for? Thanks, Joe.

      Reply
    • Ray Hearld

      I’m very disappointed in this sight. I thought when I joined I would get detailed plans free How do I stop subscription

      Reply
      • Customer Service

        Hi Ray!
        You should be able to access any plans that go along with our classes under the Bonus Materials section below the class when logged in to your account.
        You can also view plans only by clicking here after signing in to your account: https://www.wwgoa.com/article/plans/beginner-woodworking-projects/
        If you would like further assistance, or would like us to help with cancellation please reach out by email at @program-director.net or call 1-855-253-0822.

        Sincerely,
        Codi
        Woodworkers Guild of America Video Membership

        Reply