 My wife and I used to share a spacious, sunny home office in our spare bedroom. We each had a desk and everything was great, except for the fact that my job requires several hours of telephone calls per day, and I have a rather loud voice and animated style. My wife came up with a simple remedy to this, which was to reestablish my work space onto another floor of the house. So there it was; I had been voted off the island. The problem was that we had no other sizable rooms available to serve as an office, so I needed to come up with a creative solution. Kitchen? Too loud. Living area? Kids everywhere. When I finished our basement I had framed a “bump-out” which was to become a closet. Could I squeeze an office into a space designed as a closet? Not ideal, but it was 1) quiet, 2) two floors away from my wife’s office (which she didn’t think was enough, but was as good as we could do without moving), and 3) off the beaten path throughout the rest of the house where the kids commonly play. Claustrophobia be damned: I decided to build my office in a closet.
This is Part 1 of a four-part story in which I’ll take you through my design and build process. Even if you’re not relegated to a closet, this story will provide you with great ideas about desk and cabinet construction.
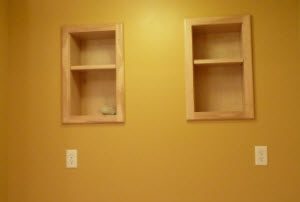 I started with built in bookcases. You may have seen phase one of this project which was to build bookshelves into the walls. This proved to be a great way to squeeze more utility out of a small space. Adding two bookcases without taking any floor space felt like a major coup.
The larger phase of the project was to build the desk and install it into this space. This is an easier project than it might seem, and I will break it down into simple steps. If you have questions as you go, don’t hesitate to post them to the WWGOA forum.
My design goals.
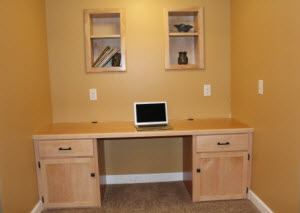
I wanted a desk that took full advantage of the limited available space. The pessimist in me initially thought “Dang, a 4×6 space is awfully small for an office”. Then my optimistic side played the trump card; “Yeah, but a 76″ wide desk is HUGE!”. That was when I decided to build it wall-to-wall. I also gave a lot of thought to how I use a desk, and came up with a few personalized design considerations:
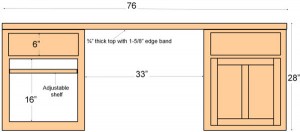
I don’t generally like the height of most desks. I find them ok for writing with a pen and paper, but I literally never do that. When I am sitting at a desk, I am talking on the phone, working on my computer, or more commonly doing both. So I dropped the desk height down a couple inches to 28″, which allows me to type with my arms at a comfortable angle. The great part of building custom is that you can build it just the way you like it.
Another thing that drives me crazy about many desks is that there is not enough room for my legs underneath. I generally feel constrained both vertically and horizontally, so I designed the desk with additional leg room in each direction. How did I lower the desk but yet increase vertical leg room? Easy. I did not configure a center drawer. They are generally too small to have much value anyway, and they just bug me when my legs hit them.
Since the desk itself takes up nearly the entire office, there will be a temptation to overload the desktop with clutter. One large item that was destined for the desktop was my printer, which I rarely use, so I designed a spot for that inside one of the base cabinets.
Many desks incorporate a file drawer, but I don’t actively use a filing system so I didn’t feel a need to include that into this design. Instead, I configured an adjustable shelf behind a closed door for additional storage.
Two drawers are plenty for me. Beyond that and I can’t keep them organized. I designed the drawers to be large enough to accommodate whatever I want to put in there.
Since this is in a basement location with no natural light, I decided to go with maple and a natural finish to keep things as light and bright as possible.
Time to make some dust!
We will build the desk in the following order: 1) base cabinet carcases, 2) drawers, 3) doors, 4) shelves, 5) top. I will provide the measurements for the project, but you will need to tailor this to meet your space.
Carcase first.
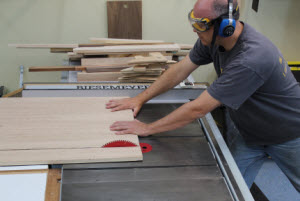
Break your plywood down to size.
Look at the cut list for specifics for the base cabinet and tailor these as needed for your space.
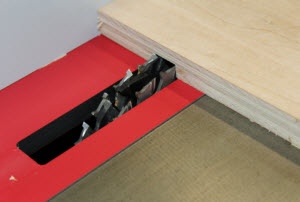
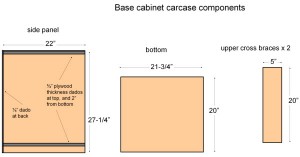
Mill dados in side panels to receive the bottom, top and back panels.
Use a dado blade or router with straight bit. Test your setup on scrap until you have the right width and depth for your plywood. The piece should slide in with slight friction and not require much force to bottom out in the dado. The rear of each side panel receives a 3/8″ x 1/4″ rabbet to receive the 1/4″ plywood back panel.
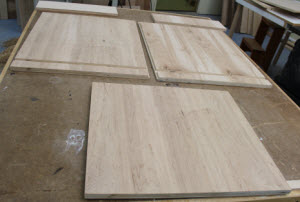
Dry run.
Test fit the pieces and dry assemble to ensure that everything is ready to go before applying glue.
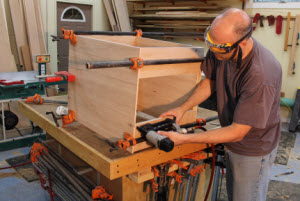
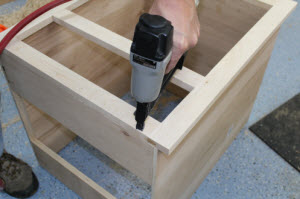
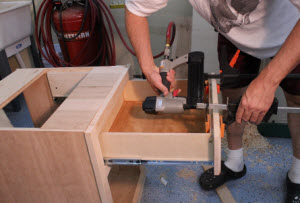
Assemble carcase.
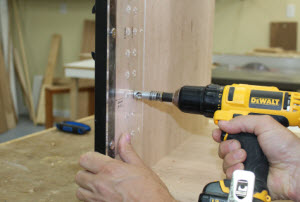
Apply a liberal application of wood glue to each joint and clamp. Check for square, make any adjustments, and then let sit for a couple hours as the glue sets up. Here I am driving brads to secure the top cross members.
Drill holes for shelf pins.
Use a jig to ensure good hole alignment and drill holes every couple inches.
Cut and attach the back panel.
Cut a piece of 1/4″ plywood to fit the back. Use 1″ brads or staples to secure the back in place. A light bead of glue to stiffen the cabinet is a nice touch here as well.
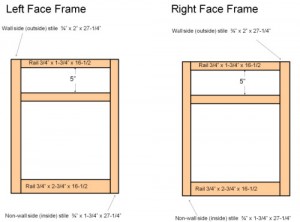
Add face frames.
Cut all face frame pieces to size as listed in cutlist, or according to your dimensions.
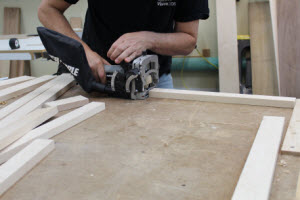
Mill joinery.
I used face frame (small) biscuits, but you could also use mortise and tenon, loose tenons, pocket screws, lap joints, dowels, or whatever you like best for face frames.

Spacer makes glue up easier.
Cut a spacer to the size of your drawer opening, and use it to hold the dimensions as you glue and clamp.
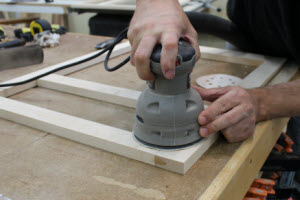
Sand joints flush.
A random orbital sander does a great job of sanding flush all joints on front and back. The back is more critical at this point because if the joints are not flush the face frame will not pull flat to the carcase.
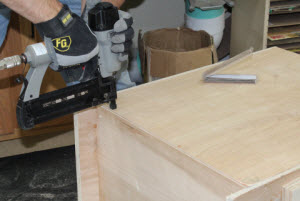
Shoot brads where you can’t see them.
I normally do not fasten face frames with brads because the additional holding power is not necessary and I don’t like to see the filled nail holes, but in this case the top 3/4″ will be hidden by the edge band on the desktop. Therefore, I felt comfortable using a couple brads in this hidden zone to hold the face frame in alignment while I clamped it in place as the glue dried.
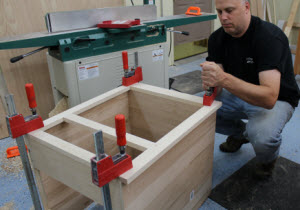
Clamp it up.
Use plenty of clamps to hold the face frame in place until the glue dries. Note the large overhang on the left side, which is used to scribe the face frame to the contour of the wall at installation time. I like to leave 3/4″ overhang or so on the “wall side” of a base cabinet, which gives me plenty of room to handle most wall imperfections. On the non-wall side, overhang by only 1/16″ to 1/8″, which will be trimmed flush in the next step.
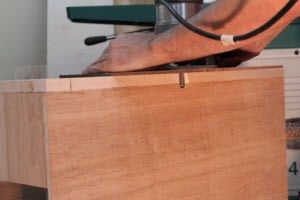
Flush trim the face frame to the carcase.
Do this only on the non-wall side of each base cabinet, or the left side of the right cabinet, and the right side of the left cabinet.
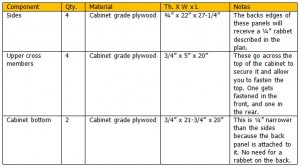
Cutlists – Carcase
Next time…drawers and doors.
Photos By Author
More is this project:
Office in a Closet Part 2: Drawers and Doors
Office in a Closet Part 3: Build and Install the Desktop
Office in a Closet Part 4: Finishing and Installing

I am trying to make a cabinet yet the hinges I am using hinges I have gap. Is there a specific type of hinge I should use that remove the gap?
Could you provide more instruction, for this novice woodworker, on the dados in the side panels?
The print for the diagrams is too tiny to read.
I'M LOOKING FOR THIS TYPE OF DESK. I DONT NEED TO PUT IT IN A CLOSET BUT THE DEMENSIONS ARE PERFECT. WHERE CAN I GET THE PLANS.
nice idea for downsizing - no need for the big old closets any more! www.downsizemyspace.com
nice idea for downsizing - no need for the big old closets any more! www.downsizemyspace.com