Well, this project was born of necessity. My wife and I had a wooden napkin holder for years until the newly acquired kitten found reason to move it from the table to the floor just to check if it, too, was subject to gravity. (Don’t ask about the $300 hand blown glass bowl he also ‘transformed’.) The holder broke – the repair wasn’t invisible.
So, down to the shop I went, hoping for some inspiration – and to save kitty’s very life. I sketched a little, tried clamping some scraps together to get an idea of proper size, you all know the drill.

With the outline of a design in mind I started searching through my meager supply of lumber – probably under 3000 board feet at this point – and struck on a couple things. It would be nice to have a contrast in the wood, to use up some fairly narrow strips discovered in one rack, and to make several holders at a time – or something like that…
Here’s how it all worked out.
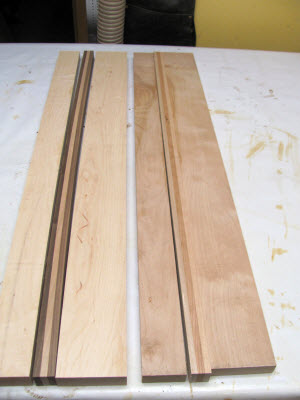 I started with a 5″ wide piece of maple, some birch and cherry similar in width and a few thin strips of walnut, cherry, maple and eucalyptus. While laying things out, I also got the bright idea that on the table with the napkin holder we often used a trivet to hold a hot oven dish.Estimating the total requirement at about 30 inches, I cut the maple to length and ripped it down the length to get a 2″ and 3″ wide piece.
 For the contrasting woods I simply glued up 3 layers.Next step was to glue things up. Note that I chose to glue the 3 stripes of contrasting wood together first, then, glue up the entire piece. Since I was making 6 sets at one time, I thought gluing up the strips and then working out the best match of strips with the maple, birch or cherry might be the wisest way to approach this project. After sorting things out, I glued up the 6 blanks.
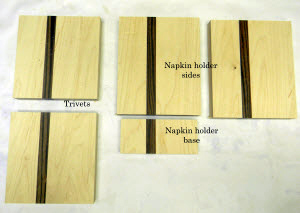 After the glue cured I ran the blanks through a thickness planer and finally a surface sander. Be sure to sand both sides. Once assembled the inner sections will be very difficult to access with any abrasive.After trimming one end, carefully measure and cut the 3 pieces for the napkin holder. Next, the remaining piece can be cut into 2 squares for trivets. When you make the base, trim both edges so the stripe will line up with the vertical sides.
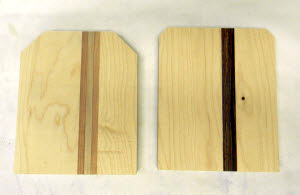 I cut the top corners at 45-degrees to add a little interest. Just be sure to mirror this step on the trivet squares. Other options are a radius on the top corners, or leave them square. At this point I run the pieces through the router using a 1/4″ round over bit to soften the edges. A routed bevel on the edges looks nice, too.Here we’re displaying 2 different edge bevels you choose how much material to clip off.
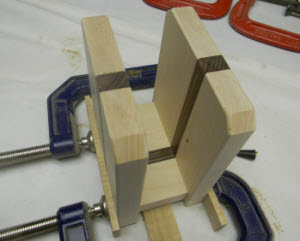 Assembly is fairly straight forward. I simply set the vertical pieces in place and put a spare amount of glue on the horizontal section. Use a 1/2″ thick piece of narrow stock as a spacer. Be sure the reveal of the horizontal piece is equal at both ends by aligning the stripe. Apply glue and clamp the 3 pieces together. Let it cure for a while.
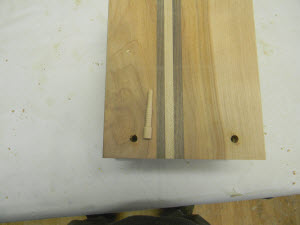
 Use small Miller dowels to reinforce the glue joint.
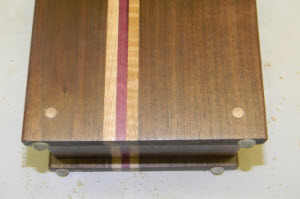
 Let the glue on the Miller dowels cure and then trim off the excess material.
 Sand to remove any tool marks left by the saw.
 I add little rubber or felt pads to the bottom of the bottom of the legs to prevent scratches on wooden tables.
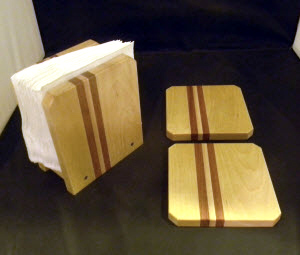 Here’s a picture of a set napkin holder and trivets.
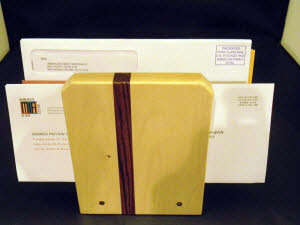 Of course, my wife, Ann, came up with another possible use.
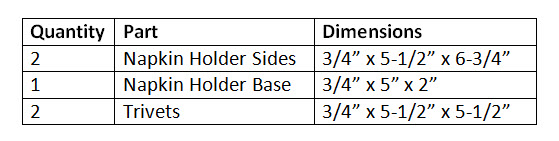 Cutting list
Sources:
Miller mini-x dowels #21747
www.rockler.com
(800) 279-4441
5/16″ Self-adhesive rubber feet
Home Center

I love your idea of the napkin holder and trivet but what kind of finish would you put on the trivet so hot pans and dishes won't burn up the finish. Thanks for an answer.
What wood glue was used for the trivet and how does it stand up to the heat?
Thanks AJ, looks like a fun little Winter project.
Interesting and nicely done.
Made a holder and trivets...also a matching set is salt and pepper shakers and toothpick holder! Ladies loved them at our church! Happy sawing!
Neat little project! Good way to show off your work and begin a conversation. Could also use the trivets with a napkin as a coaster for drinks before dinner.
SUPER NICE, I will give this one a go. popwhiting@att.net
What kind of finish did you use on the trivet
I downloaded the Pdf app but can't see a way to convert the document. The responses are circular........
AJ, I like this project. Only I'm just starting down the woodworker path and have yet to acquire some of the tools/toys you skillfully use in your shop (thickness planer or surface sander). Can you recommend a nice beginner project that can be completed with hand tools and basic power tools like circular saw, cordless drill and router table? Would be nice if it too could be given as a household gift.