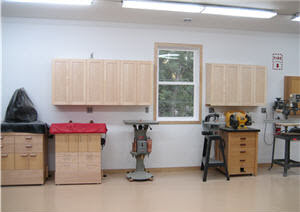
 These no-waste easy-to-build cabinets are a great way to increase the storage in your shop. These modular storage cabinets are designed to be easy to build and install, and to make maximum use of space with a minimum amount of material waste. I replaced four of my cruddy looking old shop storage cabinets with 5 of these great looking new ones (see the before and after photos).Building the cabinets took more time than I anticipated because I covered the exposed plywood edges with solid maple 1/4 thick edging rather than use iron-on wood edge tape. I’ve never been happy with the look and feel of the iron on edging. That’s just me.
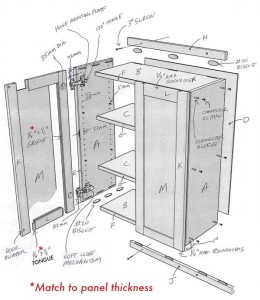
 Design & Construction Details. There are no door handles! Instead the doors are longer than the height of the cabinet. They overhang 1 at the bottom, and that’s the handle. It’s clean and it works well.The European style concealed hinges are easy to install and adjust. They ‘clip’ to their mounting plates making tool-less mounting and un-mounting a snap! The pneumatic soft close add-on device is nice. I tested it on some of my older cabinets, and I was impressed. No matter how hard you try, the doors will not slam shut. Instead they close slow and soft.
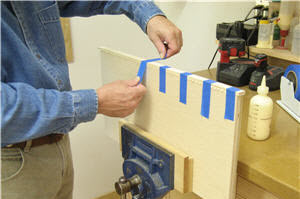
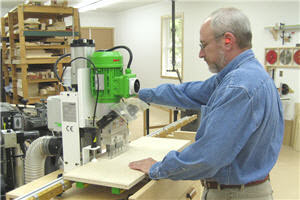
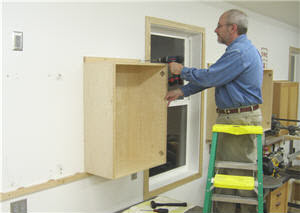
 The hinge plates, shelf support pins, and cabinet connector bolts mount in a series of 5-mm dia. holes drilled near the front and rear edges of the sides. I own a dedicated hinge and line-boring machine, and it’s what I use to drill the holes. It’s overkill for a one-person shop, but it does make hinging doors and case construction easier! There are other inexpensive and simpler jig options. You could also lay out the holes and drill them on a drill press using a 5mm brad point drill bit.
 As I’m sure you know, 3/4 thick plywood is not 3/4 thick. You’ll need to compensate for this. The finished width of the cabinet is 24. Measure the combined thickness of the 2 sides and adjust the lengths of the top, bottom and shelves accordingly.
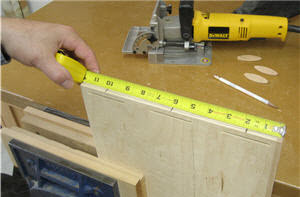
The cabinets are ‘hung’ on the wall using wall-mounted ledgers, and cabinet mounted hang strips. The hang strips are fixed to the cabinets with biscuits and glue. The ledgers and cabinets are joined with loose biscuits, no glue. When you hang your cabinets, use 3 screws through the ledgers and hang strips and into wall studs. Each 2' wide cabinet section needs to be secured to the wall with four screws; two through the hang strip, and two through the ledger. You’ll need to use wall anchors if you a masonry wall with no wall studs.
I have included a cut list of all of the components at the end of this article along with a summary of where I purchased the components I used in my cabinets. Following are the instructions on how to assemble the cabinets.
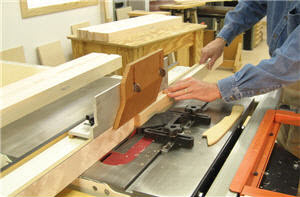
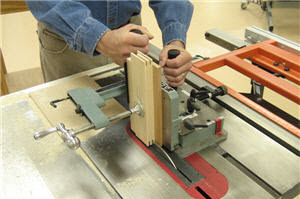
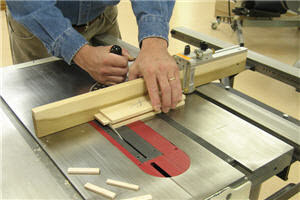
Make the Cabinet Boxes. Cut the tops, bottoms, sides, and shelves to size (pieces A, B and C). Make the edging strips (E, F and G) slightly wider than the plywood thickness. Cut their lengths 1/2 longer than the edges they will cover.

Plywood has an A grade face and a B grade face. Put the A faces inward on the cabinet sides that join each other with the connector bolts, and outward where the cabinet sides are finished ends. Put all of the top and bottom pieces A face inward. Label the parts well to avoid confusion.
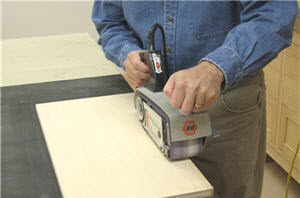
Cut the backs (D) to size. Lay the cabinet boxes face down, and set the backs in place loose (no nails). Lay out the hang strip and ledger biscuit grooves in the cabinet tops and bottoms. Move the biscuit jointer’s fence 1/32 closer to its blade, and then cut the biscuit grooves in the cabinet tops and bottoms with the jointer’s fence resting on the cabinet backs. This setup creates a 1/32 space between the cabinet back and wall so it’s easier to hang the cabinets.
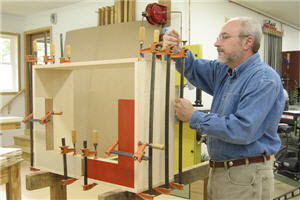
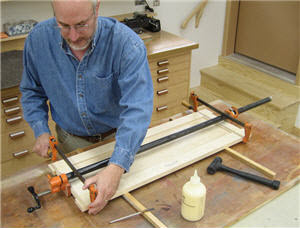
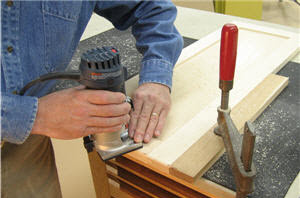
Finish sand the shelves, hang strips, ledgers, cabinet backs, and outsides of the cabinet boxes. Glue and clamp the hang strips to the cabinets. Ease all exposed sharp edges. Apply your favorite finish to the shelves, ledgers, cabinet boxes and backs. I used Briwax. Nail the backs in place, and attach the hinge mounting plates.
Make the Doors. The dimensions given for the door stiles and rails (K and L) allow for 1/16 gaps between all doors. At a cabinet finished end, the door outside edge will be setback 1/32 from the cabinet side. Cumulative error in machining setups makes achieving these tolerances impossible. Knowing this, I make my stiles a smidgen wide, and then trim and fit the assembled doors.
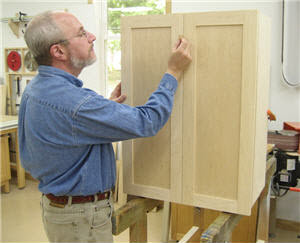
Hang, adjust and trim to final fit the doors. When you’re done, remove the doors and hinges. Finish sand the doors and apply the finish. Rehang the doors, stick the door bumpers in place, set the shelves, and you’re done.
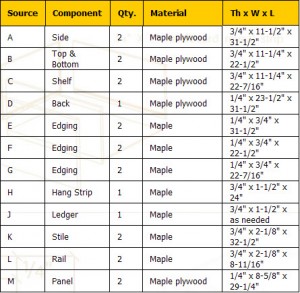
 Cutting List.
Overall Dimensions:
24 wide x 32-1/2 tall x 12-1/2 deep
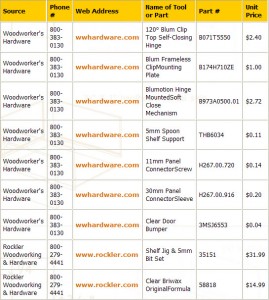
 Material Sources:
Share tips, start a discussion or ask other students a question. If you have a question for an expert, please click here.
Already a member?

I use French cleats to hang cabinets. Easier to hang and adjust left or right as needed.
Good start, looking for floor cabinets too!
For those needing larger photos there are a number of means to accomplish this right at your computer. 1. Right click the photo then click "save image as" and save the photo as a jpeg. Then open it and enlarge it. 2. Right click the the photo and click copy then paste the photo into another program such as word or a graphics program to enlarge it. 3. simply change the the setting in your browser to a higher viewing percentage to view the images at a larger scale. Hope this helps some of you I know good woodworking skills can be more important than computer skills. Seems I'm always having to learn both.
cannot download says its not available
have an idea for the size of the print etc., print out the drawings and whatever else you need, your local library has a copy machine that enlarges, for a minimal cost. hope that helps
will use in shop, having trouble reading cutting list, no excuses, give my tired old eyes a brake. Thanks MZ
Lots of ideas to be culled from this article. I definitely won't be using any hardwoods because of costs and I feel I need to justify all expenses. Also, please move the fire extinguisher, it is blocked by the drill press.
Why do the photo's pop up even smaller than what is on the page, when you click on them to enlarge them. This now happens on all similar articles.
When the church where my Boy Scouts meet remodeled their kitchen, I got a 14' one piece wall cabinet. I mounted it with French cleats since I didn't want to align holes in the cabinets with the wall studs. I had to rent a material lift to install the assembly. It was worth the cost since the cabinet was free.