 One of my favorite childhood memories is going to the home of my friends to eat cavatelli pasta made by their mother, Albena (“Bena”), master cook and mother of seven. This savory pasta is a small ridged dumpling-like noodle, where the ridges add an appealing texture and hold more sauce. Bena uses a production-class machine to form cavatelli for her large family, but this simple cavatelli paddle will serve as a great tool to form cavatelli for smaller gatherings.
 In my testing I found that I could form enough cavatelli for five people in about 15 minutes (not including time to make the dough and cook the pasta), and I am clumsy at best in making them. With practice I think I could bring that time down quite a bit. If you enjoy cooking at all, you are going to love making (and eating!) cavatelli, and from a woodworking perspective this project is easy and fun as well.
First, let’s make the cavatelli board.
Start with a board that is about 4″ x 15″ x 3/4″. Hardwood is best because the grooves will hold up better over time. I used maple and cherry for mine and both of these options worked great.
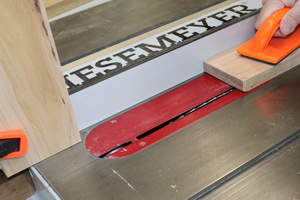
Set up your table saw.
Tilt the blade to 45 degrees, and raise the blade to a height of only about 1/16″. This might be difficult to calibrate precisely, so it’s best to experiment on scrap to see how you like the depth of cut and the profile it produces. You may also need to make adjustments for the kerf size and tooth pattern of your blade. My blade is thin kerf 40 tooth ATB, and it worked well, but I think most any quality blade would work ok. I used a digital gauge to measure blade height and I found that .07″ worked best, which is slightly higher than 1/16″ but less than 3/32″. This might sound precise, but with 2-3 minutes of experimentation on scrap your saw will be ready to go. Then set up a stop block behind the saw blade so that the length of groove cut by the saw blade is about 8″. This length is not critical and can be adjusted for your own design. You really only need about 2″ of space to form the cavatelli.
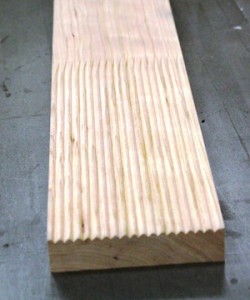
Cut the grooves.
Cut the first groove on the board roughly 1/8″ from one edge. Then move the fence 3/16″ and make the next groove. Repeat until you have milled grooves across the entire board, leaving non-grooved shoulders of roughly 1/8″ on each side. Trim sides on a jointer or with a hand plane to even up the shoulder if necessary.
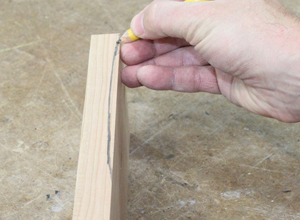
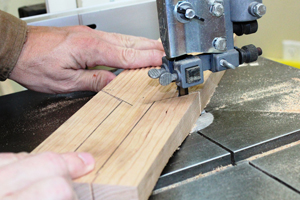
Arch for handle.
Draw a slight arch on the bottom of the handle end of the board, which will raise it off the work surface slightly and make it easier to pick up. I just did this free hand as precision is not critical, but alternatively you could use a large round object to trace this.Cut the arch on a band saw, leaving the line to allow for sanding later.
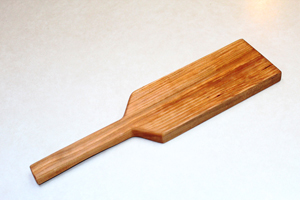
Draw and cut the handle profile.
Here I chose a straight handle with tapered shoulders, which is easy to sketch using a straight edge and ruler. You could also sketch a curved handle that flairs toward the end, or any other handle design that you desire. Be sure to make it long enough for a comfortable grip. The one shown here is roughly 7″ long by 1-1/4″ wide and works great.
Sand everything smooth.
Pay special attention to the band saw cuts, particularly where the handle hits the taper, and also fold some sand paper in half and run through each groove to remove any nubs left behind by the saw blade.
Finish.
Mineral oil, butcher block conditioner, walnut oil or salad bowl finish are all good choices for this project given its regular contact with food. I used mineral oil on mine, and plan to refresh it after each use.
Now let’s make some cavatelli!
Bena was kind enough to share her recipe with all of us. These proportions listed here will yield enough cavatelli for Bena’s large family, but for my family of four I cut it in half and have plenty of leftovers.
Ingredients
- 12 cups flour, sifted
- 3 cups water
- 6 tablespoons olive oil
- 2 eggs
- 1 teaspoon salt
Mix all ingredients thoroughly and knead for ten minutes, then cover dough with plastic wrap and let it rest for about twenty minutes.
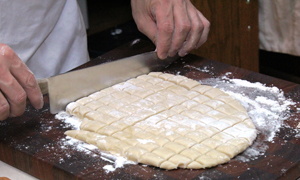 On a floured surface, roll dough to a thickness of roughly 1/3″, and cut into 1/2″ strips. Cut strips into 1/2″ lengths. So, if you followed these instructions correctly you should end up with a bunch of 1/2″ cubes. It works best to only cut the strips as you are ready to use them, to keep the dough more moist.
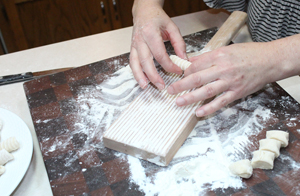
Forming the pasta.
(This is the fun part where you get to use your new cavatelli board!)
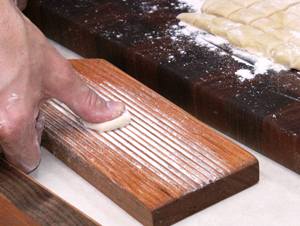
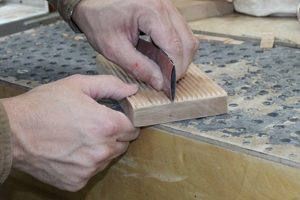
Press it.
Liberally coat the cavatelli board with flour. Take one of the dough cubes and press it down onto the grooves of the board so that it is flattened to roughly 1/8″ thick.

Roll it.
Roll the dough into a cylinder shape. Repeat until all dough is shaped. If you do this enough you will find that you can combine the pressing and rolling steps into a single smooth motion which takes about one second. I am not there yet, but made great progress in my second batch.
Boil it.
Separate cavatelli into batches small enough for your pan (For the full recipe you will want to boil in 3-4 batches), then place gently into salted boiling water and cook for 4-6 minutes. If the pasta has white remaining in the center it needs more cooking time.

Eat!
Smother with red sauce, toss with spinach and pine nuts, or just add salt, pepper and butter. There’s really no way to do this part wrong.
Photos By Author


Hello, my name is Fred. I had joined woodworkers guild sometime ago and I have not been able to access with my access code. If you could email me, I’d appreciate or find out what the problem is. I haven’t access the website for sometime that might be it so please help me out and try to find the answers thank you very much and by the way, your patterns and plans are find out so keep up the good work bye
Awesome appreciate you sharing this with us. You have the best plans and provide the best details. Thank you!
Except that just flour is used, they look a lot like my mother's gnocci (mostly it was potato). Too bad she didn't have this paddle, she just used a fork and rolled the mixture over the tines, dropping them onto the cutting board.
Nice! Thanks for the tut and the recipe too.
Thank you for posting this, and with the recipe! I’ve been wanting a gnocci paddle for awhile, and now I have two beautiful, big ones made out of cherry. Can’t wait to put my kids to work. Cavatappi are a bonus, and 12 cups of flour sounds about right for us...
I make dozens of these per year. I prefer using a router in a table with a 60 degree bit.
[…] FIND THE PROJECT HERE or PIN FOR LATER […]
Why list the flour twice??
Is the second 12 cups of flower correct in the recipe correct? seam's like an awful lot of flower.
nice