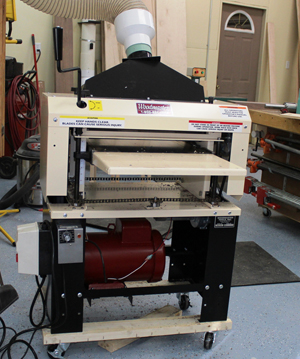
 In the first installment of this review, I looked at the set up of the Woodmaster 718, shared some initial impressions, and shared the results of my planing tests. In this segment I will look at the remaining functions that the 718 performs; drum sanding, gang ripping and molding, and will also share some observations about dust collection.
DRUM SANDING. I think it is brilliant to offer this as an add-on to a planer and I am surprised that other tool manufacturers don't do so. My shop is modest in size, and I had not been willing to give up the floor space for a dedicated drum sander, so having it share the footprint of my planer is a huge bonus.Overall I think the drum sander is pretty decent, but if I had significant drum sanding requirements I would likely try to find a creative way to fit a dedicated drum sander into my shop. The 718 has a smaller diameter sanding drum (3-1/4"), which does not deliver as flat of a sanding surface as larger dedicated drum sanders which typically have 5"-6" diameter drums. But for my needs, which include occasionally flattening a glued up panel or sanding an end grain cutting board, I have found it more than adequate. I expect to do a bit of work with a random orbital sander after running it through the drum sander, and I am OK with that for occasional use. The trade-off is shop space vs. time, and I have more time than space.
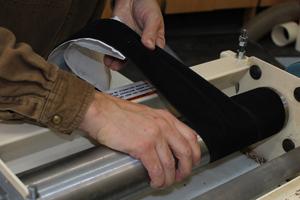 Initial Installation. I installed the drum sanding cylinder and applied the hook and loop backing. The process was straightforward. The changeover between planing and sanding was about a 10 minute operation the second time I did it, which was quicker and simpler than I expected. It is interesting to note that the sander uses a larger pulley and belt to slow down the rotation speed, which reduces the chances of burning, particularly with finer grit abrasives.Watch a video on the changeover process here: Woodmaster 718 Changeover Process
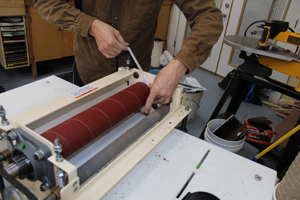 Hook and Loop Trade-offs. There are advantages and disadvantages to the hook and loop system used for abrasives on the 718. On the plus side, changing abrasives is easy, and you can run two different grits at the same time (one on each end of the drum) for two-step sanding without stopping to swap abrasives. The hook and loop system also adds a small buffer between the work piece and the drum, which dampens vibration and therefore quiets the operation. On the downside, the abrasives can cost a bit more, and the softness of the sanding surface may tend to slightly round over edge surfaces. I don't plan to use it for edges, as I will likely use my jointer for this purpose, but some woodworkers like to use a drum sander to clean up saw marks on rails and face frame components (which is handy because you can run multiples in a single run), and this could potentially cause a slight gap in a joint in those applications. Also, if I ever have to replace the Velcro backing I suspect I am in for quite a project given the bonding strength of the adhesive used.
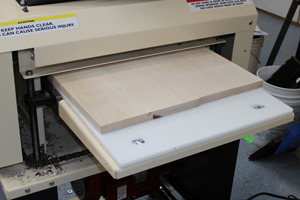 Sanding Glued-up Panels. I happened to have a project that I was working on that involved an 18" table top, so it was a good test for the drum sander. I passed the glued up panel through the sander, removing about 1/64" per pass using 80 grit paper, and it had flattened the panel in 5 passes.
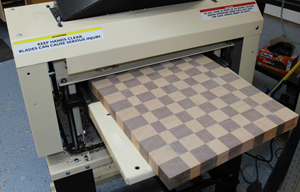 End Grain Sanding. One of the most tedious tasks that you can do in the shop is to sand end grain, particularly on hardwoods. So I decided to test the drum sanding function on a large end grain cutting board, and I was impressed by the speed and quality that the 718 delivered in this operation. I ran through with 80-grit, followed by 150-grit, which left me with only quick cleanup using a random orbital sander.
The flatness produced on this compared to starting with a hand held belt sander was outstanding, and the speed was equally impressive.
Given the smaller drum size, I have to admit that it has surpassed my expectations as a drum sander. In addition to the time savings and quality improvement, I love the dust capture of the 718 compared to using a belt sander to flatten glue-ups. For a tool that requires zero incremental footprint (given that I have already allocated the space for a planer), I really couldn't be more pleased. If I ever move into a bigger shop I will likely invest in a dedicated drum sander with a larger drum, as this will deliver even better surface quality. But for now this is far better than no drum sander at all.
MOLDING. It is, perhaps, the molding capability that separates this machine more than anything else. The power, precision, and weight of the 718 make it an ideal platform for milling anything from a chair rail to log siding and anything in between. With over 600 stock profiles and a custom molding knife service, the possibilities are virtually endless. It seems that many people purchase this machine primarily for the purpose of running a molding business, and the testimonials of these customers are impressive. While I don't have an interest in starting a production molding business, I occasionally have a need for molding on a furniture project, and I do a fair amount of DIY work as well so I am sure that I will find plenty of use for this functionality.
 Molding Setup. Configuring the 718 to mill molding was straightforward. The "Pro-Pack" comes with a molding head designed to hold a molding cutter up to 3-1/4" wide, while larger profile cutters can be installed in the standard planer head. I used a crown molding profile that is 4-3/8" wide, so I set it up in the planer head. Also, because the standard planer head is over 18" wide, I can set up multiple profiles at once, installing both the top and bottom profiles for the crown molding in a single setup, which is slick.
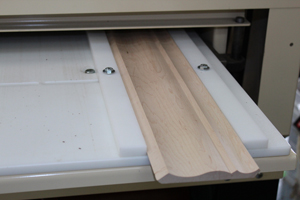 Running Molding. I was pleased, and frankly surprised by how simple it was to produce molding. The power and refinement of the machine are both quite apparent when running hard maple planks through and removing nearly 3/4" in a single pass. I found that the machine had adequate power to run the molding in a single pass per side, but I got a better quality on the face side by running it in two passes.
 Molding Quality. This machine produces molding of high end quality and consistency. By controlling the feed rate I was able to produce molding that requires no sanding by my standards. I can easily see how people run production molding businesses with this machine.
GANG RIP SAW. For prepping stock for large molding runs, the gang rip saw capability is a neat option. It allows for safe, quick ripping of multiple strips in a single pass, which delivers better quality and consistency compared to performing this function on a table saw.
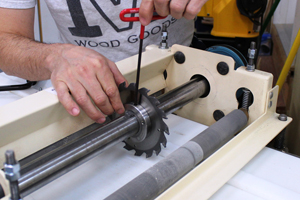 Setup. The first-time setup of this function is a bit putsy, with five screws, two collars and two keys required per blade. Once this is done the first time, however, reconfiguration back to the rip saw setup is relatively quick as you can store the blades with collars attached and simple mount the keys and tighten the set screws. This setup also requires the use of a guide rail on the poly bedboard, and achieving a straight rip is not possible without this. I was told this by a rep from Woodmaster, but for some reason I needed to learn for myself. Confirmed. Use a guide rail or the rip won't be straight.
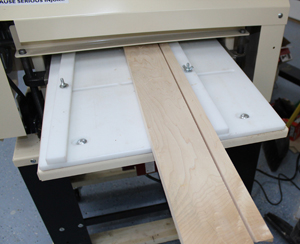 Rip Operation. I found that I could feed stock through at full speed (16 feet per minute) and the machine powered through the cuts. It was the quietest, safest ripping I have ever done. No burn marks or chatter on hard maple.
 Results. The quality of the ripped edges was impressive and dead-on straight with no measurable run-out. These could easily be used for edge gluing without having to run through a jointer. In addition to the obvious application of this for molding, I could also see prepping stock for any project that required a large number of narrow strips (face frames, cutting boards, canoe, etc.).
 DUST COLLECTION OBSERVATIONS:
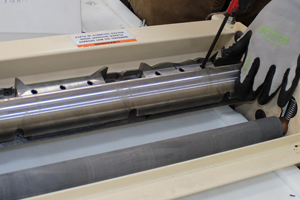
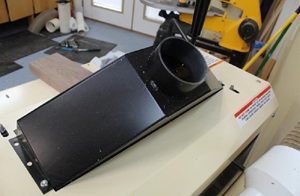
Dust hood.The dust collection hood that comes with the 718 is solidly constructed of 14 and 16 gauge welded steel with a 4" dust port. It is also positioned at an optimal angle to capture debris as it flies off the blades or abrasives, assisting its launch into the dust port and improving capture rate.
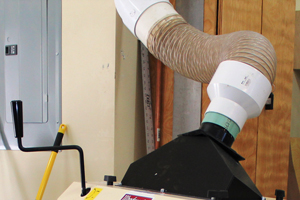 With adequate suction, I am able to collect the majority (nearly all) of dust and debris. In my setup, I have a 6" dust hose that goes right up to a reducer down to 4" at the 718. With this configuration I can pull over 850 CFM from my cyclone, and the collection is quite good. It requires some serious air movement, however, to collect adequately, which I would expect from an 18" cutterhead that can take such a deep cut. Before moving the 718 to its permanent location, I ran a 14" x 4" flexible hose to it, connected to the same dust collector. Because of the long section of flexible hose my CFM dropped to around 550 CFM (35% drop), and I noticed a significant decrease in collection, with copious amounts of shavings and dust spewing about. This is an example of why it is important to minimize the flex tubing to maximize suction at any large debris producer such as a large planer. For more information on how to optimize your dust collection ductwork, see my article on this topic here: Hooking Up Your Tools for Better Dust Collection.
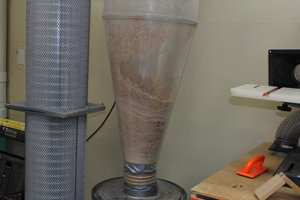 Careful; it will fill your dust collector FAST! When you remove 3/16" per pass from a long, wide plank, you will fill your dust collector in minutes. Because my old planer was removing a relatively small amount of material, I had grown accustomed to a slower frequency for emptying my dust bin, but as you can see here I was caught off guard and tried to put 50 gallons of stuff in a 35 gallon barrel.
OVERALL CONCLUSIONS. This machine has exceeded my expectations on nearly every front. The power, precision, and flexibility are all outstanding. As a furniture maker, I will use the planer functionality first and foremost. If I look at the machine strictly as a planer, I believe it holds its own with comparably priced dedicated stationary planers, and has the unique attribute of being American made. When I consider the other functions that that the 718 offers (molding, gang rip, drum sander), I believe that this machine delivers more value per square inch of shop space than any other piece of stationary equipment on the market today.
Photos By Author
Sources:
718P-153/Model 718 with Pro-Pack/$2,874
718-SH2/Spiral head for 718 planer/$1,125
3875P/Farm Duty 5HP motor upgrade/$195
WM47T/Crown Top 11/16" x 4-5/8"/$95
WM47B/Crown Bottom 11/16" x 4-5/8"/$95
Woodmaster Tools, Inc.
800-821-6651
Share tips, start a discussion or ask other students a question. If you have a question for an expert, please click here.
Already a member?

I would like to buy I woodmaster 718 I have a workshop in the UK how much would it cost to ship
how do you build a portable belt sander jig
Can the gang rip saw do more than 1 rip at a time ,Like sending a 1x6 thru it and it cutting 3 @ 1 1/2 rips at the same time, if it can only do 1 at a time ,a good table saw can cut that fast and safely
Thanks for these two very interesting articles. I see advertisements for Woodmaster machines all the time in magazines, but due to a general dislike of combination machines never really took them seriously. A Woodmaster molder/planer is now on my shop wish list, after reading your detailed reviews. These are clearly high-quality machines, and I'd love to support one of the few power tool manufacturers still making products in the USA.