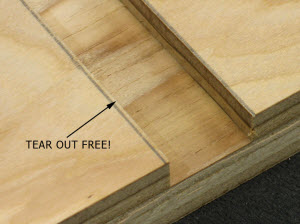
 One of the very first things I learned as a woodworker was to cut dadoes using a router and template. I've come to really appreciate the precision of the results, even though the setup and execution are more time consuming than other dado cutting methods. Template routed dadoes are clean, flat bottomed, tear out free, and the depth is consistent. Unlike table saw cut dadoes, template routed dadoes can be made at any angle relative to an edge, and they can be easily stopped at any point across a workpiece. I find it much easier to hold a router and cut a dado, than to push a large panel over a dado blade in a table saw, and try to hold it flat to the table at the same time.
 The beauty of this system is that the template is made to fit whatever thickness panel stock you have. With the inconsistent panel thicknesses we woodworkers deal with these days, making a custom dado to fit your panel stock is really the only way to go. In a perfect world, 3/4" thick plywood would measure 3/4". You know what I mean, and yes I am screaming!!! As your arsenal of different width dado templates grows, it'll become easier to find one you've already made that will fit "today's" panel thickness.
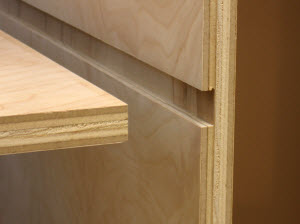
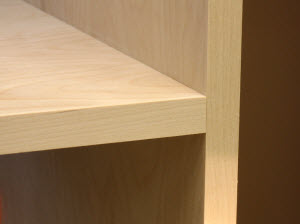
If you're new to dadoes, generally speaking they are grooves cut cross grain in panels, and they are used to assemble cabinet boxes (Photos 1 through 4). Dadoes have many advantages over other cabinet assembly joints. They carry a lot of load, they offer lots of glue surface, and they hide nasty tear out on the ends of the inserted panels.
 Through Dado - A groove cut cross grain edge-to-edge in a piece of panel stock.
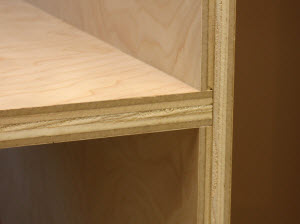 A well-fit dado is one where the parts go together without being forced, and without gaps in the joint. Through dadoes are commonly used with face frame cabinetry.
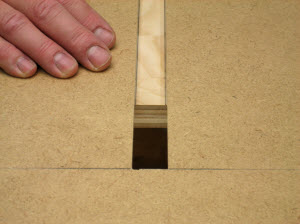
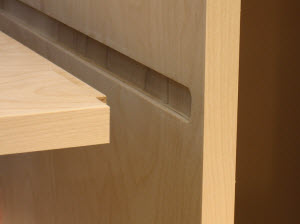 Blind Dado - The dado is stopped before the panel stock's edge. The front corner of the inserted panel is notched to fit in the dado. The notch can be easily cut using a bandsaw with a guide fence.
 There's no evidence of joinery when a blind dado is assembled. This is a great joint for European style cabinetry.
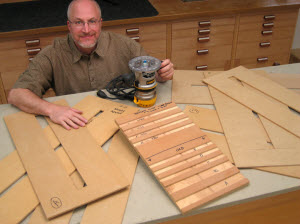
Over time I've made a lot of templates to rout my dadoes. I save them all so they can be used again and again in the future. The width of a template-routed dado is affected by many factors, obviously the greatest being the width of the opening in the template, but you also need to consider other factors in your router setups.
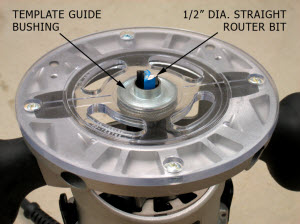 The bit, guide, and router base to shaft alignment are variables as well (Photo 5). Try and use the same router, router bit, and guide bushing every time you set up to rout dadoes, and it's always a good idea to test your setups on scrap wood.This is the router setup I use with my dado routing templates. (Photo 5) It's a 1/2" shank x 1/2" dia. straight bit, with a 5/8" OD x 17/32" ID x 7/32" tall guide bushing. The bit you’re using must be smaller than the dado you need to cut.
Make the Template
I make new dado routing templates using 1/4" thick x 14" wide x 32" long pieces of fiberboard. This allows me to cut the opening 26" long so my template works easily on 24" wide panel stock.
Lay out the opening on your template stock. Center it on the width and length of the fiberboard. The finished width of the opening is your panel thickness plus the difference between the diameter of your router bit and the outside diameter of your guide bushing. With my setup that's 1/8". Even so, I never try and cut the opening "dead on." Instead I make the first cuts tight so I can slowly widen the opening with more table saw cuts and make my final fit by trimming and testing.
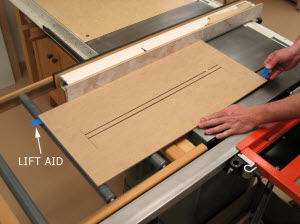 Set your table saw blade just slightly higher than 1/4", and set your saw's fence so the cut will be just inside your opening layout line. Since the opening is dead center on the template, you can cut, flip around, and then cut the other side with the same setup. NOTE: Cutting the opening sides requires tipping the workpiece onto the blade, pushing it ahead, and then lifting the workpiece off the blade. Use your saw guard if possible, and don't do this if it makes you uncomfortable, or if you have an inferior saw and fence. Understand your saw's safety rules, and never reach over a running saw blade. Cut the sides of the opening on a table saw. Pieces of masking tape at the ends make it easier to lift the cut piece off the saw blade.
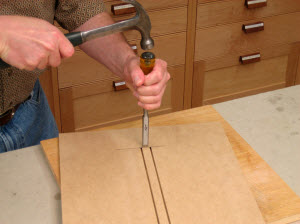 Remove the center waste piece. Don't change your table saw settings until you have final fit the template. Use a utility chisel to chop across the ends of the saw cuts to complete the opening. It doesn't take much to relieve the waste piece.
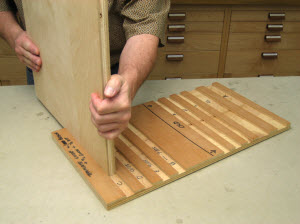
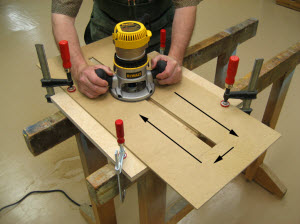 Test and Tune the Fit Clamp the template to a piece of scrap panel stock so at least one end of the template opening overhangs the scrap board by a few inches. Set up your router with the bit and guide, and set the depth accordingly. Before you turn on the router, set the router on the template with the bit inserted through an unobstructed end of the opening. Check to be sure the bit is not in contact with anything, then start the router, and rout the dado. Turn the router off and let it stop spinning completely before you remove the router from the template. Oh... If I would only follow my own advice, I wouldn't have ruined so many of my templates over the years!Rout the dado. Clamp the workpiece to sawhorses, and the template to the workpiece. Start at an open end, push the router away from you holding it tight to the left edge of the opening, and then come around the corner pulling the router towards you with it tight to the right edge of the opening.
Remove the template and check the fit. It should be tight and very close. Head back to your table saw and shift the fence just a smidgen to the left. If the fit is very tight, trim both edges of the opening with this new setting. If the fit is darn close, then mark one edge, just trim that edge, and then make another test cut and check the fit again. Still tight? Then trim the other edge. Keep going until the fit is perfect. A tight fit is never good. That only makes it hard to get your cabinet parts together during assembly.
Layout, Setup, and Routing Tips
Ok, your template's perfect now. Here are a few tips for when you rout your "real" dadoes:
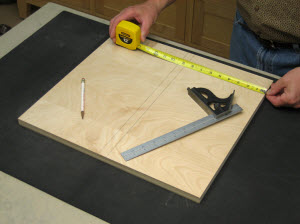 Remember, the location of your dado is only as accurate as your layout. Measure twice to make sure everything is correct. I check the measurement at both ends of the lines to be sure the dado is parallel to the panel stock end.
 When you draw your layout, mark the actual dado widths and locations, not where the template opening should align. "Eyeball" the template alignment by looking straight down the opening and making the spaces between the dado lines and template opening edges equal. Then clamp the template in place.
 Label your dado templates, and cut a sample dado of each in a template guide board. That way you can fit a piece of panel stock for a dado by testing each sample until you find the perfect one. It's a good idea to recreate your template guide board anytime you modify the system by changing routers, bits or guide bushings.
Photos By Author

Product Ordering Information:
Router and Template Guides
DeWALT Tools
# DW618 - 2-1/4 HP (maximum motor HP) EVS Fixed Base Router with Soft Start
#DW6188 - Template Guide Set
(800) 4-DEWALT
Infinity Tools
Straight Router Bits
(877) 872-2487
Also check out our video "Size of Dado Head".

Is there a particular router or bit technique that allows you to make dado with one pass. When I tried the dado with a router before the bit slowly cut deeper than originally set for. The collet was as tight as I could make. Someone told me to make several shallow passes to achieve the depth I desired, this worked for me but was time consuming. Thanks for your demo and advice.
it a question rather than a comment. I am using 5/8" melamine board and bought a 5/8" straight bit. The dado I cut is to tight and I don't want to force it in to hard (bang it). I'm not sure what size I should use. Do they have 11/16th bits? or would that be to big. The melamine board looks like it is a tad wider than 5/8", but that is what I bought. Any help here would be much appreciated. Thanls.
Making the template is critical but not clearly explained.
I don't understand the need for multiple templates when an adjustable template would be just as good and you only need one template to do multiple size dadoes saves space and time.
Dado jig
I assume you are using a pattern bit with the bearing above the cutter. how can you adjust the depth of cut when the bearing is just above the wood surface?